Having explored the MouseEvent project we will now create and test a simple interface. This interface will have a progress indicator that you will control using a command button - we will call it "Manual Progress".
A. Freshen PowerCOBOL
If you still have the MouseEvent project open, return to the PowerCOBOL project manager ("MouseEvent - PowerCOBOL" on the Windows task bar) and select File, Close from the menu bar.
Suggest you respond "No" to the prompt asking if you want to save your changes.
B. Start a New Project
From the PowerCOBOL project manager menu, select File, New Project.
This displays the New Project dialog.
In the New Project dialog select StandardDialog and click OK.
PowerCOBOL creates a project called "Untitled".
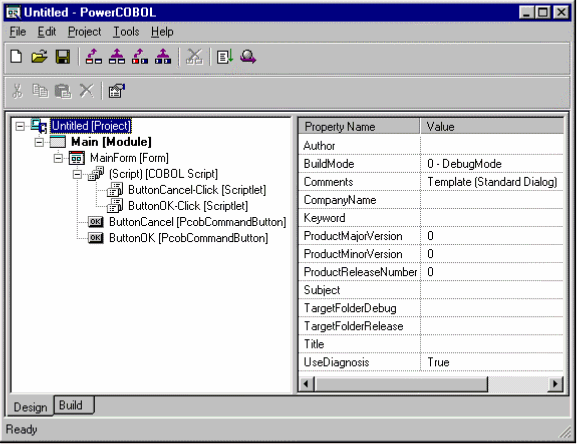
In the project tree right-click on "Untitled [Project]" and select "Expand all" from the pop-up menu.
Notice that the StandardDialog project already has two CommandButtons and associated scriptlets.
Figure 2.13 The Standard Dialog project expanded.
Give a name to the project and save it, by selecting File, Save As from the project manager menu. Navigate to a suitable folder (for example create a folder under the "samples" folder called "Getting Started Example"), enter the name "Manual Progress", and click Save.
Open the Form Editor by right-clicking on "MainForm [Form]" and selecting Open from the pop-up menu.
This brings up the Form Editor, ready for you to start adding controls.
C. Add Controls to the Form
We will add two controls to the form: a ProgressIndicator control and a CommandButton control. The CommandButton will cause the ProgressIndicator to advance (illustrating coding and event and using methods) and will also change the background color of the ProgressIndicator (illustrating referencing and setting properties).
In the form editor toolbox (the long, narrow window with two columns of buttons) select the CommandButton control: ![]() .
.
Move the mouse pointer over the form.
The pointer changes to the rectangular outline of a CommandButton.
Move the pointer to a suitable position for a push button, for example to the left of the OK button, and click.
The form editor creates a CommandButton called "CmCommand1" at the position you clicked.
Next place a ProgressIndicator control on the form by selecting its button, ![]() , in the form editor toolbox, moving the pointer to a suitable position and clicking.
, in the form editor toolbox, moving the pointer to a suitable position and clicking.
Stretch the ProgressIndicator control to a suitable size by clicking and dragging on the square grapples displayed at the corners and sides of the control when it is selected.
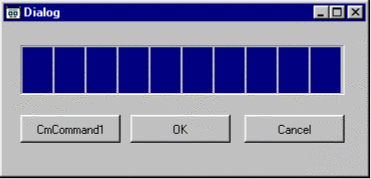
Your window should look something like the one shown in Figure 2.14 (note this window has been resized to create a smaller snapshot for this guide):
Figure 2.14 The Manual Progress form - first draft!

Now try using the sizing and alignment tools to make the buttons the same size, evenly spaced, and aligning with the Progress Indicator control, to produce an arrangement like that shown in Figure 2.15.
Figure 2.15 The Manual Progress form - tidied up.
D. Edit the Form and Control Properties
Next we adjust the form and control properties.
Double-click in an unused area of the form to bring up the properties dialog for the form.
Change the text in the Caption entry field to read "Manual Progress Indicator Demo", and click OK.
The title bar of the dialog box displays the text you entered.
Double-click on the CmCommand1 CommandButton to display its properties.
Change the text in the Caption entry field to read "Step", and click OK.
The text on the CommandButton changes to "Step".
Double-click on the ProgressIndicator control to display its properties.
Check the DisplayRate check box - this will cause a % figure to be displayed in the middle of the progress indicator.
Check the Smooth check box - this will make the progress indicator use a smooth, rather than a broken bar.
Click on the Colors tab. From the Properties drop-down list select ForeColor.
From the ColorSet drop-down list select Standard Colors.
From the ColorList select Green.
This makes the % figure stand out on the background and bar.
Click on the Common tab and double-click on the name CmProgress1. Right-click on the selected name and select Copy from the pop-up menu.
We'll use this name when we create code in the next section.
Click OK to close the properties dialog.
Your window should now look something like Figure 2.16:
Figure 2.16 Manual Progress form with text and color changes.

E. Preview the Window
Now that the window layout is designed let us check generally how it looks and behaves.
From the Layout menu, select Preview.
PowerCOBOL displays the window as it would when executing the application. Even with a simple window like the one we are using you can check a few details:
We can see how the ProgressIndicator control looks at the 0% stage. We could determine to use a color other than green for the text.
Which button is the default button - the one with the dashed "button-selected" highlight? It is probably better to make Step the default so we will change that in a moment.
Try pressing the Tab key a few times. You can see how the focus moves from control to control. We need to ensure the order is correct. For a more complex dialog this is an important check as you want the flow from control to control to work well for your users.
Try clicking on the buttons - the buttons depress but no action is taken. This is because this is only a preview. To see the code executing we need to build and execute the application.
Close the preview window by clicking on the "X" button on the right of the window title bar.
Change the default button by:
Double-clicking on the "Step" CommandButton to display the Properties dialog.
Click on the Common tab.
Select "Default Button" in the "Button Style" group box.
Click OK to close the properties dialog.
Change the tab order using the Tab Order dialog by:
From the Form Editor, Layout menu, select the "Tab Order" function.
The Form Editor displays the Tab Order dialog:
Figure 2.17 Tab Order dialog.
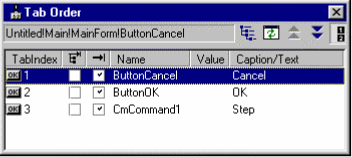
Move the Step button to the first place in the tab order by selecting the line containing "Step" and using the Up button, ![]() , in the dialog's toolbar.
, in the dialog's toolbar.
Ensure OK can Cancel are in the correct order by using the Up or Down buttons.
Close the Tab Order dialog by clicking on the Close button, ![]() , in the top-right corner.
, in the top-right corner.
Select Layout, Preview to confirm that the default button and tab order are correct.
Close the preview window by clicking on the "X" button on the right of the window title bar.
F. Add Code to the Step CommandButton
Now we write the code to respond to the button being clicked.
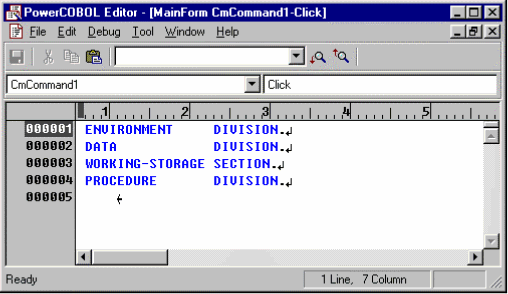
Right-click on the Step CommandButton control and select "Edit the event procedure" from the pop-up menu.
Select Click from the sub-menu.
PowerCOBOL brings up an edit window with division and section headers already configured.
Figure 2.18 Initial state of the code for the Click event of the Step button.
In the WORKING-STORAGE SECTION insert a single item:
01 Progress-Back-Color PIC S9(9) COMP-5.
This will be used as a temporary store for the background color of the progress indicator.
In the procedure division add a couple of blank lines and paste the ProgressIndicator control name ("CmProgress1") into each of the lines (- this should still be in your clipboard). To paste you can either right-click on the line and select Paste from the pop-up menu, or select Edit, Paste from the edit window menu.
PowerCOBOL can help generate code using the text strings you have pasted.
Double-click on the first "CmProgress1" string to select it.
Right-click on the selected string, and select Insert Method from the pop-up.
PowerCOBOL displays a sub-menu as shown in Figure 2.19:
Figure 2.19 Editor Insert Method menu.

PowerCOBOL recognizes that the selected string is the name of a ProgressIndicator control and displays a list of the methods that are available for ProgressIndicators, namely: Move, ProgressStep, Refresh and ZOrder.
From the Insert Method sub-menu select ProgressStep.
PowerCOBOL generates the INVOKE statement for the ProgressStep method. This method does not require any parameters, but if it did, PowerCOBOL would insert placeholder names to remind you which parameters you need to supply.
The ProgressStep method advances the progress indicator one "step". You can configure the step size in the Properties dialog. By default the step is 10, in a range from 0 to 100.
We will now use the other "CmProgress1" string to help us reference and set the BackColor property.
Double-click on the second "CmProgress1" string to select it. Right-click on the selected string and select Insert Property from the pop-up menu.
PowerCOBOL displays a sub-menu containing all the ProgressIndicator control properties as shown in Figure 2.20:
Figure 2.20 Editor Insert Property menu.
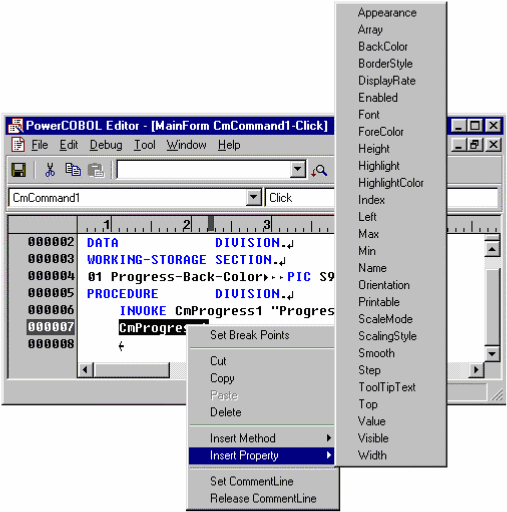
Select BackColor from the Insert Property sub-menu.
PowerCOBOL inserts the code for referencing the BackColor property.
Notice that, although we haven't generated a lot of code for the method or the property, we haven't had to do any guesswork. We found out the available methods and properties from pop-up menus, and PowerCOBOL inserted the correct code, ensuring that we don't make any typos.
Select the string: ' "BackColor" OF CmProgress1 '
Copy the string (by using Edit, Copy from the menu, or selecting Copy from the pop-up menu).
Create two new lines and paste the string into those lines (by using Edit, Paste, or selecting Paste from the pop-up menu).
Now insert the code shown in red (or light color if you are reading this from a printed manual) in Figure 2.21.
Figure 2.21 Inserting code in the Click event procedure.
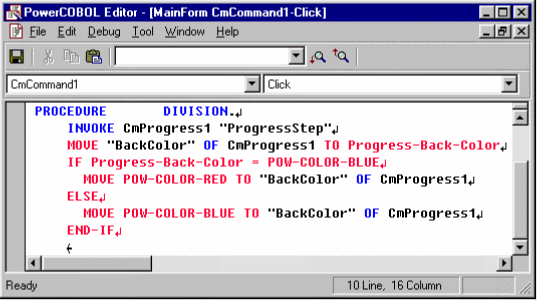
This has the effect of flipping the background color of the ProgressIndicator control between blue and red every time the Step button is clicked.
Select File, Save from the menu to save the code.
Select File, "Close All" to close the edit window.
G. Build and Execute the Application
Return to the PowerCOBOL project manager by selecting "Manual Progress - PowerCOBOL" from the Windows task bar.
From the project manager menu select File, Save, to save all your changes.
Right-click on "Main [Module]" and select Execute from the pop-up menu.
Respond "Yes" to the question "Do you want to build it?".
PowerCOBOL builds an executable module and starts it executing.
Click on the Step button a few times to see what it does.
Clicking on OK, Cancel or the "X" button, closes the window.
Debugging the Application
Hopefully the application is working as intended, but we will take a quick look at the PowerCOBOL debugger anyway. We will step execution line by line, then have PowerCOBOL interrupt execution when a data value changes, then set and run to a breakpoint.
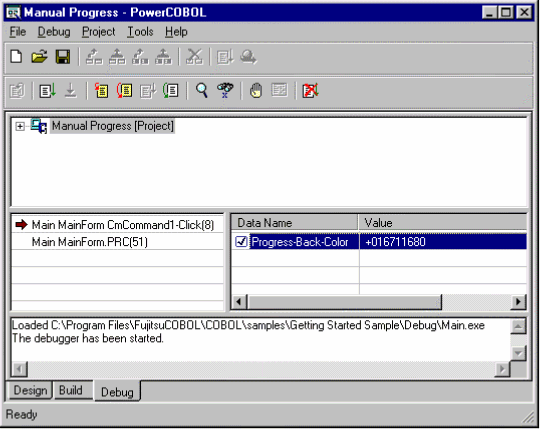
Right-click on "Main [Module]" in the project tree, and select Debug from the pop-up menu.
PowerCOBOL displays the debug window/tab.
Figure 2.22 Debug tab for the Manual Progress project.

Click on the "Step In" button, ![]() , on the debug toolbar.
, on the debug toolbar.
This starts the code and your application window displays.
Although other code has been executed to display the window, none of the code you have written has been executed so you do not yet see any code.
Click on the Step button in the Manual Progress Indicator Demo window.
Now PowerCOBOL displays the Click event code you entered. (It is possible that you may need to select the PowerCOBOL Editor window from the Windows task bar to bring it into view.)
A ">" sign to the left of the line numbers indicates the current execution line.
Also notice that the middle left pane of the debug window displays the name of the procedure being executed, the current line number, and the procedure(s) that invoked this procedure.
Double-click on the text "Progress-Back-Color" to select that data item, and right-click on the selected text.
The pop-up menu displays debug and edit functions that apply to this item.
Select Watch from the pop-up menu.
PowerCOBOL displays the name and value of Progress-Back-Color in the middle right pane of the debug window. There is a check box by Progress-Back-Color - if you check this, the debugger will interrupt execution whenever this data item is changed.
Check the check box by Progress-Back-Color.
Figure 2.23 Watching "Progress-Back-Color" on the Debug tab.
Click a few times on the "Step In" button, ![]() , on the debug toolbar to see the execution advance a few lines and the Progress-Back-Color value change.
, on the debug toolbar to see the execution advance a few lines and the Progress-Back-Color value change.
Click on the "Go" button, ![]() , on the debug toolbar, to run the code to the next break point.
, on the debug toolbar, to run the code to the next break point.
The buttons on the toolbar change to their disabled state:![]()
This is because control has been returned to the application window. You need to select that window (Manual Progress Indicator Demo) on the Windows task bar to bring it to the front of the screen.
Click on the Step button in the application window.
PowerCOBOL displays the Click event code, this time stopped at the line after Progress-Back-Color is changed - because we indicated that execution should be interrupted when that data item is changed.
In the Debug window Progress-Back-Color is highlighted in red to indicate that its value has been changed.
In the Debug window, clear the check box beside Progress-Back-Color.
Display the source code by selecting "PowerCOBOL Editor - [MainForm CmCommand1-Click]" in the Windows task bar.
Left-click on one of the MOVE statements within the IF statement, then right-click and select "Set Break Points" from the pop-up menu.
Figure 2.24 Setting a breakpoint using the pop-up menu when debugging
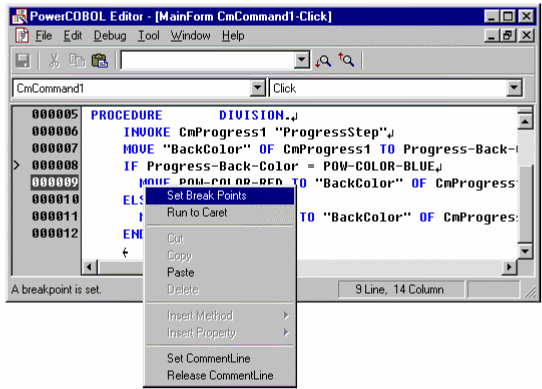
PowerCOBOL displays a "*" to the left of the line numbers to indicate that a breakpoint is set.
Click on the "Go" button, ![]() , on the debug toolbar, to run the code to the next break point and, if necessary, select the Manual Progress Indicator Demo from the Windows task bar, and click the Step button one or two times.
, on the debug toolbar, to run the code to the next break point and, if necessary, select the Manual Progress Indicator Demo from the Windows task bar, and click the Step button one or two times.
PowerCOBOL displays the source code with execution stopped at the line where the breakpoint was set.
To exit from debug select Debug, Debug quit, from the debug menu bar
Although this is a very brief review of the Debug feature, you can see that you are focused on your code and can monitor changes and progress within that code.