We will open the MouseEvent sample project and use it to explore some of PowerCOBOL's features.
A. Invoke PowerCOBOL
From the Windows Start menu select Programs, NetCOBOL for Windows, PowerCOBOL.
We suggest you maximize the PowerCOBOL window so that you can focus totally on the product. To do this click on the maximize button, ![]() , in the top right corner. (The snapshots in this guide, however, will not use maximized windows to save space and give you clearer pictures.)
, in the top right corner. (The snapshots in this guide, however, will not use maximized windows to save space and give you clearer pictures.)
B. Open the MouseEvent Sample Project
From the File menu, select Open.
Navigate to the:
C:\Program Files\Fujitsu NetCOBOL for Windows\samples\PowerCOBOL\MouseEvent
folder (assuming that you used the default folder names when you installed the products - substitute your folder names if you overrode the defaults).
Select the file "MouseEvent.ppj" and click Open. This file is the MouseEvent sample project - it lets you fill an imaginary glass with different fruit drinks.
Your window should be a bigger version of Figure 2.1:
Figure 2.1 PowerCOBOL Project Manager
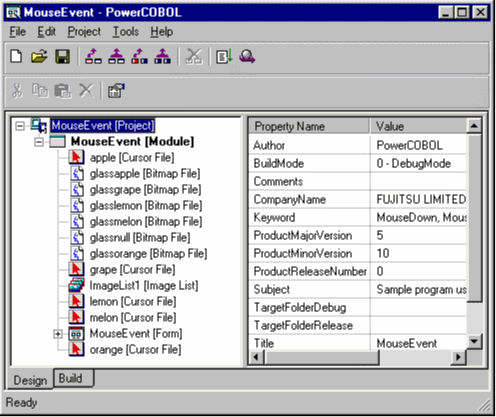
This is PowerCOBOL's project manager. The parts of the window are:
Menu bar and tool bars - giving access to the project manager's functions.
Design tab - giving design related information. It is split into two panes. The left pane contains a project tree. The right pane displays the properties for the object selected in the project tree. You can edit properties in this pane by clicking on the property value.
Build tab - displaying the results of the last build and giving access to more build-related functions.
Expand the project tree by right-clicking on "MouseEvent [Project]" and selecting "Expand all" from the pop-up menu. This expands all the nodes in the project so you can see everything that makes up this application.
Near the top of the tree you can see the MouseEvent module. This is the executable file that is created when the project is built.
Under the MouseEvent module, after a number of bitmaps and cursors, is the MouseEvent form. This is the single window for the MouseEvent application and contains the key parts.
The module also includes a number of bitmap and cursor images which are shown as child nodes of the module.
Child nodes are in alphabetical order under the parent node.
Scroll up and down the tree to observe the different parts of the project: the COBOL "scriptlets" (the small pieces of COBOL code that control the application), command button, group box, static text, image, and list view.
Notice how the different icons help you recognize the types of control.
Select different items in the project tree and observe how the properties change in the right-hand pane.
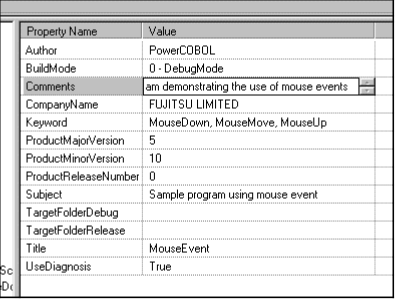
Try editing a property in the right-hand pane. For example, select MouseEvent [Project] in the project tree and click on the Comments value in the properties list. Enter the description: "Sample program demonstrating the use of mouse events".
Figure 2.2 Editing a Property in Project Manager
C. Explore the Form
The window or dialog box design is called a "form" in PowerCOBOL. The following steps introduce you to the form editor.
In the project tree right-click on "mousevent [Form]" and select Open from the pop-up menu.
This brings up the form editor, displaying the window of the MouseEvent project and a toolbox containing the controls.
Figure 2.3 The MouseEvent window displayed in the Form Editor
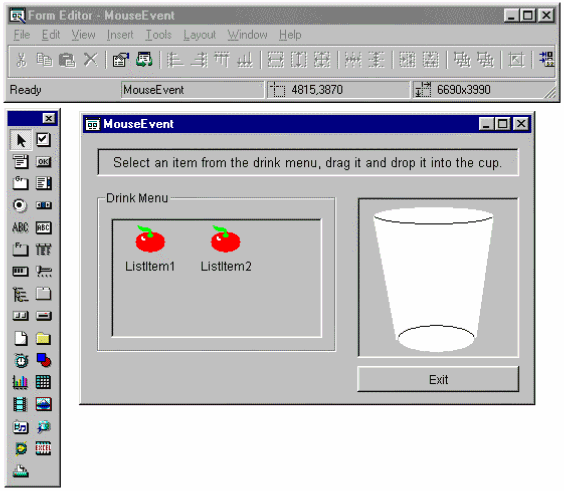
The MouseEvent window looks almost like it would if you executed the application except that it doesn't show all the different list item icons and it may have a placeholder, ![]() , for the image of the glass (PowerCOBOL uses this placeholder if memory is tight). First select the different objects ("controls") in the window and observe how the status bar, just below the toolbar, displays the name of the control, its position and size.
, for the image of the glass (PowerCOBOL uses this placeholder if memory is tight). First select the different objects ("controls") in the window and observe how the status bar, just below the toolbar, displays the name of the control, its position and size.
(You'll do more with sizes, positions and editing controls in a few minutes.)
Now right-click on a control, for example the Listview control (the one displaying two tomatoes). The form editor displays a pop-up menu containing the most frequently used functions:
Figure 2.4 A pop-up menu for a control in the Form Editor.
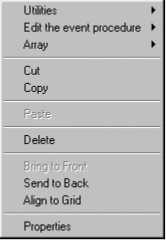
NOTE: It is always worth checking the pop-up menus in PowerCOBOL as they provide important functions to you quickly and directly.
From the pop-up menu select Properties. The form editor displays a dialog box containing all the properties for the selected control.
Figure 2.5 The Properties dialog for a ListView control.
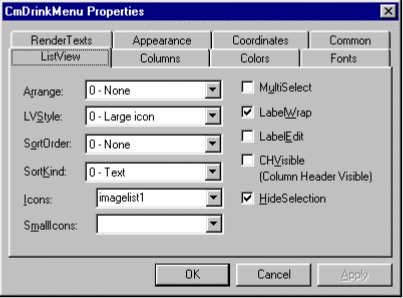
These are the same properties you saw listed in the Properties pane of the project manager, except that the properties are displayed in logical groups, not alphabetically as in the project manager. Each logical group of properties is displayed on a separate tab.
For the ListView control the groups are:
ListView -Properties specific to the ListView control, such as the specific style of the ListView control and the file that contains the icons to be used.
Columns - When the ListView control has the Report style - in which several columns of data can be displayed - the columns group of properties defines the details of the columns such as width and heading text. (The MouseEvent project doesn't use the Report style, but it could be selected dynamically so all the Columns fields are enabled).
Colors - The colors to use in the control. Note that you can select from different sets of colors.
Fonts - The font properties to be used for text displayed in the control.
RenderTexts - For controls in which textual data is displayed, such as in the Report style of the ListView control, you edit the output text using pre-configured COBOL or Date picture strings. The RenderTexts properties determine the strings to use.
Appearance - The background, border and 3D/flat styles.
Coordinates - The units of measurement to be used for the control along with its position and size expressed in those units. Also contains the ScalingStyle - a property that enables you to configure behavior if the window is resized.
Common - Properties that are common to most controls, such as the name to be used for referring to the control from the source code.
Notice how the grouping of the properties makes it easy to understand what can be configured for the control and makes it easy to find a particular property.
Cancel the Properties dialog (you can play with property values later, or when you create your own windows).
Right-click on the ListView control again, but this time select the "Edit the event procedure" function. This displays a sub-menu containing a list of all the events that can be generated for this control.
Figure 2.6 Event procedure pop-up sub-menu.
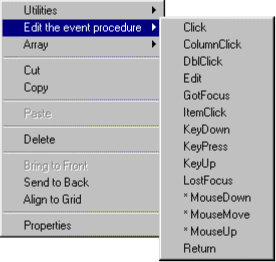
This is a key feature of PowerCOBOL - there is no guesswork involved. It is clear at each stage what is available. This greatly speeds learning and using the product. Also the system takes care of events that do not have application code attached - so applications can be developed a small step at a time: beginning programmers can learn how to handle one event and not worry about the other events they don't yet understand.
Notice how three events in the above pop-up have "*"s by them (MouseDown, MouseMove, MouseUp). These are the three events that contain application code - all the others are handled by the system, usually taking no action.
Before looking at the events with application code, we will look at what is provided for a new event. From the events sub-menu select KeyDown. PowerCOBOL displays a text editor window with some skeleton code already inserted.
Figure 2.7 PowerCOBOL Editor showing skeleton event code
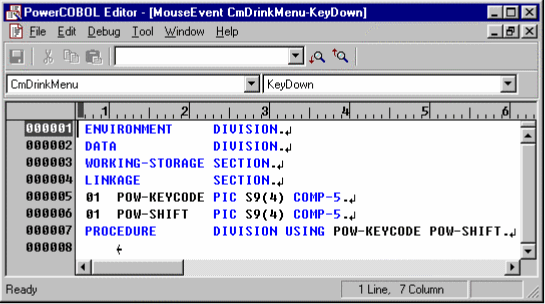
First note that this code is immediately familiar to COBOL programmers - they will have little doubt as to what they need to do next (define any local data items they require and enter the procedure code to handle the event).
Secondly, note that the KeyDown event communicates two values to the procedure code, namely a code indicating the key that was pressed and the status of the shift keys. The skeleton code already has these set up in the LINKAGE SECTION and the USING phrase of the PROCEDURE DIVISION header. Again the guesswork has been removed - the programmer immediately sees the parameters that are available to him and the form in which it is provided (PIC S9(4) COMP-5).
Now look at some of the code that has already been created. Close the KeyDown event text editor, right-click on the ListView control, select "Edit the event procedure" and this time select the MouseUp event. This time PowerCOBOL displays the existing code within the text editor.
Figure 2.8 Procedure code for the MouseUp event.
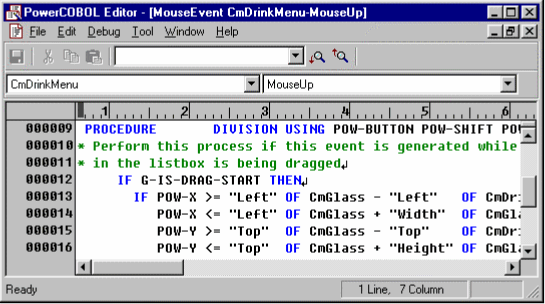
If necessary enlarge the window by dragging the bottom right corner so that you can see all or most of the code.
Because COBOL is designed to be readable, you should quickly get a feel for what is happening in the code. It checks that a drag was started, changes the glass image if the mouse pointer is over the glass, restores the pointer to its original state and resets two status indicators.
You may wonder where the data items are defined so...
Return to the form editor (select "Form Editor - MouseEvent" from the Windows task bar), click on a blank area of the form so that no control is selected and, by default, the MouseEvent form is selected.
Right-click on the same blank area, and select "Edit DATA DIVISION" from the pop-up and "* WORKING-STORAGE" from the sub-menu.
Figure 2.9 WORKING-STORAGE code for MouseEvent
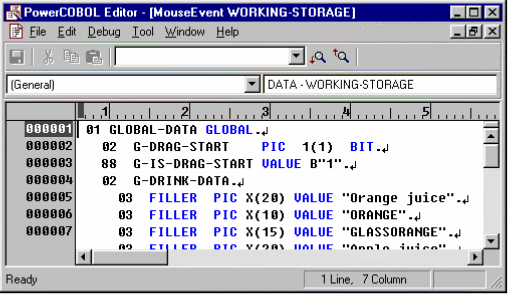
PowerCOBOL displays the WORKING-STORAGE data defined for the form. Any items declared as GLOBAL can be referenced and set by any of the procedure code "scriptlets" defined for the controls in the form.
This illustrates the flexibility PowerCOBOL provides in data definition - you can define data that is local to a control or procedure, and data that can be referenced by all procedures within a form.
Having seen the design and some of the code for the form, you probably want to see exactly what it does. Return to the project manager by selecting "MouseEvent - PowerCOBOL" from the Windows task bar. Right-click on "MouseEvent [Module] and select Execute from the pop-up menu.
PowerCOBOL will offer to build and save the project for you - respond OK to these messages.
You will see PowerCOBOL building the application and switching back to the project tree when the build is successful.
PowerCOBOL then starts the MouseEvent module.
Figure 2.10 The MouseEvent sample window.
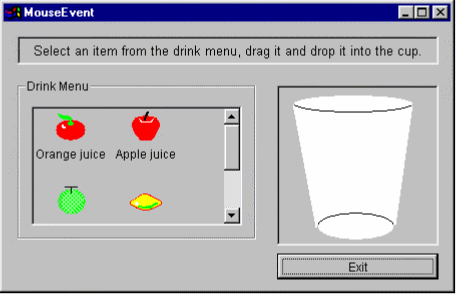
Experiment with the interface, possibly switching back to the form editor to inspect the properties and code that determine the behaviors.
Finally in this quick tour of an existing project, we will look at the sizing, alignment and spacing aids in PowerCOBOL.
If you've ever tried creating a tidy dialog layout, you will know that sizing and aligning items can be one of the more tedious operations, unless your design tool provides you with appropriate functions.
Return to the form editor by selecting "Form Editor - MouseEvent" from the Windows task bar.
Suppose that you decided to align everything vertically in the window - so that all items stretch the full width of the window, with the Drink Menu group box under the "Select an item ..." static text control, the image of the glass under the group box, and the Exit button under the image.
First stretch the window, by clicking on and dragging the bottom border, so that it is long enough for the controls to be stacked vertically.
Click on the Exit button and drag it to the bottom of the window.
Click on the image control and drag it down so that it is between the Drink Menu group box and the Exit button. Your window might look like the one in Figure 2.11 below.
Figure 2.11 Repositioned items for aligning and sizing exercise.
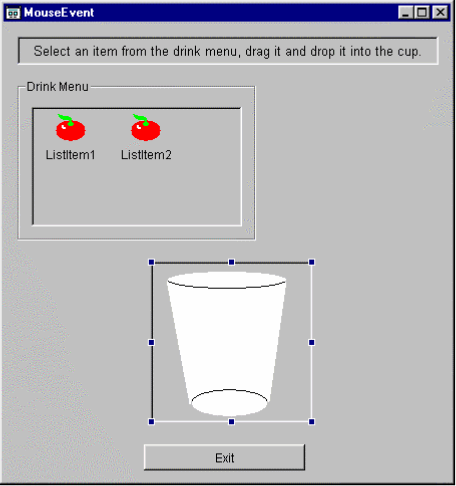
We are going to perform operations on a group of controls, so we first select that group.
The top static text control ("Select an item ...") is going to be the reference point so we select that first by clicking on it.
Then press and hold the shift key down and click on the "Drink Menu" group box, image control and "Exit" command button.
All the controls, apart form the ListView control, should be selected - indicated by squares ("grapples") at the corners and midpoints of the controls' sides.
First we will make sure all the items are aligned horizontally.
On the form editor toolbar, click on the Adjust left button: ![]()
All the controls are left aligned.
Notice that, in the same group on the toolbar, there are Adjust right, Adjust top, and Adjust bottom buttons as well.
Next we make sure all the controls are the same width.
On the form editor toolbar, click on the Width Match button: ![]()
All the controls are resized so that their width matches the "Demonstrates how to ..." static text control (the reference control).
Notice that, in the same group on the toolbar, there are also Height Match, and Size Match buttons.
The last group operation is to ensure that the controls are spaced evenly vertically.
On the form editor toolbar, click on the Vertical Space Equalization button: ![]()
The vertical positions of the controls are adjusted to space them evenly.
Finally you reposition and resize the ListView control to match the size of the Drink Menu group box by selecting it and dragging its edges or corners.
Your final layout should look something like the form in Figure 2.12:
Figure 2.12 Resized, and realigned MouseEvent window.
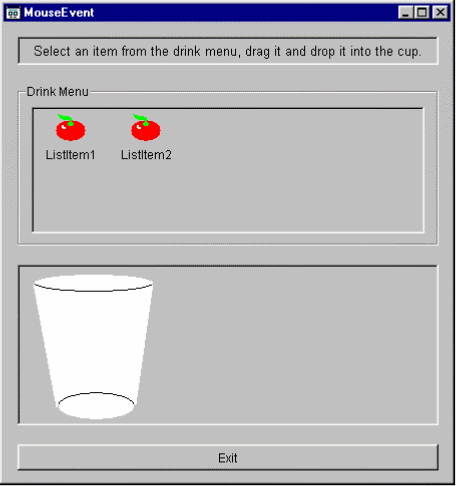
Although it is unlikely that you would choose this design you can see how most of your positioning requirements have been met with a minimum of effort.
There is one other positioning aid that you might expect - an alignment grid. You can:
Set the size of the grid.
Have it displayed by dots on the form or kept invisible.
Have objects positioned on the grid.
Have objects sized to fit the grid.
Set the grid properties by selecting Tools, Grid from the Form Editor menu.