To achieve remote debugging, you must use a program that monitors orders to start debugging from different computers on the network.
There are two types of remote debugger connectors in this program. These are shown below:
Server remote debugger connector
This is a program that monitors orders to start debugging from a client that runs on the server.
For details, refer to "2.8.2.1 How to start remote debugging for general programs".
Client remote debugger connector
This is a program that monitors orders to start debugging from a server that runs on the client.
For details, refer to "2.8.2.2 How to start remote debugging for programs that run in server environments such as Interstage", and "2.8.2.3 How to start remote debugging using the just-in-time debugging function".
In these programs, restrict the permission to connect to the computer where necessary. For details, refer to "2.8.3.5 Restricting connection to computers that allow remote debugging".
If executing a remote debug with "2.8.2.1 How to start remote debugging for general programs", use the server remote debugger connector.
This program is run on the server.
The start format for the server remote debugger connector is shown below.
start format for the server remote debugger connector
If the server is Windows
cobrds32 [port] [connect-restrictions]
If the server is Solaris
svdrds [port] [connect-restrictions]
Port Format
-p port-number
Specify the port number for monitoring using a number from 1024 to 65535.
If -p is omitted, the standard port (59998) will be monitored.
Connect restriction format:
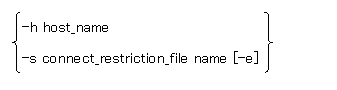
Format | Contents |
|---|---|
-h host_name | Specify a host name or an IP address to allow connection. |
-s connect_restriction_file_name | Specify the connect restriction file. |
-e | The processing result of the contents of the specified connect restriction file are displayed. |
If -s and -h are both omitted, connection will be allowed from all computers.
After the remote debugger connector is started, the IP address and port number are displayed, and orders from the client to start debugging are monitored.
To close the remote debugger connector, hold down the Ctrl and C keys together.
Information
If you have to specify an environment variable for the program you want to debug, set this before you start the remote debugger connector.
If you have to start each program that you want to debug in a different environment, you have to run the remote debugger connector in each environment.
Like the environment variable, the environment here determines the operation when the remote debugger connector is started, and its settings cannot be modified later.
If you have to start each program that you want to debug in a different environment, or if several developers debug at the same time, specify-p when the remote debugger connector starts, and then use a different port.
Examples of starting the server remote debugger connector
Several developers debug at the same time
cobrds32 -p 10001 -h client-1
cobrds32 -p 10002 -h client-2
cobrds32 -p 10003 -h client-3
This is the case when three developers use the remote debugger at the same time.
Choose the port number to be used by each developer and specify this using -p.
Specify -h to accept only the specific computer's request for remote debugging and to reject incorrect connections by other developers.
Specify the format of the connect restriction file as shown below:
format of the connect restriction file
[ ALLOW={ ALL | connection-target [connection-target...] } ]
[ DENY={ ALL | connection-target [connection-target...] }]
This allows connection from the connection target specified in ALLOW. If this is omitted, it is assumed that ALL has been specified.
This denies connection from the connection target specified in DENY. If this is omitted, it is assumed that ALL has been specified.
If you specify ALL, connection is allowed or denied from all computers.
If ALLOW and DENY are both specified, and ALLOW is described, ALLOW has priority.
If this is register on several lines, write "\" at the end of the line.
Example
ALLOW=192.168.0.1 192.168.0.3 \
192.168.0.8-192.168.0.10
The connection target format is shown below.
Format | Example | Example of IP address application range |
|---|---|---|
IP address | 192.168.0.1 | 192.168.0.1 |
Range | 192.168.0.1-192.168.0.10 | 192.168.0.1 to 192.168.0.10 |
Wildcard (*1) | 192.168.0.* | 192.168.0.0 to 192.168.0.255 |
Host name (*2) | Hostname | 192.168.0.1 |
*1 : You can specify "*" instead of the decimal parts (8-bit) delimited by "."
*2 : This example assumes that a host name called "Hostname" has been assigned for an IP address of 192.168.0.1.
Format | Example | Example of IP address application range |
|---|---|---|
IP address | fe80::1:23:456:789a | fe80::1:23:456:789a |
Range | fe80::1:23:456:1-fe80::1:23:456:789a | fe80::1:23:456:1 to fe80::1:23:456:789a |
Wildcard (*3) | fe80::1:23:*:789a | fe80::1:23:0:789a to fe80::1:23:ffff:789a |
Host name (*4) | Hostname | fe80::1:23:456:789a |
*3 : You can specify "*" instead of the hexadecimal parts (16-bit) delimited by ":"
*4 : This example assumes that a host name called "Hostname" has been assigned for an IP address of fe80::1:23:456:789a.
For details about typical examples, refer to "2.8.3.5 Restricting connection to computers that allow remote debugging".
For details of IPv6, refer to " For IPv6 of debugging" in the "NetCOBOL User's Guide".
Note
If there is an error in the contents of the connect restriction file, the specified details will be invalid, and connection will be allowed from all computers.
If executing a remote debug with "2.8.2.2 How to start remote debugging for programs that run in server environments such as Interstage", and "2.8.2.3 How to start remote debugging using the just-in-time debugging function", use the client remote debugger connector.
This program is run on the client.
The start format for the client remote debugger connector is shown below:
In the Project Manager window, Tools menu, select "Remote debugger connector".
After the remote debugger connector starts, the following icon is displayed in the task tray, and the settings are the same as those the previous time the remote debugger connector was started. The order from the server to start debugging is monitored.
![]()
To modify the settings or check the settings contents, right-click the task tray icon and then select Environments from the displayed menu. To close the remote debugger connector, right-click the task tray icon, and then select Exit from the displayed menu.
Information
The remote debugger connector can also be started from NetCOBOL Studio. For details, refer to the "NetCOBOL Studio User's Guide".
This section explains how to make the Remote debugger connector settings.
Figure 2.16 Remote Debugger Connector Dialog Box
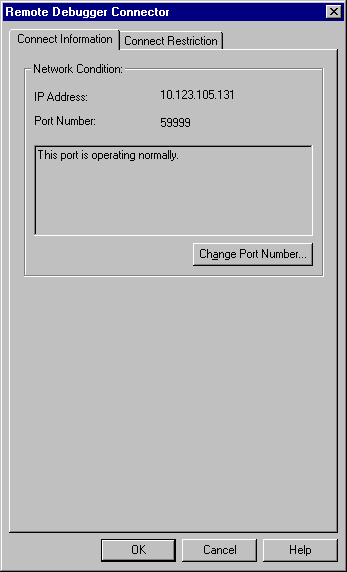
Using the Remote Debugger Connector dialog box, you can modify the settings for the remote debugger connector and check the settings contents.
The information requested on each tab is as follows:
Parameter | Description | |
|---|---|---|
Connect Information | Network Condition: | IP address of the machine or hostname where the remote debugger connector is activating, and the port number monitored by the remote debugger connector are displayed. When you select Change Port Number, Change Port Number dialog box opens. |
Connect Restriction | Connect Allowed Target: | Set the connect-allowed targets. If you select Allow All the Connection, all computers are allowed to connect. Allow Target displays the list of the connect-allowed targets. Using each button, Add, Edit and Remove, you can modify the list of connect-allowed targets. |
Connect Denied Target: | Set the connect-denied target. If you select Deny All the Connection, all computers are denied to connect. Deny target displays the list of the connect-denied targets. Using each button, Add, Edit and Remove, you can modify the list of the connect-denied targets. | |
For details about typical examples, refer to "2.8.3.5 Restricting connection to computers that allow remote debugging".
The way to restrict connections to computers that allow remote debugging is shown in table below. This table uses the IPv4 address. The IPv6 address can also be used. Refer to "For IPv6 of debugging" in the "NetCOBOL User's Guide".
In this table, the server remote debugger connector is expressed by "server", and the client remote debugger connector is expressed by "client".
The connect restriction file is used in the server. For details, refer to "2.8.3.3 Format of the connect restriction file".
In the client, make the settings in the Connect Restriction page of the Remote Debugger Connector dialog box. For details, refer to "2.8.3.4.2 The Remote Debugger Connector dialog box settings".
Format | Server | Client |
|---|---|---|
This allows connection for only a specific target. The IP address to be allowed connection is as follows: 192.168.0.1 | ALLOW=192.168.0.1 DENY=ALL | Setting for "Connect Allowed Target": - Select "Allow Target". - Set as follows in the edit box: 192.168.0.1 Setting for "Connect Denied Target": - Select "Deny All the Connection". |
This allows connection for several specific targets. The IP addresses to be allowed connection are as follows: 192.168.0.1 192.168.0.2 192.168.0.10 | ALLOW=192.168.0.1 \ 192.168.0.2 192.168.0.10 DENY=ALL | Setting for "Connect Allowed Target": - Select "Allow Target". - Set as follows in the edit box: 192.168.0.1 192.168.0.2 192.168.0.10 Setting for "Connect Denied Target": - Select "Deny All the Connection". |
This allows connection for a specific range. The range of IP addresses to be allowed connection is as follows: Lower limit: 192.168.0.1 Upper limit: 192.168.0.10 | ALLOW=192.168.0.1-192.168.0.10 DENY=ALL | Setting for "Connect Allowed Target": - Select "Allow Target". - Set as follows in the edit box: 192.168.0.1-192.168.0.10 Setting for "Connect Denied Target": - Select "Deny All the Connection". |
This allows connection in octet units. The range of IP addresses to be allowed connection is as follows: Lower limit: 192.168.0.0 Upper limit: 192.168.0.255 | ALLOW=192.168.* DENY=ALL | Setting for "Connect Allowed Target": - Select "Allow Target". - Set as follows in the edit box: 192.168.0.* Setting for "Connect Denied Target": - Select "Deny All the Connection". |
This allows connection for all computers. | ALLOW=ALL DENY=ALL | Setting for "Connect Allowed Target": - Select "Allow All the Connection". Setting for "Connect Denied Target": - Select "Deny All the Connection". |