This section explains how to use the debugger for the following tasks:
Setting breakpoints
Checking and changing data contents
Breaking execution when data changes
Changing the statement execution sequence
Tracing the execution path
Tracing the program calling path
Breaking into an executing program
Allocating linkage section items
Checking test coverage
Restarting the debugging session
Automating debugging operations
Configuring the debugger
Splitting the source screen
Configuring source code font and colors
Checking the status of debugger items
Data File Input/Output
You can set breakpoints at specific locations, at the entry or exit of programs, and on specific conditions being satisfied.
You set simple breakpoints at the current cursor location by using the toolbar Set/Delete Breakpoint button
![]()
or the breakpoint function on the shortcut menu. More complex breakpoints are set using the Debug menu Breakpoint function.
In the Line Command window, use the BREAK command.
The Specific Execution Condition on the Continue menu offers another way of executing to a particular point in the program. This function allows you to execute the program up to a particular verb, location or access point of a particular file. Use the Continue, Specific Execution function to execute up to the selected point(s).
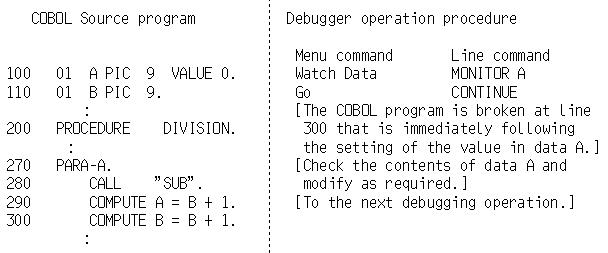
Sometimes you know that a data item does not have the correct value but it is not obvious where the incorrect value is coming from. In these situations you need to use the Data Monitor function. Data Monitor monitors the data item and interrupts execution when the contents change.
You switch on the monitoring of a data item from the Watch window or by using the MONITOR line command.
For example, to find out where the application updates data item A, consider the following figure.
Figure 2.10 Finding Data Modification Locations
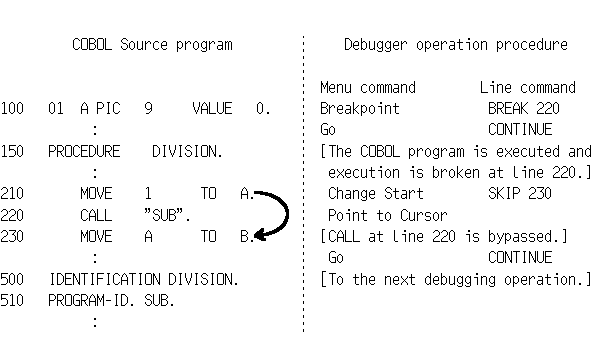
The debugger can bypass statements that contain errors and pass control to statements that are not in the original execution sequence.
Use the Change Start-Point to Cursor function, on the Continue or shortcut menus, to change the program execution sequence.
For example, to bypass line 220 in the program below:
Figure 2.11 Changing the Statement Execution Sequence
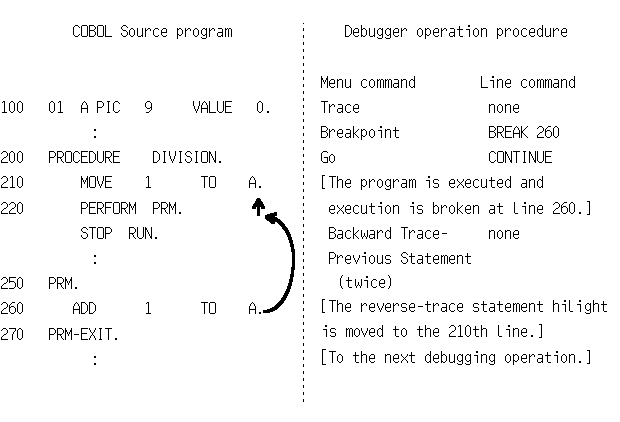
You can often encounter situations where you can stop a program at the point an error occurs, but there are many possible routes to that point. The Backward Trace function highlights (colors) the statement currently being traced. As a colored statement shifts, you can visually review the flow of program controls.
The Trace function enables the recording of the flow of control. When execution is interrupted, you can use the Backward Trace functions to retrace the path of execution.
There are four trace functions:
Previous Statement: Steps backward from the current trace sentence to the sentence that was executed before it.
Next Statement: Steps forwards from the current trace sentence to the sentence that was executed after it.
Previous Procedure: Jumps backwards from the current trace statement to the first statement in the procedure containing the statement, and then to the first statement in the procedure that was executed before the current trace procedure.
Next Procedure: Jumps forwards to the first statement in the procedure that was executed after the current trace procedure.
The Trace function is not available as a line command.
For example, to confirm which location calls procedure PRM, consider the following figure.
Figure 2.12 Tracing an Execution Path
When data in the linkage section is incorrect or the timing of a program call is incorrect, you often need to confirm which program made the call. The debugger lets you check the calling path using the Call Stack function available from the Window menu and the toolbar.
Call Stack displays a list of the active programs in the call stack. For example, suppose the application executes the following sequence:
			MAINPROG     CALLS    PROGRAMA
    PROGRAMA    CALLS    PROGRAMC
      PROGRAMC    EXITS
    PROGRAMA    EXITS
MAINPROG    CALLS    PROGRAMB
    PROGRAMB    CALLS    PROGRAMC
    Breakpoint encountered in PROGRAMC.
Then the Call Stack list looks like this:
Figure 2.13 Call Stack Window

Note that PROGRAMA does not appear in the list, as it is no longer active in the CALL hierarchy.
You can break into looping programs, or regain control of programs being run, by pressing the esc key. You can also select the Break function from the Continue menu or the toolbar.
If you are working with a Windows application, for example using PowerCOBOL generated code, you may need to take an action in the user window before control returns to the debugger.
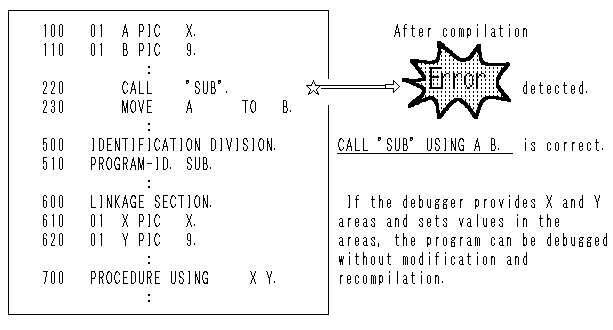
Finding linkage section allocation errors in the midst of debugging large program suites is potentially time consuming. You need to correct and recompile program source, rebuild the application, and restart debugging. The debugger provides the Linkage function to ease such situations.
For example, if a calling program omits a parameter from the CALL statement, debugging of the subprogram can continue without interrupting the debugging session. Use the Linkage function to allocate an area in memory for the missing linkage section item.
The debugger deal locates the allocated area when it returns control to the calling program from the subprogram.
Figure 2.14 Allocating Linkage Section Items
When testing programs, you often want to be sure that certain sections or lines of code have at least been executed. The Passage Count function lets you do this.
First, determine the points in your programs that you want to check. Then, set passage counts by either selecting the Passage Count function on the Debug menu or the Set Passage Count function on the shortcut menu. Execute the program. Selecting Debug, Update Passage Count Display, causes the highlight color to change for executed statements. Alternatively, you can select Debug, Passage Count that displays the Passage Count window. This window gives a list of all passage count statements and the number of executions for each statement.
You can restart debugging the same program, without terminating the debugger, by using the Continue, Re-debug function. All data is re-initialized and you can choose whether to retain or reset the following:
Breakpoints
Passage counts
Watch Data
Watch conditional expression.
If you need to demonstrate your debugging steps, or to perform the same debugging procedures frequently, you can automate your debug operations. The debugger supports two types of automated debugging: batch and automatic.
Both types use a command file that contains debugger commands.
Batch Debugging
In this mode, you specify a command file at the start of debugging. The command file drives the whole debugging session; you do not have to interact with the debugger.
Automatic Debugging
With automatic debugging, you select a command file during a debugging session, and the debugger executes the commands in the file. Control returns to you when all the commands have been executed. Automatic debugging is useful when you want to repeat the execution of a string of commands.
Creating Command Files
Using a text editor
Specifying a history file in the Start Debugging dialog (Batch Debugging tab)
Starting and stopping history file creation during a debugging session using the Option, Output Log menu function or the ENV command.
You can use the history files, created by the debugger, as command files with no changes. Alternatively, you can use a text editor to make appropriate changes to the history files, or to select particular sections for use in batch or automated debugging.
The following example shows a command file to set a breakpoint, and display a data value before and after the breakpoint.
	  break 47      ; Set a breakpoint
  list data-out ; Display data
  cont          ; Run
  list data-out ; Display data
  cont          ; Run
  quit          ; Quit
The debugger treats characters following semicolons as comments.
You can use the Option, Environments function to configure the following aspects of the debugging environment:
The environments other than the statement identification number mode and replacement character will be enabled the next time the debugger is started.
Animation speed: Speed at which the Animate function executes statements.
Display source text of subprogram: Whether or not Animate and Backward Trace show the code of subprograms.
Display all threads: Specifies whether backward trace and animation will be carried out with the implicit thread only or with all the threads.
Watch the PERFORM statements: Whether to watch the PERFORM statements. When the PERFORM statements are to be watched, the detection of out-of-line PERFORM errors can be handled, and the number of internal PERFORM statements for which Animate and Backward Trace will display the code can be controlled.
Suspend execution when an exception event occurs: Indicates whether to suspend execution before the exception procedure is executed when an exception condition occurs. Refer to "Defining Exception Processes " in the "NetCOBOL User's Guide."
Suspend execution when the first signal is received: Indicates whether to suspend execution when the first signal is received. Refer to "2.6.2 Debug functions for signals handled by the exception handler".
Suspend execution when thread end: Indicates whether to suspend execution when thread end.
Capital/small letter on line commands: Whether the debugger handles uppercase letters and lowercase letters as equivalent on line commands.
Line number display method: Display the number in the COBOL source file, or a sequential line number generated by the compiler.
Display the line number: Whether or not the line number in the Source File window is displayed.
Window update during animation: Specifies whether the Call Stack window and the Thread List window will be updated during animation.
Replacement character for non-displayable values: This is the character that the debugger substitutes for non-displayable byte values when displaying, printing and monitoring data.
State of debugger when suspended: Specifies whether the debugger should be activated or not when execution is suspended.
Windows to be opened during batch debugging: Specifies windows to be opened in the Main window during batch debugging.
Alarm on suspension: Specifies whether the beeper should beep or not when execution is suspended.
Alarm on suspension during batch debugging: Specifies whether the beeper should beep or not when execution is suspended during batch debugging.
Compatibility: Specifies whether the scope of debugger functionality will be restricted to the specific version range.
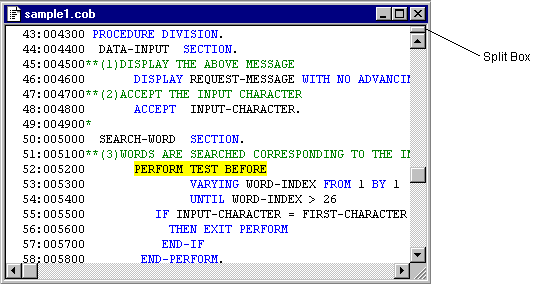
You can split the Source File window into two separately scrollable windows. To do this, click and drag the Split box that is in the top right hand corner of the window, immediately above the scroll bar.
Figure 2.15 The Split Box
The Font and Color commands under View bring up dialog boxes that let you configure the font for the source code and the color of fifteen different attributes of the COBOL source display.
The debugger maintains information about a number of items: breakpoints, passage counts, watch data, and the watch conditional expression. It displays these in the dialog box for each function.
The Breakpoint dialog box displays a list of the breakpoints set and whether they are enabled or disabled.
The Passage Count dialog box displays a list of statements with passage counts, and the counts for these statements.
The Watch window displays a list of data items being watched or monitored and a list of the conditional expressions being monitored.
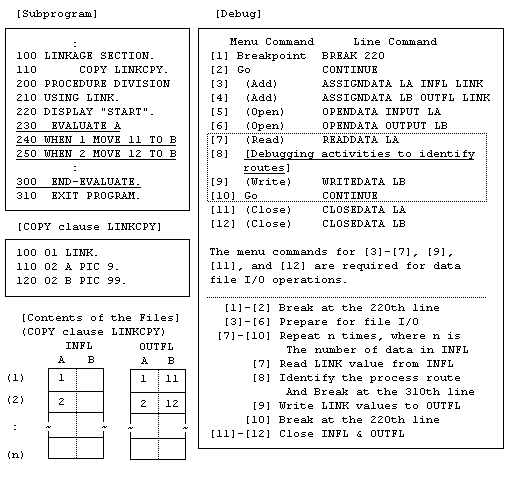
The Data File I/O capability is available to read/write data values to/from a file. Brief descriptions of these functions follow.
Reading from a File
This sets a data item to the value read from a file. This is useful when you set a large number of values, because you can store them in a file in advance, instead of using the SET command to change data.
The typical usage is to identify process routes. To do this, you need to prepare values that let your program take every route. Reading such values from a file saves you the time it would take to enter values during a test, thus making the task much easier.
Writing into a File
This writes values of data items into a file. Because you can reference values previously stored in a file, instead of using the LIST command for displaying data, this is useful when you need to reference many values at a time.
The typical usage is to review processing results that might vary depending on process routes or entered data. Writing into a file allows you to focus on checking process routes during a test, because you can take the time to review processing results after the test is completed.
Using the Fujitsu Data Editor is recommended when you create or check a data file that is to be used for the Data File I/O capability.
Example
In this example, we identify the process route the subprogram takes, and review all the return values from the parameters after the debugging activities are completed.
Create a file for reading
Create a file (INFL) in which the values required to take every route are set to the data item (A), assuming the data area (LINK) in the linkage section to be one record.
Debug
At the entry point of the subprogram, read values stored in a file (INFL) into the data area (LINK) in the linkage section to identify the route.
At the exit of the subprogram, write values stored in the data area (LINK) in the linkage section into a file (OUTFL).
Review the written file
Check the file (OUTFL) to review the values in the data area (LINK) in the linkage section that were changed by the subprogram.