This section explains the procedure for configuring the shutdown facility with the shutdown configuration wizard.
The configuration procedure for the shutdown facility varies depending on the machine type. Check the machine type of hardware and set an appropriate shutdown agent.
The following table shows the shutdown agent necessary by machine type.
Server machine type name | RCI | XSCF | ALOM | ILOM | |||||||
|---|---|---|---|---|---|---|---|---|---|---|---|
Panic | Reset | Panic | Reset | Break | Break | Panic | Reset | ||||
SPARC Enter | M3000 | Japan | Fujitsu | Y | Y | Y | Y | Y | - | - | - |
Other than Fujitsu | - | - | Y | Y | Y | - | - | - | |||
Other than Japan | - | - | Y | Y | Y | - | - | - | |||
T1000 | - | - | - | - | - | Y | - | - | |||
T5120 | - | - | - | - | - | - | Y | Y | |||
SPARC | T3 series | - | - | - | - | - | - | Y | Y | ||
(*1) When using ILOM Reset, you need firmware for SPARC Enterprise server (System Firmware 7.1.6.d or later).
Note
When you are operating the shutdown facility by using one of the following shutdown agents, do not use the console.
XSCF Panic
XSCF Reset
XSCF Break
ILOM Panic
ILOM Reset
If you cannot avoid using the console, stop the shutdown facility of all nodes beforehand. After using the console, cut the connection with the console, start the shutdown facility of all nodes, and then check that the status is normal. For details on stop, start, and the state confirmation of the shutdown facility, see the manual page describing sdtool(1M).
In the /etc/inet/hosts file, you must describe IP addresses and host names of the administrative LAN used by the shutdown facility for all nodes. Check that IP addresses and host names of all nodes are described.
When you set up asynchronous RCI monitoring, you must specify the timeout interval (kernel parameter) in /etc/system for monitoring via SCF/RCI. For kernel parameter settings, see the section "A.5.1 CF Configuration."
If a node's AC power supply is suddenly disconnected during operation of the cluster system, the PRIMECLUSTER, after putting the node for which the power supply was cut into LEFTCLUSTER status, may disconnect the console. In this instance, after confirming that the node's power supply is in fact disconnected, cancel the LEFTCLUSTER status using the cftool -k command. Afterwards, reconnect the console and switch on the power supply to the node.
If the SCF/RCI is malfunctioning or if there is the detection of a hardware error such as the RCI cable being disconnected or detection of redundant RCI address settings, it will take a maximum of 10 minutes (from the time that the error is detected or the shutdown facility is started up) until those statuses are reflected to the sdtool -s display or shutdown facility status display screen.
After setting the shutdown agent, conduct the cluster node forced stop test to check that the cluster nodes have undergone a forced stop correctly. For details on the cluster node forced stop test, see "1.4 Test."
To make the administrative LAN, used in the shutdown facility, redundant by GLS, use the physical IP address takeover function of NIC switching mode.
See
For details on the shutdown facility and the asynchronous monitoring function, refer to the following manuals:
"3.3.1.7 PRIMECLUSTER SF" in the "PRIMECLUSTER Concepts Guide".
"8. Shutdown Facility" in "PRIMECLUSTER Cluster Foundation (CF) Configuration and Administration Guide".
In SPARC Enterprise M3000, M4000, M5000, M8000, and M9000, XSCF is used. The connection method to XSCF as the shutdown facility can be selected from SSH or the telnet.
Default connection is SSH.
Please confirm the following settings concerning XSCF before setting the shutdown facility.
Commonness
The log in user account must be made excluding root for the shutdown facility, and the platadm authority must be given.
At the SSH connection
In XSCF, SSH must be effective in connected permission protocol type from the outside.
User inquiries of the first SSH connection (such as generation of the RSA key) must be completed by connecting to XSCF from all the cluster nodes via SSH using the log in user account for the shutdown facility.
At the telnet connection
In XSCF, telnet must be effective in connected permission protocol type from the outside.
Note
When the connection to XSCF is a serial port connection alone, it is not supported in the shutdown facility. Please use XSCF-LAN.
Moreover, record the following information on XSCF.
XSCF IP address or an XSCF host name registered in the "/etc/inet/hosts" file of the node
Log in user account and password for shutdown facility in XSCF
*1) When the network routing is set, IP address of XSCF need not be the same to management LAN segment of the cluster node.
See
For information on how to configure and confirm XSCF, see the "XSCF User's Guide".
The required shutdown agent varies depending on the hardware machine type.
Check the following combinations of the hardware machine types and shutdown agents.
SPARC Enterprise M3000, M4000, M5000, M8000, and M9000 provided by companies other than Fujitsu in Japan, or
SPARC Enterprise M3000, M4000, M5000, M8000, and M9000 with logos of both Fujitsu and Oracle provided in other than Japan
XSCF Panic
XSCF Break
XSCF Reset
SPARC Enterprise M3000, M4000, M5000, M8000, and M9000 other than above
RCI Panic
XSCF Panic
XSCF Break
RCI Reset
XSCF Reset
Setting up the operation environment for the asynchronous RCI monitoring
This setting is required only for the following cases:
SPARC Enterprise M3000, M4000, M5000, M8000, and M9000 provided by Fujitsu in Japan
When you set up asynchronous RCI monitoring, you must specify the timeout interval (kernel parameter) in /etc/system for monitoring via SCF/RCI.
See
For kernel parameter settings, see "A.5.1 CF Configuration."
Note
You need to reboot the system to enable the changed value.
Starting up the shutdown configuration wizard
From the CF main window of the Cluster Admin screen, select the Tool menu and then Shutdown Facility -> Configuration Wizard. The shutdown configuration wizard will start.
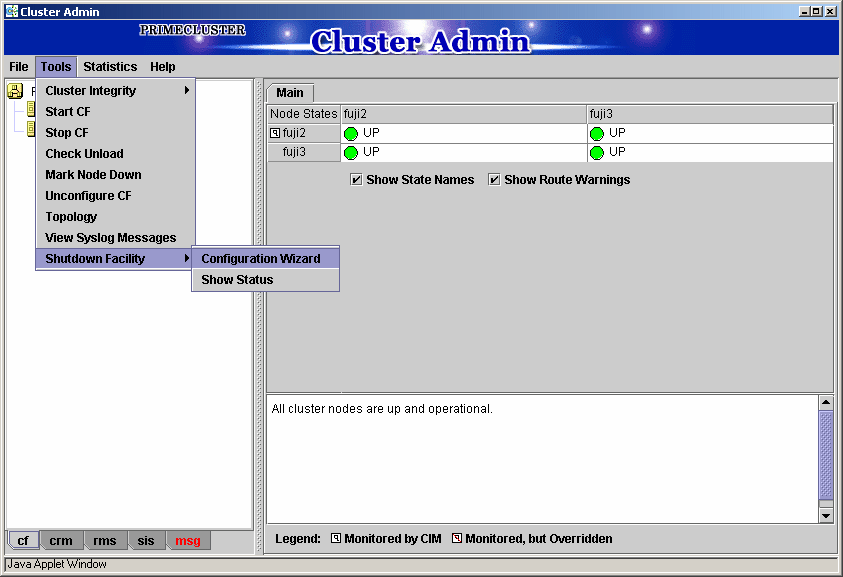
Note
You can also configure the shutdown facility immediately after you complete the CF configuration with the CF wizard.
The following confirmation popup screen will appear. Click Yes to start the shutdown configuration wizard.

Selecting a configuration mode
You can select either of the following two modes to configure the shutdown facility:
Easy configuration (recommended)
Detailed configuration
This section explains how to configure the shutdown facility using Easy configuration (recommended). With this mode, you can configure the PRIMECLUSTER shutdown facility according to the procedure.
Figure 5.1 Selecting the SF configuration mode
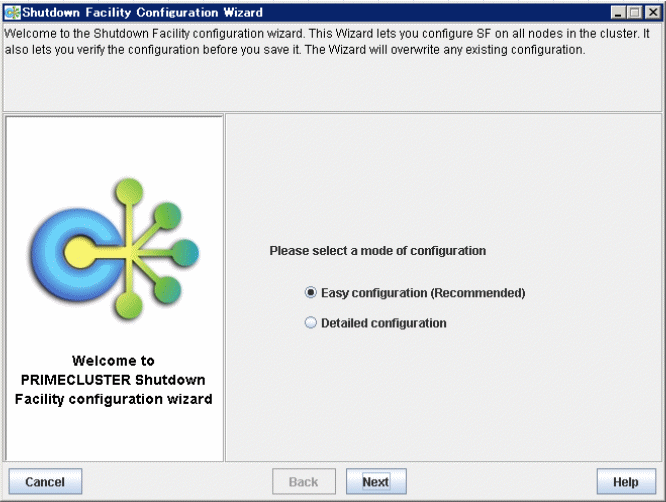
Select Easy configuration (Recommended) and then click Next.
Selecting a shutdown agent
The selection screen for the shutdown agent will appear.
Figure 5.2 Selecting a shutdown agent
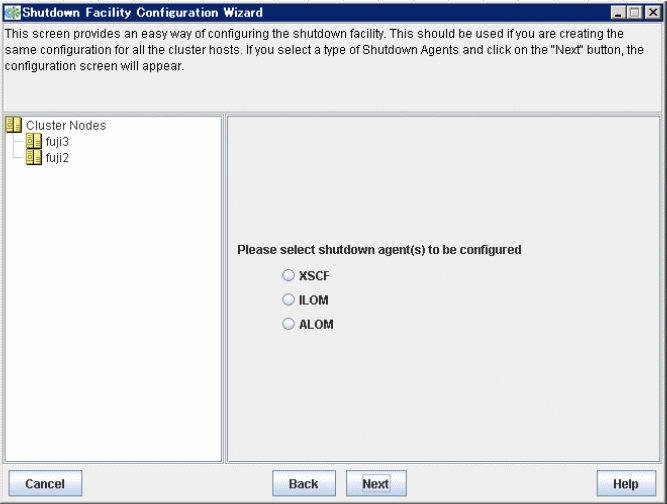
Confirm the hardware machine type and select the appropriate shutdown agent.
SPARC Enterprise M3000, M4000, M5000, M8000, and M9000 provided by companies other than Fujitsu in Japan or SPARC Enterprise M3000, M4000, M5000, M8000, and M9000 with logos of both Fujitsu and Oracle provided in other than Japan
SPARC Enterprise M3000, M4000, M5000, M8000, and M9000 other than above
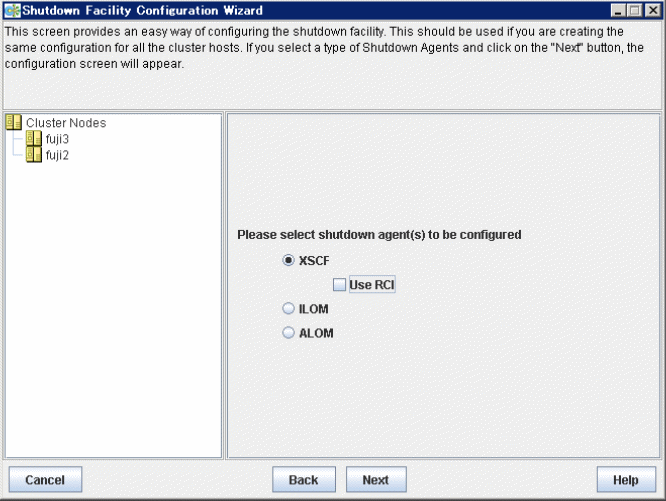
Select XSCF.
If you select XSCF, Use RCI is displayed. Clear the checkbox of Use RCI.
The following shutdown agents are automatically set:
XSCF Panic
XSCF Break
XSCF Reset
Clear the checkbox, and then click Next.
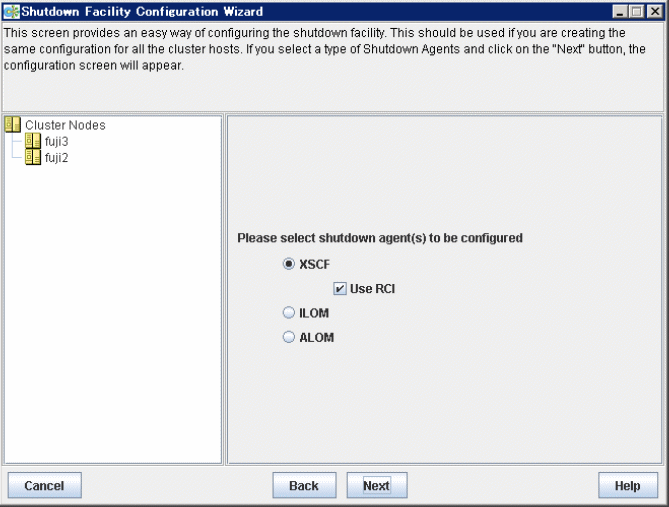
Select XSCF.
If you select XSCF, Use RCI is displayed, however do not clear the checkbox of Use RCI.
The following shutdown agents are automatically set:
RCI Panic
XSCF Panic
XSCF Break
RCI Reset
XSCF Reset
Select XSCF, and then click Next.
Information
If you select a shutdown agent, the timeout value is automatically set:
For XSCF Panic/XSCF Break
4 or fewer nodes
Timeout value = 20 (seconds)
5 or more nodes
Timeout value = 6 x number of cluster nodes + 2 (seconds)
Example for 5 nodes: 6 x 5 + 2 = 32 (seconds)
For XSCF Reset
4 or fewer nodes
Timeout value = 40 (seconds)
5 or more nodes
Timeout value = 6 x number of cluster nodes + 22 (seconds)
Example for 5 nodes: 6 x 5 + 22 = 52 (seconds)
For RCI Panic/RCI Reset
Timeout value = 20 (seconds)
Configuring XSCF
The screen for entering the information of XSCF will appear.
Figure 5.3 Selecting the number of XSCF IP addresses
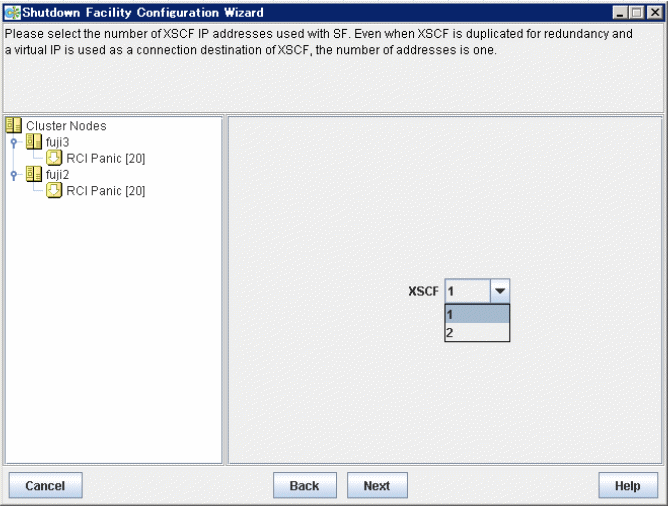
Select the number of XSCF IP addresses to use in the shutdown facility.
Note
If XSCF unit is duplexed but XSCF-LAN is not duplexed, the number of XSCF IP addresses is 1.
In this case, specify the virtual IP (takeover IP address) for the XSCF IP addresses.
Select the number of XSCF IP addresses, and click Next.
The screen to set the information of XSCF will appear.
"a) For selecting [1] for the number of XSCF IP addresses" and "b) For selecting [2] for the number of XSCF IP addresses" are respectively explained below.
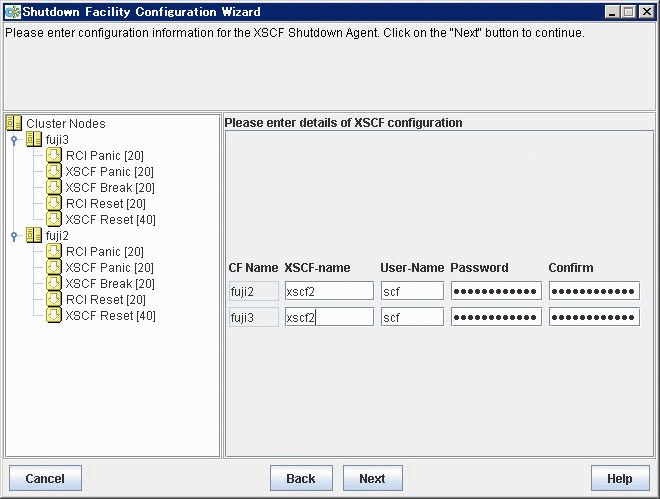
Enter the settings for XSCF that you recorded in "5.1.2.1.1 Checking Console Configuration".
Enter the IP address of XSCF or the host name of XSCF that is registered in the /etc/inet/hosts file.
Enter a user name to log in to XSCF.
Enter a password to log in to XSCF.
Upon the completion of configuration, click Next.
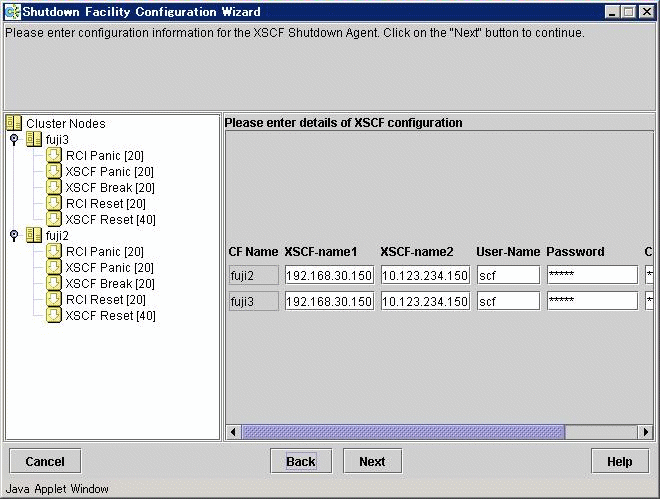
Enter the settings for XSCF that you recorded in "5.1.2.1.1 Checking Console Configuration".
Enter the IP address of XSCF-LAN#0 or the host name that is registered in the /etc/inet/hosts file.
Enter the IP address of XSCF-LAN#1 or the host name that is registered in the /etc/inet/hosts file.
Enter a user name to log in to XSCF.
Enter a password to log in to XSCF.
Note
The user names and passwords for 2 of the XSCF must be the same.
Upon the completion of configuration, click Next.
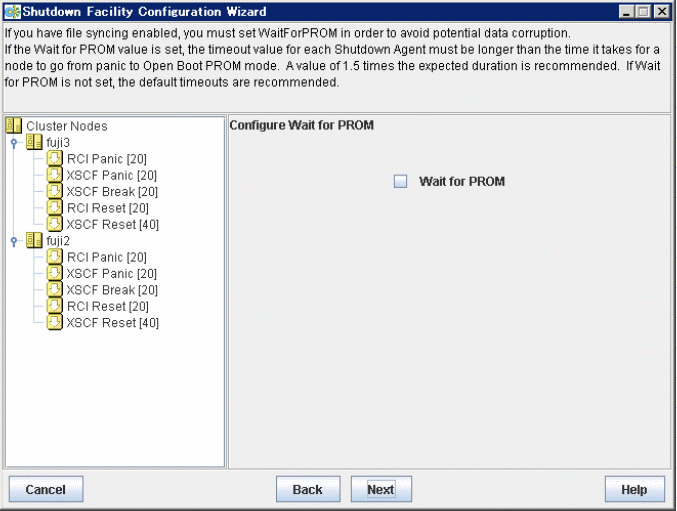
Configuring Wait for PROM
Note
Wait for PROM is currently not supported.
You do not have to select the checkbox, and then click Next.
Figure 5.4 Configure Wait for PROM
Configuring hardware selection
If you select XSCF as the shutdown agent, the screen for selecting hardware will appear.
Figure 5.5 Configuring hardware selection
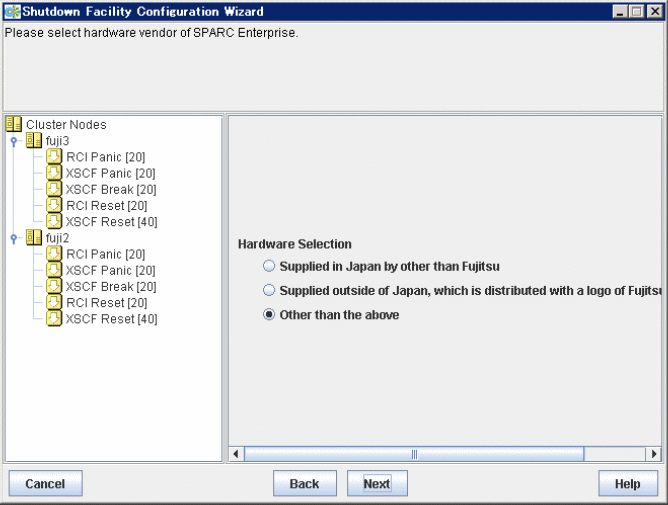
For SPARC Enterprise M3000, M4000, M5000, M8000, and M9000 provided by companies other than Fujitsu in Japan
Select "Supplied in Japan by other than Fujitsu".
For SPARC Enterprise M3000, M4000, M5000, M8000, and M9000 with logos of both Fujitsu and Oracle provided in other than Japan
Select "Supplied outside of Japan which is distributed with a logo of Fujitsu and Oracle".
For SPARC Enterprise M3000, M4000, M5000, M8000, and M9000 other than the above
Select "Other than the above".
Upon the completion of configuration, click Next.
Entering node weights and administrative IP addresses
The screen for entering the weights of the nodes and the IP addresses for the administrative LAN will appear.
Figure 5.6 Entering node weights and administrative IP addresses
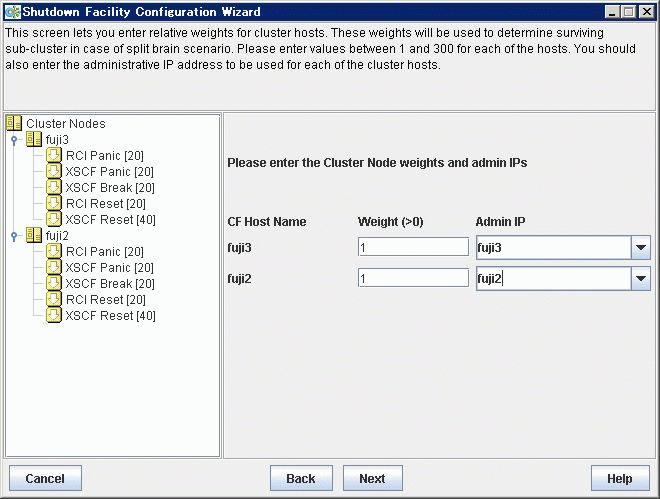
Enter the weights of the nodes and the IP addresses for the administrative LAN.
Enter the weight of the node that constitutes the cluster. Weight is used to identify the survival priority of the node group that constitutes the cluster. Possible values for each node range from 1 to 300.
For details on survival priority and weight, refer to the explanations below.
Enter an IP address directly or click the tab to select the host name that is assigned to the administrative IP address.
Upon the completion of configuration, click Next.
Even if a cluster partition occurs due to a failure in the cluster interconnect, all the nodes will still be able to access the user resources. For details on the cluster partition, see "2.2.2.1 Protecting data integrity" in the "PRIMECLUSTER Concepts Guide".
To guarantee the consistency of the data constituting user resources, you have to determine the node groups to survive and those that are to be forcibly stopped.
The weight assigned to each node group is referred to as a "Survival priority" under PRIMECLUSTER.
The greater the weight of the node, the higher the survival priority. Conversely, the less the weight of the node, the lower the survival priority. If multiple node groups have the same survival priority, the node group that includes a node with the name that is first in alphabetical order will survive.
Survival priority can be found in the following calculation:
Survival priority = SF node weight + ShutdownPriority of userApplication
Weight of node. Default value = 1. Set this value while configuring the shutdown facility.
Set this attribute when userApplication is created. For details on how to change the settings, see "8.1.2 Changing the Operation Attributes of a Cluster Application".
See
For details on the ShutdownPriority attribute of userApplication, see "6.7.5 Attributes".
The typical scenarios that are implemented are shown below:
Set the weight of all nodes to 1 (default).
Set the attribute of ShutdownPriority of all user applications to 0 (default).
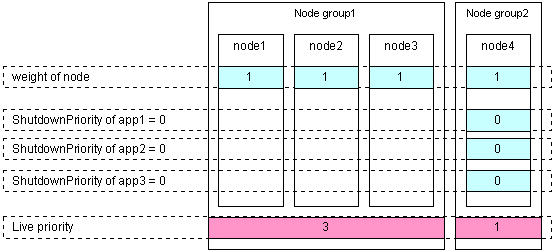
Set the "weight" of the node to survive to a value more than double the total weight of the other nodes.
Set the ShutdownPriority attribute of all user applications to 0 (default).
In the following example, node1 is to survive:
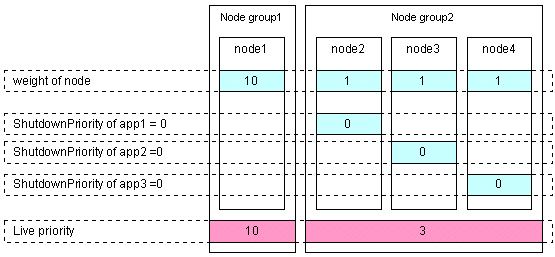
Set the "weight" of all nodes to 1 (default).
Set the ShutdownPriority attribute of the user application whose operation is to continue to a value more than double the total of the ShutdownPriority attributes of the other user applications and the weights of all nodes.
In the following example, the node for which app1 is operating is to survive:
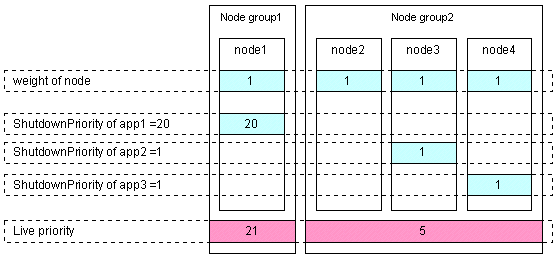
Saving the configuration
Confirm and then save the configuration. In the left-hand panel of the window, those nodes that constitute the cluster are displayed, as are the shutdown agents that are configured for each node.
Figure 5.7 Saving the configuration
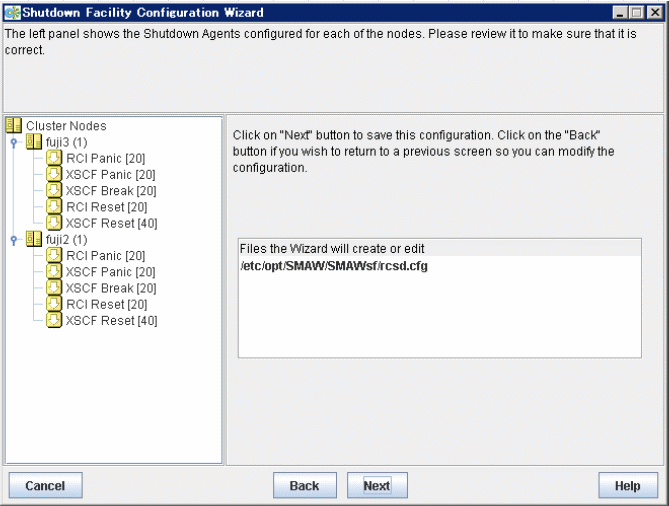
Click Next. A popup screen will appear for confirmation.
Select Yes to save the setting.
Displaying the configuration of the shutdown facility
If you save the setting, a screen displaying the configuration of the shutdown facility will appear. On this screen, you can confirm the configuration of the shutdown facility on each node by selecting each node in turn.
Information
You can also view the configuration of the shutdown facility by selecting Shutdown Facility -> Show Status from the Tool menu.
Figure 5.8 Show Status
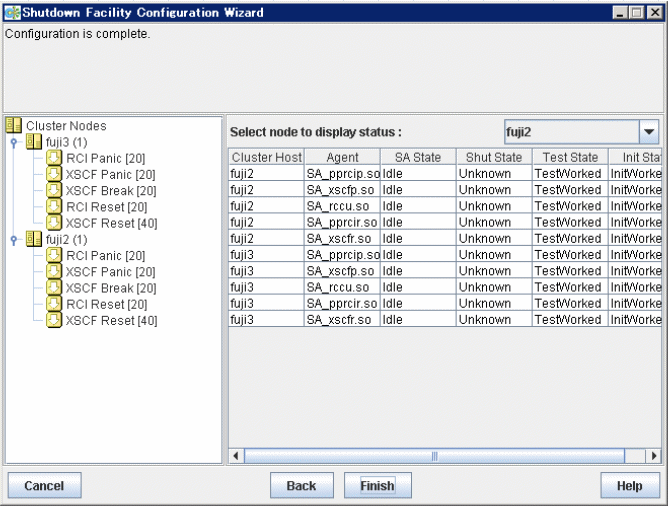
"Unknown" is shown during normal system operation. If an error occurs and the shutdown facility stops the relevant node successfully, "Unknown" will change to "KillWorked".
Indicates the state in which the path to shut down the node is tested when a node error occurs. If the test of the path has not been completed, "Unknown" will be displayed. If the configured shutdown agent operates normally, "Unknown" will be changed to "TestWorked".
Indicates the state in which the shutdown agent is initialized.
To exit the configuration wizard, click Finish. Click Yes in the confirmation popup screen that appears.
Note
On this screen, confirm that the shutdown facility is operating normally.
If "InitFailed" is displayed in the Initial state even when the configuration of the shutdown facility has been completed or if "Unknown" is displayed in the Test state or "TestFailed" is highlighted in red, the agent or hardware configuration may contain an error. Check the /var/adm/messages file and the console for an error message. Then, apply appropriate countermeasures as instructed the message that is output.
If connection to XSCF is telnet, the test state becomes TestFailed at this point in time. Confirm that the shutdown facility is operating normally, after the "5.1.2.1.3 Setting of the connection method to the XSCF".
See
For details on how to respond to the error messages that may be output, see the following manual.
"11.12 Monitoring Agent messages" in the "PRIMECLUSTER Cluster Foundation (CF) Configuration and Administration Guide".
The default of setting of the connection method to the XSCF is SSH connection, in the SPARC Enterprise M3000, M4000, M5000, M8000, or M9000. The procedure when changing to the telnet connection is the following.
Change of the connection method
Execute the following command in all nodes to change a connection method.
# /etc/opt/FJSVcluster/bin/clrccusetup -m -t telnet |
Example)
# /etc/opt/FJSVcluster/bin/clrccusetup -m -t telnet <RETURN> # /etc/opt/FJSVcluster/bin/clrccusetup -l <RETURN> Device-name cluster-host-name IP-address host-name user-name connection-type ------------------------------------------------------------------------------- xscf fuji2 xscf2 1 xuser telnet xscf fuji3 xscf3 1 xuser telnet |
Starting up the shutdown facility
Execute the following command in each node, and confirm the shutdown facility has started.
# /opt/SMAW/bin/sdtool -s |
If the state of configuration of shutdown facility is displayed, shutdown facility is started.
If "The RCSD is not running" is displayed, shutdown facility is not started.
If shutdown facility is started, execute the following command, and restart the shutdown facility.
# /opt/SMAW/bin/sdtool -r |
If shutdown facility is not started, execute the following command, and start the shutdown facility.
# /opt/SMAW/bin/sdtool -b |
ALOM in console can be used by SPARC Enterprise T1000 or T2000.
Confirm the following settings concerning ALOM before setting the shutdown facility.
The log in user account must be made for the shutdown facility, and c level (console access) authority must be given.
In connected permission protocol type from the outside, the telnet must be effective.
The following ALOM composition variables must not have been changed from default.
if_emailalerts : false(default)
sc_clieventlevel : 2(default)
sc_cliprompt : sc(default)
Note
Connected permission from the outside to ALOM is default and SSH. In that case, it is not supported in the shutdown facility.
When the connection to ALOM is a serial port connection alone, it is not supported in the shutdown facility.
Moreover, record the following information on ALOM.
ALOM IP address(*1) or an ALOM host name registered in the "/etc/inet/hosts" file.
User name used to log in the ALOM.
Password used to log in the ALOM.
*1) When the network routing is set, Internet Protocol address of ALOM need not be the same to management LAN segment of the cluster node.
See
For information on how to configure and confirm ALOM, see the "Advanced Lights out Management (ALOM) CMT Guide".
The required shutdown agent varies depending on the hardware machine type.
Check the following combinations of the hardware machine types and shutdown agents.
For SPARC Enterprise T1000, T2000
ALOM Break
Starting up the shutdown configuration wizard
From the CF main window of the Cluster Admin screen, select the Tool menu and then Shutdown Facility -> Configuration Wizard. The shutdown configuration wizard will start.

Note
You can also configure the shutdown facility immediately after you complete the CF configuration with the CF wizard.
The following confirmation popup screen will appear. Click Yes to start the shutdown configuration wizard.

Selecting a configuration mode
You can select either of the following two modes to configure the shutdown facility:
Easy configuration (recommended)
Detailed configuration
This section explains how to configure the shutdown facility using Easy configuration (recommended). With this mode, you can configure the PRIMECLUSTER shutdown facility according to the procedure.
Figure 5.9 Selecting the SF configuration mode

Select Easy configuration (Recommended) and then click Next.
Selecting a shutdown agent
The selection screen for the shutdown agent will appear.
Figure 5.10 Selecting a shutdown agent
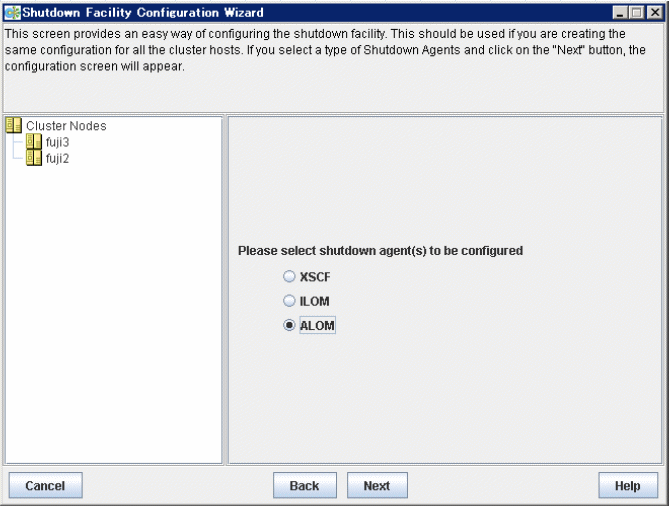
Confirm the hardware machine type and select the appropriate shutdown agent.
For SPARC Enterprise T1000, T2000
Select ALOM.
The following shutdown agent is automatically set:
ALOM Break
Select ALOM, and then click Next.
Information
If you select a shutdown agent, the timeout value is automatically set.
For ALOM Break
Timeout value = 40 (seconds)
Configuring ALOM
The screen for entering the information of ALOM will appear.
Figure 5.11 Configuring ALOM
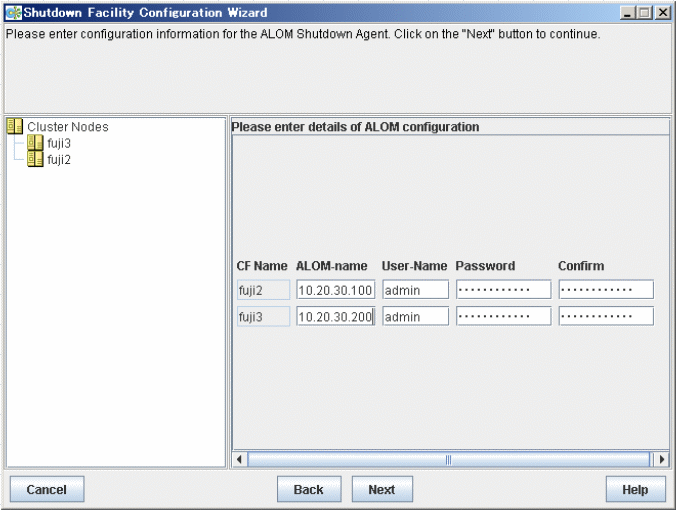
Enter the settings for ALOM that you recorded in "5.1.2.2.1 Checking Console Configuration".
Enter the IP address of ALOM.
Enter a user name to log in to ALOM.
Enter a password to log in to ALOM.
Upon the completion of configuration, click Next.
Entering node weights and administrative IP addresses
The screen for entering the weights of the nodes and the IP addresses for the administrative LAN will appear.
Figure 5.12 Entering node weights and administrative IP addresses
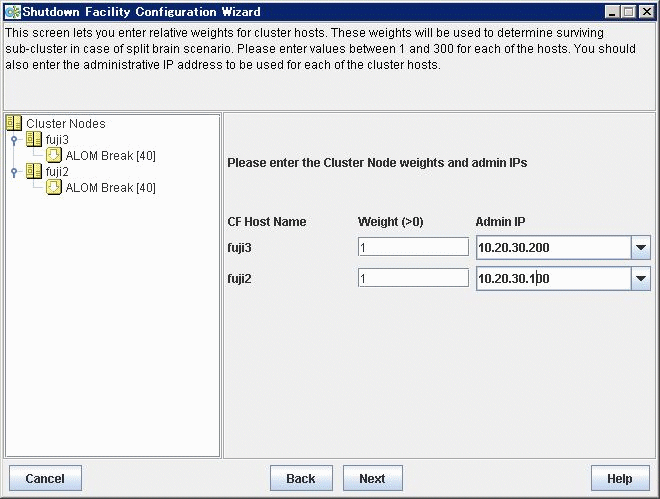
Enter the weights of the nodes and the IP addresses for the administrative LAN.
Enter the weight of the node that constitutes the cluster. Weight is used to identify the survival priority of the node group that constitutes the cluster. Possible values for each node range from 1 to 300.
For details on survival priority and weight, refer to the explanations below.
Enter an IP address directly or click the tab to select the host name that is assigned to the administrative IP address.
Upon the completion of configuration, click Next.
Even if a cluster partition occurs due to a failure in the cluster interconnect, all the nodes will still be able to access the user resources. For details on the cluster partition, see "2.2.2.1 Protecting data integrity" in the "PRIMECLUSTER Concepts Guide".
To guarantee the consistency of the data constituting user resources, you have to determine the node groups to survive and those that are to be forcibly stopped.
The weight assigned to each node group is referred to as a "Survival priority" under PRIMECLUSTER.
The greater the weight of the node, the higher the survival priority. Conversely, the less the weight of the node, the lower the survival priority. If multiple node groups have the same survival priority, the node group that includes a node with the name that is first in alphabetical order will survive.
Survival priority can be found in the following calculation:
Survival priority = SF node weight + ShutdownPriority of userApplication
Weight of node. Default value = 1. Set this value while configuring the shutdown facility.
Set this attribute when userApplication is created. For details on how to change the settings, see "8.1.2 Changing the Operation Attributes of a Cluster Application".
See
For details on the ShutdownPriority attribute of userApplication, see "6.7.5 Attributes".
The typical scenarios that are implemented are shown below:
Set the weight of all nodes to 1 (default).
Set the attribute of ShutdownPriority of all user applications to 0 (default).

Set the "weight" of the node to survive to a value more than double the total weight of the other nodes.
Set the ShutdownPriority attribute of all user applications to 0 (default).
In the following example, node1 is to survive:

Set the "weight" of all nodes to 1 (default).
Set the ShutdownPriority attribute of the user application whose operation is to continue to a value more than double the total of the ShutdownPriority attributes of the other user applications and the weights of all nodes.
In the following example, the node for which app1 is operating is to survive:

Saving the configuration
Confirm and then save the configuration. In the left-hand panel of the window, those nodes that constitute the cluster are displayed, as are the shutdown agents that are configured for each node.
Figure 5.13 Saving the configuration
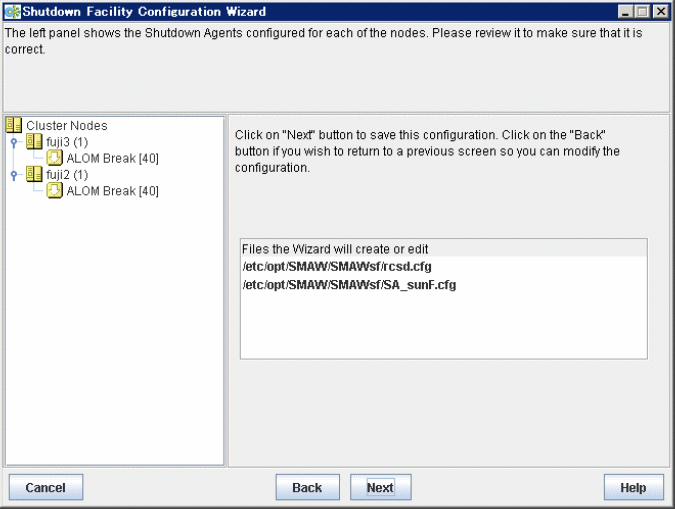
Click Next. A popup screen will appear for confirmation.
Select Yes to save the setting.
Displaying the configuration of the shutdown facility
If you save the setting, a screen displaying the configuration of the shutdown facility will appear. On this screen, you can confirm the configuration of the shutdown facility on each node by selecting each node in turn.
Information
You can also view the configuration of the shutdown facility by selecting Shutdown Facility -> Show Status from the Tool menu.
Figure 5.14 Show Status
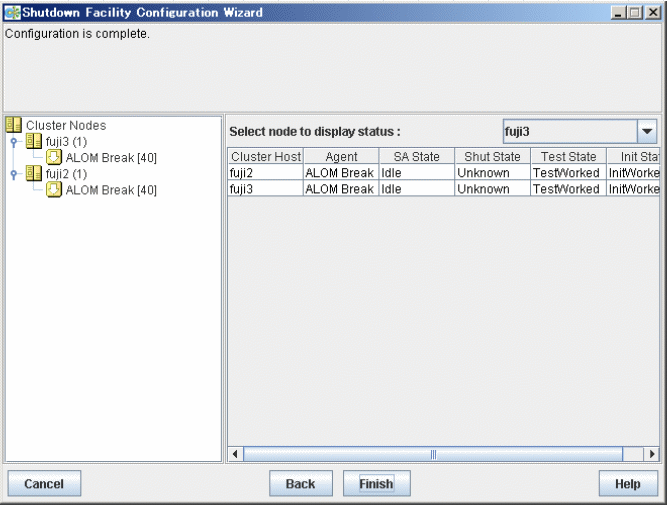
"Unknown" is shown during normal system operation. If an error occurs and the shutdown facility stops the relevant node successfully, "Unknown" will change to "KillWorked".
Indicates the state in which the path to shut down the node is tested when a node error occurs. If the test of the path has not been completed, "Unknown" will be displayed. If the configured shutdown agent operates normally, "Unknown" will be changed to "TestWorked".
Indicates the state in which the shutdown agent is initialized.
To exit the configuration wizard, click Finish. Click Yes in the confirmation popup screen that appears.
Note
On this screen, confirm that the shutdown facility is operating normally.
If "InitFailed" is displayed in the Initial state even when the configuration of the shutdown facility has been completed or if "Unknown" is displayed in the Test state or "TestFailed" is highlighted in red, the agent or hardware configuration may contain an error. Check the /var/adm/messages file and the console for an error message. Then, apply appropriate countermeasures as instructed the message that is output.
See
For details on how to respond to the error messages that may be output, see the following manual.
"11.12 Monitoring Agent messages" in the "PRIMECLUSTER Cluster Foundation (CF) Configuration and Administration Guide".
In SPARC Enterprise T5120, T5220, T5140, T5240, T5440, or Sparc T3 series, ILOM is used.
Check the following settings concerning ILOM before setting the shutdown facility.
The log in user account is made for the shutdown facility, and CLI mode of that is set to the default mode (*1).
User inquiries of the first SSH connection (such as generation of the RSA key) are completed by connecting to ILOM from all the cluster nodes via SSH using the log in user account for the shutdown facility.
If you are using ILOM 3.0, please check the following settings as well.
The log in user account for the shutdown facility must be set to one of the following privileges:
If the keyswitch_state parameter is set to normal
Console, Reset and Host Control, Read Only (cro)
Operator(*2)
If the keyswitch_state parameter is set to locked
Admin, Console, Reset and Host Control, Read Only (acro)
Administrator(*2)
If a necessary privilege is not set, TestFailed or KillFailed of shutdown agent would be occurred.
The log in user account for the shutdown facility must not be using SSH host-based key authentication.
Moreover, record the following information on ILOM.
ILOM IP address(*3)
Log in user account and password for shutdown facility in ILOM
*1) You can check if CLI mode of the log in user account is set to the default mode by the following procedure.
Log in CLI of ILOM.
Check prompt status.
Prompt status that is set to the default mode.
->
Prompt status that is set to alom mode.
sc>
*2) Due to compatibility of ILOM 3.0 with ILOM 2.x, this operation is also available for users with administrator or operator privileges from ILOM 2.x.
*3) When the network routing is set, IP address of ILOM need not be the same to management LAN segment of the cluster node.
See
For details on how to make and check ILOM settings, please refer to the following documentation.
For ILOM 2.x:
"Integrated Lights Out Manager User's Guide"
For ILOM 3.0:
"Integrated Lights Out Manager (ILOM) 3.0 Concepts Guide"
"Integrated Lights Out Manager (ILOM) 3.0 Web Interface Procedures Guide"
"Integrated Lights Out Manager (ILOM) 3.0 CLI Procedures Guide"
"Integrated Lights Out Manager (ILOM) 3.0 Getting Started Guide"
The required shutdown agent varies depending on the hardware machine type.
Check the following combinations of the hardware machine types and shutdown agents.
For SPARC Enterprise T5120, T5220, T5140, T5240, T5440, and SPARC T3 series
ILOM Panic
ILOM Reset
Starting up the shutdown configuration wizard
From the CF main window of the Cluster Admin screen, select the Tool menu and then Shutdown Facility -> Configuration Wizard. The shutdown configuration wizard will start.

Note
You can also configure the shutdown facility immediately after you complete the CF configuration with the CF wizard.
The following confirmation popup screen will appear. Click Yes to start the shutdown configuration wizard.

Selecting a configuration mode
You can select either of the following two modes to configure the shutdown facility:
Easy configuration (recommended)
Detailed configuration
This section explains how to configure the shutdown facility using Easy configuration (recommended). With this mode, you can configure the PRIMECLUSTER shutdown facility according to the procedure.
Figure 5.15 Selecting the SF configuration mode

Select Easy configuration (Recommended) and then click Next.
Selecting a shutdown agent
The selection screen for the shutdown agent will appear.
Figure 5.16 Selecting a shutdown agent
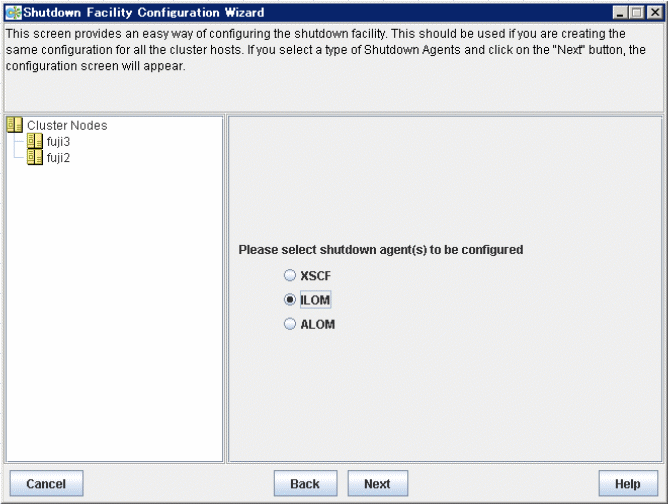
Confirm the hardware machine type and select the appropriate shutdown agent.
For SPARC Enterprise T5120, T5220, T5140, T5240, T5440, and SPARC T3 series
Select ILOM.
The following shutdown agents are automatically set:
ILOM Panic
ILOM Reset
Select ILOM, and then click Next.
Information
If you select a shutdown agent, the timeout value is automatically set.
For ILOM Panic/ILOM Reset
Timeout value = 70 (seconds)
Configuring ILOM
The screen for entering the information of ILOM will appear.
Figure 5.17 Configuring ILOM
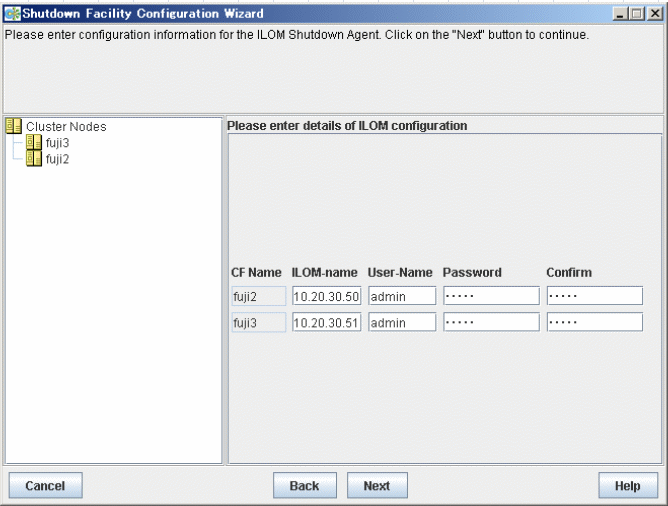
Enter the settings for ILOM that you recorded in "5.1.2.3.1 Checking Console Configuration".
Enter the IP address of ILOM or the host name of ILOM that is registered in the /etc/inet/hosts file.
Enter a user name to log in to ILOM.
Enter a password to log in to ILOM.
Upon the completion of configuration, click Next.
Entering node weights and administrative IP addresses
The screen for entering the weights of the nodes and the IP addresses for the administrative LAN will appear.
Figure 5.18 Entering node weights and administrative IP addresses
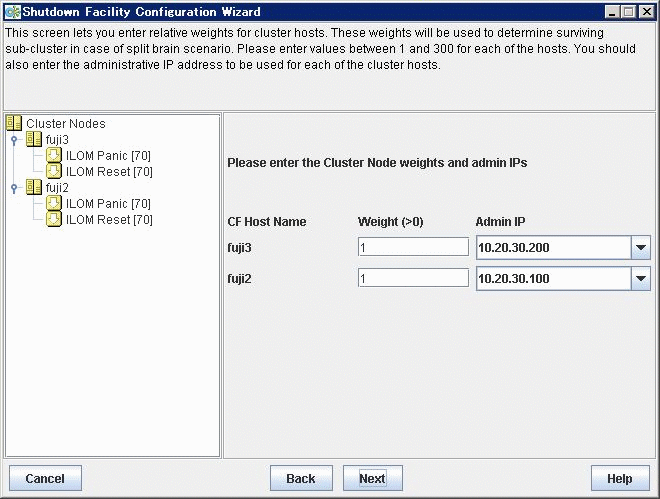
Enter the weights of the nodes and the IP addresses for the administrative LAN.
Enter the weight of the node that constitutes the cluster. Weight is used to identify the survival priority of the node group that constitutes the cluster. Possible values for each node range from 1 to 300.
For details on survival priority and weight, refer to the explanations below.
Enter an IP address directly or click the tab to select the host name that is assigned to the administrative IP address.
Upon the completion of configuration, click Next.
Even if a cluster partition occurs due to a failure in the cluster interconnect, all the nodes will still be able to access the user resources. For details on the cluster partition, see "2.2.2.1 Protecting data integrity" in the "PRIMECLUSTER Concepts Guide".
To guarantee the consistency of the data constituting user resources, you have to determine the node groups to survive and those that are to be forcibly stopped.
The weight assigned to each node group is referred to as a "Survival priority" under PRIMECLUSTER.
The greater the weight of the node, the higher the survival priority. Conversely, the less the weight of the node, the lower the survival priority. If multiple node groups have the same survival priority, the node group that includes a node with the name that is first in alphabetical order will survive.
Survival priority can be found in the following calculation:
Survival priority = SF node weight + ShutdownPriority of userApplication
Weight of node. Default value = 1. Set this value while configuring the shutdown facility.
Set this attribute when userApplication is created. For details on how to change the settings, see "8.1.2 Changing the Operation Attributes of a Cluster Application".
See
For details on the ShutdownPriority attribute of userApplication, see "6.7.5 Attributes".
The typical scenarios that are implemented are shown below:
Set the weight of all nodes to 1 (default).
Set the attribute of ShutdownPriority of all user applications to 0 (default).

Set the "weight" of the node to survive to a value more than double the total weight of the other nodes.
Set the ShutdownPriority attribute of all user applications to 0 (default).
In the following example, node1 is to survive:

Set the "weight" of all nodes to 1 (default).
Set the ShutdownPriority attribute of the user application whose operation is to continue to a value more than double the total of the ShutdownPriority attributes of the other user applications and the weights of all nodes.
In the following example, the node for which app1 is operating is to survive:

Saving the configuration
Confirm and then save the configuration. In the left-hand panel of the window, those nodes that constitute the cluster are displayed, as are the shutdown agents that are configured for each node.
Figure 5.19 Saving the configuration
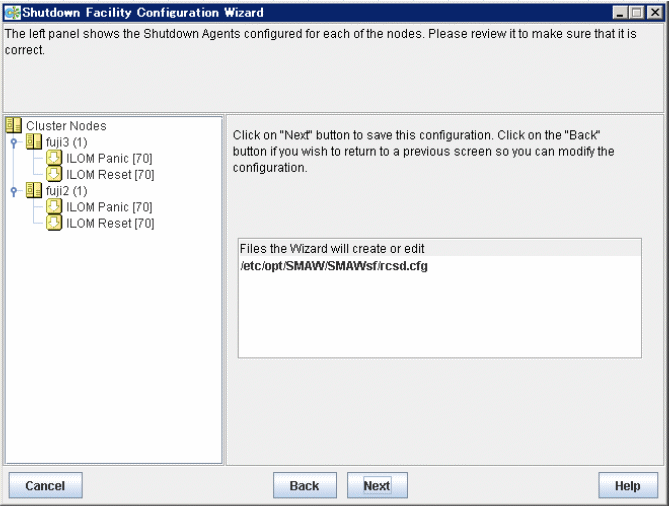
Click Next. A popup screen will appear for confirmation.
Select Yes to save the setting.
Displaying the configuration of the shutdown facility
If you save the setting, a screen displaying the configuration of the shutdown facility will appear. On this screen, you can confirm the configuration of the shutdown facility on each node by selecting each node in turn.
Information
You can also view the configuration of the shutdown facility by selecting Shutdown Facility -> Show Status from the Tool menu.
Figure 5.20 Show Status
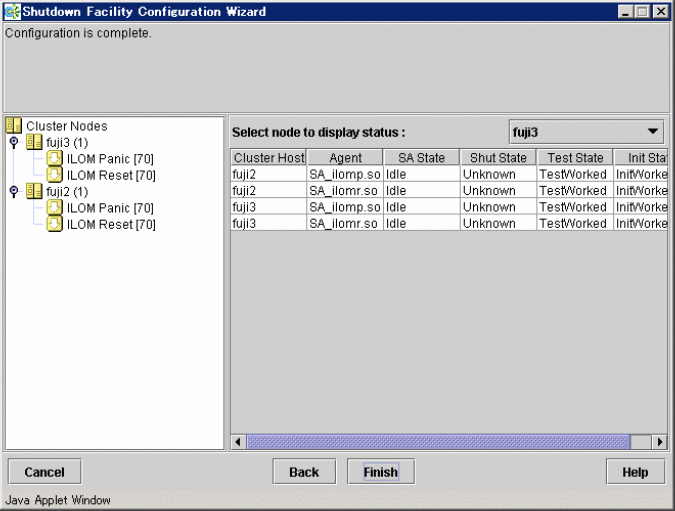
"Unknown" is shown during normal system operation. If an error occurs and the shutdown facility stops the relevant node successfully, "Unknown" will change to "KillWorked".
Indicates the state in which the path to shut down the node is tested when a node error occurs. If the test of the path has not been completed, "Unknown" will be displayed. If the configured shutdown agent operates normally, "Unknown" will be changed to "TestWorked".
Indicates the state in which the shutdown agent is initialized.
To exit the configuration wizard, click Finish. Click Yes in the confirmation popup screen that appears.
Note
On this screen, confirm that the shutdown facility is operating normally.
If "InitFailed" is displayed in the Initial state even when the configuration of the shutdown facility has been completed or if "Unknown" is displayed in the Test state or "TestFailed" is highlighted in red, the agent or hardware configuration may contain an error. Check the /var/adm/messages file and the console for an error message. Then, apply appropriate countermeasures as instructed the message that is output.
See
For details on how to respond to the error messages that may be output, see the following manual.
"11.12 Monitoring Agent messages" in the "PRIMECLUSTER Cluster Foundation (CF) Configuration and Administration Guide".