For the purpose of demonstrating a NetCOBOL application and how to set it up, we will use a simple single-program application that reads three fields from the Employee table of the Pubs database that comes with SQL Server. This project is named “MySQL”. It consists of a single .exe file named “MySQL.EXE”, which is created from the following COBOL program:
Identification Division.
Program-ID. MySQL
Environment Division.
Data Division.
Working-Storage Section.
01 Loop-Flag Pic 9 Value 0.
    EXEC SQL BEGIN DECLARE SECTION END-EXEC.
01 EmpID Pic X(9) Value Spaces.
01 FName Pic X(20) Value Spaces.
01 LName Pic X(30) Value Spaces.
01 SQLSTATE Pic X(5) Value Spaces.
    EXEC SQL END DECLARE SECTION END-EXEC.
Procedure Division.
    Move 0 To Loop-Flag
              SQLSTATE.
    EXEC SQL
              CONNECT TO Default
    END-EXEC.
    EXEC SQL
              DECLARE CUR1 CURSOR FOR
                 SELECT emp_id, fname, lname FROM employee
    END-EXEC.
    EXEC SQL
              OPEN CUR1
    END-EXEC.
    If SQLSTATE Not = Zeroes
       Display "Open Cursor Error! SQLSTATE: ", SQLSTATE
       Exit Program
    End-If.
    Move 0 To Loop-Flag
    Perform Until Loop-Flag Not = 0
       EXEC SQL
                 FETCH CUR1 INTO :EmpID,
                                 :FName,
                                 :LName
       END-EXEC
       IF SQLSTATE = Zeroes
          Display EmpID, " ", FName, " ", LName
       Else
          Move 1 To Loop-Flag
          EXEC SQL CLOSE CUR1 END-EXEC
       End-IF
    End-Perform.
    EXEC SQL
               DISCONNECT DEFAULT
    END-EXEC.
    Exit Program.
Prior to running a NetCOBOL SQL application, you must set up the SQL database(s) and table(s), ensure that your security and authorization information is properly configured and available to you, and set up an ODBC DSN.
Once you have accomplished these tasks, you must make this information available to your NetCOBOL SQL application at run time. This is done in 2 separate steps:
Create a NetCOBOL specific information file (.inf file) which will contain required information.
Point the application at the appropriate .inf file by creating/adding it to a COBOL85.CBR file.
You create a .inf file using the NetCOBOL utility named “SQLODBCS.EXE”. This utility will help you specify the required parameters and write them out in the proper format. It also encrypts the Password value specified. You can view a .inf file in a text editor, but you cannot modify any password fields because the are encrypted. However, you may modify other fields in a text editor.
If you have not done so already, you may want to take advantage of the COBOL Project Manager’s configuration features and add the SQLODBCS.EXE utility into the Tools pull down menu. If you do not care to do this, you will have to manually find and execute this utility each time you wish to execute it.
Adding SQLODBCS.EXE to the Tools Menu
To add the SQLODBCS.EXE utility to the Tools pull down menu of the COBOL Project Manager, perform the following steps:
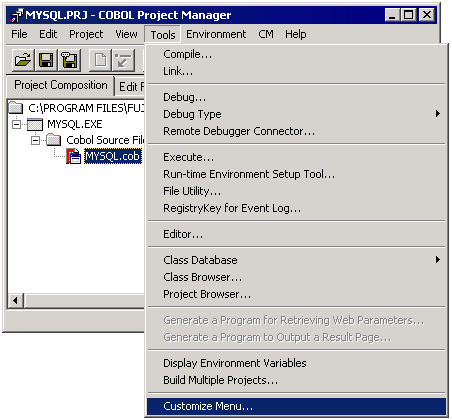
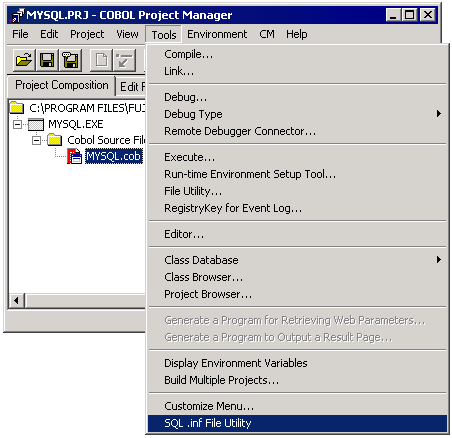
Bring up the COBOL Project Manager. Click on the Tools pull-down menu and select the Customize Menu option as shown in Figure.
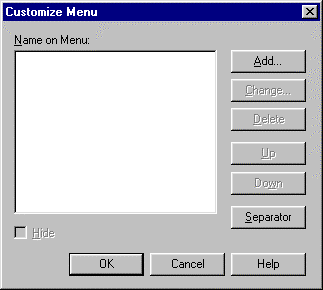
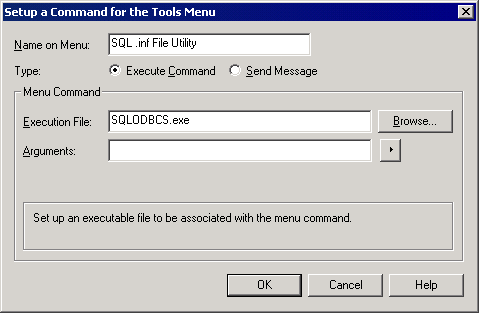
Click on the Add button to add a new menu item. Project Manager displays a dialog box that allows you to enter the name of the executable file to be associated with the new menu item. Fill in the fields as shown in Figure.
Click on the OK button.
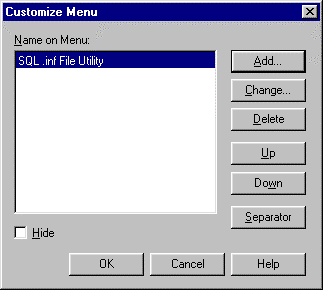
Project Manager returns you to the Customize menu dialog box displaying the information about the newly added item as shown in Figure.
Click on the OK button.
The SQLODBCS utility has now been added to the Tools pull-down menu of the COBOL Project Manager. When you click on the Tools pull-down menu it should appear as shown in Figure.
Creating a .INF File
To create a .inf file for a NetCOBOL SQL application:
Select the SQL .inf File Utility from the Tools menu (or find the SQLODBCS.EXE utility in the "C:\Program Files\Fujitsu NetCOBOL for Windows" folder and execute it).
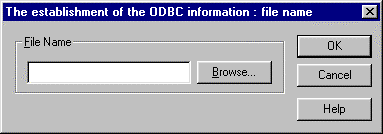
The utility displays a file name dialog box to allow you to specify the name of the .inf file you wish to create or modify as shown in Figure.
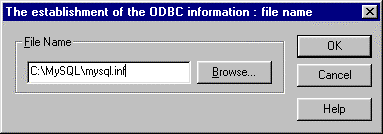
Note that it is important to fully specify the drive and path of the .inf file you wish to create or modify, to ensure it gets saved to the proper location. If you fail to do this, your new .inf file may be saved to a different directory than where you expect to find it later. For our example, we are going to create a .inf file named C:\MYSQL\MySQL.inf.
Enter the name of the .inf file you wish to create as shown in Figure.
Click on the OK button, respond Yes to the message asking you if you wish to create a new file, and OK to the message confirming that a file was created. The SQLODBCS utility window appears as shown in Figure.
In order to understand how to specify parameters for a .inf file in the SQLODBCS utility, you need to understand about connections to servers from a NetCOBOL application.
To establish a connection to an actual SQL database in a NetCOBOL program (as shown in the example COBOL program above), you must code an SQL CONNECT statement such as:
EXEC SQL
   CONNECT TO 'FRED'
END-EXEC.
In the above code example, the NetCOBOL program is attempting to connect to a server name “FRED”. This is a bit misleading as “FRED” is not the name of an actual SQL or 2000 Server. Instead, “FRED” is a symbolic name to be associated with an entry in a NetCOBOL .inf file.
Remember that when you created an ODBC Data Source in the ODBC Data Sources administrator, you specified the actual SQL Server to connect to. This connection is managed by ODBC and it does not make sense for a COBOL program to specify a physical server, as conflicts could arise with ODBC Data Sources.
The name “FRED” therefore simply refers to an entry in the .inf file, which will contain other parameters, including the name of the actual ODBC data source to use at runtime. Another reason for this level of abstraction from the physical server name is to allow you to set up multiple entries for the same physical server. You might have many different ODBC data sources defined for a variety of different databases and/or tables that exist on a single SQL Server. You would thus require a method to be able to specify these different ODBC data sources.
Another important point is the ability to connect to a default server. The code for this looks like:
EXEC SQL
   CONNECT TO DEFAULT
END-EXEC.
In the above case, “DEFAULT” is a special symbolic name. It allows you to abstract the name of the symbolic connection out of the program. You can specify a DEFAULT server entry in the SQLODBCS utility to point at any data source (of course you could also make ‘FRED’ your default entry and always connect to ‘FRED’ as well). You can thus think of “DEFAULT” as just another symbolic entry in the .inf file. Simply notice that “DEFAULT” does not require quotes around it like other symbolic names in an SQL CONNECT statement.
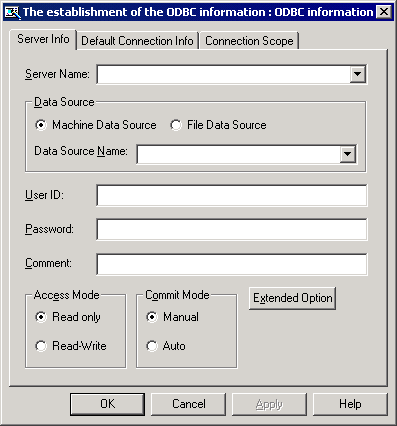
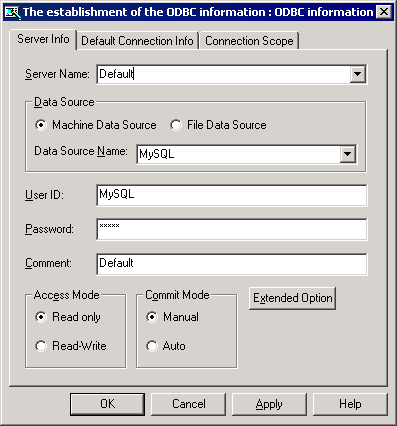
Now that you understand symbolic server names and how they are used in SQL CONNECT statements, take a look back at the SQLODBCS window as shown in Figure.
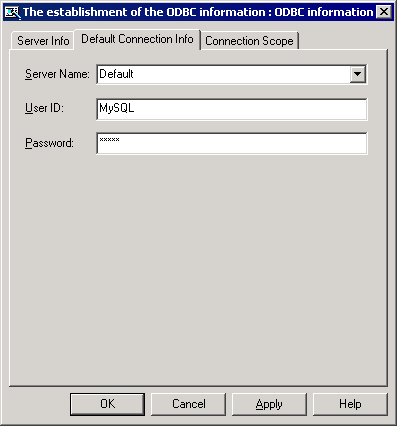
Notice that there are two areas for entering parameters. Near the bottom is an area entitled “Default Connection Information”. You must enter the name of a default server, a User ID and a Password. These three fields are required and will be used at runtime. You may remember that you specified a User ID and Password in the ODBC data source when you created it under the ODBC Data Sources Administrator. Note that NetCOBOL will ignore these, however, and will instead always use the User ID and Password you specify in the SQLODBCS utility (the User ID and Password stored in the .inf file you create). Note that the Password will be encrypted and not viewable.
You can override the User ID and Password from within the actual COBOL program in the CONNECT Statement. For example, if you code the following:
EXEC SQL
   CONNECT TO ‘FRED’
   USER ‘ID0001/PW01’
END-EXEC.
The value “ID0001” will be used as the User ID, and the value “PW01” will be used as the password when connecting to the actual database server, regardless of the User ID and Password currently specified in the .inf file.
If you code:
EXEC SQL
   CONNECT TO ‘FRED’
   USER ‘ID0001’
END-EXEC.
The value “ID0001” will be used for the User ID, but since you did not specify a Password, the Password currently specified in the .inf file will be used when connecting to the actual database server.
In neither case will the User ID or Password specified in the actual ODBC data source be used - NetCOBOL will always override this.
This means that you must specify a User ID and Password in the SQLODBCS utility for any .inf file you wish to create. If you leave these out, the SQLODBCS utility will refuse to create your .inf file. If you manually delete these entries in a .inf file, you will receive an error at runtime.
Our simple SQL COBOL application noted above connects to DEFAULT as shown in the code below.
EXEC SQL
   CONNECT TO DEFAULT
END-EXEC.
We now continue with the steps for creating the .inf file.
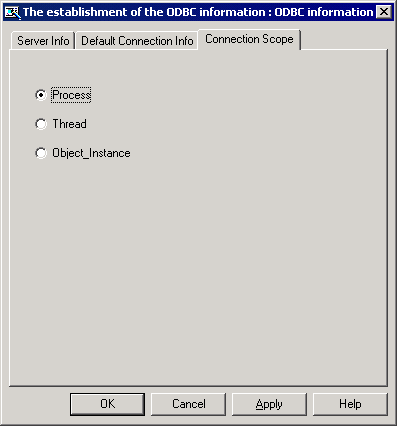
To create the appropriate .inf file, enter the parameters shown in Figures. If you are using multithreading or object oriented programs, see the SQLODBCS Help for the appropriate Connection Scope settings.
Click on the Apply button to create the .inf file and write it to disk.
The .inf file created by the above parameters will contain the following entries:
[SERVER LIST]
Default=Default
[Default]
@SQL_DATASRC=MySQL
@SQL_USERID=MySQL
@SQL_PASSWORD=BEINKAOHLEPJENBABBMM
@SQL_ACCESS_MODE=READ_ONLY
@SQL_COMMIT_MODE=MANUAL
@SQL_CONCURRENCY=READ_ONLY
@SQL_ODBC_CURSORS=USE_DRIVER
@SQL_QUERY_TIMEOUT=0
[SQL_DEFAULT_INF]
@SQL_SERVER=Default
@SQL_USERID=MySQL
@SQL_PASSWORD=BEINKAOHLEPJENBABBMM
[CONNECTION_SCOPE]
@SQL_CONNECTION_SCOPE=PROCESS
The Server List contains a line indicating that the server specified as the Default connection (for any program trying to connect to DEFAULT) will be the symbolic entry “Default” (Default=Default).
Following this is the entry information for the symbolic server name “Default”. Note that Entry headings are designated with square brackets around them. This entry contains the name of the ODBC data source to be used (@SQL_DATASRC=MySQL), the access mode to be used (@SQL_ACCESS_MODE=READ_ONLY), and the commit mode to be used (@SQL_COMMIT_MODE=MANUAL).
Following the entry for the symbolic server “Default” is an entry for the default information to be used (SQL_DEFAULT_INF). This contains the name of the default symbolic server and a User ID and Password to be used to access it. Note that the Password value has been encrypted.
Setting up the Runtime Environment Information
Once you have set up your SQL databases and tables, created the appropriate ODBC data source, and created the appropriate .inf file, you are ready to execute your application.
You must, however, ensure that you point the NetCOBOL runtime at the appropriate .inf file. By finding the .inf file, the NetCOBOL runtime will have all of the information needed to interface with ODBC at runtime to access the database tables your application references.
To point the runtime to the appropriate .inf file, you need to create a COBOL85.CBR file (or add a new entry for your application to an existing COBOL85.CBR file). You should create this file in the directory in which your main application executable (.exe) file resides.
It should include the following lines of code:
[MYSQL]
@ODBC_Inf=c:\mysql\mysql.inf
The entry “[MYSQL] designates the name of the main program. The line “@ODBC_Inf=c:\mysql\mysql.inf” tells the runtime which .inf file to use and where it is located. That’s all there is to it.
Instead of editing the COBOL85.CBR file using a text editor, you can use the Runtime Environment Setup Tool, available from COBOL Project Manager’s Tools menu. Keys to using this tool are that:
The file you want to edit/create is COBOL85.CBR.
The Section you want to edit/create is MySQL.
You can select @ODBC_Inf from the pull-down list.
You can use the browse (…) button to select the .inf file.
You MUST click Set to add this variable to the list.
You MUST click Apply to save the setting.