A. Brief Introduction to OO COBOL
The "NetCOBOL User's Guide" contains a full introduction to the Fujitsu OO COBOL implementation. The following comments are intended for those who only want the minimum of information before looking at an actual OO COBOL application. The comments assume a familiarity with OO concepts and terminology.
Fujitsu OO COBOL provides: class/object models, information hiding (data encapsulation, object properties), modularization (methods, including prototype methods), single and multiple inheritance, context-dependent functions (polymorphism), conformance checking, static and dynamic binding, garbage collection, and exception handling.
All these features are provided by very natural extensions to the COBOL language.
In OO COBOL:
Classes are made up of a Factory object and Class objects.
The Factory object contains data and methods required either for creating and maintaining objects, or for objects that only require one instance per class.
The Class objects contain the data and methods that define the entity that the class models.
Methods can have their own local data as well as procedure code.
Methods are invoked using the INVOKE statement.
Each of the main constructs "CLASS-ID", "FACTORY", "OBJECT" and "METHODID" are defined using appropriate combinations of the four standard COBOL divisions (IDENTIFICATION, ENVIRONMENT, DATA and PROCEDURE).
Class definitions are stored in REPOSITORIES.
Non-OO COBOL applications can invoke OO programs and OO code can call non-OO programs.
B. Guided Tour of an OO COBOL Application
This tour uses one of the OO COBOL samples, Sample18, to give you quick views of the support for OO COBOL within NetCOBOL. You will look at Sample18 in the Project Manager, in the source editor, in the Project Browser and in the Class Browser.
First we'll look at Sample18 within the COBOL Project Manager. Remember that Project Manager presents an application build structure along with access to most of the NetCOBOL development tools.
Start COBOL Project Manager (from the Windows task bar select Start, Programs, Net COBOL, COBOL Project Manager).
From the Project Manager menu bar select File, Open and navigate to the:
C:\Program Files\Fujitsu NetCOBOL for Windows\Samples\cobol\Sample18 folder.
Select and Open sample18.prj.
Expand the MAIN.EXE, Cobol Source File, ALLMEM.COB, BONU_MAN.COB, ADDRESS.COB, and MAIN.COB nodes by clicking on the plus, icons.
The sample18 project tree looks like this:

The tree is similar to those for standard COBOL applications. It shows that MAIN.EXE is built from several COBOL source files (ALLMEM.COB, BONU_MEM.COB, etc.) and uses .DLLs defined in COLLECT.LIB.
The tree is different from those for standard COBOL applications in that repositories have been added to the tree. These nodes show the repositories that are either created by a particular source file (target repositories) or that are referenced by the source file (dependent repositories).
Once you specify an application's source structure you can have Project Manager figure out the repository information by using the "Repository File Search" function on Project Manager's Edit menu.
The repository information helps identify the function of the different source files. For example:
MAIN.COB is a standard COBOL program that uses an OO class system for its functions. It therefore references several different classes.
ADDRESS.COB is a class definition, hence it has a target repository. It only inherits from the FJBASE root class so it does not have any dependent repositories.
ALLMEM.COB has a target repository and is therefore a class definition. It references an item in the ADDRESS class so has a dependent repository.
Now we'll take a quick look at some OO COBOL source.
Double-click on ALLMEM.COB.
Scroll past the initial (green) comments to the (blue and black) COBOL source.

Note
The CLASS-ID paragraph. This is actually part of the IDENTIFICATION DIVISION but the IDENTIFICATION DIVISION header is optional so you will often see a new code structure starting with its identifying paragraph (CLASS-ID, FACTORY, OBJECT, or METHOD-ID).
The INHERITS clause in the CLASS-ID paragraph indicating the class this class inherits from - in this case the system base class FJBASE.
The methods starting with METHOD-ID, ending with END METHOD, containing data and procedure code.
At the end of the source file, the END OBJECT and END CLASS, delimiters.
Although some new elements have been introduced, the general structure and layout should be familiar to COBOL programmers - particularly those who have experience with nested programs.
Close the editor and return to COBOL Project Manager.
When developing an OO COBOL application, people within a project group will likely want to review relationships between source and class elements, without having to release the classes to the whole development organization. The Project Browser tool has been provided for this purpose.
First indicate that a project information database should be created, by selecting Properties from the menu bar and confirming that "Create Project Database" is checked on the Properties dialog.
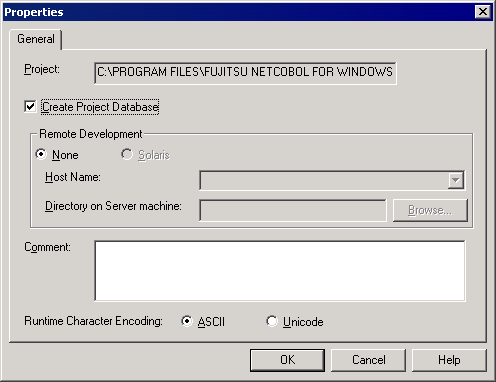
If it is not checked, click on the "Create Project Database" check box.
Build the project information database by right-clicking on SAMPLE18.PRJ in the project tree, and selecting Build from the pop-up menu.
Assuming that no other updates have been made to the project, Project Manager does no compiles or links, but just displays a "Terminating database file creation" message.
You can invoke the Project Browser by selecting, Tools, Project Browser from the Project Manager menu bar.
Project Manager invokes the Project Browser tool with the SAMPLE18 project already loaded:
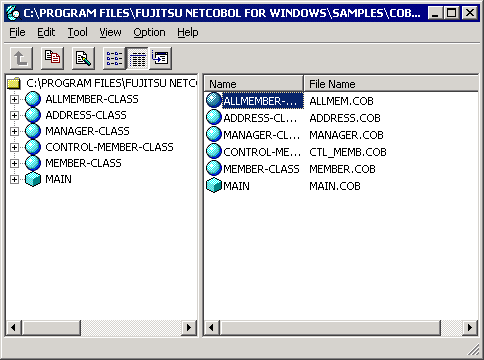
The left pane provides a tree view of the classes being used by the project.
The right pane provides details about the item selected in the left pane.
Expand one of the nodes in the left-hand pane, for example the ALLMEMBERCLASS.
The Project Browser expands the tree to show classes that inherit from this class, referenced classes, methods, properties and inherited methods. See the Project Browser Help for a description of the different icons. Sharp icons denote items defined within the selected class, faded icons denote items defined outside the class (generally these are inherited items).
Select different items in the left-hand pane and note the information that is presented in the right-hand pane, such as arguments required for methods and data descriptions of properties.
Notice that the Project Browser includes non-OO elements, like the MAIN program - an essential part of the project, but not part of the OO system.
Now we'll switch to the Class Browser for a slightly different view on this application.
Close the Project Browser and return to the COBOL Project Manager, where we will create a class information database.
A class information database combines information from several class repositories for display by the Class Browser.
From the Project Manager menu bar, select Tools, Class Database, Options.
Project Manager displays the dialog titled "Set the Class Database Generation Options". Its purpose is for you to list all the folders containing repositories that you wish to include in your class information database, and for you to specify the name and location for the class information database.
We will only specify the Sample18 folder for source repositories.
Click on the Add button in the "Repository folder" group box.
Project Manager displays the "Browse for Folder" dialog.
(Note - this dialog starts browsing at the desktop as it assumes that your repositories will often be located on a central server.)
Navigate to the:
C:\Program Files\Fujitsu NetCOBOL for Windows\Samples\cobol\Sample18 folder, select it, and click OK.
The sample18 folder is added to the list.
Click on the Browse button in the "Class database file" group box and navigate to the:
C:\Program Files\Fujitsu NetCOBOL for Windows\Samples\cobol\Sample18 folder. Then enter "samples" in the "File name" entry field of the Open window, and click on the Open button.
A class information database called "samples.cid" will be created in the sample18 folder - normally you would place this file in a central location accessible to all developers.
Click OK to close the "Set the Class Database Generation Options" dialog.
Create the class information database by selecting Tools, Class Database, Create from the Project Manager menu bar.
Project Manager creates the class information database and displays a message saying "Class database created successfully".
You can now invoke the Class Browser by selecting Tools, Class Browser from the Project Manager menu bar.
Project Manager invokes the Class Browser, displaying information from the Samples class information database.
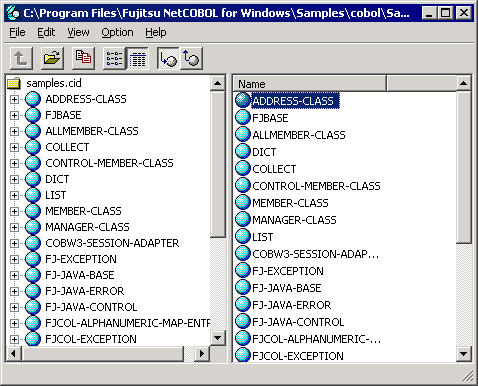
The Class Browser has a similar appearance to the Project Browser with the following differences:
Class Browser only displays OO class information.
Classes within class browser can come from many different projects and application areas.
Class Browser does not display source file name information.
You can select whether Class Browser should expand classes up or down the class hierarchy.
Experiment with browsing the Sample18 classes. Note how the Class Browser helps you understand the relationships between the classes and the interfaces available in each class.
For more information on OO COBOL consult chapters 14 - 17 in the "NetCOBOL User's Guide".