The COBOL Project Manager is an integrated development environment that provides project level management for developing COBOL applications. The Project Manager brings together:
A sophisticated, yet easy to use source code editor
A full ANSI 85 and ANSI 74 compliant 32 bit COBOL compiler
A 32 bit linker
A sophisticated COBOL source debugger
Execution facilities
Project management and Make facilities
Fujitsu’s File Management Utility
OO COBOL Class and Project browsers
We will use one of the COBOL samples to illustrate how to access the various functions of COBOL Project Manager.
A. Invoking COBOL Project Manager and Opening a Project
From the Windows Start menu select Programs, Fujitsu NetCOBOL V10, COBOL Project Manager.
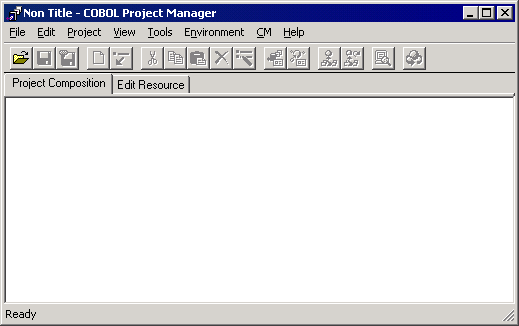
The COBOL Project Manager window is displayed.
Click on the Project Open button, on the toolbar and navigate to the folder:
C:\Program Files\Fujitsu NetCOBOL for Windows\Samples\cobol\Sample05 - assuming that you used the default folder names when you installed the products. Substitute your folder names if you overrode the defaults.
Select the file sample05.prj and click Open.
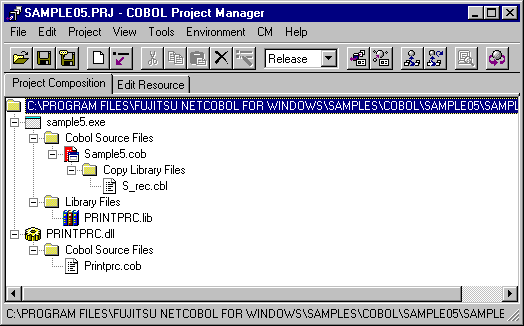
Project Manager opens the project and displays a contracted project tree:

Notice that you can immediately see that there are two parts to this project - an EXE file and a DLL file. You would be correct in deducing that the program within the EXE calls a program within the DLL!
Fully expand the project tree by selecting View, Expand All from the menu bar.
(Or you can repeatedly click on the plus symbols, , in the project tree but that takes longer!). The expanded tree looks like this:
Example
You quickly have an overview of how the application sources are structured: a main program, SAMPLE5.COB, calls a subprogram, PRINTPRC.COB, and they both share a common copy library, S_REC.CBL.
The chosen program structure uses a library file PRINTPRC.LIB.
The different types of file are clearly distinguished by different icons.
The icon for the main program, SAMPLE5.COB, stands out as it is colored red.
The project tree is made up of folders and items. Folders contain collections of associated items, and items are assembled from several collections. For example the project folder contains two items, SAMPLE5.EXE and PRINTPRC.DLL. The SAMPLE5.EXE item is made up of two collections: a collection of COBOL source files; and a collection of library files (because the application is a simple one, each collection only contains one item).
Right-click on various folders and items in the project tree.
Project Manager displays a pop-up menu with appropriate functions for the selected folder or item.
You build project trees by using the New Folder and New/Add File functions.
B. Editing Source Code
For example, one of the things you can do using the pop-up menu is edit the source code. Right-click on SAMPLE5.COB and select Edit from the pop-up menu.
SAMPLE5.COB demonstrates the use of free format coding, and doesn't have line numbers in columns 1-6. The editor therefore displays the dialog below:
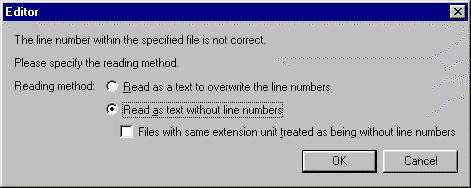
Make sure you select "Read as text without line numbers" and click OK.
The Editor displays the source code for SAMPLE5.COB.
Notice that readability of the code is aided by using different colors for comments, reserved words and user-defined words.

We will make a trivial change to the program so that you can see Project Manager's build function in action.
Make sure the status bar is visible by selecting View from the Editor menu bar.
If there is no check mark by "Status Bar" click on "Status Bar" and the status bar will be displayed at the bottom of the window.
Scroll down until you get to line 61 (the line number is displayed in the status bar). Line 61 contains the text:
DISPLAY "GENERATE WORK-FILE =" WORK-FILE-NAME
Insert a space after the "=" sign.
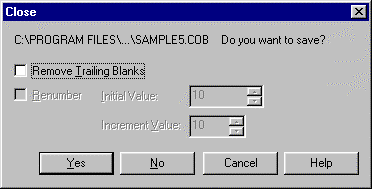
Close and save the file by selecting File, Exit Editor from the menu bar and responding "Yes" to the dialog asking if you want to save.
C. Building and Executing
Because the project structure is already in place building is straightforward.
Right-click on SAMPLE5.EXE in the project tree, and select Build from the popup menu.
Project Manager compiles the changed source program and builds the EXE. The build is actually guided by a make file that Project Manager maintains based on the project tree.
Any errors in the build are highlighted in red. The Builder tool has functions for navigating from one error to the next. If you have any errors, double click on the error line and the builder puts you into the Editor at the appropriate line. Fix each error and build the program again.
A successful build has no red error messages:

Close the Builder window.
Setting compiler and linker options: Had you wanted to change the compiler or linker options before building, you would have selected SAMPLE05.PRJ in the project tree view and, from the menu bar, selected Project, Option, Compiler (or Linker) Options. These functions display dialogs in which you can set the options. You are offered lists of all the compiler options and dialogs explaining the supported options, so you do not have to remember all those details.
Note
SAMPLE5 prints a single sheet of data to your default printer. If this is likely to cause a problem do not execute the steps 4, 5 and 6.
SAMPLE05 relies on a file that is created by SAMPLE02. With our apologies, changes to this guided tour mean the file is not necessarily available at this point. To be sure it is available, close the SAMPLE05 project, open SAMPLE02.PRJ (in the ..\Sample02 folder), Build SAMPLE02 and execute SAMPLE02 (select SAMPLE02.EXE in the project tree and select Project, Execute from the menu bar). Then close SAMPLE02.PRJ and reopen SAMPLE05.PRJ.
Now execute the program by selecting SAMPLE5.EXE in the project tree and selecting Project, Execute from the menu bar.
Project Manager starts the program executing. SAMPLE5 executes displaying the message you edited - check that there is a space after the "=" sign.
Click OK in the message box. SAMPLE5 continues to run, printing a single sheet of data to your default printer.
We will have a closer look at the program in the debugging section.
D. Maintaining Data Files
NetCOBOL provides the COBOL File Utility for maintaining COBOL data files.
From the Tools menu, select File Utility.
Project Manager invokes the COBOL File Utility.
Click on the Commands menu of the COBOL File Utility to see the range of functions provided. You can select each of these functions in turn to see exactly what they provide. The following list summarizes the functions ("COBOL files" means sequential, relative or indexed files in fixed or variable length format):
Convert: Converts text files to variable length sequential files or variable length sequential files to text files.
Load: Loads COBOL files from variable length sequential files.
Unload: Creates variable length sequential files from COBOL files.
Browse: Provides hex and character display of data in COBOL and text files.
Print: Prints data from COBOL and text files.
Edit: Provides hex and character editing of data in COBOL and text files.
Extend: Provides hex and character input of data to extend (add to) COBOL and text files.
Sort: Sorts data in COBOL and text files.
Attribute: Displays statistics on indexed files.
Recovery: Recovers data from corrupted indexed files.
Reorganize: Reorganizes indexed files by deleting blocks of unused data.
Copy: Copies files.
Delete: Deletes files.
Move: Moves files.
Although some of the functionality of the COBOL File Utility is provided in a basic fashion you can see that most file maintenance needs are covered by the above functions.
Purchasers of the Enterprise Edition of NetCOBOL also have the Data Converter and Data Editor tools. These provide more sophisticated, COBOL-record-descriptionaware data conversion and editing functions. These tools are provided on the Start Programs menu (NetCOBOL group) or can be added to Project Manager using the Tools, Customize Menu function. Dataedit.exe and Dataconv.exe are stored in the "C:\Program Files\Fujitsu NetCOBOL for Windows\DataTool" folder.