Start RMS Configuration Wizard
Start the RMS Configuration Wizard and configure userApplication.
The configuration name that is specified for the hvw command should be the same as that is specified at "2.5.2 userApplication creation".
Edit userApplication
The RMS Configuration Wizard is displayed. Select Application-Edit
node1: Main configuration menu, current configuration: nas_config
No RMS active in the cluster
 1) HELP                              10) Configuration-Remove
 2) QUIT                              11) Configuration-Freeze
 3) Application-Create                12) Configuration-Thaw
 4) Application-Edit                  13) Configuration-Edit-Global-Settings
 5) Application-Remove                14) Configuration-Consistency-Report
 6) Application-Clone                 15) Configuration-ScriptExecution
 7) Configuration-Generate            16) RMS-CreateMachine
 8) Configuration-Activate            17) RMS-RemoveMachine
 9) Configuration-Copy
Choose an action: 4
Select userApplication (displayed in capital letters) from a list of userApplication.
Edit: Application selection menu (restricted):
1) HELP
2) QUIT
3) RETURN
4) OPTIONS
5) APP1
Application Name: 5
Select CommandLines in the NAS turnkey wizard.
Settings of turnkey wizard "NAS"
 1) HELP                              12) Crm:SystemState2(-)
 2) -                                 13) LocalFileSystems(-)
 3) SAVE+EXIT                         14) RemoteFileSystems(Rfs_APP1)
 4) -                                 15) IpAddresses(-)
 5) ApplicationName=APP1              16) RawDisks(-)
 6) Machines+Basics(app1)             17) RC-VolumeManagement(-)
 7) CommandLines(-)                   18) VERITAS-VolumeManagement(-)
 8) Controllers(-)                    19) Netapp(Netapp_APP1)
 9) Crm:Application(-)                20) Eternusdx(-)
10) Crm:BasicApplication(-)           21) Gds:Global-Disk-Services(-)
11) Crm:SystemState3(-)               22) Gls:Global-Link-Services(-)
Choose the setting to process: 7
Select AdditionalStartCommand in the CommandLines wizard. Then, select FREECHOICE and specify the Online script that is created at "2.7.1 Creation of Online/Offline script".
CommandLines (Cmd_APP1:not yet consistent)
1) HELP
2) -
3) SAVE+EXIT
4) REMOVE+EXIT
5) AdditionalStartCommand
6) (ReturnCodes)
Choose the setting to process: 5
1) HELP
2) RETURN
3) FREECHOICE
Set a start command: 3
        >> /nas/start.sh
You return to the CommandLines wizard. Select StopCommands[0]. Then, select FREECHOICE and specify the Offline script that is created at "2.7.1 Creation of Online/Offline script".
CommandLines (Cmd_APP1:consistent)
 1) HELP
 2) -
 3) SAVE+EXIT
 4) REMOVE+EXIT
 5) AdditionalStartCommand
 6) StartCommands[0]='/nas/start.sh'
 7) StopCommands[0]=none
 8) CheckCommands[0]=none
 9) CheckCommandTimeouts[0]=none
10) Flags[0]=DT300
11) (ReturnCodes)
Choose the setting to process: 7
1) HELP
2) RETURN
3) FREECHOICE
Set a start command: 3
        >> /nas/stop.sh
You return to the Commandlines wizard. If you have more user applications you want to use, add it using AdditionalStartCommand. When it is completed, select SAVE+EXIT.
CommandLines (Cmd_APP1:consistent)
 1) HELP
 2) -
 3) SAVE+EXIT
 4) REMOVE+EXIT
 5) AdditionalStartCommand
 6) StartCommands[0]='/nas/start.sh'
 7) StopCommands[0]='/nas/stop.sh'
 8) CheckCommands[0]=none
 9) CheckCommandTimeouts[0]=none
10) Flags[0]=DT300
11) (ReturnCodes)
Choose the setting to process: 3
You return to the NAS turnkey wizard. Create or edit other userApplication resources if necessary. When it is completed, select SAVE+EXIT.
Settings of turnkey wizard "NAS"
 1) HELP                              12) Crm:SystemState2(-)
 2) -                                 13) LocalFileSystems(-)
 3) SAVE+EXIT                         14) RemoteFileSystems(Rfs_APP1)
 4) -                                 15) IpAddresses(-)
 5) ApplicationName=APP1              16) RawDisks(-)
 6) Machines+Basics(app1)             17) RC-VolumeManagement(-)
 7) CommandLines(Cmd_APP1)            18) VERITAS-VolumeManagement(-)
 8) Controllers(-)                    19) Netapp(Netapp_APP1)
 9) Crm:Application(-)                20) Eternusdx(-)
10) Crm:BasicApplication(-)           21) Gds:Global-Disk-Services(-)
11) Crm:SystemState3(-)               22) Gls:Global-Link-Services(-)
Choose the setting to process: 3
You return to a list of userApplication. If you want to configure other userApplication, select that userApplication. If it is completed, select RETURN.
Edit: Application selection menu (restricted):
1) HELP
2) QUIT
3) RETURN
4) OPTIONS
5) APP1
Application Name: 3
You return to the RMS Configuration Wizard. Select Configuration-Generate, and then Configuration-Activate, and enables the configuration. When it is done, select QUIT.
node1: Main configuration menu, current configuration: nas_config
No RMS active in the cluster
 1) HELP                              10) Configuration-Remove
 2) QUIT                              11) Configuration-Freeze
 3) Application-Create                12) Configuration-Thaw
 4) Application-Edit                  13) Configuration-Edit-Global-Settings
 5) Application-Remove                14) Configuration-Consistency-Report
 6) Application-Clone                 15) Configuration-ScriptExecution
 7) Configuration-Generate            16) RMS-CreateMachine
 8) Configuration-Activate            17) RMS-RemoveMachine
 9) Configuration-Copy
Choose an action: 2
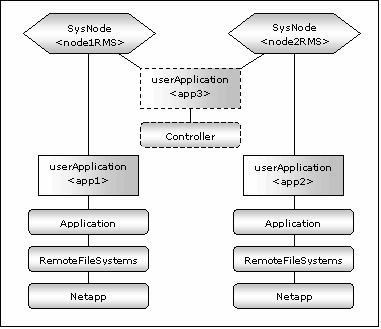
Scalable operation
userApplication is configured as follows:
Standby operation
userApplication is configured as follows:
