This section describes how to change the printing monitoring mode/E-mail control mode set during the installation of client (CT) and how to change the size of log file temporarily saved in the client (CT).
The change method includes execution in the Management Server and execution in the client (CT).
Change Method | Items that can be modified | Version of Client (CT) that can be modified | |
|---|---|---|---|
Change in Management Server | Use the Information File of CT operating parameter |
| V14.2.0 or later |
| |||
| V14.2.0 or later | ||
| V14.2.0 or later | ||
Change in Terminal Operation Settings window |
| All versions | |
Change in Client (CT) | Change in Add or Remove Programs |
| All versions |
* The change of printing monitoring mode through the information file of the CT operating parameter is used to temporarily change the settings of the client (CT). When the information file of CT parameter is deleted or moved to another saving location after the configuration value has been modified, it will be performed with the configuration value in the Terminal Operation Settings window through the next policy notification.
Use information file of CT operating parameter
Note
Windows(R) 8 Fast Startup feature
Assume that you are using Windows(R) 8, the Fast Startup feature is enabled, and you shut down before you have logged on. In this case, the transfer target information file and CT operation parameter information file update operations, the CT policy request operation, and the self version upgrade check that are normally performed when a PC starts may not work. To ensure that these operations are performed properly, restart the operating system instead of shutting down.
Set the modified value in information file of the CT operating parameter and save it to the Management Server. The file information will be notified to the client (CT) as CT policy. The modified content will be reflected to the client (CT) according to Timing of reflecting set value,.
Create the information file (DTKCTSetting.txt) of CT operating parameter, and save it to the Management Server.
For details on information file of CT operating parameter, refer to "Information File of CT Operating Parameter" of Systemwalker Desktop Keeper Reference Manual.
Location for Saving
Under Windows Server(R) 2008 or Windows Server(R) 2012 environment
C:\ProgramData\Fujitsu\Systemwalker Desktop Keeper
When the client (CT) is started or immediate update is performed through the Management Console, the settings contents will be notified to client (CT) as CT policy.
The result of notification will be output to the following location as the information file of CT operating parameter or result log (DTKCTSetting.log).
Under Windows Server(R) 2008 or Windows Server(R) 2012 environment
C:\ProgramData\Fujitsu\Systemwalker Desktop Keeper
After CT policy notification, the settings will be reflected to the client (CT). The timing of reflection depends on the setting items.
Setting Item | Timing of Reflecting the Set Value |
|---|---|
IP Address of Backup Management Server | It will be reflected after OS is restarted. |
Size of Result log file | It will be reflected immediately. |
Size of Prohibition Log File | It will be reflected immediately. |
Size of Error Log File | It will be reflected when the date is modified and new error log file is created. |
Number of Days to Save Error Logs | It will be reflected when the date is modified and new error log file is created. |
Size of Trace Log File | It will be reflected immediately. |
Printing Monitoring Mode | It will be reflected immediately. |
Port Number for E-mail Sending Monitoring | It will be reflected after OS is restarted. |
Monitoring Mode of E-mail Attachment Prohibition | It will be reflected after OS is restarted. |
Port Number for Communication of E-mail Attachment Prohibition | It will be reflected after OS is restarted. |
Port Number 2 for Communication of E-mail Attachment Prohibition | It will be reflected after OS is restarted. |
Run Immediately after Logon | It will be reflected after OS is restarted. |
Message for Confirming the Recipient Address during E-mail Sending | It will be reflected after OS is restarted. |
Use of Dial-up Connection | It will be reflected immediately. |
Compatibility Record of Network Drive | It will be reflected immediately. |
Confirm the configuration value that is modified.
In each client (CT) with modified settings, the setting information of FSW11EJ7.EXE (system maintenance) command will be displayed and the output contents will be confirmed. For details, refer to "Display Setting Information" of Systemwalker Desktop Keeper Reference Manual.
Delete the information file of the CT operating parameter or move it to another saving location.
(When this file exists in the saving location, the operating environment of the client (CT) will be changed again.)
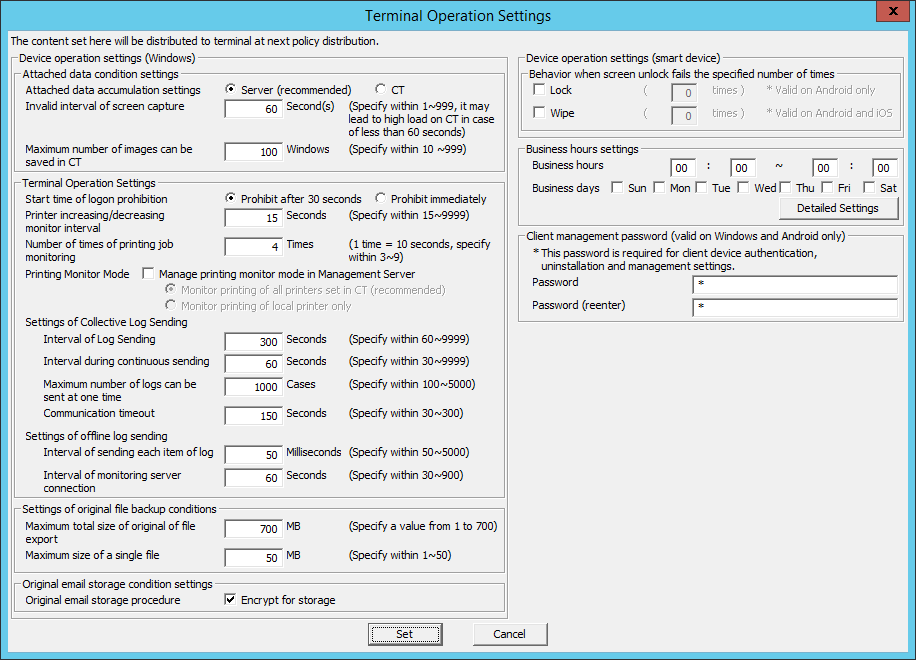
Change in the Terminal Operation Settings window
Refer to 2.4.2 Perform Terminal Operation Settings for operation procedure and setting items.
The modified information notified to the client (CT) will be reflected immediately.
When the Printing Monitoring Mode is also set in the information file of CT operating parameter, the configuration value of the information file of the CT operating parameter will be reflected.
Change in Add or Remove Programs
Logon to the PC with a user that belongs to the Administrators group of local computer or a user that belongs to the Domain Admins group.
Select Add or Remove Programs of Control Panel.
Select Systemwalker Desktop Keeper Client, and click the Change button.
The installation window of CT is displayed.
Change the configuration value in the Set printing monitoring mode window.
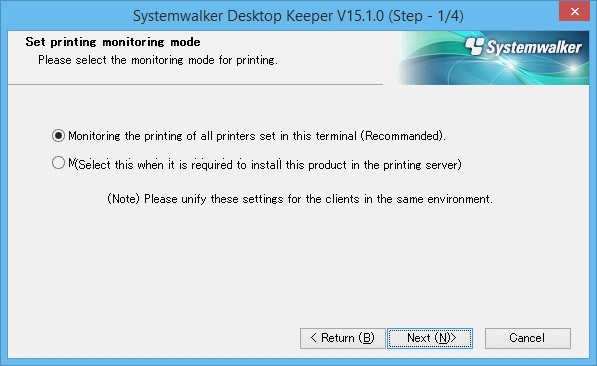
For details on the configuration value, refer to "Installation in Wizard Style" of Systemwalker Desktop Keeper Installation Guide.
Logon to the PC with a user that belongs to the Administrators group of local computer or a user that belongs to the Domain Admins group.
Select Add or Remove Programs of Control Panel.
Select Systemwalker Desktop Keeper Client, and click the Change button.
The installation window of CT is displayed.
Change the configuration value of Set E-mail Control Mode.
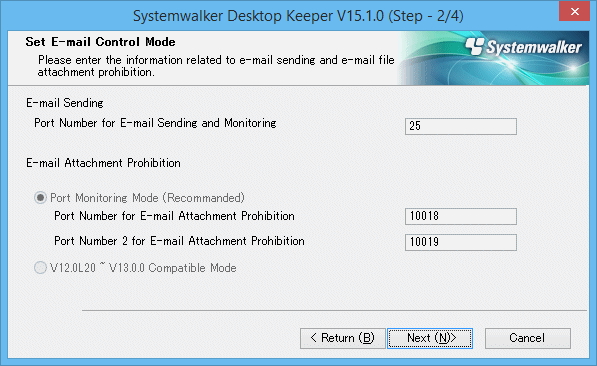
For details on the configuration value, refer to "Installation in Wizard Style" of Systemwalker Desktop Keeper Installation Guide.