This section describes how to import configuration information of Systemwalker Desktop Patrol and create configuration information tree of Systemwalker Desktop Keeper.
When linking with Systemwalker Desktop Patrol, refer to the configuration information managed in Systemwalker Desktop Patrol. Import information from Systemwalker Desktop Patrol first, and update the inherent information of Systemwalker Desktop Keeper to the tree for management.
After the environment of Systemwalker Desktop Patrol has been built completely, install Systemwalker Desktop Keeper, and import configuration information from Systemwalker Desktop Patrol after CT has been installed.
Automatically Import Configuration Information of Systemwalker Desktop Patrol
When Link with Other systems of the Server Settings Tool has been set, the configuration information of Systemwalker Desktop Patrol will be imported automatically.
For how to do so, refer to "Set the Link with Other Systems" of Systemwalker Desktop Keeper Installation Guide.
Use Server Settings Tool
The following describes the procedure of import using the Server Settings Tool.
Select Execute Systemwalker Desktop Patrol Linkage in Settings menu.
The confirmation window for executing the link is displayed.
[STSY-SEL017] Execute Systemwalker Desktop Patrol configuration information import command.
Get configuration information from Systemwalker Desktop Patrol, and update the database.
The processing will take some time. Start to link?

                            [Yes]          [No]
To execute the link with Systemwalker Desktop Patrol, click the Yes button.
The information indicating data is being imported from Systemwalker Desktop Patrol is displayed.
After the data import has completed, the completion message will be displayed.
Click the OK button.
Use Systemwalker Desktop Patrol Configuration Information Import Command
This section describes how to import configuration information using the Systemwalker Desktop Patrol configuration information import command.
When importing configuration information for the first time, create a new group and import all configuration information.
When importing for the second time and later, import the information that is different from the last time.
During the execution of the Systemwalker Desktop Patrol configuration information import command, do not operate in the Management Console and Log Viewer.
The start and end information of configuration information import will be output to event logs.
When importing configuration information for the first time, the following methods can be selected:
Import through executing the command manually as the administrator.
Register the command in the task scheduler and execute it when there is no user of the Management Console and Log Viewer.
When importing configuration information for the second time and later, the following methods can be selected:
Import information only when system configuration changes.
Register the command in task scheduler and update it regularly.
Prepare the configuration information file (CSV file) that records import information in Systemwalker Desktop Patrol.
CT group information and CT location information are recorded in the configuration information file.
For how to output configuration information, refer to the manual of Systemwalker Desktop Patrol.
Do not edit the created configuration information file.
Copy the configuration information file created in Systemwalker Desktop Patrol to Management Server of Systemwalker Desktop Keeper.
In a 3-level system structure, when the managed the client (CT) exists under the Master Management Server, the configuration information file should be copied to the Master Management Server as well.
[Execution Location of Command]
Execute the command on the server that has copied the configuration information file.
However, as for the order of execution, in a 3-level system structure, when copying configuration information file to Master Management Server, execute the command on the Master Management Server again after executing it on Master Management Server.
[When executing the command manually]
Logon to the server on which the command is executed with the user name that belongs to the Administrator or Domain Admins group of the local PC.
Confirm the following are not in operation:
Backup tool
Backup command
Restoration tool
Command of Active Directory Linkage
Start the command prompt.
Execute the Systemwalker Desktop Patrol configuration information import command.
It is not necessary to pay attention to the directory during command execution.
When viewing all execution result information of command, specify result log file in command option.
For examples of executing the Systemwalker Desktop Keeper configuration information import command, refer to "DTKIMPDP.EXE (Import Systemwalker Desktop Patrol Configuration Information)" in Systemwalker Desktop Patrol Reference Manual.
Confirm the execution result in the window.
In addition, confirm again after obtaining the value of environment variable %ERRORLEVEL%.
The value of %ERRORLEVEL% is the return value of Systemwalker Desktop Patrol configuration information import command. For the value and its definition, refer to "DTKIMPDP.EXE (Import Systemwalker Desktop Patrol Configuration Information)" in Systemwalker Desktop Keeper Reference Manual.
When executing after the command is registered in task scheduler.
Logon to the server on which the command is executed with the user name that belongs to the Administrator or Domain Admins group of the local PC.
Start the task scheduler and register the following content.
[Systemwalker Desktop Patrol configuration information import command]
Specify the result log file in command option.
In the case of a 3-level Management Server, set retry times in command option (also for confirming data consistency with the Master Management Server).
The waiting time for each retry is 60 seconds. The number of retry times is specified to 10 (with a maximum waiting time of 10 min).
For details on how to specify the option, refer to "Systemwalker Desktop Patrol Configuration Information Import Command" in Systemwalker Desktop Keeper Reference Manual.
[Timing (date, time frame, etc.) for command execution]
Specify the time frame in which backup tool, restoration tool and backup command are not started.
In addition, specify the time frame in which there are fewer users of the Management Console and Log Viewer.
Confirm the job execution result displayed in task scheduler.
After the command execution has finished, view result log file and confirm the command has ended normally (operation log will be added).
[Status after command execution]
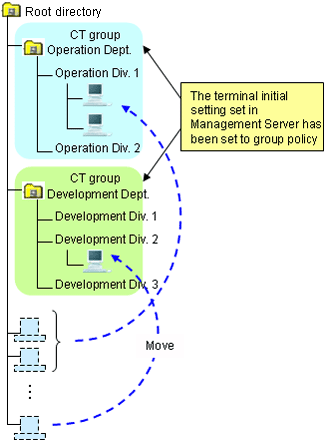
When a group is created
After creating a group under the Root directory, the value of terminal initial settings will be set as the user policy.
After creating a group in an existing group, group policy of the parent group will be set.
When a group is updated
Even if the update of group name and moving of group level location exist, the registration information of group policy and department administrator will still be inherited.
When a group is deleted
The information of group policy and department administrator of deleted group will be deleted at the same time.
When the group and the client (CT) created in Systemwalker Desktop Keeper after the import of configuration information exist under the deleted group, this content will be moved to the Root directory.
When no client (CT) exists under the group
Only the group is displayed. Select Do not display empty group from the Tool Settings menu of the Management Console if it is not needed.
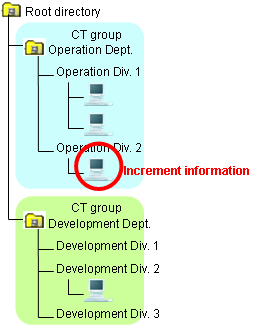
About moving of CT
After importing configuration information, the CT will move according to configuration information file.
The CT will not move if there is no data in configuration information (displayed under the Root directory always).
If the CTs of Systemwalker Desktop Patrol and Systemwalker Desktop Keeper installed in the PC are 13.0.0 or later, the clients (CTs) can be moved according to configuration information file.
Create, rename, move and delete a group in the Management Console according to the management information in Systemwalker Desktop Keeper.
The system administrator and department administrators can update, move and delete a user name, set group policy and department administrator (only system administrator is allowed) for the imported group. For the allocation of the department administrator, refer to "2.6 Allocate Department Administrator".
The updating, moving and deleting of group name performed in the Management Console of Systemwalker Desktop Keeper will be invalid after next import of configuration information and will be corrected in the re-imported configuration information.
Registration information of group policy and department administrator will be inherited after it is imported again.
When deleting a group, the correspondent group will be imported again through the next import of configuration information, but since the information of group policy and department administrator has been deleted, the group must be reset.
In addition, system administrator and department administrator can create a new group, update and delete a group in the imported group.
When there is no upper level group at next import of configuration information, the group created in the imported group will be moved to the Root directory.
The same operation as group can be conducted to the client (CT).
When continuing when continuing to import configuration information by linking with Systemwalker Desktop Patrol after the second time and the folders of Systemwalker Desktop Patrol and Systemwalker Desktop Keeper are used at the same time, perform the following operations.
For the group used in Systemwalker Desktop Keeper only, no need to perform the following operations.
Update the change information of the Management Console to Systemwalker Desktop Patrol
Because the updating, moving and deleting of group name performed in Management Console will be invalid after the next import of configuration information, changes performed in "4. Modify configuration information tree as needed" will be updated to Systemwalker Desktop Patrol manually.
Delete the group created in the Management Console of Systemwalker Desktop Keeper. For details on how to delete, refer to "Delete".
Output configuration information in Systemwalker Desktop Patrol and import Systemwalker Desktop Keeper.
To use the configuration information file with changes in Systemwalker Desktop Keeper updated, repeat the steps from "1. Output configuration information in Systemwalker Desktop Patrol" to "4. Modify configuration information tree as needed" before using it.
Information
This is the file required for creating user group tree when importing information from Systemwalker Desktop Patrol.
The correspondent information of PC (computer name) and user name is specified in this file
For details how to create correspondent files of Systemwalker Desktop Keeper configuration information import, refer to "Correspondent Files of Systemwalker Desktop Keeper Configuration Information Import" in Systemwalker Desktop Keeper Reference Manual.
The relationship between files in use and the server that saves the files is as follows:
In a 2-level system structure
Save the correspondent files and configuration information files on Management Server.
In a 3-level system structure
When managing user information collectively
Correspondent file: It is saved in the Master Management Server (this is for importing user information on Master Management Server).
Configuration information file: it is saved in the Master Management Server and Management Server (even if there is no the client (CT) under the Master Management Server, it should still be saved in the Master Management Server).
When managing user information on each the Management Server
Correspondent file: it is saved in the Management Server (this is for importing user information on each Management Server).
Configuration information file: it is saved in Management Server. However, the client (CT) exists under the Master Management Server, so it should still be saved in the Master Management Server.
Add /U and /F options before executing the Systemwalker Desktop Patrol configuration information import command. For details, refer to "DTKIMPDP.EXE (Systemwalker Desktop Patrol Configuration Information Import)" in Systemwalker Desktop Keeper Reference Manual.
This is the file required for updating the information of a discarded PC in Systemwalker Desktop Patrol to configuration information tree when importing information from Systemwalker Desktop Patrol.
For details on how to create information file of discarded folder, refer to "Information File of Discarded Folder" in Systemwalker Desktop Keeper Reference Manual.
The following tasks must be completed before executing the Systemwalker Desktop Patrol configuration information import command.
Create a group for deleted CT
In order to display the PC deleted in Systemwalker Desktop Patrol in groups in the configuration information tree of Systemwalker Desktop Keeper, a special group for deleted PCs must be created in the configuration information tree of Systemwalker Desktop Keeper.
The group name must be unique.
After specifying a name for the created group in the option of Systemwalker Desktop Patrol configuration information import command, the deleted PC will be displayed in the group of configuration information tree of Systemwalker Desktop Keeper.
Create information file of discarded folder
During differential import of the discarded PC information in Systemwalker Desktop Patrol, the file will be created when it is displayed in configuration information tree of Systemwalker Desktop Keeper.
Set the discarded PC and the group to which it belongs in Systemwalker Desktop Patrol.
For details how to create information file of discarded folder, refer to "Information File of Discarded Folder" in Systemwalker Desktop Keeper Reference Manual.
Information File of Discarded Folder is saved in the Management Server. However, it should also be saved in the Master Management Server if the managed the client (CT) exists under the Master Management Server.
Add the /E option before executing the Systemwalker Desktop Patrol configuration information import command. For details, refer to "DTKIMPDP.EXE (Systemwalker Desktop Patrol Configuration information Import)" in Systemwalker Desktop Keeper Reference Manual.
Install the CT of Systemwalker Desktop Keeper.
When the Management Server communicates with the client (CT), the client (CT) will be displayed under the Root directory.
At this time, the value of terminal initial settings will be set as CT policy in the client (CT).

Execute the Systemwalker Desktop Patrol configuration information import command (for the first time).
The client (CT) is allocated to the tree.
Execute the Systemwalker Desktop Patrol configuration information import command (for the second time and later).
Only the differential information is imported.
Use [Link with Other Systems] of Management Console
This section describes how to import configuration information through the menu of the Management Console.
Note
The method of importing configuration information by using [Link with Other Systems] will be limited.
When importing new configuration information, [Link with Other Systems] of the Management Server can be used for the first import only.
After creating configuration information by using [Link with Other Systems] of the Management Console, the configuration information imported through [Link with Other Systems] will be reserved and the configuration information will be imported again and the group will be created when the Systemwalker Desktop Patrol configuration information import command is used.
This will cause repeated information and difficulties in management; therefore, do not use them in combination.
After importing configuration information by using [Link with Other Systems] of the Management Console for the second time and later, all the original management information (group information, policy, department administrator, etc.) imported through [Link with Other Systems] will be deleted and re-built in the information of Systemwalker Desktop Patrol.
Therefore, group policy and department administrator must be reset after import.
In the case of a 3-level system structure, import configuration information by connecting the Management Console of the Master Management Server. At this time, the Master Management Server and lower level servers will have the same group structure.
When importing configuration information, the client (CT) that satisfies any of the following conditions will be displayed under the Root directory. Other clients (CTs) will be displayed under each group according to configuration information.
The CT version of Systemwalker Desktop Keeper is V12.
Systemwalker Desktop Patrol is not installed in the client (CT).
After importing configuration information, the value of terminal initial settings will be set as group policy. In the case of a 3-level system structure, set the value of terminal initial settings of the Management Server in CT group policy under each Management Server.
In order to match the imported CT group information and CT information, information must be displayed in [DTPID] of the PC as import target in CT list on the Management Console window of Systemwalker Desktop Keeper. (Install Systemwalker Desktop Keeper and Systemwalker Desktop Patrol in the target PC and the information will be imported to [DTPID] after next startup of Windows.)
When there is no information displayed in [DTPID] of the PC as import target, CT group information will not be imported during the import of configuration information of Systemwalker Desktop Patrol. The client (CT) will be registered to the Root directory.
CT group that does not have 1 client (CT) registered will not be imported.
The client (CT) that belong to the "deleted CT" group will not become the link target.
If the group name in Systemwalker Desktop Patrol contains over 40 single-byte (20 fullwidth) characters, the first 40 single-byte (20 fullwidth) characters will be made as the group name to import to Systemwalker Desktop Keeper.
The following describes procedure of import.
Output configuration information in Systemwalker Desktop Patrol.
For the method of output, refer to the manual of Systemwalker Desktop Patrol.
Do not edit the created configuration information file.
Start the Management Console window.
Select Link with Systemwalker Desktop Patrol > Import Configuration Information from the Link with Other Systems menu.
The Specify a File for Importing Configuration Information window is displayed.
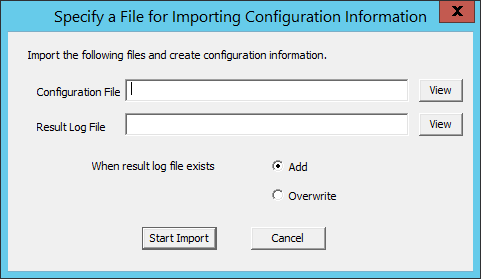
Click the Start Import button after entering the following information.
Item Name | Description |
|---|---|
Composition File | Specify the imported file using the following method.
The maximum length of full path that can be entered is 218 halfwidth (109 fullwidth) characters. However, the following symbols are not allowed in a file name: |
Result Log File | Specify the file for outputting import operation result. As the extension will not be added automatically, specify an extension that can be determined easily, such as "KEKKA.TXT" through the following method.
The maximum length of full path that can be entered is 218 halfwidth (109 fullwidth) characters. However, the following symbols are not allowed in a file name: |
When result log file exists | Select the processing when result log file exists in the specified location in Result Log File.
|
[Output Conditions]
Configuration information of Systemwalker Desktop Keeper can be output to configuration information file if it satisfies all the following conditions:
When the client (CT) version of Systemwalker Desktop Keeper is V13.0.0 or later
When there is information in DTPID in the CT list of Management Console
The client (CT) that belongs to the "deleted CT" group will not become a link target.
The following describes the procedure of outputting information.
Start the Management Console window.
Select Link with Systemwalker Desktop Patrol > Export Configuration Information from the Link with Other Systems menu.
The Specify a File for Exporting Configuration Information window is displayed.
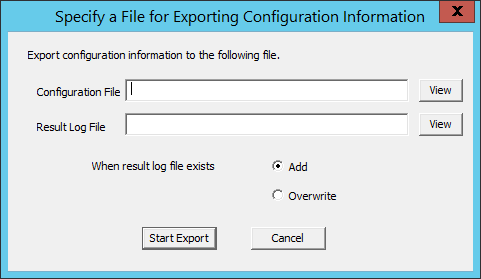
Click the Start Output button after entering the following information.
Item Name | Description |
|---|---|
Configuration File | Specify the target for saving the file for outputting configuration information.
The maximum length of full path that can be entered is 218 halfwidth (109 fullwidth) characters. However, the following symbols cannot be contained in a file name. |
Result Log File | Specify the file for outputting import operation result. As the extension will not be added automatically, specify an extension that can be determined easily such as "KEKKA.LOG", through the following method.
The maximum length of full path that can be entered is 218 halfwidth (109 fullwidth) characters. However, the following symbols are not allowed in a file name: |
When result log file exists | Select the processing when result log file exists in the specified location in Result Log File.
|
Import configuration information in Systemwalker Desktop Patrol.
For the method of import, refer to the manual of Systemwalker Desktop Patrol.