This section describes how to create an instance using WebAdmin.
If WebAdmin is not set up when the installation is performed, refer to "E.1 Setting Up WebAdmin" and then set up WebAdmin.
Use Windows(R) Internet Explorer 8.0, 9.0, 10.0, or 11.0 as the browser, and allow cookies and pop-up requests from the server on which Symfoware Server is installed.
Refer to "Appendix D Recommended WebAdmin Environments" for information on how to change the pop-up request settings and other recommended settings.
Note
WebAdmin does not run in Windows(R) safe mode.
If the same instance is operated from multiple WebAdmin windows, it will not work correctly.
The browser [Back] button will not work correctly. If you need to navigate to a previous page, close the browser and then log in again.
If the browser was not operated for a fixed period (about 15 minutes), the login window will be displayed again for the next operation. However, this will not happen if the [Monitor] window was displayed.
Port access permissions
If a port is blocked (access permissions have not been granted) by a firewall, enable use of the port by granting access. Refer to the vendor document for information on how to grant port access permissions.
Consider the security risks carefully when opening ports.
This section describes how to log in to WebAdmin.
Activation URL for WebAdmin
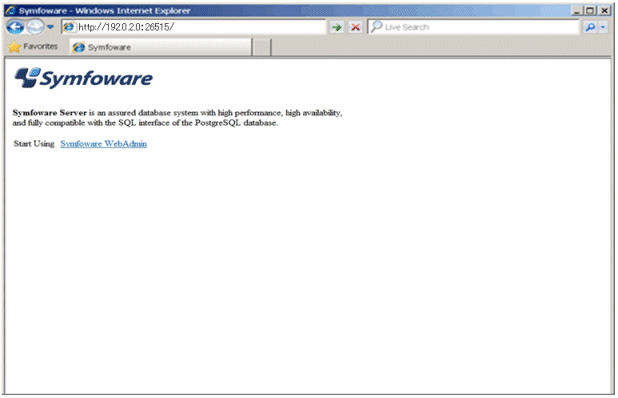
In the browser address bar, type the activation URL of the WebAdmin window in the following format:
http://hostNameOrIpAddress:portNumber/
hostNameOrIpAddress: Host name or IP address of the server where Symfoware Server is installed
portNumber: Port number of WebAdmin. The default port number is 26515.
The activation URL window shown below is displayed.
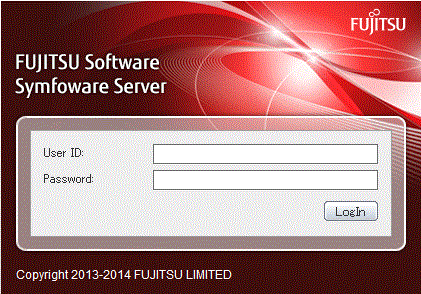
Logging in to the database server
Clicking "Symfoware WebAdmin" on the startup window displays the WebAdmin [Login] window. Enter the instance administrator user ID (operating system user account name) and password, and log in to Symfoware Server.
This section describes how to create an instance.
Information
WebAdmin calculates values using the formula indicated in "Managing Kernel Resources" under "Server Administration" in the PostgreSQL Documentation, and configures these in the kernel parameters. Refer to "Appendix L Configuring Kernel Parameters" for information on configuring parameter names.
Refer to "Appendix F Configuring Parameters" for information on the postgresql.conf values required to derive the set values.
Activate WebAdmin, and log in to the database server.
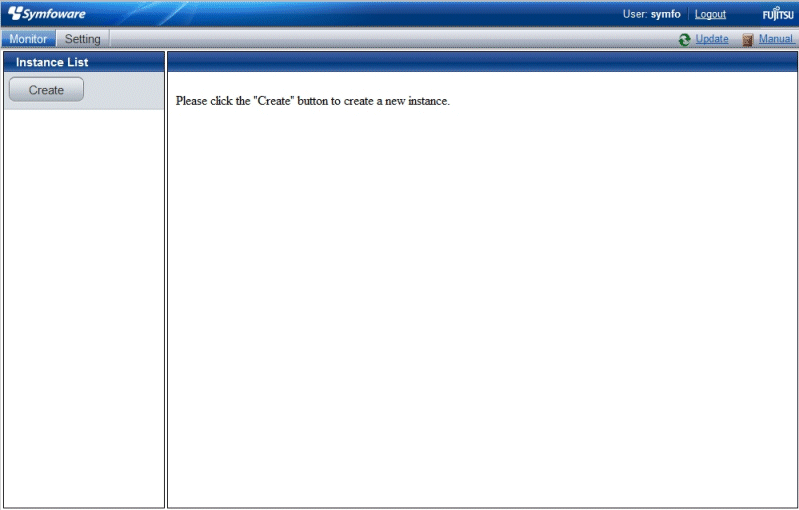
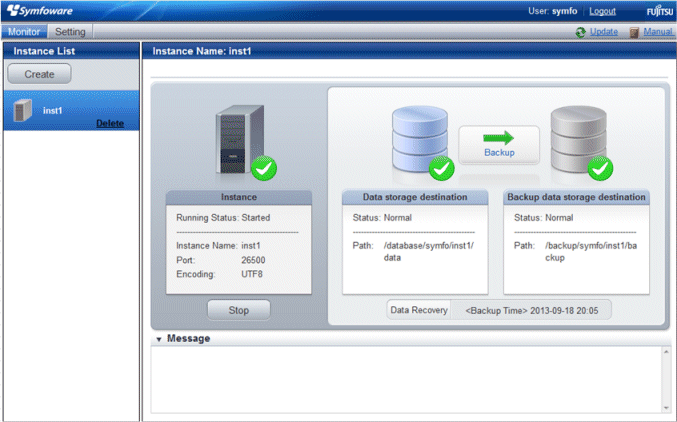
Click [Create] in the [Instance List] window of the [Monitor].
Enter the information for the instance to be created.
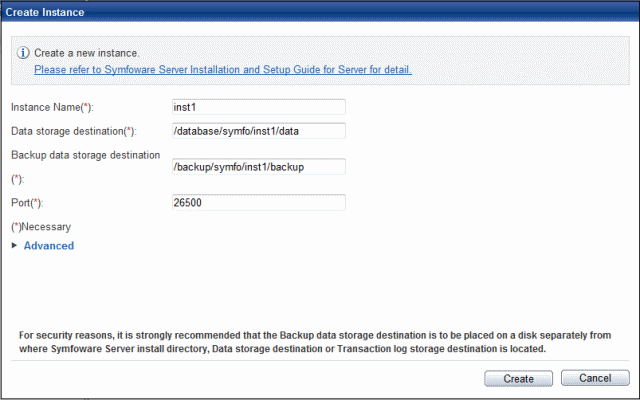
Enter the following items:
[Instance Name]: Name of the database instance to manage
The name must meet the conditions below:
Maximum of 16 characters
The first character must be an ASCII alphabetic character
The other characters must be ASCII alphanumeric characters
[Data storage destination]: Directory where the database data will be stored
[Backup data storage destination]: Directory where the database backup will be stored
[Port]: Port number of the database server
Note
Refer to "4.2.2 Preparing Directories for Resource Deployment" - "Considerations when deploying resources" for information on points to consider when determining the data storage destination, backup data storage destination, and transaction log storage destination.
Only the port number can be modified after the instance has been created.
Do not specify directories that include symbolic link or multibyte characters when specifying the data storage destination or backup data storage destination.
Click [Advanced] to change the transaction log storage destination and database encoding.
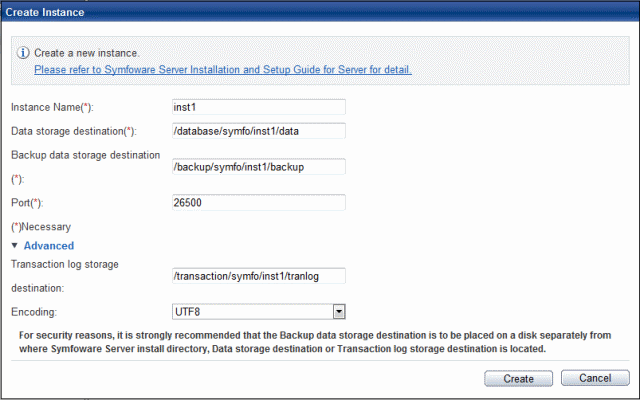
Enter the following items:
[Transaction log storage destination]: Directory where the transaction log will be stored
[Encoding]: Database encoding system
Note
Refer to "4.2.2 Preparing Directories for Resource Deployment" - "Considerations when deploying resources" for information on points to consider when determining the transaction log storage destination.
Do not specify directories that include symbolic link or multibyte characters when specifying the transaction log storage destination.
In the instance that was created using WebAdmin, the locale of the character set to be used in the database, and the locale of the collating sequence, are fixed using C.
Click [Create] to create an instance.
When the creation of the instance is complete, the following window will be displayed:
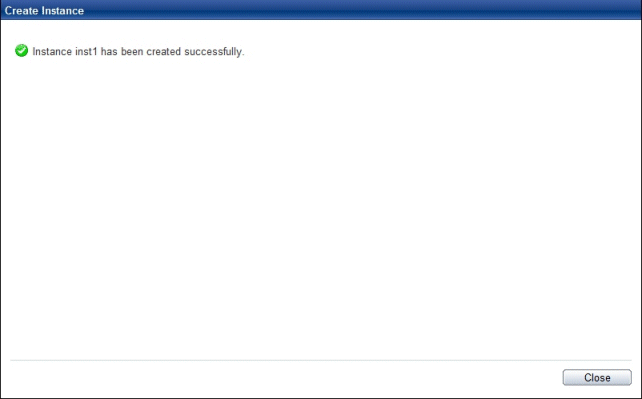
The instance will be started when it is created successfully.
Back up the basic information that was set
Perform a backup of the file shown below. The file to be backed up contains the basic information specified in this screen, and this information will be needed to recover the WebAdmin management information when a fault occurs on the system disk.
installDir/gui/data/gui-instances
You can change the following information that is set when instances are created.
You can change the character set and maximum number of connections, for example, to suit the operating and management environment for Symfoware Server.
Information
These settings are the same as the parameters that can be set in the files shown below. Refer to "Appendix F Configuring Parameters" for information on the equivalence relationship between the item name and the parameter.
postgresql.conf
pg_hba.conf
Note
The files shown below can also be modified directly, however if a parameter not described in "Appendix F Configuring Parameters" was edited by mistake, WebAdmin may not run correctly.
postgresql.conf
pg_hba.conf
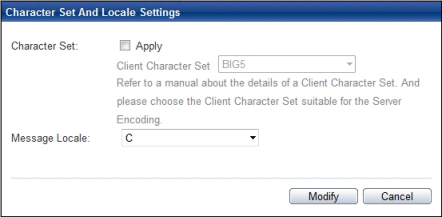
Start WebAdmin and log in to the database server.
Select [Character Code] from the [Setting] menu.
Click [Edit].
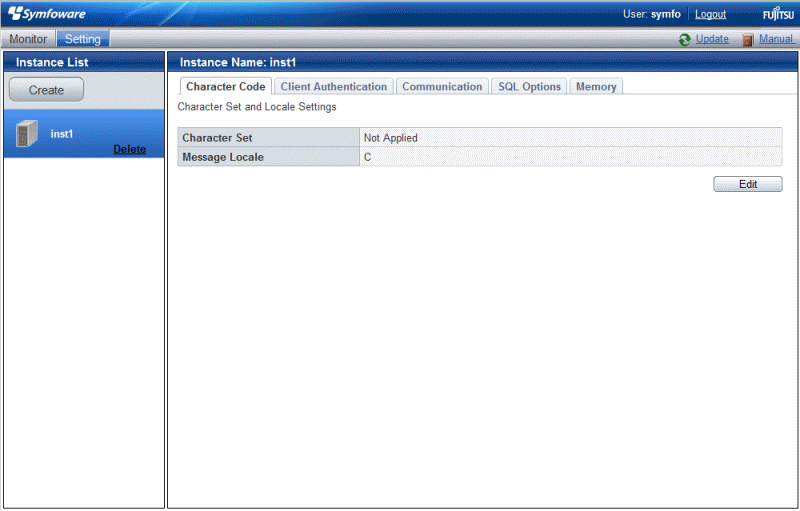
Edit [Character Set] and [Message Locale], and then click [Modify].
See
Select a client-side encoding system that can be converted to/from the database encoding system. Refer to "PostgreSQL Documentation" - "Server Administration" - "Automatic Character Set Conversion Between Server and Client" for information on the encoding system combinations that can be converted.
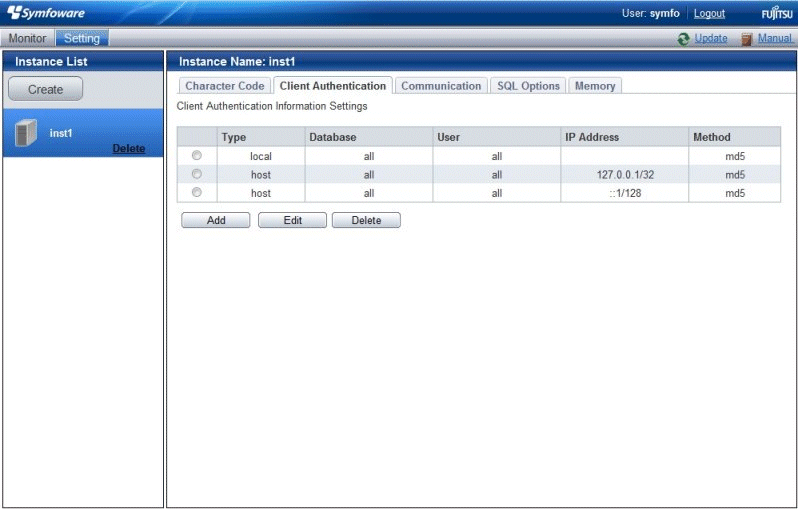
Start WebAdmin and log in to the database server.
Select [Client Authentication] from the [Setting] menu.
Click [Add] to register new authentication information.
To change authentication information, select the information, and then click [Edit].
To delete authentication information, select the information, and then click [Delete].
Note
When creating the instance, do not delete the entry below, because it is a connection required for WebAdmin to monitor the operational status of the database:
Type=local, Database=all, User=all, and Method=md5
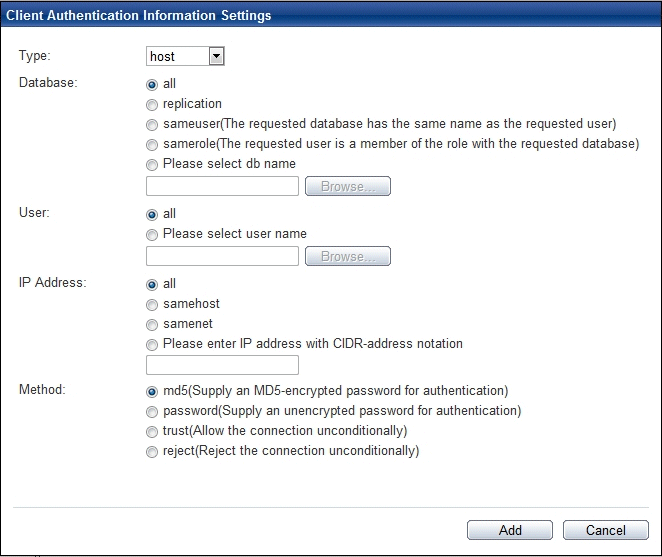
Click [Add] - the following window will be displayed.
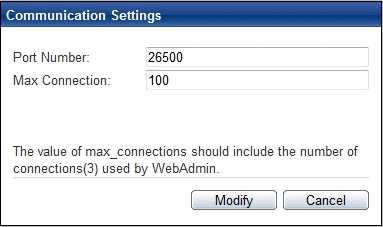
Start WebAdmin and log in to the database server.
Stop the instance.
Select [Communication] from the [Setting] menu.
Click [Edit].

Edit [Port Number] and [Max Connection], and then click [Modify].
Note
Calculate the maximum number of connections using the formula below:
maximumNumberOfConnections = maximumNumberOfConnectionsFromApplications + 3 (*1)
*1: 3 is the default number of connections required by the system
Calculate the maximum number of connections using the following formula when changing either max_wal_senders (using streaming replication) or superuser_reserved_connections (connections reserved for use by the superuser) in postgresql.conf.
maximumNumberOfConnections = maximumNumberOfConnectionsFromApplications + superuser_reserved_connections + max_wal_senders
Refer to "Appendix F Configuring Parameters" for more information on postgresql.conf.
Also check if the memory used exceeds the memory installed (refer to "Parameters automatically set by WebAdmin according to the amount of memory")
To increase the maximum number of connections, edit the kernel parameter. Refer to "Appendix L Configuring Kernel Parameters", and "Managing Kernel Resources" in "Server Administration" in the PostgreSQL Documentation for details.
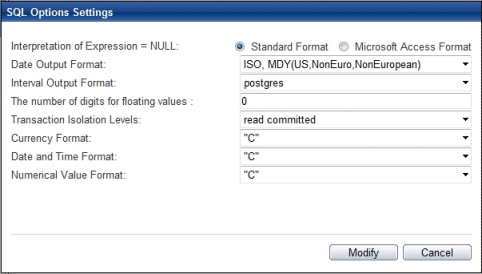
Start WebAdmin and log in to the database server.
Select [SQL Options] from the [Setting] menu.
Click [Edit].
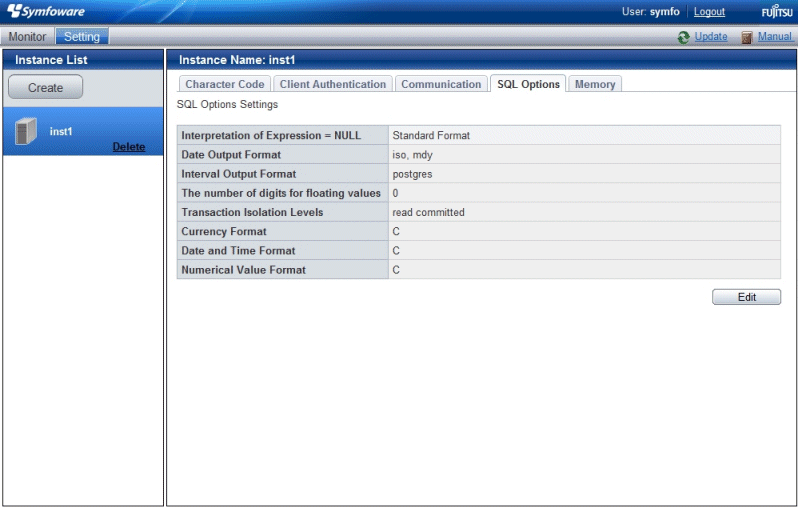
Edit [Interpretation of Expression = NULL], [Date Output Format], [Interval Output Format], [The number of digits for floating values], [Transaction Isolation Levels], [Currency Format], [Date and Time Format], and [Numerical Value Format], and then click [Modify].
Note
If you select postgres in Date Output Format, dates will be output in the "12-17-1997" format, not the "Wed Dec 17 1997" format used in the PostgreSQL Documentation.
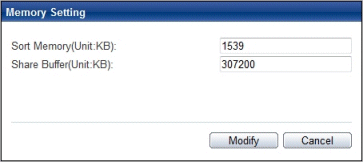
Start WebAdmin and log in to the database server.
Stop the instance.
Select [Memory] from the [Setting] menu.
Click [Edit].
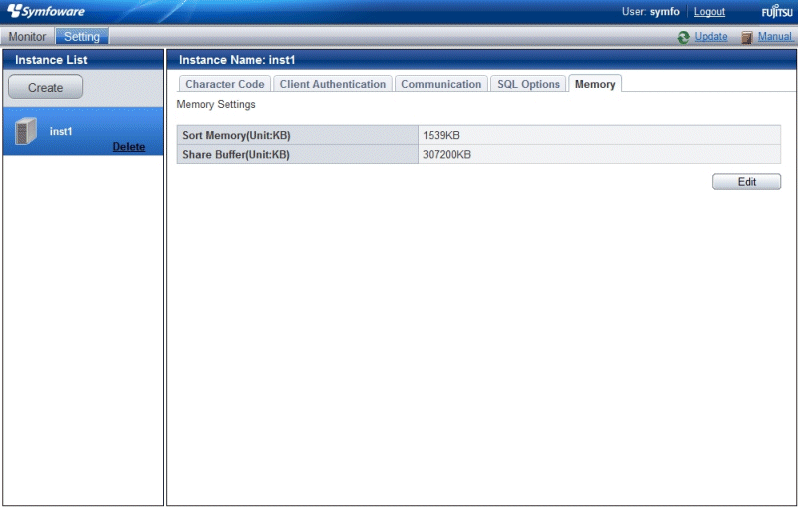
Edit [Sort Memory(Unit:KB)] and [Share Buffer(Unit:KB)], and then click [Modify].
Note
Also check if the memory used exceeds the memory installed (refer to "Parameters automatically set by WebAdmin according to the amount of memory" for information on how to check).
To modify the buffer size of the database, edit the kernel parameter. Refer to "Appendix L Configuring Kernel Parameters", and "Managing Kernel Resources" in "Server Administration" in the PostgreSQL Documentation for details.