This section describes how to create an instance using WebAdmin.
Note
Always use WebAdmin to delete an instance if it was created using WebAdmin.
This section describes points to take into account when using WebAdmin.
This section describes notes on using browsers.
Windows(R) Internet Explorer 8.0, 9.0, and 10.0 are supported.
For the display, use 1024x768 or higher and 256 or more colors.
The browser's [Back] feature cannot be used. In some browsers, the backspace key has the same functionality as the [Back] feature. Operations cannot be guaranteed when either of these techniques is used.
WebAdmin cannot be used in single-user mode. To use WebAdmin, restart the OS using a mode other than single-user mode.
WebAdmin does not allow encryption environments to be build.
See
Refer to "Protecting Storage Data Using Transparent Data Encryption" in the Operation Guide for information on building encrypted environments.
Confirm the browser settings given below prior to using WebAdmin. If any settings are different, change them.
The required browser settings are described below.
WebAdmin uses cookies for communication between the browser and WebAdmin. Confirm that the setting to accept cookies has been selected.
Selecting the character set
WebAdmin outputs results to the browser in UNICODE (UTF-8).
Ensure the character set and font for the browser are set to UNICODE.
Select [View] >> [Encoding] >> [Auto-Select].
Confirm that the browser font is set to the default for optimal display of the WebAdmin window.
Select [View] >> [Text Size] >> [Medium].
Click [Tools] >> [Internet options] >> [General] >> [Appearance] >> [Fonts], and then configure the following items:
Select [MS PGothic] as the [Webpage font].
Select [MS Gothic] as the [Plain text font].
Text may not display correctly in the browser unless fonts that correspond to the character set returned to the browser are installed.
In this case, install the fonts using the following procedure:
Click [View] >> [Encoding] >> [More], and then select the font to be displayed.
Install the font in accordance with the instructions in the [Language pack installation] dialog box.
If the Pop-up Blocker is enabled, use the procedure below to configure settings to allow pop-ups from the server where Symfoware Server is installed.
Click [Tools] >> [Internet options], and then select the [Privacy] tab.
If the [Turn on Pop-up Blocker] check box under [Pop-up Blocker] is not selected, the Pop-up Blocker feature will not operate, so the steps below are not required.
In the [Privacy] tab, click [Settings] under [Pop-up Blocker].
In the [Pop-up Blocker Settings] window, enter the URL of the server where Symfoware Server is installed in the [Address of website to allow] box and click [Add].
In the [Pop-up Blocker Settings] window, click [Close].
In the [Privacy] tab, click [OK].
If execution of WebAdmin setup was selected during installation, WebAdmin will be set up. WebAdmin can be used immediately after installation, and starts automatically when the machine is restarted. When the machine is restarted, the Web server feature of WebAdmin is started automatically.
Refer to "C.1 Setting Up WebAdmin" if WebAdmin has not yet been set up.
This section describes how to log in to WebAdmin.
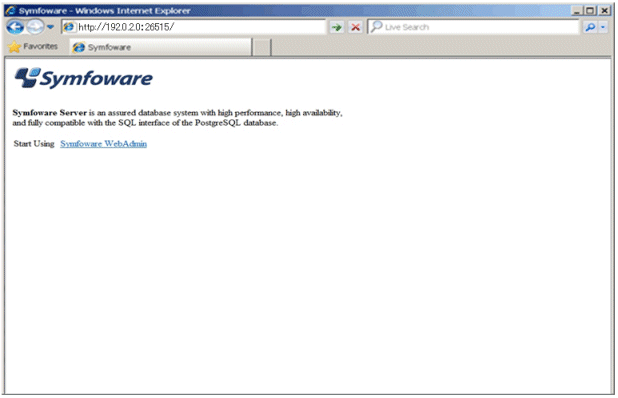
Activation URL for WebAdmin
In the browser address bar, type the activation URL of the WebAdmin window in the following format:
http://hostNameOrIpAddress:portNumber/
hostNameOrIpAddress: Host name or IP address of the server where Symfoware Server is installed
portNumber: Port number of WebAdmin. The default port number is 26515.
For a server with IP address "192.0.2.0" and port number "26515":
http://192.0.2.0:26515/
The activation URL window shown below is displayed.
Logging in to the database server
Click [Symfoware WebAdmin] on the activation window to activate WebAdmin and display the [LogIn] window. You can log in to Symfoware Server from the [LogIn] window.
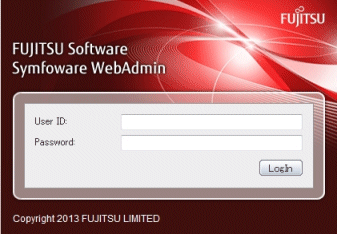
Specify the following values when logging in:
[User ID]: User ID (OS user account) of the instance administrator
[Password]: Password corresponding to the user ID
Note
General users of the OS can also log in to WebAdmin.
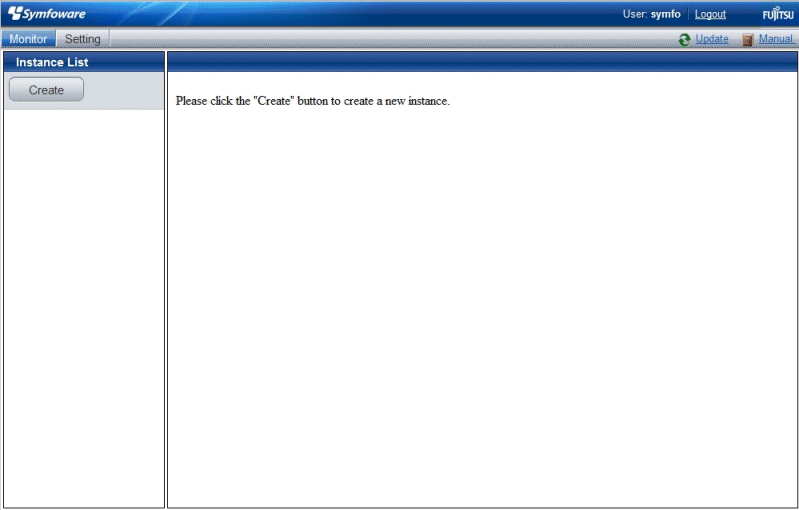
This section describes how to create an instance.
WebAdmin will automatically tune the kernel parameters when an instance is created.
Information
WebAdmin calculates values using the formula indicated in "Managing Kernel Resources" under "Server Administration" in the PostgreSQL Documentation, and configures these in the kernel parameters. Refer to "Appendix J Configuring Kernel Parameters" for information on configuring parameter names.
Refer to "Appendix E Configuring Parameters" for information on the postgresql.conf values required to derive the set values.
Activate WebAdmin, and log in to the database server.
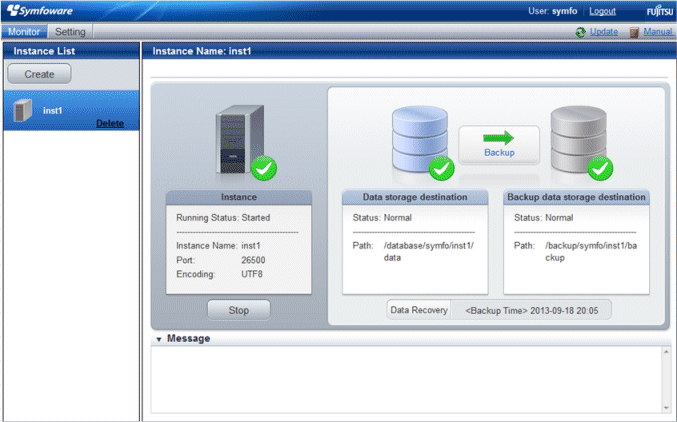
Click [Create] in the [Instance List] window of the [Monitor] menu.
Enter the information for the instance to be created.
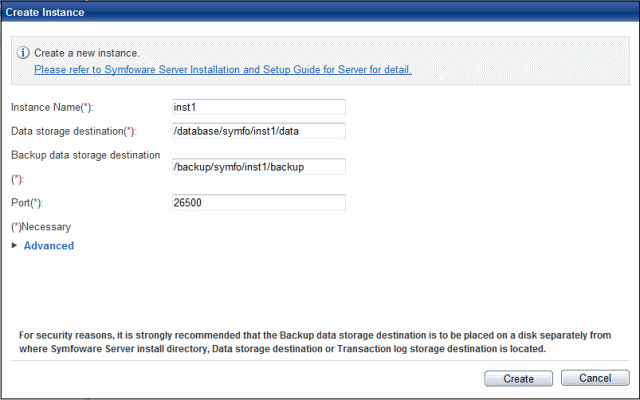
Enter the following items:
[Instance Name]: Name of the database instance to manage
[Data storage destination]: Directory where the database data will be stored
[Backup data storage destination]: Directory where the database backup will be stored
[Port]: Port number of the database server
Note
Store in a separate file the data storage destination and backup data storage destination path names specified in this window. Also, obtain a backup of the following file.
These will be required to recover the directories if there is a disk failure.
installationDirectory/gui/data/gui-instancesDo not specify symbolic link files when specifying the data storage destination or backup data storage destination.
Do not specify directories that include multibyte characters when specifying the data storage destination or backup data storage destination.
Deploy the backup data storage destination, data storage destination, and transaction log storage destination on different disks, to take into account disk failures
Click [Advanced] to change the transaction log storage destination and database encoding.
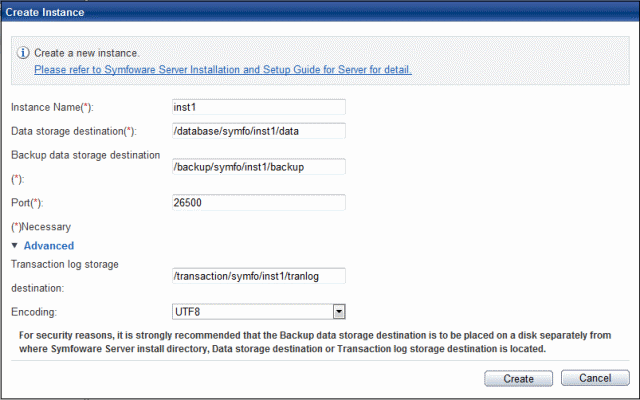
Enter the following items:
[Transaction log storage destination]: Directory where the transaction log will be stored
[Eencoding]: Encoding of the database
Note
In a file, record the path names of the data storage destination, the backup data storage destination, and the transaction log storage destination specified in this window.
This information will be required in the event that the directory needs to be recovered, such as if a fault occurs in the disk device.
Do not specify symbolic link files when specifying the transaction log storage destination.
Do not specify directories that include multibyte characters when specifying the transaction log storage destination.
The default locale for instances created with WebAdmin is C.
Click [Create] to create an instance.
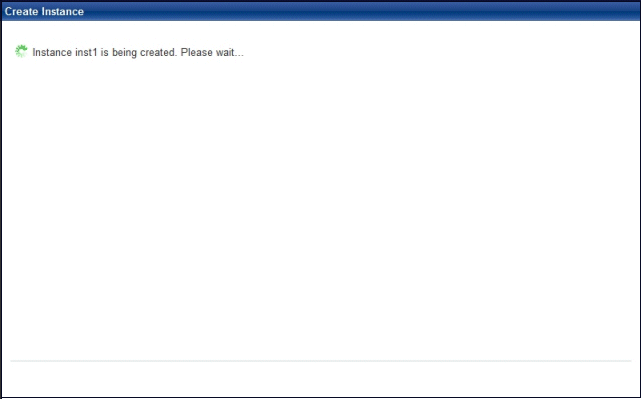
[The instance is being made.]
[Making the instance is completed.]
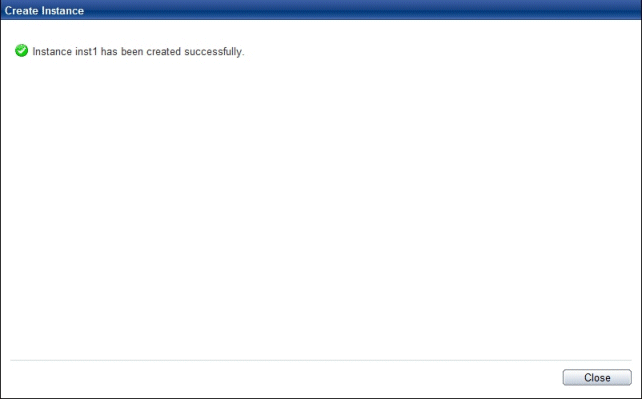
The instance will be started when it is created successfully.
You can change the following information that is set when instances are created.
You can change the character set and maximum number of connections, for example, to suit the operating and management environment for Symfoware Server.
Information
These settings are stored in the files below - you can edit them directly, but WebAdmin may not work properly if you make a mistake (refer to "Appendix E Configuring Parameters" for details):
postgresql.conf
pg_hba.conf
Start WebAdmin and log in to the database server.
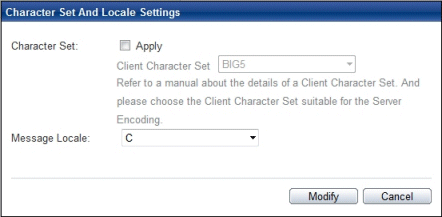
Select [Character Code] from the [Setting] menu.
Click [Edit].

Edit [Character Set] and [Message Locale], and then click [Modify].
See
Select a character set compatible with the server's one (refer to "Automatic Character Set Conversion Between Server and Client" in "Server Administration" in the PostgreSQL Documentation for details).
Start WebAdmin and log in to the database server.
Select [Client Authentication] from the [Setting] menu.
Click [Add] to register new authentication information.
To change authentication information, select the information, and then click [Edit].
To delete authentication information, select the information, and then click [Delete].
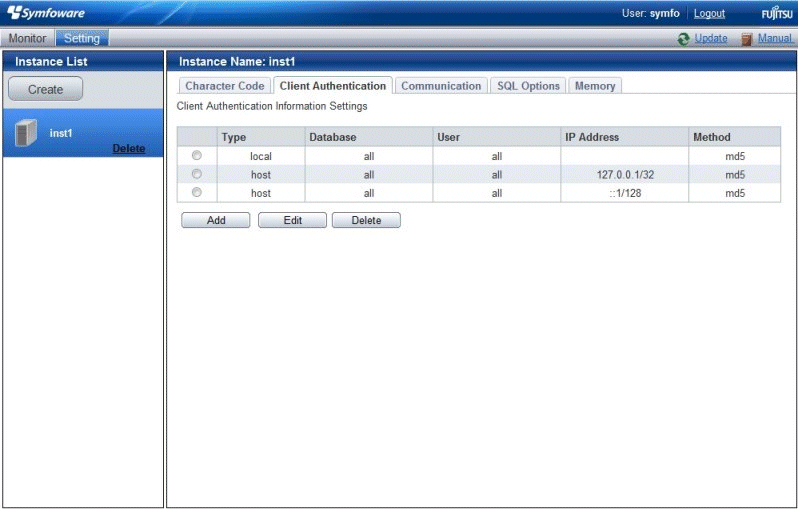
Click [Add] - the following window will be displayed.

Note
Configure the "local" connection format setting to give permission to the instance administrator, otherwise WebAdmin may not work properly.
Start WebAdmin and log into the database server.
Select [Communication] from the [Setting] menu.
Note
Before changing communication information, stop the instance.
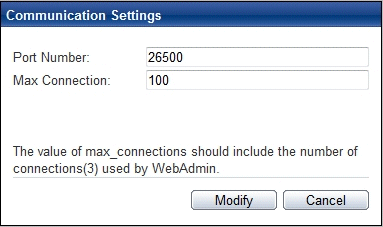
Click [Edit].
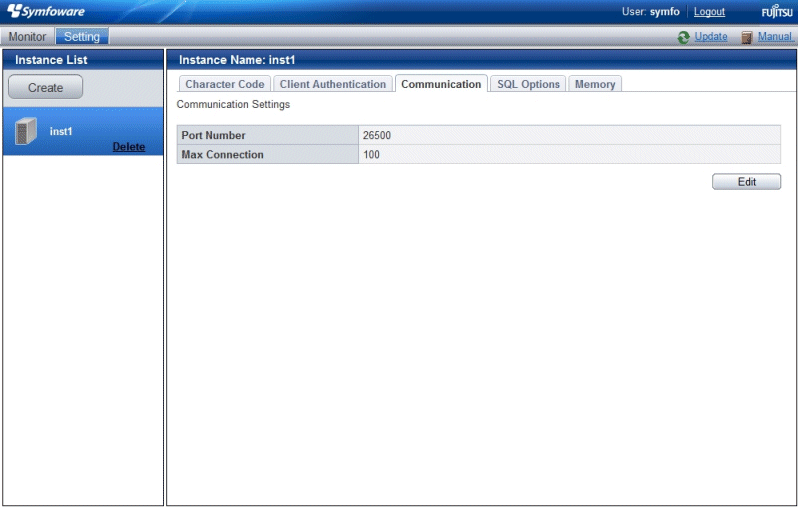
Edit [Port Number] and [Max Connection], and then click [Modify].
Note
Calculate the maximum number of connections using the formula below:
maximumNumberOfConnections = maximumNumberOfConnectionsFromApplications + 3 (*1)
*1: 3 is the default number of connections required by the system
Calculate the maximum number of connections using the following formula when changing either max_wal_senders (using streaming replication) or superuser_reserved_connections (connections reserved for use by the superuser) in postgresql.conf.
maximumNumberOfConnections = maximumNumberOfConnectionsFromApplications + superuser_reserved_connections + max_wal_senders
Refer to "Appendix E Configuring Parameters" for more information on postgresql.conf.
Kernel parameters need to be tuned to change the maximum number of connections. Refer to "Appendix J Configuring Kernel Parameters", or "Managing Kernel Resources" in "Server Administration" in the PostgreSQL Documentation for information on tuning kernel parameters.
Also check if the memory used exceeds the memory installed (refer to "Parameters automatically set by WebAdmin according to the amount of memory")
Start WebAdmin and log in to the database server.
Select [SQL Options] from the [Setting] menu.
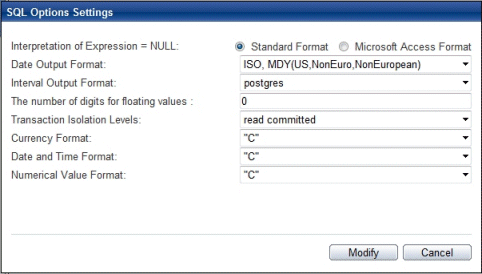
Click [Edit].
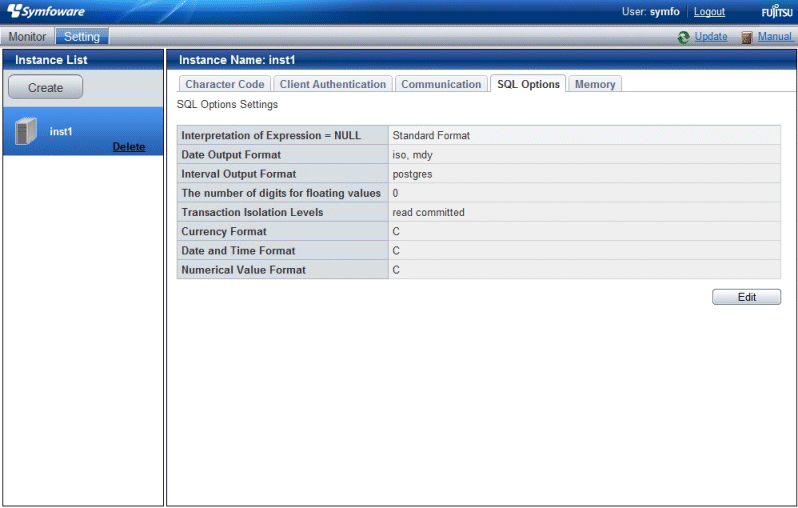
Edit [Interpretation of Expression = NULL], [Date Output Format], [Interval Oputput Format], [The number of digits for floating values], [Transaction Isolation Levels], [Currency Format], [Date and Time Format], and [Numerical Value Format], and then click [Modify].
Note
If you select postgres in Date Output Format, dates will be output in the "12-17-1997" format, not the "Wed Dec 17 1997" format used in the PostgreSQL Documentation.
Start WebAdmin and log in to the database server.
Select [Memory] from the [Setting] menu.
Note
Before changing used memory information, stop the instance.
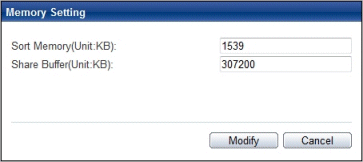
Click [Edit].
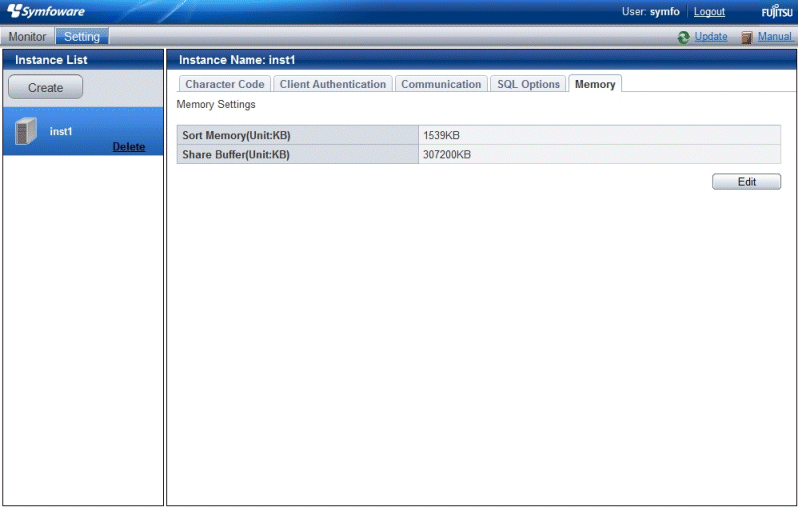
Edit [Sort Memory(Unit:KB)] and [Share Buffer(Unit:KB)], and then click [Modify].
Note
Kernel parameters need to be tuned to change the buffer size of the database. Refer to "Appendix J Configuring Kernel Parameters", or "Managing Kernel Resources" in "Server Administration" in the PostgreSQL Documentation for information on tuning kernel parameters.
Also check if the memory used exceeds the memory installed (refer to "Parameters automatically set by WebAdmin according to the amount of memory" for information on how to check).