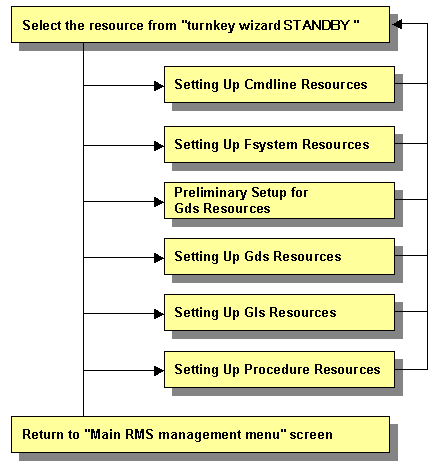
This section explains how to register resources to the userApplication that was set up in the previous section.
You can register the following resources:
Cmdline resources
You can use Cmdline resources to set up script files or commands as resources. The Cmdline resources are required to generate the state transition of userApplication along with the stop of user applications, and conversely, to start or stop ISV applications or user applications along with the state transition of the userApplication.
Fsystem resources
Used when you mount a file system along with userApplication startup.
Note
To use a file system in a class created by GDS as an Fsystem resource, you must register the GDS resource to the same userApplication.
Gds resources
Used when you start and stop a disk class to be defined by GDS (Global Disk Services) by linking it with the userApplication.
Gls resources
Used when you set up a takeover IP address that is to be defined in a userApplication with the redundant line control function, or when you set a takeover IP address in a userApplication with the single line control function.
Procedure resources
Used when you register a state transition procedure in the userApplication.
Resource setup flow

This section describes the procedure for creating Cmdline resources.
Operation Procedure:
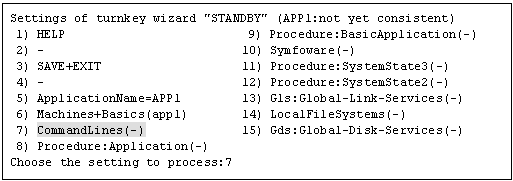
Select "CommandLines" from "turnkey wizard STANDBY."

"CommandLines" will appear. Select "AdditionalStartCommand."

Select "FREECHOICE" and then enter the full path of the StartCommand. If you need to specify arguments, delimit them with blanks.
StartCommand is executed during Online processing to start user applications.
[StartCommand exit codes]
StartCommand has the following exit codes:
0: Normal exit. The Online processing is successfully done.
Other than 0: Abnormal exit. The Online processing fails. When the script exits with the cord other than 0, the resource will enter Faulted.

"CommandLines" will appear. If you need to stop the user programs, select "StopCommands."
StopCommand is executed during Offline processing to stop user applications.
You do not always have to set up the StopCommand.
[StopCommand exit codes]
StopCommand has the following exit codes:
0: Normal exit. The Offline processing is successfully done.
Other than 0: Abnormal exit. The Offline processing fails. When the script exits with the cord other than 0, the resource will enter Faulted.
If you do not use StopCommand, start from step 6.

Select "FREECHOICE" and then enter the full path of StopCommand. If you need to specify arguments, delimit them with blanks.

"CommandLines" will appear. Select "CheckCommands."
CheckCommand is executed periodically to notify RMS of the state of the user applications.
0: Online.
Other than 0: Offline.
If you enable the ALLEXITCODES attribute, the script that is defined in CheckCommand provides more detailed state of the user applications. Change the attribute in step 8.

Select "FREECHOICE" and then enter the full path of the CheckCommand. If you need to specify arguments, delimit them with blanks.

Change the attribute.
Change the attribute to suit the purpose. To change the attribute, select "Flags[0]." For details on the attribute, see "11 Appendix - Attributes" and "HELP" in the "PRIMECLUSTER Reliant Monitor Services (RMS) with Wizard Tools Configuration and Administration Guide."
Note
If you enable the "NULLDETECTOR" attribute, CheckCommand is not started from RMS. For hot-standby operation, enable the following two attributes;
STANDBYCAPABLE
RMS executes Standby processing of the resources on all nodes where the userApplication is Offline.
ALLEXITCODES
Check script provides the detailed state of the resource with the exit code.
For further details about the hot-standby operation settings, see "6.6 Setting Up Online/Offline Scripts."
Finally, select "SAVE+EXIT."

An Fsystem resource must be set up if you want to mount a file system when userApplication is started.
To control multiple mount points in parent-child relationships, create the file system as one Fsystem resource.
[Prerequisites]
You need to work on the following prerequisites to use an Fsystem resource.
Reserving monitoring disk area
Reserve the dedicated monitoring disk area in shared disk device so that shared disk failures and cable failures are detected on each shared disk device.
Reserve the monitoring area in either 1or 2 unit shown in the table below. Configuration based on the No. 2 is recommended.
No | Reserve monitoring area for each | Range of failure detection | Prerequisites |
|---|---|---|---|
1 | Shared disk device | Failures including cable disconnection are detected in unit of shared disk device. |
|
2 | Disk area (1LU) | In addition to the above, failures such as LUN errors on shared disk device are detected in unit of shared disk area (operation unit). |
|
Defining mount points
Define mount points that are used as resources in /etc/fstab.pcl on all the nodes where userApplication is configured. Each line must begin with "#RMS#."
Example) /etc/fstab.pcl
#RMS#/dev/sdd1        /mnt/swdsk1          ext3    defaults        1 2
#RMS#/dev/sdd2        /mnt/swdsk2          ext3    defaults        1 2
#RMS#/dev/sdd3        /mnt/monitor         ext3    defaults,ro     1 2
If a file system is created in the GDS setting screen, the mount point is also defined in /etc/fstab. Copy the line of the mount point defined by GDS onto /etc/fstab.pcl, and each line of the mount point that is set with GDS must begin with "#RMS#."
Example) /etc/fstab.pcl
#RMS#/dev/sfdsk/class0001/dsk/volume0001 /mnt/swdsk1 ext3 noauto 0 0
#RMS#/dev/sfdsk/class0001/dsk/volume0002 /mnt/swdsk2 ext3 noauto 0 0
#RMS#/dev/sfdsk/class0001/dsk/volume0003 /mnt/monitor ext3 noauto,ro 0 0
Note
You must set the shared classes that were used to create the file system from the GDS setting screen as Gds resources. For details, see "6.7.3.4 Setting Up Gds Resources."
Read Only must be set for the mount attribute of the monitoring-only disk area.
Example:
Example)
#RMS#/dev/sdf1 /mnt/monitor ext3 defaults,ro 1 2You cannot define different volumes on the same mount point.
Setting file systems
It is necessary to create file systems on disk partitions that are used as resources.
Example) When creating the ext3 file system
# /sbin/mkfs -t ext3 /dev/sdd1
# /sbin/tune2fs -j /dev/sdd1
Confirm on each node that the file system can be mounted.
Example) When checking if the file systems can be mounted
# /bin/mount -t ext3 /dev/sdd1 /mnt/swdsk1
# /bin/umount /mnt/swdsk1
Note
Set file systems for the monitoring disk area as well.
Forcible file system check prevention (recommended)
If ext3 is used for a file system, the file system might forcibly be checked during online processing of a switching file system. It is part of the ext3 specification that file systems are checked when a certain number of mounting has been executed since the last file system check, or a certain period of time has passed.
When the file systems are forcibly checked along with node startup or failover, timeout occurs due to file system online processing, and PRIMECLUSTER startup or failover might fail.
It is necessary to prevent the file systems from being checked by executing the following command for all the ext3 switching files.
# tune2fs -c0 -i0 <device name>
Example)
# tune2fs -c0 -i0 /dev/sdi1After executing the above command, check if "Maximum mount count :-1","Check interval:0"is displayed using the following command:
# tune2fs -l /dev/sdi1
[snip]
Mount count: 10
Maximum mount count: -1
[snip]
Check interval: 0 (<none>)
[snip]
If the forcible file system check is prevented, file systems might corrupt due to failures such as disk errors and kernel bug. These failures cannot be detected through file system logging and journaling. The file system corruption might cause data corruption. To prevent this, execute the "fsck - f" command to enable the file system forcible check during periodic maintenance.
Operation Procedure:
Select "LocalFileSystems" from "turnkey wizard STANDBY."

Select "AdditionalMountPoint."

The mount point, which is defined in /etc/fstab.pcl, will appear. Select mount points for monitoring-only disks.
Note
Set up mount points for monitoring-only disks before setting disk mount points.
If you register multiple mount points, repeat steps 3 to 7 for each mount point.

Select "SAVE+RETURN."

The mount point, which is defined in /etc/fstab.pcl, will appear. Select mount points for disk operation.

Select "MONITORONLY", so the "MONITORONLY" attribute will be ON.

Select "SAVE+RETURN."

Select "SAVE+EXIT."

[Prerequisites]
If you need to set up a Gds resource, you must first set up a shared volume.
Also, before you make the settings required for the Gds resources, execute the following command on either node.
This command operation is required for linking the specified Gds resources with the status of the userApplication and to start and stop the GDS volume. In addition, this command sets all nodes sharing the volume to offline status.
# /opt/SMAW/SMAWRrms/bin/hvgdsetup -a [class-name]Information
To check the setup status of a shared volume, execute the following command:
# /opt/SMAW/SMAWRrms/bin/hvgdsetup -lNote
If the preliminary setup is not performed, the cluster application is set to Inconsistent status. For details, see "(3) Cluster applications become "Inconsistent"." in "F.1.9 Cluster System Related Error" of the "PRIMECLUSTER Global Disk Services Configuration and Administration Guide."
This operation must not be performed when a GFS shared file system is used.
After completing the preliminary setup for the Gds resources, register the Gds resources to the userApplication. The procedure for setting Gds resources to a userApplication is described below.
Operation Procedure:
Select "Gds:Global-Disk-Services" from "turnkey wizard STANDBY."

Select "AdditionalDiskClass" from "Volume management."
If you want to register multiple resources, repeat steps 2 to 3 for each resource.
Example) When you register the class [CL] of the shared volume in userApplication:

A list of the cluster resources that can be registered in userApplication appears.
Select the cluster resource.

Select "SAVE+EXIT."

[Prerequisites]
Before setting up the Gls resources, you must first set up the virtual interfaces and takeover virtual interfaces. For details, see "PRIMECLUSTER Global Link Services Configuration and Administration Guide : Redundant Line Control Function."
Operation Procedure:
Select "Gls:Global-Link-Services" from "turnkey wizard STANDBY."

Select "AdditionalTakeoverIpaddress" and then set the takeover IP address.
If you need to register multiple resources, repeat steps 2 to 4 for each resource.

The takeover IP addresses are displayed as options.
Select one.

Set up the operation mode of the resource.
The operation modes of the resources are "AUTORECOVER(A)" (selective value) and "NOT:AUTORECOVER(N)" (default value). If you select "SAVE+RETURN," the default value "NOT:AUTORECOVER(N)" will be set. Select "AUTORECOVER(A)" if an attempt to recover the resource is to be made for a given duration (default: 60 seconds) when a resource error occurs, or select "NOT:AUTORECOVER(N)" if switchover to another node is to be performed immediately.

To save the Gls resource settings and then exit, select "SAVE+EXIT."
You can change the timeout value of the Gls resource by selecting "(Timeout=60)" and setting any value (seconds).

See
By setting up the value in the StandbyTransition attribute when the cluster application is created, Gls resources on the standby node can be switched to the "Standby" state and the state of the Gls resources on the standby node can be monitored. For information on how to make this setting, see "6.7.2.1 Creating Standby Cluster Applications."
The procedure resource setting is used to register the state transition procedure resource of the products supported by PRIMECLUSTER in userApplication.
[Prerequisites]
To create a procedure resource, you must first create a state transition procedure and register the procedure to the resource database.
For details, see "E.1 Registering a Procedure Resource."
Operation Procedure:
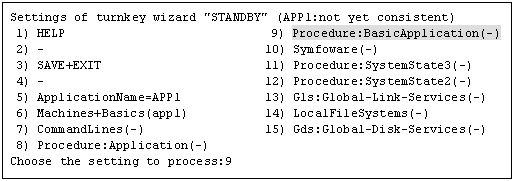
Select "Procedure:XXXXXXXXXX" from "turnkey wizard STANDBY."
Example of registering cluster resources of the BasicApplication class to a userApplication:

Select "AdditionalProcedureResource" from "Application detail Resource wizard."
To register multiple resources, execute steps 2 to 4 for each resource.

The list of cluster resources will appear. Select one.
Note
If a cluster resource does not appear on this screen, it indicates that the cluster resource has not been registered in the resource database. Confirm whether the cluster resource has been registered on each node of the userApplication, which is designed with "6.7.2 Setting Up userApplication." Register cluster resources if they are not registered. For details on the "clgettree" command, see the manual pages of this command. For details on registering the cluster resource in the resource database, see "E.1 Registering a Procedure Resource."

You can change the following on this screen. If necessary, select "SAVE+RETURN" from "Application detail Resource wizard" after that.
Timeout value of the state transition procedure
The default value is 1,800 seconds. If you use a machine that requires more than 1800 seconds for timeout, you need to change the value by selecting "TIMEOUT."
Priority within the resource class
The default value is specified by -p option when the state transition procedure resource is registered with the "claddprocrsc" command. If the -p option is not specified, 65535 is used as the default value. If you register multiple resources of the same class in the cluster application and specify the order of online and offline, change this value by selecting "PRIORITY" from the following screen. The resources will be online in the ascending order, and will be offline in the descending order.
