This section describes how to install and set up related software when building a cluster system between guest OSes on one host OS.
Perform the following as needed.
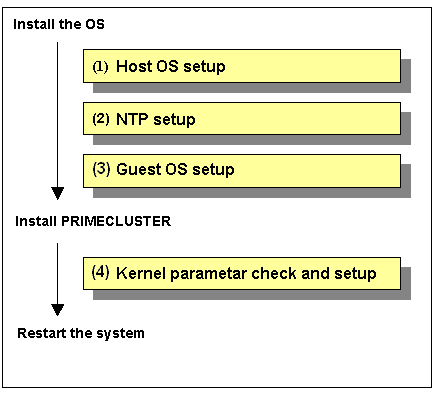
Host OS setup
If you plan to operate a guest OS as part of a cluster, set up the required disk devices, virtual bridges, virtual SCSI devices, user accounts, and guest OS initializations on the host OS.
Perform this setup after installing the operating system.
For details, see "3.2.1.1 Host OS setup."
NTP setup (host OS/guest OS)
This setup is for synchronizing the time on each node comprising the cluster system, which is necessary when creating a cluster.
This setup should be performed on the host OS and guest OS before installing PRIMECLUSTER.
See
For details on how to set up NTP, see "PRIMEQUEST Virtual Machine Function User's Manual".
Guest OS Setup
On the guest OSes comprising the cluster system, you need to set up the network, including IP addresses of the public LAN and administrative LAN.
Perform this setup after installing the operating system.
For details, see "3.2.1.2 Guest OS setup."
Kernel parameter check and setup
To operate the PRIMECLUSTER-related software, you need to edit the values of the kernel parameters based on the environment.
Perform this setup before rebooting the installed PRIMECLUSTER.
For details, see "3.2.1.3 Kernel parameter check."
See
For details on the configuration, see "A.12.1 When building a cluster system between guest OSes on one host OS."
If you plan to operate a guest OS as part of a cluster, you need to set up the host OS.
Perform the following setup after installing the operating systems on the host OS and guest OS.
Setting up disks and related devices
You need to complete the setup of disks and related devices beforehand.
Installing and setting up related software
Install and set up the software product (ETERNUS Multipath Driver) required for using system disk of the guest OS on the host OS. For how to install and set up the related software, see the "Software Information" for ETERNUS Multipath Driver.
Note
Immediate cluster failover in the event of an I/O device failure where the system volume is set
For the default setting of the ext3 file system, the cluster failover does not occur and the system operation might be continued based on the information retained in the memory, even if the I/O device where the system volume is set is failed.
If you want to operate the immediate cluster failover by PRIMECLUSTER in the event of an I/O device failure where the system volume is set, perform the following settings.
For each partition in the system volume, specify "errors=panic" to ext3 mount option.
Example) To configure the settings in /etc/fstab (when "/," "/var," and "/home" exist in one system volume)
LABEL=/     /     ext3 errors=panic 1 1
LABEL=/boot /boot ext3 errors=panic 1 2
LABEL=/var  /var  ext3 errors=panic 1 3
LABEL=/home /home ext3 errors=panic 1 4
Setting up virtual SCSI devices
For using a shared disk on a guest OS, you need to set up a virtual SCSI device. For details, see "PRIMEQUEST Virtual Machine Function User's Manual".
Mirroring the guest OS system disk
To mirror the guest OS system disk, set up the local mirrored volume created on the host OS for the guest OS.
See
For details on the settings, see the section about redundancy in "PRIMEQUEST Virtual Machine Function User's Manual".
Setting up the virtual bridge (administrative LAN/public LAN/cluster interconnect)
For the network interfaces, including the administrative LAN, public LAN and cluster interconnect, that are used by virtual domains, you need to set up virtual bridges for the virtual networks beforehand.
The following virtual bridge configurations are used in cluster systems.
gextbr:
Virtual bridge for the public LAN
xenbr:
Virtual bridge for the administrative LAN
gintbr:
Virtual bridge for the cluster interconnect
See
For details, see "PRIMEQUEST Virtual Machine Function User's Manual".
Note
Use only the gintbr configuration for the virtual bridge of the cluster interconnect.
Example: Define the virtual bridges (gintbr4 and gintbr5) for the cluster interconnect in the script file (network-bridge-pcl) of the previously set up virtual bridge.
Virtual bridge for the cluster interconnect
Virtual bridge for the administrative LAN
Virtual bridge for the public LAN
The file name of the script to call the virtual bridge creation script
(1) Edit the script that defines the virtual bridge (network-bridge-pcl) which is located in "/etc/xen/scripts" on the host OS.
If there is no script, create it
#!/bin/sh
#
# Sample of Create/Delete virtual bridge
#
# $1 start : Create virtual bridge
#    stop  : Delete virtual bridge
#    status: Display virtual bridge information

# Exit if anything goes wrong
set -e

command=$1

glsxenscript=/opt/FJSVhanet/local/sbin/hanetxen
xenscript=/etc/xen/scripts/network-bridge
xenscriptgext=/etc/xen/scripts/gext-network-bridge
xenscriptgint=/etc/xen/scripts/gint-network-bridge  ***added

# op_start:subscript for start operation #
op_start () {
        $xenscript $command vifnum=0 netdev=eth0
        $xenscript $command vifnum=1 netdev=eth1
        $xenscriptgext $command extnum=2 netdev=eth2
        $xenscriptgext $command extnum=3 netdev=eth3
        $xenscriptgint $command intnum=4  ***added
        $xenscriptgint $command intnum=5  ***added

}

# op_stop:subscript for stop operation #
op_stop () {
        op_start $command
}

case "$command" in
         start)
                  # Create your virtual bridge
                  $glsxenscript stop
                  op_start
                  $glsxenscript start
         ;;

         stop)
                  # Delete virtual bridge
                  $glsxenscript stop
                  op_stop
         ;;

         status)
                  # display virtual bridge information
                  $xenscript status
         ;;

         *)
                  echo "Unknown command: $command" >&2
                  echo 'Valid commands are: start, stop, status' >&2
                  exit 1

esac
(2) Set execute permissions
# cp  network-bridge-pcl /etc/xen/scripts
# cd /etc/xen/scripts
# chmod +x network-bridge-pcl
(3) Register with the xend service
Edit the "network-script" parameter of the xend service configuration file ((/etc/xen/xend-config.sxp). "network-bridge" has been set in the "network-script" parameter. Change it to the created script name.
# Your default ethernet device is used as the outgoing interface, by default.
# To use a different one (e.g. eth1) use
#
# (network-script 'network-bridge netdev=eth1')
#
# The bridge is named xenbr0, by default.  To rename the bridge, use
#
# (network-script 'network-bridge bridge=<name>')
#
# It is possible to use the network-bridge script in more complicated
# scenarios, such as having two outgoing interfaces, with two bridges, and
# two fake interfaces per guest domain.  To do things like this, write
# yourself a wrapper script, and call network-bridge from it, as appropriate.
#
(network-script network-bridge-pcl)
(4) If the script (/etc/xen/gext-network-bridge) does not exist, create it.
See
For details, see the manual of "PRIMECLUSTER Global Link Services Configuration and Administration Guide: Redundant Line Control Function" or "PRIMEQUEST Virtual Machine Function User's Manual".
Creating a user ID
Create the required general user ID (FJSVvmSP) on the host OS for the guest OS control by PRIMECLUSTER.
# useradd FJSVvmSP
Point
This user ID will be the one used by the shutdown facility to log in to the host OS to force shut down the nodes. This user ID and password are used for configuring the shutdown facility.
Initializing the guest OS
After completing the installation of a guest OS and the installation of the bundled software on the guest OS, initialize the guest OS.
Note
This setup should be performed for all guest OSes comprising the cluster system.
See
For details on the settings, see "PRIMEQUEST Virtual Machine Function User's Manual".
On the guest OSes comprising the cluster system, you need to set up the network, including IP addresses of the public LAN and administrative LAN.
Perform this setup on all guest OSes of a cluster.
Note
For PRIMEQUEST 1000 Series, guest domain names set on installation of the guest OSes are used when setting up the Shutdown Facility.
For information on how to check guest domain names, see "PRIMEQUEST Virtual Machine Function User's Manual".
See
If you want to change the public LAN and administrative LAN used by PRIMECLUSTER, see "8.2 Changing an IP Address on the Public / Administrative LAN".
Information
The Web-Based Admin View automatically configures the settings so that the interface, whose IP address host name is equivalent to the node name created when the PRIMECLUSTER was installed, can be used as a transfer route between cluster nodes and cluster management servers or between cluster management servers and clients.
You need to edit the values of the kernel parameters based on the environment.
All nodes on which PRIMECLUSTER is to be installed
The kernel parameters differ according to the products and components to be used.
Check the Kernel Parameter Worksheet and edit the value if necessary.
See
For information on the kernel parameters, see "A.6 Kernel Parameter Worksheet".
Note
To enable modifications, you need to restart the system after installation.