The Screen Control Library is a library for managing large numbers of screens in applications and applets concerted with window transitions. The library contains control functions for reading, displaying and deleting screens.
Follow the instructions below to develop an applet for switching between the displays of two different screens, using the Screen Control Library.
Creating a Java Application Project
Start the workbench.
Select [File] > [New] > [Project] from the menu bar.
The [New Project] wizard is displayed. Select [Java Application Project] from the tree. Then, click [Next].
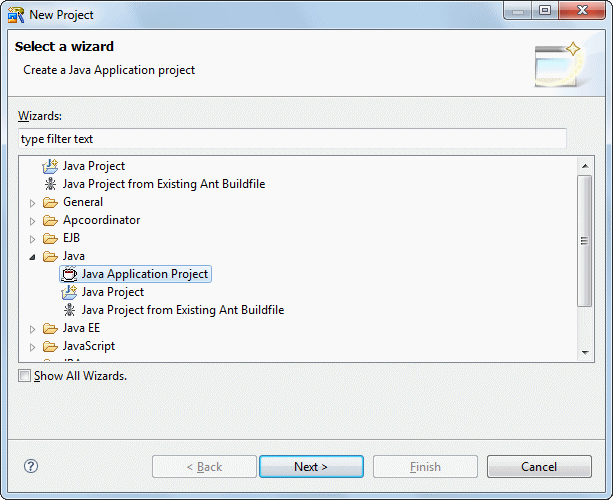
Click [Next].
The [Java Application Project] page is displayed. A project is created according to the information entered for items on this page.
Enter information as follows.
Setup Items | Setup Content |
|---|---|
Project name | LoginApplet |
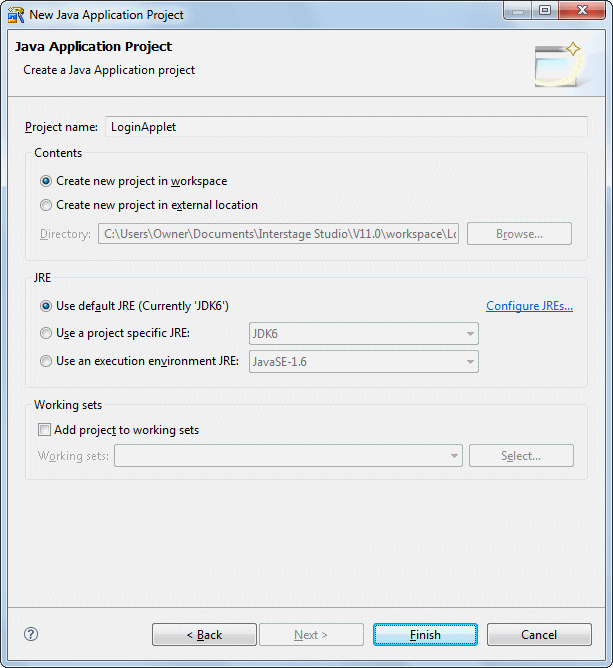
Click [Finish].
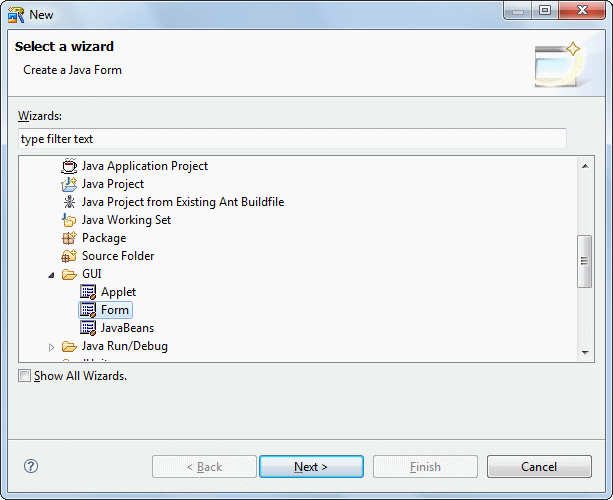
The next step is to create an applet. Select [File] > [New] > [Other] from the menu bar in workbench. Then, select [Java] > [GUI] > [Applet] from the tree in the [New] wizard that appears.
The [Applet Information] page is displayed. Enter information as follows.
Setup Items | Setup Content |
|---|---|
Package | myapp.applet |
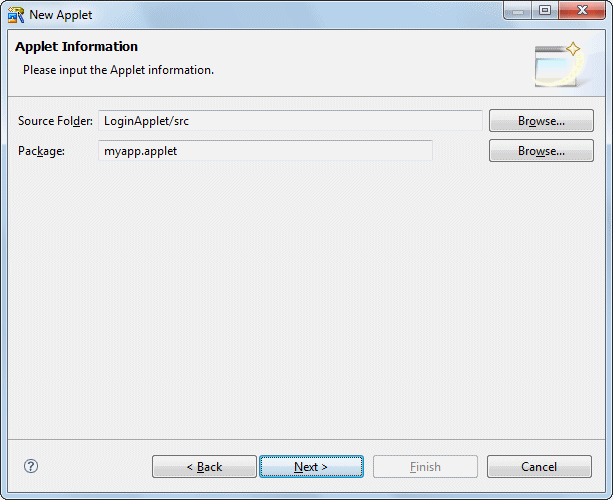
Click [Next].
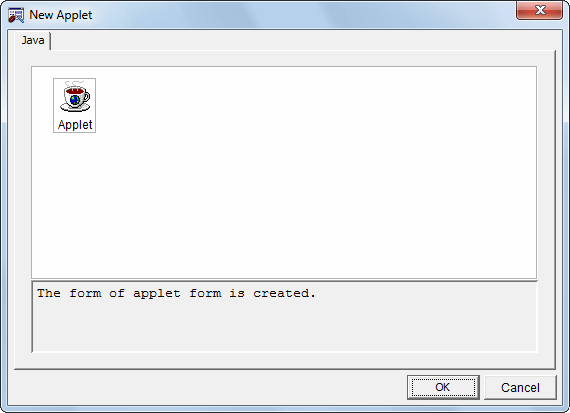
The [New Applet] dialog box is displayed.
Select [Applet] on the [Java] tab, and then click [OK].
The page for entering applet class information is displayed.
Enter "LoginApplet" in the [Applet Name] field.
Select [javax.swing.JApplet] as the base class.
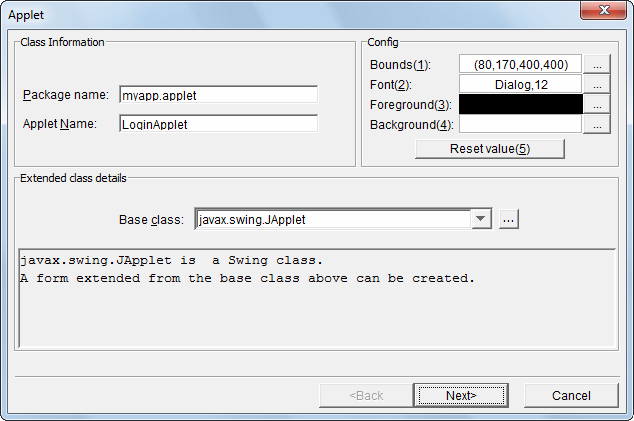
Click [Next].
The [Create HTML] page is displayed. You can create an HTML template in which the applet is pasted.
Specify the following settings:
Setup Items | Setup Content |
|---|---|
Generate HTML | Checked |
Generate HTMLfor JBK plug-in | Checked |
Page title | LoginApplet |
Width of applet | 400 |
Height of applet | 400 |
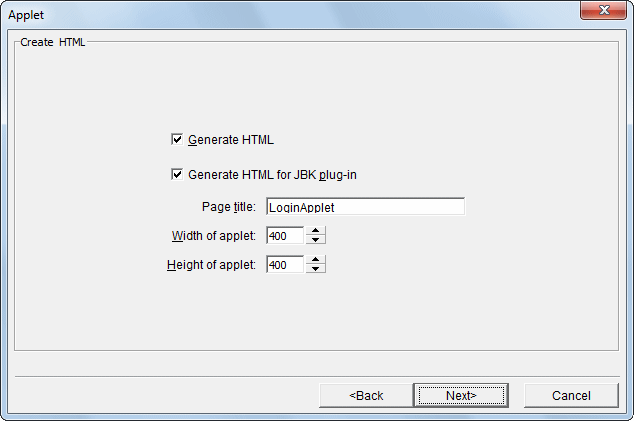
Click [Next].
The [Parameter Information] page is displayed.
Parameters are not used, so you can delete "myItem0." Click [Delete]. Then, click [Create].
Java Form Designer starts.
To use the Screen Control Library, paste screen control class (extended JFLCardPanel class) into the applet, but this task is performed at a subsequent time. For this reason, close Java Form Designer.
From the [File] menu of Java Form Designer, select [Close] to close the applet form.
This is the end of the procedure for creating a project.
Creating a Screen Control Panel
Create the Screen Control Panel.
Select [File] > [New] > [Other] from the workbench menu bar.
The [New] wizard is displayed. Select [Java] > [GUI] > [Form] from the tree.
Click [Next].
The [Java Form Information] page is displayed. Enter information as follows.
Setup Items | Setup Content |
|---|---|
Package | myapp.applet |
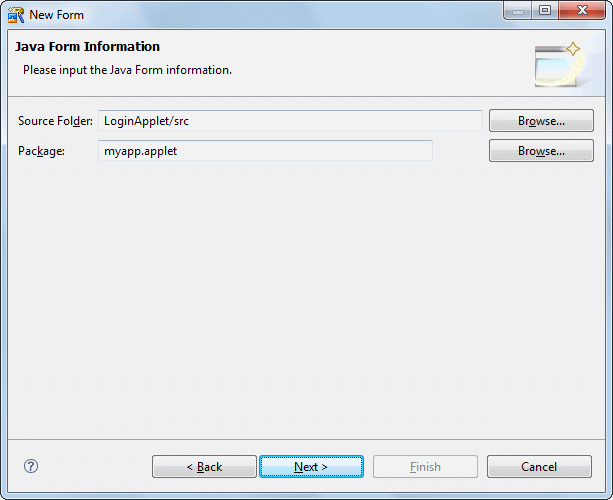
Click [Next].
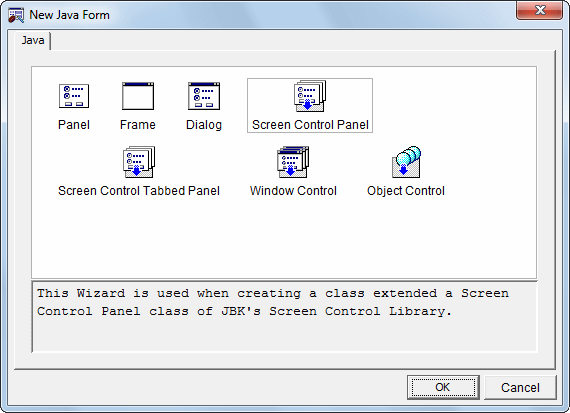
The [New Java Form] wizard is displayed. Select [Screen Control Panel] on the [Java] tab. Then, click [OK].
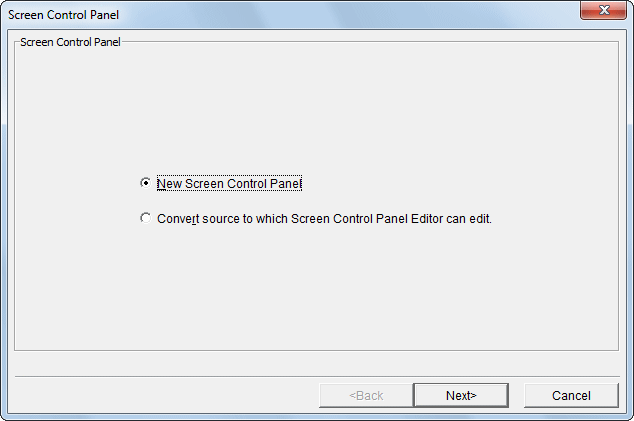
On the first page of the wizard, select whether to create a resource or use an existing resource. Because you are creating a panel in this example, select the [New Screen Control Panel] option. Then, click [Next].
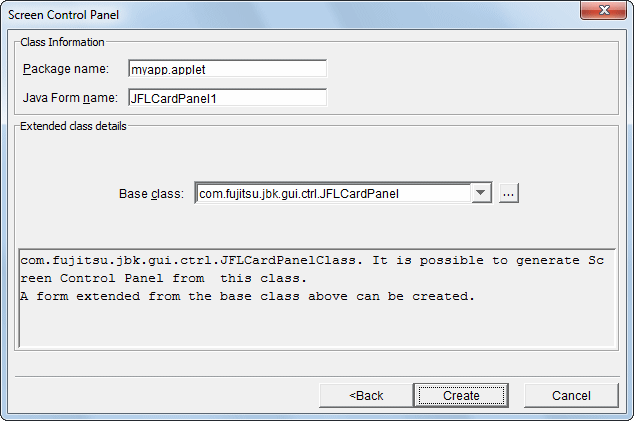
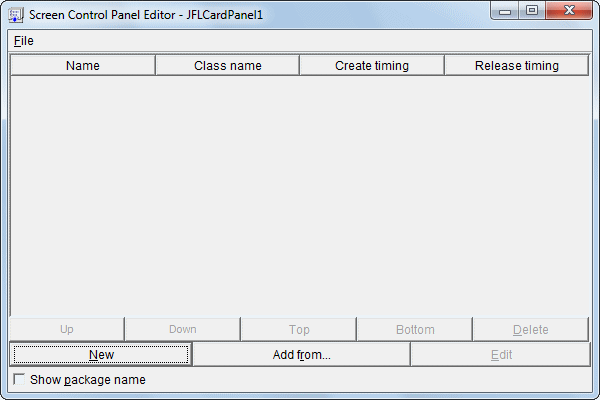
The page for entering class information is displayed. Confirm that "JFLCardPanel1" is specified as the Java form name and "com.fujitsu.jbk.gui.ctrl.JFLCardPanel" is specified for the base class. Then, click [Create].
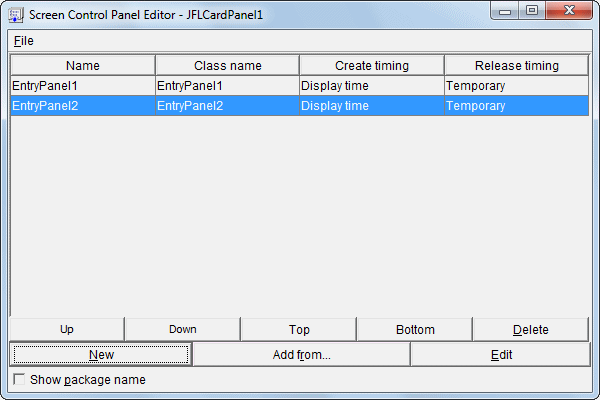
Screen Control Panel Editor is displayed. In this window, you control such details as the setup sequence and names of screen parts, create timing, and release timing. For this project, you will use two task screens (task panels): Login screen and Message screen. Click [New] twice.
Two panels are added. Specify "Login screen" for "EntryPanel1" and "Message screen" for "EntryPanel2."
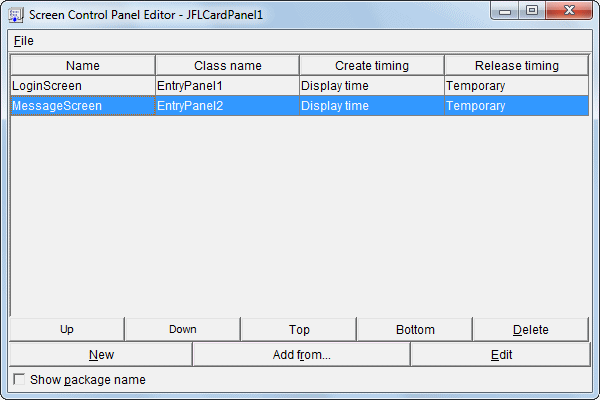
Click a screen name to edit it. Change "EntryPanel1" to "LoginScreen" and "EntryPanel2" to "MessageScreen".
Creating a Login Screen
Design the Login screen. In Screen Control Panel Editor, select "LoginScreen" and click [Edit].
A confirmation message is displayed. Click [Yes].
Java Form Designer starts. EntryPanel1 is displayed.
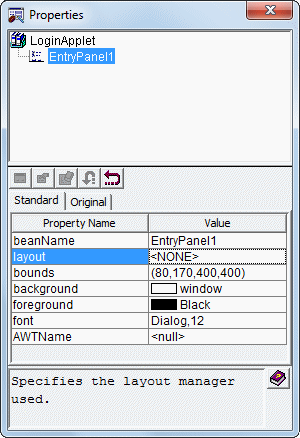
In its initial state, Layout Manager for EntryPanel1 is set to "FlowLayout." FlowLayout places components in sequence from left to right. Because you want to place Beans freely, release the Layout Manager setting.
From the Java Form Designer [View] menu, select [Properties] if the Properties window is not already displayed.
Change the Layout Manager setting from "FlowLayout" to "<NONE>."
Place Beans.
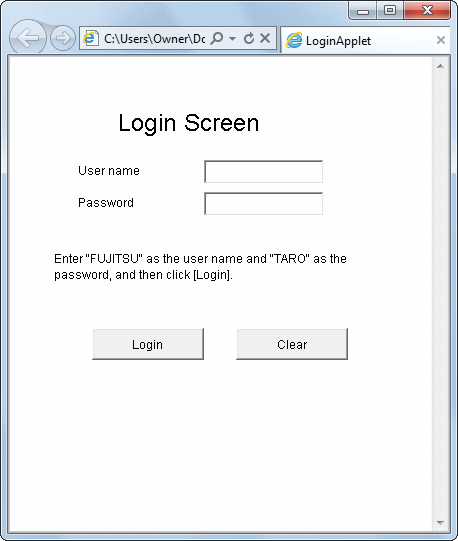
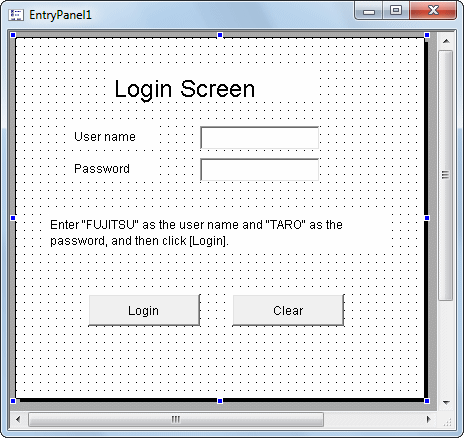
First, place the title character string "Login screen".
If [JBK] is not already selected in the Object Palette, click [JBK].
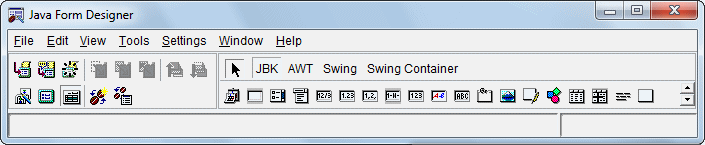
Click [Multiple-Line Label] in the Object Palette.
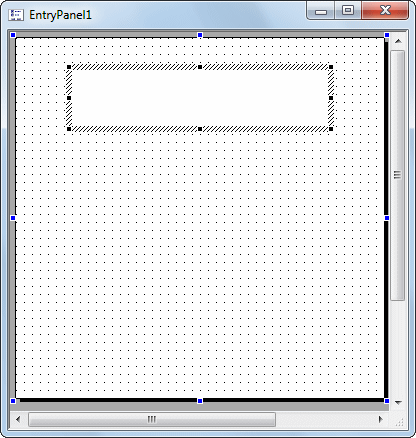
Place it in the Java form. In the Java form, click on the location where you want to paste the Bean.
Drag the mouse to select the area to be filled with the Bean, and release the left mouse button at the appropriate point.
Specify the character string to be displayed.
With the Bean selected, click the [Original] tab in the Properties window.
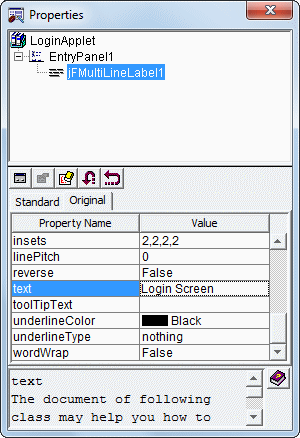
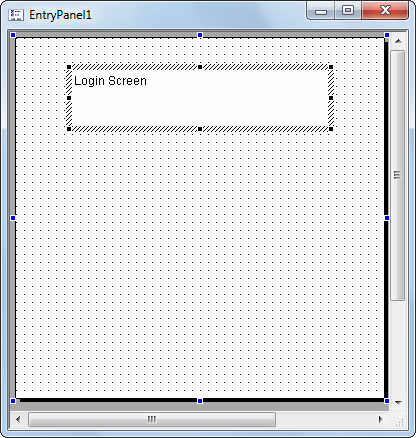
Enter "Login screen" for the text property value.
Place any other Beans as necessary, and define appropriate properties. Standard settings for a Bean rectangle are listed below. Your settings may be different, depending on the priority of the Beans.
Bean type | Bean name | Rectangle (left side, top, width, height) | Character String Field | Other | |
|---|---|---|---|---|---|
JBK | Multiple-Line Label | jFMultiLineLabel1 | 96,32,208,32 | Login screen | Font:Dialog,24 |
JBK | Multiple-Line Label | jFMultiLineLabel2 | 56,88,88,24 | User name | |
JBK | String Field | username | 184,88,120,24 | ||
JBK | Multiple-Line Label | jFMultiLineLabel3 | 56,120,88,24 | Password | |
JBK | String Field | password | 184,120,120,24 | echoChar:* | |
JBK | Multiple-Line Label | jFMultiLineLabel4 | 32,176,344,40 | Enter "FUJITSU" as the user name and "TARO" as the password, and then click [Login]. | wordWrap:True |
JBK | Image button | jFImageButton1 | 72,256,112,32 | Login | |
JBK | Image button | jFImageButton2 | 216,256,112,32 | Clear | |
Describe each event process. Describe the processes by using Java editor in workbench.
Click the [View] menu of Java Form Designer, and select [Java Editor] to open Java editor.
Next, describe the event processes. The Hashtable class in the "java.util" package is used in the event processes, so add the import keyword at the beginning of the source. Add the text shown below in red.
import java.util.Hashtable;For this example, describe the process that is executed when [Login] is clicked and when [Clear] is clicked.
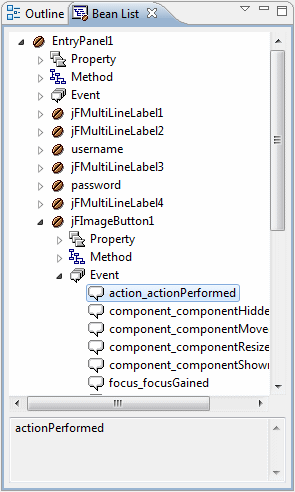
In the "action_actionPerformed" event, describe the process that is executed when a button is clicked. In order to describe the process in the "action_actionPerformed" of "jFImageButton1" expand [EntryPanel1] > [jFImageButton1] > [Event] in the Bean List view, and select "action_actionPerformed." Right-click "action_actionPerformed" to display the Context menu, and select [Insert]. Alternatively, double-click "action_actionPerformed."
If the Bean List view is not displayed, select [Window] > [Show View] > [Other] on the workbench menu bar. Then, expand [Java] from the [Show View] dialog box, and select [Bean List] to display it.
A confirmation message appears. Click [Yes]. The event method is added to the source in Java editor.
Define the process in the added "jFImageButton1_action_actionPerformed$" method when [Login] button is clicked. Use setData method of JFLEntryPanel to store screen data, and setPanel method to move to message screen.
Add the text shown below in red.
    private void jFImageButton1_action_actionPerformed$(java.awt.event.ActionEvent e) {
        if (!defaultEventProc$(e)) {
            // The process executed when the above event occurs is described here.
            Hashtable inputdata = new Hashtable();
            inputdata.put("username", new String(username.getText()));
            inputdata.put("password", new String(password.getText()));
            this.setData(inputdata);
            this.setPanel("MessageScreen");
        }
    }
In the "jFImageButton2_action_actionPerformed$" method, describe the process that is executed when [Clear] (jFImageButton2) is clicked.
Expand [jFImageButton2] > [Event] in the Bean List view. Select and right-click "action_actionPerformed." From the Context menu that is then displayed, select [Insert]. Alternatively, double-click "action_actionPerformed."
A confirmation message appears. Click [Yes].
Define the method so that when [Clear] is clicked, the two character string fields are cleared.
Add the text shown below in red.
    private void jFImageButton2_action_actionPerformed$(java.awt.event.ActionEvent e) {
        if (!defaultEventProc$(e)) {
            // The procedure when the event is generated is described here.
            username.setText("");
            password.setText("");
        }
    }
This is the end of definition of the Login screen.
Select [File] > [Save] from the workbench menu bar.
To close the Java Form, select [File] > [Close] from the Java Form Designer menu bar.
Creating a Message Screen
Next, design the Message screen. Select "MessageScreen" in Screen Control Panel Editor, and then click [Edit].
A confirmation message appears. Click [Yes].
Java Form Designer starts, and EntryPanel2 is displayed.
Because you want to place Beans freely in this panel, release the Layout Manager setting. Change the Layout Manager setting from "FlowLayout" to "<None>."
Place Beans, and define appropriate properties. Standard settings for a Bean rectangle are listed below. Your settings may be different, depending on the priority of the Beans.
Bean type | Bean name | Rectangle (left side, top, width, height) | Character String Field | Other | |
|---|---|---|---|---|---|
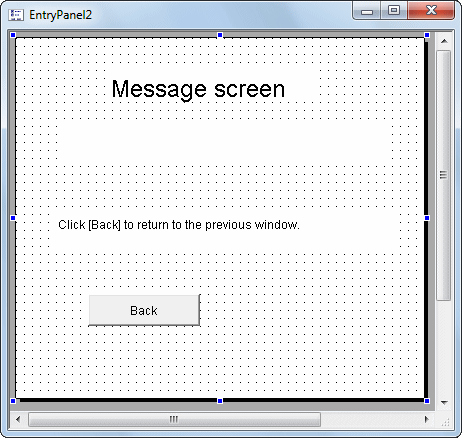
JBK | Multiple-Line Label | jFMultiLineLabel1 | 93,32,208,32 | Message screen | Font:Dialog,24 |
JBK | Multiple-Line Label | msg | 48,88,328,40 | ||
JBK | Multiple-Line Label | jFMultiLineLabel2 | 40,176,344,40 | Click [Back] to return to the previous window. | |
JBK | Image button | jFImageButton1 | 72,256,112,32 | Back | |
Describe the process so that Login screen contents are read and a message is displayed at the time of a screen transition. The Hashtable class in the "java.util" package is used, so add the import keyword at the beginning of the source.
Add the text shown below in red.
import java.util.Hashtable;Next, use the JFLEntryPanel getData method to refer to the screen data corresponding to the screen.
Define the method so that the entered user name and password are verified and the appropriate message is defined in Multiple-Line Label.
Describe the process shown below at the end of the class file.
    public void exposedPanel(String lastPanelName) {
        Hashtable inputdata = (Hashtable) this.getData("LoginScreen");
        String username = (String) inputdata.get("username");
        String password = (String) inputdata.get("password");
        if (username.equals("FUJITSU") && password.equals("TARO")) {
            msg.setText("Hello " + username + ". You have logged in successfully.");
        } else {
            msg.setText("Incorrect user name or password ");
        }
    }
Point
Change prohibition part which is managed by Java Form Designer
Java forms include sources for calling screen (Bean) information and event processes. Because Java Form Designer is used to manage the sources, changing the sources is prohibited.
These sources that must not be changed are enclosed by comments in blue, as shown below.
public class EntryPanel2 extends com.fujitsu.jbk.gui.ctrl.JFLEntryPanel {
    //@@Form Design Information start

      - Sources that are managed with Java Form Designer and that must not be changed -

    //@@Form Design Information end
Next, in the "jFImageButton1_action_actionPerformed$" method, describe the process that is executed when [Back] is clicked.
Expand [EntryPanel2] > [jFImageButton1] > [Event] in the Bean List view, select and right-click "action_actionPerformed", and then select [Insert] from the Context menu that is displayed. Alternatively, double-click "action_actionPerformed."
A confirmation message appears. Click [Yes].
Define the method so that when [Back] is clicked, the setPanel method is implemented for a screen transition to the Login screen.
Add the text shown below in red.
    private void jFImageButton1_action_actionPerformed$(java.awt.event.ActionEvent e) {
        if (!defaultEventProc$(e)) {
            // The process executed when the above event occurs is described here.
            this.setPanel("LoginScreen");
        }
    }
This is the end of definition of the Message screen.
Select [File] > [Save] from the workbench menu bar.
To close the Java Form, select [File] > [Close] from the Java Form Designer menu bar.
Close Screen Control Panel Editor.
Select [File] > [Exit] on the Screen Control Panel Editor menu bar.
Pasting a Screen Control Class into an Applet
The screen control class (Screen Control Panel) is pasted into an applet by implementing the add method in the initUser$ method of the LoginApplet class. Describe the process in Java editor in workbench.
Add the text shown below in red in the initUser$() method of the LoginApplet class.
    protected void initUser$ () {
        // User definition initialization is described here.
        JFLCardPanel1 cardPanel = new JFLCardPanel1();
        cardPanel.setBounds(0,0,400,400);
        getContentPane().add(cardPanel);
    }
Save the LoginApplet class. Select [File] > [Save] on the workbench menu bar.
Building
Building is executed automatically when resource files (such as the Java files) are saved if the [Build Automatically] item is enabled in the [Project] menu.
If [Build Automatically] is disabled, right-click on the project and select [Build Project] or select [Build Project] in the [Project] menu.
A JAR file is required so create it.
Use the export wizard to create the JAR file.
Select [File] > [Export] to start the export wizard.
Select [Java] > [JAR file] in the export wizard.
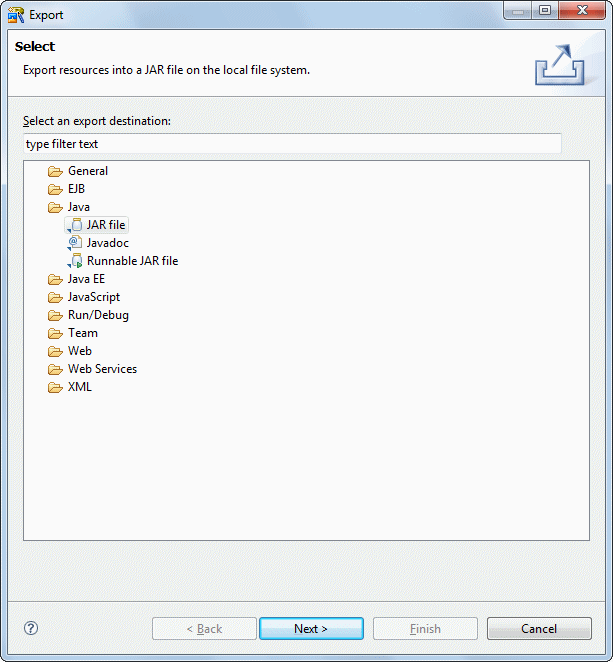
The JAR export wizard is displayed.
Select [LoginApplet] > [src] folder in [Select the resources to export] and enter the following settings.
After setting the information, click [Finish].
Setup Items | Setup Content |
|---|---|
Select the resources to export | src/ |
Export generated class files and resources | Checked |
JAR file | LoginApplet/LoginApplet.jar |
Compress the contents of the JAR file | Checked |
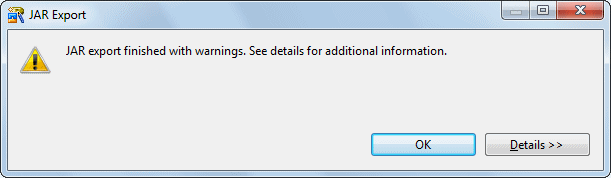
The following message is output when exporting JAR, but this does not indicate a problem.
Running
Select the file (class) to be run. Then, click [LoginApplet] > [src] > [myapp.applet] > [LoginApplet.java] in the [Package Explorer] view in workbench.
Create a launch configuration in the same way as described in Running of "F.3.1 Developing Applet", and run the project. Enter the following for settings:
Setup Items | Setup Content |
|---|---|
Project | LoginApplet |
Applet | myapp.applet.LoginApplet |
Parameters Width | 400 |
Parameters Height | 400 |
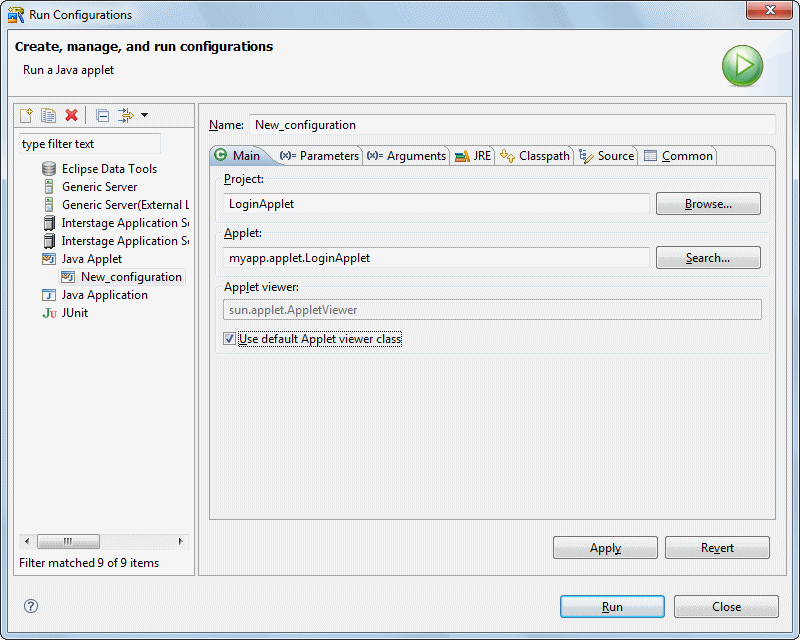
Clicking [Run] causes Applet Viewer to start, and the applet runs in it.
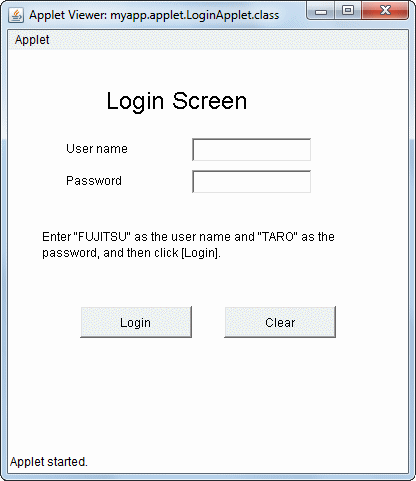
Enter "FUJITSU" as the user name and "TARO" as the password, and then click [Login].
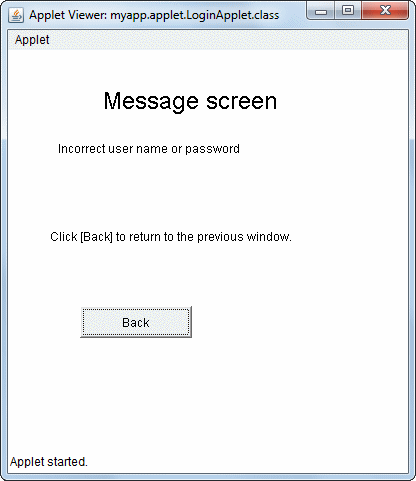
The Message screen is displayed.
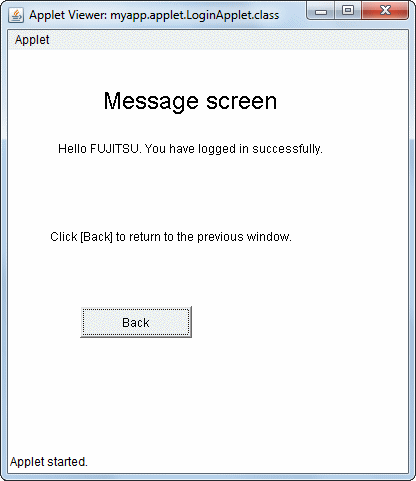
You can return to the Login screen by clicking [Back].
The following message is displayed if a user name other than "FUJITSU" and password other than "TARO" are input.
Close Applet Viewer by clicking the [Close (X)] button on the title bar.
Next, confirm that the applet runs correctly in a Web browser.
To do this, open the "LoginApplet-JBKPlugin.html" file stored in the project folder in Internet Explorer.