This section provides information on the maintenance of a backup management list. A backup management list is maintained on the server that performs the backup.
A backup management list and a recovery control file created at the time of backing up the Symfoware database spaces are backed up.
For details of this, refer to swstresback (Resource backup command).
Backup management list backup data size
Check the size of the file that the subdirectory of the following directory contains.
<Environment directory>\etc\backup\dataIn the cluster environment, check the size of the file that the subdirectory of the following directory contains.
<shared disk>:\etc\opt\swstorage\etc\backup\dataFor backing up Symfoware databases, check the file sizes in the following directories:
Target directory for output of the recovery control file
Point
When you execute swstresback (Resource backup command) by using the same directory used before to save data, the file system in which these directories exist should be at least three times greater than the size returned in query above.
This is because swstresback (Resource backup command) executes backup in the state holding the data saved before.
A backup management list and a recovery control file created at the time of backing up the Symfoware database spaces are restored.
For details of this, refer to swstresrst (Resource restore command).
This section describes the maintenance of a replication management list.
To back up a replication management list, back up the repository of the Management Server. For information about backing up a repository, refer to "Saving a database" in the ETERNUS SF AdvancedCopy Manager Operation Guide relevant to the OS of the Management Server.
Point
Operational information for replication management is saved in a repository.
It is recommended that a replication management list be backed up when operation information for replication management is changed with swsrpsetvol (Replication volume information setting command), or with swsrpdelvol (Replication volume information deletion command).
Perform the following steps to restore a replication management list:
Restore the repository to the Management Server. For information about restoring a repository, refer to "Recovering a database" in the ETERNUS SF AdvancedCopy Manager Operation Guide relevant to the OS of the Management Server.
If the Management Server is Windows
Select "RDB dictionary and DSI recovery (LOAD Mode)" as the recovery method.
If the Management Server is Solaris or Linux
Specify 0 for stgdbrcv -m option (recovery mode) as the recovery method.
On the Managed Server, execute swsrprecoverres (Resource adjustment command) with the -r option.
Point
When above 2 steps are performed, operational information for replication management of a repository is copied to a Managed Server, where it is then available for use.
When this information for replication management in the repository does not need to be changed, and only the operation information for replication management on the Managed Server is incorrect (for some reason), perform only step 2.
This section explains maintenance methods for the VSS backup management list that is used in the Hyper-V backup function.
Perform them on servers that are using Hyper-V's VSS backup function (Hyper-V host and backup servers).
Make sure that no commands of the Hyper-V backup function are being executed, and perform the backup and restore of the VSS backup management list manually.
For backing up the VSS backup management list, copy the files that are in below directory to any other directory as needed.
<Environment directory>\etc\repl\data\vrqFor restoring the VSS backup management list, copy the files that you copied according to "11.1.1.3.1 Backing up the VSS backup management list" back to below directory.
<Environment directory>\etc\repl\data\vrqThis section describes the maintenance of a database used by a Management Server.
Saving a database can be performed either through functionality provided Using a GUI or Using the database save command.
An explanation of each method is provided below.
After saving a database, refer to "11.7 Maintaining a database of ETERNUS SF Manager" and save a database of ETERNUS SF Manager as well.
Note
Executing this process with the service listed below must be paid attention.
Terminal service (via a remote desktop connection)
If the Management Server is running on Windows Server 2003, the Terminal Service must be used by making a console session connection to it. Refer to the following link for information on how to make console session connections:
http://support.microsoft.com/kb/947723/en
http://support.microsoft.com/kb/278845/en
Do not use service listed below, as it will not work properly.
Telnet server service
When the Management Server is in cluster operation, you should prepare directories into which data is saved on shared disks.
Using a GUI
Save a database as follows:
Click the [Start] button and select [Programs] -> [AdvancedCopy Manager] -> [DB Setup].
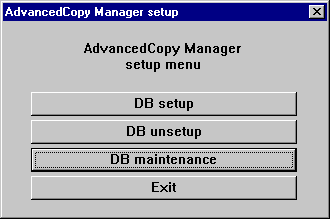
The following window will be displayed. Click the [DB maintenance] button.
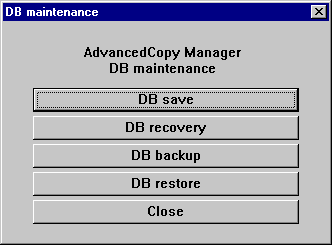
The following DB maintenance window will be displayed. Click the [DB save] button.
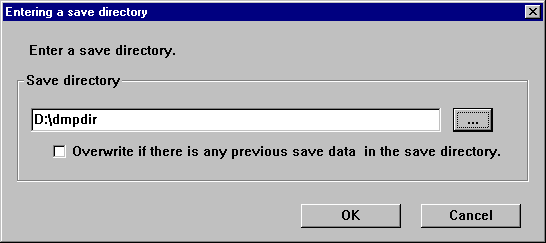
The save directory specification window will be displayed. To specify a save directory, enter the directory name and click the [OK] button. To overwrite an already saved directory, click in the [Overwrite if there is any previous save data in the save directory] checkbox.
Note
Create the save directory in advance.
The blank space and the following characters [" | : * ? / . < > , % & ^ = ! ; # ' @] cannot be used in the save directory name.
The DB save processing confirmation window will be displayed. Check that the information entered is correct and click the [Start] button.
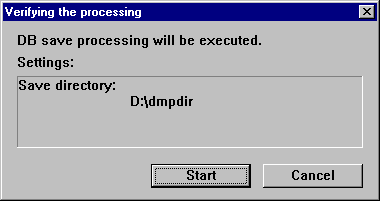
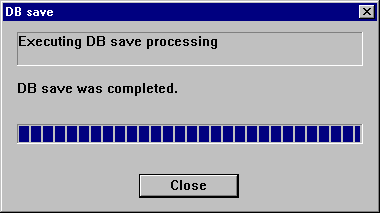
When the DB save has completed successfully, the following window will be displayed. Click the [Close] button.
Using the database save command
Execute this command on the Management Server.
For details on this command, refer to stgdbdmp (Database save command).
Point
Use this save method only when the configuration information is changed due to the addition of a Managed Server, or fetching of new device information. It is recommended to save a database regularly (for example, once a day).
To safeguard against an input-output error in an external file while saved data is being acquired, it is recommended to keep at least two generations of saved data.
Note
If no data is saved by this command or by using screens, the database cannot be recovered with the "11.1.1.4.3 Recovering a database" process when an input-output error has occurred in the database.
Database backup data size
Calculate the size using the following formula:
60 + (number of devices to be managed x 0.001) megabytes |
You will need to recover a database if an input-output error occurs while using the database. The method of recovering the database depends on where in the database the error occurred.
To determine where an error has occurred in a database, follow the steps below:
Click the Start button and select [Programs] -> [Administrator Tool (Common)] -> [Event Viewer].
Display the event viewer window and select [Log] -> [Application].
The application log window will be displayed. From the records whose source name is displayed as "SymfoWARE", double-click the record that encountered the error. This will display the detailed window.
On the detailed window, find a qdgXXXXX error message. The below table shows the "recovery modes" corresponding to error messages. A "recovery mode" indicates where to find information that is required to recover a database. For more information, refer to "11.1.1.4.3 Recovering a database".
Note
If multiple errors occur at the same time, recovery may not be possible using one of the recovery modes shown above. In this case, recreate a database and then use the recovery mode "Database recovery (LOAD mode)". This will perform a recovery up to the point when data has been saved.
Data written after the last database save will be adversely affected by the error and cannot be restored.
The swstsrsemtch (Resource match command) with -x option will need to be executed on all Managed Servers on which the backup is performed, after which swsrprecoverres (Resource adjustment command) with -r option will need to be executed on the Managed Servers on which the replication is performed.
If an input-output error (or any other error) occurs in the database space, perform recovery as follows:
Note
Executing this process with the service listed below must be paid attention.
Terminal service (via a remote desktop connection)
If the Management Server is running on Windows Server 2003, the Terminal Service must be used by making a console session connection to it. Refer to the following link for information on how to make console session connections:
http://support.microsoft.com/kb/947723/en
http://support.microsoft.com/kb/278845/en
Do not use service listed below, as it will not work properly.
Telnet server service
When the Management Server is in cluster operation, note the following points:
Before you execute this process, make the shared disk for the repository and that for shared data usable.
Upon the successful completion of recovery, resource "SymfoWARE RDB RDBSWSTF" on the Management Server transaction may remain faulty on the cluster administrator. In this case, set the Management Server transaction online from the cluster administrator.
Click the Start button and select [Programs] -> [AdvancedCopy Manager] -> [DB Setup].
The following window will be displayed. Click the [DB maintenance] button.

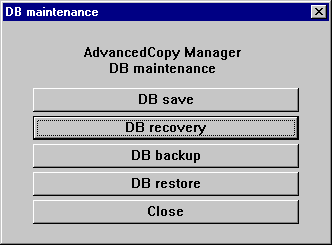
The following DB maintenance window will be displayed. Click the [DB recovery] button.
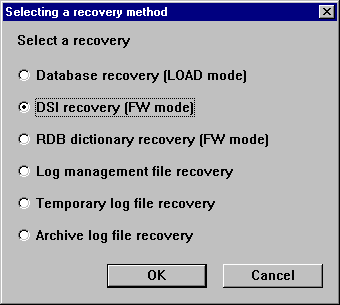
The recover mode selection window will be displayed. Select a recovery mode and click the [OK] button. For information on deciding on a recovery method, refer to "11.1.1.4.2 Finding an error in a database".
When selecting "Log management file recovery" or "Archive log file recovery", go to step 6. The window of step 5 is not displayed.
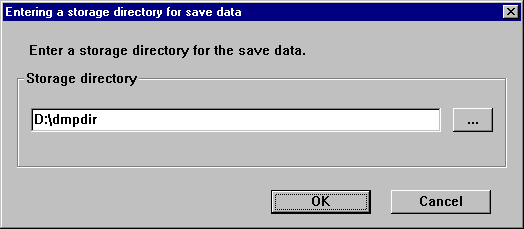
The window for entering a save data storage directory will be displayed. Specify a directory in which save data has been stored and click the [OK] button.
The processing confirmation window will be displayed. Check that the entered information is correct and click the [Start] button.
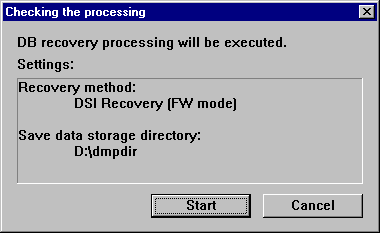
When the DB recovery process is completed, the following completion window will be displayed. Click the [Close] button.
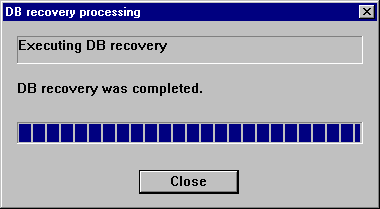
When the DB recovery process is completed, save the database. It is recommended to save the database in a different location than previously. For information on the save methods, refer to "11.1.1.4.1 Saving a database".
Restart all the services on the Management Server. For information on stopping and starting a service, refer to "Chapter 2 Starting and Stopping Services".
This section describes the maintenance of a registry. Perform this procedure on a Management Server or a Managed Server.
In a command prompt window, back up the following files using the copy command, etc.
<Environment directory>\etc\swnode.ini
<Environment directory>\etc\device.ini
<Drive letter of the shared disk for AdvancedCopy Manager share data>:\etc\opt\swstorage\etc\swnode.ini
<Drive letter of the shared disk for AdvancedCopy Manager share data>:\etc\opt\swstorage\etc\device.ini
Back up the registry to the backup directory on hard drive D. This example assumes that AdvancedCopy Manager has been installed at C:\ETERNUS_SF.
C:\>copy C:\ETERNUS_SF\ACM\etc\swnode.ini D:\backup\ C:\>copy C:\ETERNUS_SF\ACM\etc\device.ini D:\backup\ |
Registry backup data size
Check the size of the file to be backed up.
In a command prompt window, use the copy command or another method to restore the following files.
<Environment directory>\etc\swnode.ini
<Environment directory>\etc\device.ini
<Drive letter of the shared disk for AdvancedCopy Manager share data>:\etc\opt\swstorage\etc\swnode.ini
<Drive letter of the shared disk for AdvancedCopy Manager share data>:\etc\opt\swstorage\etc\device.ini
Restore files saved to the \backup directory in D drive.
C:\>copy D:\backup\swnode.ini C:\ETERNUS_SF\ACM\etc\ C:\>copy D:\backup\device.ini C:\ETERNUS_SF\ACM\etc\ |
This section describes the maintenance of Symfoware database information file.
Back up Symfoware database information file used for Symfoware backup server operation.
For backing up Symfoware database information file, copy the files that are in below directory to any other directory as needed.
In case of normal operation (non-clustered environment)
<Environment directory>\etc\repl\data\DEFAULT\symfoIn case of operation in clustered environment
<Environment directory for logical node>\etc\repl\data\DEFAULT\symfo
Restore Symfoware database information file used for Symfoware backup server operation.
Copy the file backed up in "11.1.1.6.1 Backing up Symfoware database information file" into the following directories:
In case of normal operation (non-clustered environment)
<Environment directory>\etc\repl\data\DEFAULT\symfoIn case of operation in clustered environment
<Environment directory for logical node>\etc\repl\data\DEFAULT\symfo
This section describes the maintenance of a target directory for output of the recovery control file.
Back up a target directory for output of the recovery control file that is used for Symfoware backup server operation.
In the target directory for output of the recovery control file are stored a recovery control file and a backup history file that are created at backup time.
Copy the files in the target directory for output of the recovery control file into any directory.
In case of normal operation (non-clustered environment)
<Environment directory>\etc\SymfoWARE\RepIn case of operation in clustered environment
<Environment directory for logical node>\etc\SymfoWARE\Rep
Restore a target directory for output of the recovery control file that is used for Symfoware backup server operation.
Copy the file backed up in "11.1.1.7.1 Backing up a target directory for output of the recovery control file" into the target directory for output for output of the recovery control file.
In case of normal operation (non-clustered environment)
<Environment directory>\etc\SymfoWARE\RepIn case of operation in clustered environment
<Environment directory for logical node>\etc\SymfoWARE\Rep