This section explains the customization procedure for a primary node.
This section explains the required procedure for customizing a primary node for ETERNUS SF Manager.
Follow the procedure below to prepare a generic script to be used on the primary node.
In the ETERNUS SF Manager program directory on the primary node, store the generic script file that you created in "4.1.1 Shared resources".
Set the access restrictions for the stored generic script file.
Run the following command for the stored generic script file:
>cacls fileName /P "NT AUTHORITY\SYSTEM:F" "BUILTIN\Administrators:F" <RETURN> |
Example
C:\ETERNUS_SF>cacls apache.vbs /P "NT AUTHORITY\SYSTEM:F" "BUILTIN\Administrators:F" Are you sure (Y/N)?y Processing file: C:\ETERNUS_SF\apache.vbs |
Create the cluster resources to be used on the primary node.
For adding ETERNUS SF Manager to already existing cluster services (transactions)
Use the Failover Cluster Manager screen to stop all transactions of the relevant cluster service.
However, keep the shared disk being used by ETERNUS SF Manager online.
For creating ETERNUS SF Manager in newly created cluster services (transactions)
Follow the procedure below to create cluster resources for ETERNUS SF Manager in the cluster service.
The screen name and item name may be different depending on operating systems.
For explanation purposes, the name of the "Service or Application" for ETERNUS SF Manager is set to "ESF-manager" in Windows Server 2008.
Start the Failover Cluster Manager screen and connect to the clustered system.
Create a "Service or Application" for ETERNUS SF Manager.
Right-click Services and Applications in the Failover Cluster Manager tree, and, in the subsequently displayed menu, select More Actions... > Create Empty Service or Application.
Under Services and Applications, the New service or application will be created.
Right-click New service or application and then select Properties.
The New service or application Properties dialog box will be displayed.
On the General tab, modify the Name. Then, under Preferred owners, select the resource name for the primary node, and click Apply.
After applying the settings, click OK.
Allocate a shared disk to the "Service or Application" for ETERNUS SF Manager.
Right-click Services and Applications > ESF-manager, and then select Add storage.
The Add Storage screen will be displayed.
From Available disks, select the shared disk for ETERNUS SF Manager and click OK.
Allocate a client access point to the "Service or Application" for ETERNUS SF Manager.
Right-click Services and Applications > ESF-manager, and then select Add a resource > 1 - Client Access Point.
The New Resource Wizard screen will be displayed.
Set the following items and click Next.
Name
Set the network name that you prepared in "4.1.1 Shared resources".
Network
Check the network to be used.
Address
Set the Logical IP address resources (the IP address resources) that you prepared in "4.1.1 Shared resources".
Check the contents on the Confirmation screen and click Next.
Check the contents on the Summary screen and click Finish.
Make sure that the settings have been applied.
At the center of the screen, under ESF-manager Summary, confirm that the set resources have been added to Server Name.
Take ownership of the shared disk and of the transactions that are used by the Quorum disk and ETERNUS SF Manager.
Copy the files on the dynamic disks of ETERNUS SF Manager on the primary node to the shared disk for ETERNUS SF Manager.
Use Explorer or a similar tool to create the directory "driveName:\ETERNUS_SF\" in a directory on the shared disk.
Use Explorer or a similar tool to copy the files from the local disks on the primary node to the directory on the shared disk.
Local disk (copy source) | Shared disk (copy destination) |
|---|---|
programDir\Common\etc\db | driveName:\ETERNUS_SF\db |
programDir\Common\etc\message | driveName:\ETERNUS_SF\message |
programDir\Common\sys\apache\conf | driveName:\ETERNUS_SF\apache\conf |
programDir\Common\sys\apache\logs | driveName:\ETERNUS_SF\apache\logs |
programDir\Common\var | driveName:\ETERNUS_SF\var |
programDir\LM\var | driveName:\ETERNUS_SF\LM\var |
programDir\Common\sys\tomcat\conf | driveName:\ETERNUS_SF\tomcat\conf |
programDir\Common\sys\tomcat\logs | driveName:\ETERNUS_SF\tomcat\logs |
programDir\Common\sys\tomcat\webapps\esfv15\WEB-INF\log | driveName:\ETERNUS_SF\tomcat\webapps\esfv15\WEB-INF\log |
Use Explorer or a similar tool to modify the following directory names:
programDir\Common\etc\db
programDir\Common\etc\message
programDir\Common\sys\apache\conf
programDir\Common\sys\apache\logs
programDir\Common\var
programDir\Common\sys\tomcat\conf
programDir\Common\sys\tomcat\logs
programDir\Common\sys\tomcat\webapps\esfv15\WEB-INF\log
Note
If another program is using any files in the above directories, modification of the directory names may fail.
If modification of the directory names fails, reboot the server and try again.
On the primary node, set up links to the directories of the shared disk for shared data.
Set up symbolic links from the directories on the local disks on the primary node to the directories on the shared disk.
Setup of symbolic links is required for the following directories:
Local disk (linked source) | Shared disk (link target) |
|---|---|
programDir\Common\etc\db | driveName:\ETERNUS_SF\db |
programDir\Common\etc\message | driveName:\ETERNUS_SF\message |
programDir\Common\sys\apache\conf | driveName:\ETERNUS_SF\apache\conf |
programDir\Common\sys\apache\logs | driveName:\ETERNUS_SF\apache\logs |
programDir\Common\var | driveName:\ETERNUS_SF\var |
programDir\Common\sys\tomcat\conf | driveName:\ETERNUS_SF\tomcat\conf |
programDir\Common\sys\tomcat\logs | driveName:\ETERNUS_SF\tomcat\logs |
programDir\Common\sys\tomcat\webapps\esfv15\WEB-INF\log | driveName:\ETERNUS_SF\tomcat\webapps\esfv15\WEB-INF\log |
Implement the following procedure for all directories:
Move each directory that you copied according to "5.1.1.1.4 Copying of dynamic disk files" to the directory one level above the original directory.
Execute the following command:
>mklink /d srcDir dstDir <RETURN> |
For srcDir, specify the directory on the local disk from which to set the link.
For dstDir, specify the directory on the shared disk to which the link is to be set.
Edit the registry.
Use the registry editor to modify the registry key that stores the var directory for the license manager.
As described below, change the path that is written in the registry key to the path of the copy destination directory you used in "5.1.1.1.4 Copying of dynamic disk files".
Before modification | After modification |
|---|---|
programDir\LM\var | driveName:\ETERNUS_SF\LM\var |
[Sample display for registry key]
For 32-bit operating system:
HKEY_LOCAL_MACHINE
  SOFTWARE
    Fujitsu
      ETERNUS SF License Manager
        CurrentVersion
VarPathName |
For 64-bit operating system:
HKEY_LOCAL_MACHINE
  SOFTWARE
    Wow6432Node
      Fujitsu
        ETERNUS SF License Manager
          CurrentVersion
VarPathName |
Set up the access restrictions for the folder on the shared disk.
Execute the following command:
>cacls folderName /T /P "NT AUTHORITY\SYSTEM:F" "BUILTIN\Administrators:F" <RETURN> |
For folderName, specify "driveName:\ETERNUS_SF\var\log".
Set up the access restrictions for the ETERNUS SF Manager database folder that you copied to the shared disk.
On the primary node, execute the following command:
>cacls driveName:\ETERNUS_SF\db\data /T /P "NT AUTHORITY\SYSTEM:F" "BUILTIN\Administrators:F" "esfpostgres:C" <RETURN> |
Customize a primary node according to the following procedure.
Perform step 6 and later are required when Optimization option is installed.
Copy all files from the environment settings directory of Storage Cruiser's manager and from the working directory to the shared disk.
Use Explorer or a similar tool to copy the following directories of Storage Cruiser's manager to the shared disk:
Copy source directory | Copy destination directory |
|---|---|
environmentDir\ESC\Manager\etc | sharedDisk\ESC\Manager\etc |
workDir\ESC\Manager\var | sharedDisk\ESC\Manager\var |
Edit the registry.
Use the registry editor to modify the registry keys that store the environment settings directory and the working directory.
Change the path that is written in the registry key to the path of the copy destination directory you used in step 1.
Name | Before modification | After modification |
|---|---|---|
etcdir | environmentDir\ESC\Manager | sharedDisk\ESC\Manager |
etcPathName | environmentDir\ESC\Manager\etc | sharedDisk\ESC\Manager\etc |
vardir | workDir\ESC\Manager | sharedDisk\ESC\Manager |
varPathName | workDir\ESC\Manager\var | sharedDisk\ESC\Manager\var |
[Sample display for registry key]
For 32-bit operating system:
HKEY_LOCAL_MACHINE
  SOFTWARE
    Fujitsu
      Systemwalker_Resource_Coordinator
        Site
CurrentVersion |
For 64-bit operating system:
HKEY_LOCAL_MACHINE
  SOFTWARE
    Wow6432Node
      Fujitsu
        Systemwalker_Resource_Coordinator
          Site
CurrentVersion |
Edit the setup file.
Use the text editor to modify the setup file that store the environment settings directory and the working directory.
Edit below file *1 and *2.
File name: programDir\ESC\Manager\opt\FJSVssetl\sys\.install.sys
stxs_optdir= (Do not modify these settings!) stxs_etcdir=*1 stxs_vardir=*2 stxs_jredir= (Do not modify these settings!) |
Setting item | Setting value |
|---|---|
*1 | sharedDisk\ESC\Manager\etc\opt\FJSVssetl |
*2 | sharedDisk\ESC\Manager\var\opt\FJSVssetl |
Edit the detailed setting file of the storage management.
Use the text editor to set the detailed setting file that store the takeover IP address for Management Server transaction.
Add the line of "LOGICAL_MANAGER_IP" and/or "LOGICAL_MANAGER_V6IP" in below detailed setting file.
File name: sharedDisk\ESC\Manager\etc\opt\FJSVssmgr\current\sanma.conf
Additional line is different according to the takeover IP address for Management Server transaction as follows:
For only IPv4 address:
LOGICAL_MANAGER_IP="takeoverIPAddressForManagementServerTransaction(IPv4Format)";
For only IPv6 address:
LOGICAL_MANAGER_V6IP="takeoverIPAddressForManagementServerTransaction(IPv6Format)";
For IPv4 address and IPv6 address:
LOGICAL_MANAGER_IP="takeoverIPAddressForManagementServerTransaction(IPv4Format)";
LOGICAL_MANAGER_V6IP="takeoverIPAddressForManagementServerTransaction(IPv6Format)";
Refer to "LOGICAL_MANAGER_IP" and "LOGICAL_MANAGER_V6IP" in "sanma.conf Parameter" in the ETERNUS SF Storage Cruiser Operation Guide for information on the detailed setting file.
Delete the directories.
Use Explorer or a similar tool to delete the following directories of ETERNUS SF Manager from the primary node.
environmentDir\ESC\Manager\etc
workDir\ESC\Manager\var
Copy the files on the dynamic disks that are used by Optimization option on the primary node to a shared disk.
Use Explorer or a similar tool to create "sharedDisk:\AST\" directory.
Copy the following data to the directories on the shared disk.
Local disk (copy source) | Shared disk (copy destination) |
|---|---|
environmentDir\AST\Manage\etc\opt\FJSVssast\data | sharedDisk\AST\etc\data |
workDir\AST\Manage\var\opt\FJSVssast\data | sharedDisk\AST\var\data |
Use Explorer or a similar tool to modify the following directory names:
environmentDir\AST\Manager\etc\opt\FJSVssast\data
workDir\AST\Manager\var\opt\FJSVssast\data
Examples to change the directory name are shown below:
C:ETERNUS_SF\AST\Manager\etc\opt\FJSVssast\data_original
C:ETERNUS_SF\AST\Manager\var\opt\FJSVssast\data_original
Note
If another program is using any files in the above directories, modification of the directory names may fail.
If modification of the directory names fails, reboot the server and try again.
On the primary node, set up links to the directories on the shared disk for shared data.
Local disk (linked source) | Shared disk (link target) |
|---|---|
environmentDir\AST\Manage\etc\opt\FJSVssast\data | sharedDisk\AST\etc\data |
workDir\AST\Manage\var\opt\FJSVssast\data | sharedDisk\AST\var\data |
Execute the following command for all directories:
>mklink /d srcDir dstDir <RETURN> |
For srcDir, specify the directory on the local disk from which to set the link.
For dstDir, specify the directory on the shared disk to which the link is to be set.
Customize the primary node.
Follow the procedure below to prepare a generic script to be used on the primary node.
In the program directory for ETERNUS SF Manager or AdvancedCopy Manager CCM on the primary node, store the generic script file that you created in "4.1.4 Resources required for AdvancedCopy Manager CCM".
Set up the access restrictions for the stored generic script file.
Execute the following command to the stored generic script file.
>cacls fileName /P "NT AUTHORITY\SYSTEM:F" "BUILTIN\Administrators:F" <RETURN> |
Customize the primary node.
Information
This section uses the following values for explanatory purposes:
Value | Description |
|---|---|
$INS_DIR | "Program directory" used when installing ETERNUS SF Manager or AdvancedCopy Manager CCM |
$ENV_DIR | "Environment settings directory" used when installing ETERNUS SF Manager or AdvancedCopy Manager CCM |
$TMP_DIR | "Working directory" used when installing ETERNUS SF Manager or AdvancedCopy Manager CCM |
$SHARE_DL | "Drive letter" of shared disk for shared data |
$SHARE_TOP | "Storage directory" for "Environment settings directory" and "Working directory" of shared disk for shared data |
For the path name of "$SHARE_DL:\$SHARE_TOP", only single-byte alphanumeric characters with no spaces can be used. The path name can be specified with a maximum of 76 characters.
Create directories on the shared disk for shared data.
On the primary node, create the following directories on the shared disk for shared data:
$SHARE_DL:$SHARE_TOP\etc
$SHARE_DL:$SHARE_TOP\var
Copy the environment setup files to the shared disk for shared data.
On the primary node, copy the files from the following directory paths to the copy destination directories on the shared disk for shared data.
Copy source directory | Copy destination directory |
|---|---|
$ENV_DIR\CCM\etc | $SHARE_DL:$SHARE_TOP\etc |
$TMP_DIR\CCM\var | $SHARE_DL:$SHARE_TOP\var |
Create backup directories for the AdvancedCopy Manager CCM setup files.
On the primary node, create the following directories.
$INS_DIR\CCM\noncluster\bin
$INS_DIR\CCM\noncluster\micc\sys
$INS_DIR\CCM\noncluster\sys
Copy the .install.sys, stxc_install.sys, and sys.properties files.
Copy the following files from the source directories to the destination directories on the primary node.
Copy source directory | Copy destination directory |
|---|---|
$INS_DIR\CCM\micc\sys\.install.sys | $INS_DIR\CCM\noncluster\micc\sys\.install.sys |
$INS_DIR\CCM\bin\.stxc_install.sys | $INS_DIR\CCM\noncluster\bin\.stxc_install.sys |
$INS_DIR\CCM\sys\sys.properties | $INS_DIR\CCM\noncluster\sys\sys.properties |
Note
The copied files are required for "Chapter 13 Deletion of Cluster Environment for Management Server Transactions".
Edit the .install.sys, stxc_install.sys, and sys.properties files.
On the primary node, edit nodes from *1 to *4 of files below:
File name: $INS_DIR\CCM\micc\sys\.install.sys
stxs_optdir= (Do not modify these settings!) stxs_etcdir= (Do not modify these settings!) stxs_vardir=*1 stxs_jredir= (Do not modify these settings!) |
File name: $INS_DIR\CCM\bin\.stxc_install.sys
stxc_optdir= (Do not modify these settings!) stxc_etcdir=*2 stxc_jredir= (Do not modify these settings!) |
File name: $INS_DIR\CCM\sys\sys.properties
com.fujitsu.eternussf.acm.ccm.optpath= (Do not modify these settings!) com.fujitsu.eternussf.acm.ccm.etcpath=*3 com.fujitsu.eternussf.acm.ccm.varpath=*4 com.fujitsu.eternussf.acm.ccm.micc.path= (Do not modify these settings!) com.fujitsu.eternussf.acm.ccm.grapi.path= (Do not modify these settings!) com.fujitsu.eternussf.acm.ccm.language= (Do not modify these settings!) |
Setting item | Setting value | Sample setting |
|---|---|---|
*1 | $SHARE_DL:$SHARE_TOP\var\micc | G:\ccmdata\var\micc |
*2 | $SHARE_DL:$SHARE_TOP\etc | G:\ccmdata\etc |
*3 | $SHARE_DL\:$SHARE_TOP\\etc\\ | G\:\\ccmdata\\etc\\ |
*4 | $SHARE_DL\:$SHARE_TOP\\var\\ | G\:\\ccmdata\\var\\ |
The sample setting values use drive "G:" for $SHARE_DIR and "ccmdata" for $SHARE_TOP.
Note
If $SHARE_TOP of *3 or *4 is located on multiple directory levels, use "\\" as a delimiter.
To set up a primary node, use the procedure below.
Note
For Windows Server 2012, install the Failover Cluster Command Interface before performing the cluster setup.
The Windows "Computer Browser service" must be activated if a user belonging to the Administrators of the domain wants to perform customization for the Windows version of WSFC.
Do not use the Telnet Server service.
Execute the cluster setup command.
Execute the following cluster setup command on the primary node:
programDir\ACM\bin\stgclset_mscs |
Select the node type and shared disk.
The initial window of the cluster setup command will be displayed.
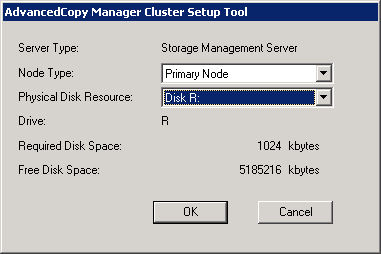
Each item is explained below. Make the required entries and then click OK.
Item | Explanation |
|---|---|
Server Type | Confirm that the server is a "Storage Management Server". |
Node Type | Select "Primary Node". |
Physical Disk Resource | Select the disk resource of the shared disk for shared data that was prepared in "4.1.1 Shared resources". |
Drive | The drive letter corresponding to the physical disk resource is displayed. |
Required Disk Space | The minimum disk size required for the cluster environment is displayed. |
Free Disk Space | The amount of free disk space of the specified drive is displayed. |
Set the cluster information for the primary node.
The setting screen of the cluster setup command will be displayed. The following screen is for Windows Server 2008. A screen name may vary from operating system to operating system.
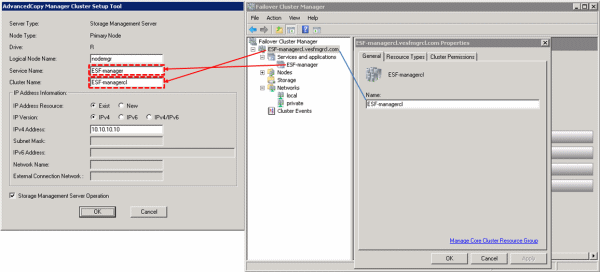
Each item is explained below. Make the required entries and then click OK.
Item | Explanation |
|---|---|
Server Type | Confirm that the server is a "Storage Management Server". |
Node Type | Confirm that the node is "Primary Node". |
Drive | The drive letter corresponding to the physical disk resource is displayed. |
Logical Node Name | Enter the logical node name as defined in "4.1.3 Resources required for AdvancedCopy Manager's manager". |
Service Name | Enter the service name as defined in "4.1.1 Shared resources". |
Cluster Name | Enter the cluster name as confirmed in "4.1.1 Shared resources". |
IP Address Resource | Select "Exist" if a server is the Management Server. |
IP Version | Select the IP version of Management Server IP address. |
IPv4 Address | Enter the logical IP address as defined in "4.1.1 Shared resources". |
IPv6 Address | Enter the logical IP address as defined in "4.1.1 Shared resources". |
Storage Management Server Operation | Select this item. |
Set the port number and service.
The following page will be displayed. If the port number and service has already been set, this page is not displayed.
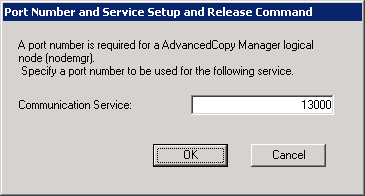
Each item is explained below. Make the required entries and then click OK.
Item | Explanation |
|---|---|
Communication Service | Enter the port number for the transaction communication service as defined in "4.1.3 Resources required for AdvancedCopy Manager's manager". |
The following page will be displayed. Click OK.

Set the database information.
When the following page will be displayed, change the displayed information as required, and click Continue. If one shared disk for AdvancedCopy Manager repository and shared disk for shared data, specify the drive selected in item 2 as the database creation folder. Finally, be sure that you create a database on the shared disk.
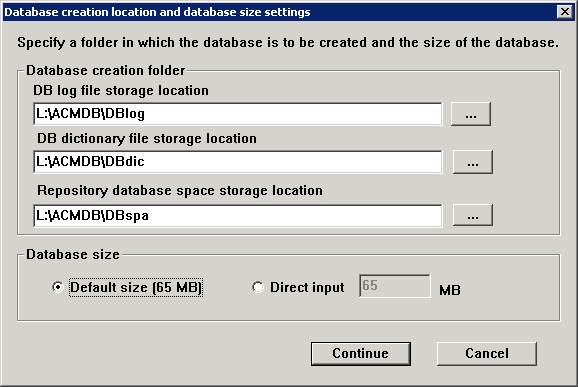
Each item is explained below. Make the required entries and then click Continue.
This is the folder where the database will be created.
Enter the full path for each of the database directories. The specified folders must be new NTFS folders. If a folder specified is not a NTFS folder or if it already exists, choose another name.
Note
Do not select the option [Compress drive to save disk space] in the General tab for any of these drives.
Overhead is greater to a compressed drive than a non compressed drive. Depending on the amount of I/O, access errors may occur in low OS resource conditions.
Do not check the [Compress or Encrypt Attributes] in the [Advanced Attributes] section of the [Properties] or [Advanced] part of the General tab.
Overhead is greater to a compressed and/or encrypted drive. Access errors may occur in low OS resource conditions.
If the encryption property is selected, access errors may occur when decryption cannot be performed.
Specify the database size in megabyte units. Use the value calculated by referring to "Estimation of database size" in the ETERNUS SF Installation and Setup Guide. To use the default value, select the Default size (65MB) checkbox.
Set the database access user.
Enter the user name and password of the user who will access the database. After entering the information, click Settings. The IP address entered in the cluster setup command window is displayed in the IP address field of the Storage Management Server. This IP address cannot be changed.
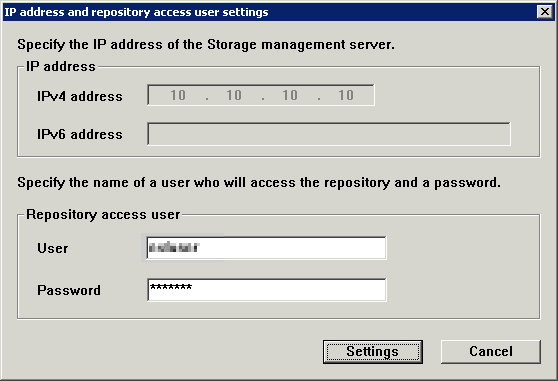
These are the following conditions for the specification of User and Password.
A user name and password that can be specified in the operating system
Note
If user settings were entered as shown above, and the user is deleted or the password is changed on the operating system, perform the setup processing again. Refer to "User deletion or password change in repository access user settings" in the ETERNUS SF AdvancedCopy Manager Operation Guide (for Windows).
The Windows "Computer Browser service" must be activated if a user belonging to the Administrators of the domain wants to perform customization for the Windows version of WSFC. If the customization is performed when the Computer Browser service is not started, the database setup processing might fail and the "Machine information cannot be obtained" message will be displayed.
Confirm the setting information.
When the setting information for the database is displayed, confirm the displayed information and click Start.
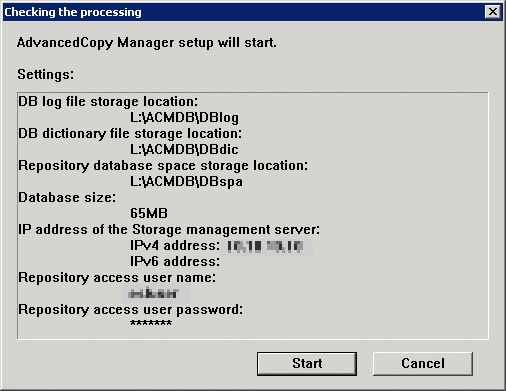
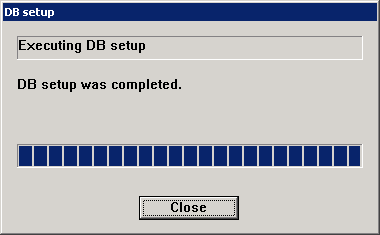
The database setup process starts.
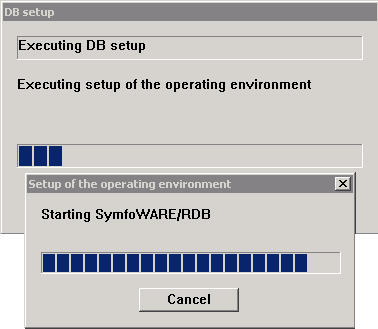
The following progress bar will be displayed, when the process is completed. Click Close.
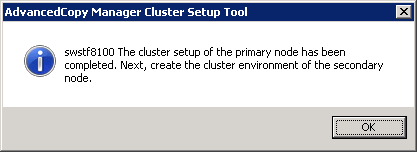
The cluster setup of the primary node has been completed.
When the cluster setup completion window is displayed, click OK.
