The section describes the upgrade of clustered systems.
The following values are used in the description:
Directory name | Explanation |
|---|---|
$INS_DIR | "Program Directory" specified at the ETERNUS SF Manager installation. |
$ETC_DIR | "Environment Directory" specified at the ETERNUS SF Manager installation. |
The operational environment must be prepared prior to upgrading the Storage Cruiser's manager, as described below.
Checking the Symfoware
The Symfoware product is bundled with this product. If Symfoware is already installed on the server where the upgrade will be performed, check the Symfoware environment before starting the upgrade.
See
Refer to "Before installation" in "Installation of ETERNUS SF Manager" in the ETERNUS SF Installation and Setup Guide for this version for details.
Check that the ETERNUS SF Manager services are stopped on the secondary node.
If not stopped, use the Failover Cluster Manager on the secondary node to stop the transactions of ETERNUS SF Manager.
When using the ETERNUS VASA Provider or the ETERNUS Information Provider, check that the ETERNUS Information Provider service is stopped on the secondary node.
If not stopped, use the Failover Cluster Manager on the secondary node to stop the transactions of the ETERNUS Information Provider.
On the primary node, stop the ETERNUS SF Manager services.
Use the Failover Cluster Manager to stop the transactions of ETERNUS SF Manager.
However, the shared disk for shared data of ETERNUS SF Manager must be online.
When using the ETERNUS VASA Provider or the ETERNUS Information Provider, stop the ETERNUS Information Provider service on the primary node.
Use the Failover Cluster Manager to stop the transactions of the ETERNUS Information Provider.
However, the shared disk for shared data of the ETERNUS Information Provider must be online.
If Managed Server transactions coexist in the clustered system, perform the following procedure:
On the secondary node for a target transaction, check that the Managed Server transactions are stopped.
If not stopped, use the Failover Cluster Manager to stop Managed Server transactions on the secondary node.
If multiple Managed Server transactions exist, perform this procedure on each secondary node for Managed Server transactions.
On the primary node for a target transaction, stop the Managed Server transaction.
Use the Failover Cluster Manager to stop Managed Server transactions.
However, the shared disk for shared data of Managed Server transactions must be online.
If multiple Managed Server transactions exist, perform this procedure on each primary node for Managed Server transaction.
Stop the local transactions on all the nodes, perform the following procedure:
Select Control Panel > Administrative Tools > Services.
Select "AdvancedCopy Manager COM Service" and then click Stop.
Back up the environment and data.
On the primary and secondary nodes, back up the Windows system.
On the primary node, back up the shared disk for shared data of ETERNUS SF Manager.
If Managed Server transactions coexist in the clustered system, back up the shared disk for shared data of Managed Server transactions on each primary node for target transaction.
Point
If a failure occurs during the upgrade, you cannot restore the environment to the pre-installation status (rollback). Therefore, back up the following before the upgrade.
Windows system
Shared disk for shared data of ETERNUS SF Manager
Shared disk for shared data of Managed Server transactions
If a failure occurs during the upgrade, restore the system from the backup.
On the primary node, check that SymfoWARE RDB RDBSWSTF services are started.
If not started, refer to "Starting Services" in the ETERNUS SF AdvancedCopy Manager Operation Guide (for Windows).
Note
If the Windows system cannot be backed up, the upgrade procedure described in the section below cannot be performed.
In this case, perform the following procedure:
Uninstall the previous product version.
If Symfoware Server that was bundled with AdvancedCopy Manager is being used, perform the following:
From the Control Panel, use the Add or Remove Programs or Programs and Features function to uninstall Symfoware.
If you have installed both the Symfoware Server and the Symfoware Server Client, uninstall the Symfoware Server Client first.
Install this product version.
The following describes the upgrade procedure for the primary node.
Log on to the server using Administrator privileges.
Save the AdvancedCopy Manager CCM environment setting file ($INS_DIR\CCM\sys\sys.properties).
Copy it to any directory other than the installation destination directory for AdvancedCopy Manager CCM.
The saved file is required for post-Upgrade Installation.
Restore the original file of the AdvancedCopy Manager CCM environment setting file (sys.properties).
Overwrite the original environment setting file with the copy destination file.
Original environment setting file | Copy destination file |
|---|---|
$INS_DIR\CCM\noncluster\sys\sys.properties | $INS_DIR\CCM\sys\sys.properties |
Save the generic script for AdvancedCopy Manager CCM.
If stored the generic script under the bin directory of the program directory for AdvancedCopy Manager CCM according to "Preparation of generic script for AdvancedCopy Manager CCM" in the ETERNUS SF Cluster Environment Setup Guide for the relevant previous version for the corresponding operating system and node, copy it to any directory other than the installation destination directory for AdvancedCopy Manager CCM.
The saved file is required for post-Upgrade Installation.
Insert the DVD-ROM "ETERNUS SF SC/ACM/Express Mediapack for Windows (Manager Program) (1/2)" for this version into the DVD-ROM drive.
Refer to "DVD-ROM contents" in the ETERNUS SF Installation and Setup Guide for this version for information on the DVD-ROM structure and detailed contents.
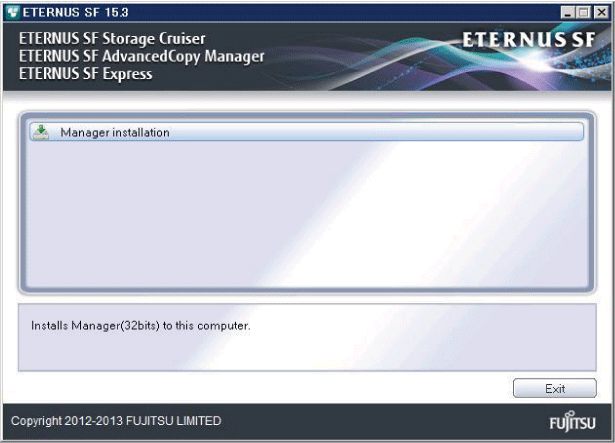
The following window will be displayed. Click Manager installation.
To cancel the upgrade at this point, click Exit.

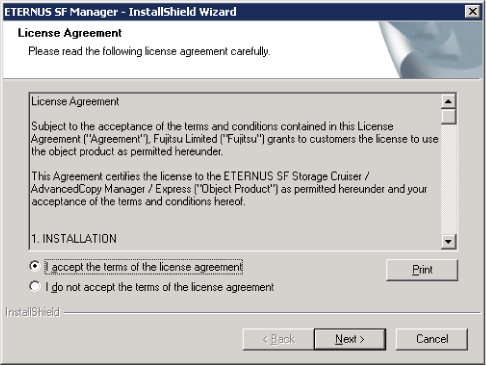
Read the terms and conditions of the License Agreement page.
If the conditions are agreeable, select [I accept the terms of the license agreement] and then click Next.

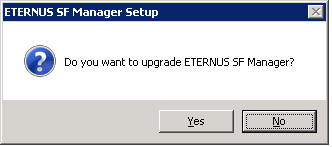
The following dialog box will be displayed. Click Yes.
To cancel the upgrade, click No.

The system configuration will be updated. Wait for the configuration update process to complete.

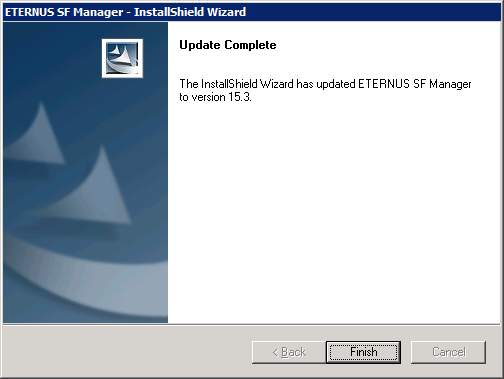
The following installation wizard page will be displayed. The upgrade is completed. Click Finish.

Eject the DVD-ROM.
When the upgrade has been completed, the tasks below need to be performed:
Check that SymfoWARE RDB RDBSWSTF services are stopped.
If not stopped, refer to "Stopping Services" in the ETERNUS SF AdvancedCopy Manager Operation Guide (for Windows).
Restore the AdvancedCopy Manager CCM environment setting file.
Overwrite the AdvancedCopy Manager CCM environment setting file ($INS_DIR\CCM\sys\sys.properties) saved in step 2 of "5.1.2.2 Performing the upgrade (Primary node)" with the file after the upgrade.
Edit the stxs_etcdir information within the AdvancedCopy Manager CCM environment setting file ($INS_DIR\CCM\micc\sys\.install.sys) as follows:
Before | After |
|---|---|
stxs_etcdir=previousDir | stxs_etcdir=upgradedDir (*1) |
*1: Specify the value of stxs_etcdir set to the $INS_DIR\CCM\noncluster\micc\sys\.install.sys file for upgradedDir.
Note
Do not change anything other than the stxs_etcdir line in the $INS_DIR\CCM\micc\sys\.install.sys file.
The $INS_DIR\CCM\noncluster\micc\sys\.install.sys file is for reference only, do not edit.
Restore the generic script for AdvancedCopy Manager CCM.
If the generic script is saved in step 4 of "5.1.2.2 Performing the upgrade (Primary node)", copy the saved generic script to the directory that stored the generic script according to "Preparation of generic script for AdvancedCopy Manager CCM" in the ETERNUS SF Cluster Environment Setup Guide for the relevant previous version for the corresponding operating system and node.
Edit the following environment setting files for AdvancedCopy Manager on the shared disk for shared data of ETERNUS SF Manager:
<Drive of shared disk for shared data of ETERNUS SF Manager>:\etc\opt\swstorage\clsetup.ini
<Drive of shared disk for shared data of ETERNUS SF Manager>:\etc\opt\swstorage\etc\swstg.ini
Change the version information within each file, as follows:
Upgrade patterns | Descriptive contents of the version information | |
|---|---|---|
Before | After | |
Version 15.0B to 15.3 | Version=V15.0 | Version=V15.3 |
Version 15.1 to 15.3 | Version=V15.1 | |
Version 15.2 to 15.3 | Version=V15.2 | |
Note
Do not change anything other than the version information.
If Managed Server transactions exist in the clustered system, edit the environment setting files for AdvancedCopy Manager on the shared disk for Managed Server transactions shared data, on the primary node for a target service.
On the primary node for target transactions, edit the following files:
<Drive of shared disk for shared data of Managed Server transactions>:\etc\opt\swstorage\clsetup.ini
<Drive of shared disk for shared data of Managed Server transactions>:\etc\opt\swstorage\etc\swstg.ini
Change the version information within each file, as follows:
Upgrade patterns | Descriptive contents of the version information | |
|---|---|---|
Before | After | |
Version 15.0B to 15.3 | Version=V15.0 | Version=V15.3 |
Version 15.1 to 15.3 | Version=V15.1 | |
Version 15.2 to 15.3 | Version=V15.2 | |
Note
Do not change anything other than the version information.
If the SNMP Trap XML definition file has been customized, re-customize the definition file to use the new features of Storage Cruiser.
Customize the newly installed definition file:
1_3_6_1_4_1_789.xml
See
Refer to "SNMP Trap XML Definition File" in the ETERNUS SF Storage Cruiser Operation Guide for information on customizing the SNMP Trap XML definition file.
Perform the upgrade for the secondary node.
The upgrade procedure is the same as that for the primary node. Refer to "5.1.2.2 Performing the upgrade (Primary node)".
When the upgrade has been completed, the tasks below need to be performed:
Restore the AdvancedCopy Manager CCM environment setting file.
Overwrite the AdvancedCopy Manager CCM environment setting file ($INS_DIR\CCM\sys\sys.properties) saved in step 2 of "5.1.2.2 Performing the upgrade (Primary node)" with the file after the upgrade.
Edit the stxs_etcdir information within the AdvancedCopy Manager CCM environment setting file ($INS_DIR\CCM\micc\sys\.install.sys) as follows:
Before | After |
|---|---|
stxs_etcdir=previousDir | stxs_etcdir=upgradedDir (*1) |
*1: Specify the value of stxs_etcdir set to the $INS_DIR\CCM\noncluster\micc\sys\.install.sys file for upgradedDir.
Note
Do not change anything other than the stxs_etcdir line in the $INS_DIR\CCM\micc\sys\.install.sys file.
The $INS_DIR\CCM\noncluster\micc\sys\.install.sys file is for reference only, do not edit.
After performing "5.1.2.3 Tasks to be performed after the upgrade (Primary node)" and "5.1.2.5 Tasks to be performed after the upgrade (Secondary node)", perform the following procedure:
Start ETERNUS SF Manager services on the primary node.
Use the Failover Cluster Manager to start the transactions of ETERNUS SF Manager.
When using the ETERNUS VASA Provider or the ETERNUS Information Provider, start the ETERNUS Information Provider service on the primary node.
Use the Failover Cluster Manager to start the transactions of the ETERNUS Information Provider.
If Managed Server transactions exist in a clustered system, start the Managed Server transactions in the primary node for a target transaction.
Use the Failover Cluster Manager to start the Managed Server transactions.
If multiple Managed Server transactions exist, apply this procedure for each Managed Server transaction.
Start the local transactions on all the nodes, perform the following procedure:
Select Control Panel > Administrative Tools > Services.
Select "AdvancedCopy Manager COM Service" and then click Start.
Reset the password for the repository access user in the primary node.
Execute the stguserset command to reset the password for the repository access user.
Point
Even if the password has not changed, ensure that you reset the password.
See
Refer to "Change of password or deletion of the user who was specified as the repository access user" in the ETERNUS SF AdvancedCopy Manager Operation Guide (for Windows) for this version for information on the procedure.
Change the server information in the primary node.
To ensure data consistency, execute the stgxfwcmmodsrv command to change the server information.
When executing the stgxfwcmmodsrv command, specify the Management Server name for the -n option.
Note
For changing the server information, start a new window for command execution, and then perform the procedure on the window.
See
Refer to "stgxfwcmmodsrv (Server information change command)" in the ETERNUS SF AdvancedCopy Manager Operation Guide (for Windows) for this version for information on the command.
If Managed Server transactions exist in the clustered system, change the server information.
To ensure data consistency, execute the stgxfwcmmodsrv command to change the server information.
When executing the stgxfwcmmodsrv command, specify the Managed Server name for the -n option.
This operation should be performed on the primary node for Management Server transactions.
If multiple Managed Server transactions exist, perform this procedure for each Managed Server transaction.
Note
For changing the server information, start a new window for command execution, and then perform the procedure on the window.
See
Refer to "stgxfwcmmodsrv (Server information change command)" in the ETERNUS SF AdvancedCopy Manager Operation Guide relevant to the OS of the Management Server for information on the command.
Note
If operating the Web Console from the same web browser as before the upgrade, delete the web browser's cache prior to operation.