This section explains the setup of the CEP engine.
After installation, the CEP service that manages the CEP engine will start, and one immediately usable CEP engine (hereafter, referred to as the "initial CEP engine") will be created. The CEP engine will have stopped status.
Figure 4.1 Status immediately after installation
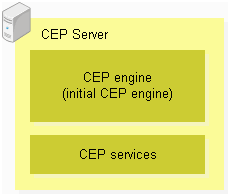
This initial CEP engine has the settings shown below. This initial CEP engine can be used to deploy and check the operation of a sample application.
Item | Value to be set |
|---|---|
CEP engine name | The name specified at installation. This is "CepEngine" if the specification was omitted at installation. |
Logging type | Not set (Logging not used). |
Directory name | Same as above |
Number of open logging files | Same as above. |
Logging cycle time | Same as above. |
Socket adapter port | 9600 |
JVM High-speed Filter options (*1) | Maximum value of memory allocation pool: 2048 MB |
JVM Complex Event Processing options (*1) | Same as above. |
*1: Settings relating to memory used by the CEP engine. Refer to "6.3.4.1 Tuning JVM Options" for information on each parameter.
Below is the engine configuration file used in initial CEP engine creation.
/etc/opt/FJSVcep/cep/sample_eng.xmlRefer to "9.1.1 Engine Configuration File" for information on how to view the content of the engine configuration file.
When using logging in the initially created CEP engine, the CEP engine settings must be changed.
The two methods below are used to change the CEP engine settings, and the items that can be changed will vary depending on the method used.
Method for changing settings | Items that can be changed |
|---|---|
Using cepconfigeng |
|
Using cepsetjvmopt |
|
Changing settings using cepconfigeng is explained below.
Refer to "6.3.4.1 Tuning JVM Options" for information on changing settings using cepsetjvmopt.
Changing settings using cepconfigeng
Below is a flowchart for changing settings using cepconfigeng.
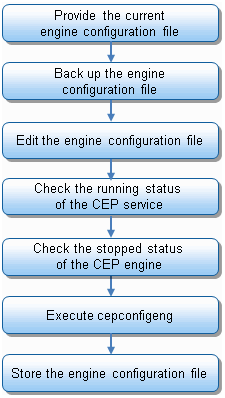
The procedure for changing CEP engine settings is explained below. For these tasks, log in as a superuser to execute the commands.
Prepare the current engine configuration file.
A CEP engine that is not to be changed must also be defined in the engine configuration file to be specified at cepconfigeng command execution. Therefore, define the changes based on the current stored engine configuration file.
The engine configuration file used in the creation of the initial CEP engine is stored in the following location:
/etc/opt/FJSVcep/cep/sample_eng.xmlExample
Example of preparing the engine configuration file used in the creation of the initial CEP engine
# cp /etc/opt/FJSVcep/cep/sample_eng.xml /etc/opt/FJSVcep/Engine.xml<ENTER>
Note
If the engine configuration file to be specified at cepconfigeng command execution does not include a created CEP engine definition, cepconfigeng will delete the CEP engine which is not specified in the engine configuration file.
Back up the engine configuration file.
Before editing the current engine configuration file, create a backup of the engine configuration file. Always create a backup to avoid losing definition information erroneously.
Example
Example of backing up the engine configuration file
# cp /etc/opt/FJSVcep/Engine.xml /etc/opt/FJSVcep/Engine.bak.xml<ENTER>
Edit the engine configuration file.
Edit the engine configuration file using a command such as vi, and then define the settings for the target CEP engine.
Refer to "9.1.1 Engine Configuration File" for information on the format of the engine configuration file.
Example
Definition example of enabling logging for the initial CEP engine
The definition example below shows "enabling logging of the CEP Server (output destination is the engine log)" for the initial CEP engine immediately after installation.
The "CepEngine" that is displayed in the definition depends upon the CEP engine name specified at installation.
<?xml version="1.0" encoding="UTF-8" standalone="yes"?>
<subSystemConfig xmlns="urn:xmlns-fujitsu-com:cspf:bdcep:v1">
  <engineConfig id="CepEngine">
    <logging>
      <type>file</type>
    </logging>
    <socketAdapterPort>9600</socketAdapterPort>
  </engineConfig>
</subSystemConfig>
Check the running status of the CEP service.
The CEP service must be running to execute cepconfigeng. Use cepdispserv to check the status of the CEP service. Refer to "8.5 cepdispserv" for details.
If the CEP service is not running, use cepstartserv to start it. Refer to "8.10 cepstartserv" for details.
Example
Example of using cepdispserv to check the running status of the CEP service
Execute cepdispserv to check that the content below is output.
The operating process number will be displayed where "nnnn" is displayed.
Generated CEP engine names are displayed in place of CepEngine.
# cepdispserv<ENTER>
(...)
Interstage Java EE DAS           started
(...)
Interstage Java EE Node Agent    started
(...)
CEPAgentIJServerCluster running
CepEngine_flt not running
CepEngine_cep not running
(...)
Status            : Running
(...)
jsvc (pid nnnn nnnn) is running...
(...)
pg_ctl: server is running (PID: nnnn)
(...)
Command cepdispserv executed successfully.
Information
The CEP service entity
A CEP service is a service made up of multiple processes.
Check the stopped status of the engine.
The target CEP engine must be stopped for cepconfigeng to change the settings of the CEP engine. Use cepdispeng to check the status of the engine. Refer to "8.4 cepdispeng" for details.
If the CEP engine is running, use cepstopeng to stop the CEP engine. Refer to "8.11 cepstopeng" for details.
Example
Example of using cepdispeng to check the stopped status of the initial CEP engine
Execute cepdispeng to check the content of the initial CEP engine output, as shown below.
The "CepEngine" that is displayed in the command execution example and output example depends upon the CEP engine name specified at installation.
# cepdispeng -e CepEngine<ENTER>
engineId         :CepEngine
port             :9600
status_filter    :STOP
status_cep       :STOP
Command cepdispeng executed successfully.
Execute cepconfigeng.
Specify the edited engine configuration file and execute cepconfigeng. When the command is executed, confirmation of the change is requested, type "y" to continue execution. Execution of the command can be canceled by typing "n" or "q". Refer to "8.2 cepconfigeng" for details.
Example
Example of executing cepconfigeng
Below is an example of specifying "/etc/opt/FJSVcep/Engine.xml" as the edited engine configuration file.
# cepconfigeng -f /etc/opt/FJSVcep/Engine.xml<ENTER>
Are you sure you want to change the CEP Engine configuration? [y,n,q]:y<ENTER>
Command cepconfigeng executed successfully.
Store the engine configuration file.
The engine configuration file specified in cepconfigeng will be required in future for further additions or deletions of CEP engines or for changing settings, so store it in a safe place. Consider creating a backup on external media, as required.
Note
The backup creation method depends upon the management policy of the system. Always check with the system administrator.
In general, only one CEP engine operates, but there may be times when multiple CEP engines need to be provided, such as when a development environment is being divided for multiple development groups.
This product allows a maximum of five CEP engines to be created for one CEP Server. This section explains how to create a new CEP engine using cepconfigeng.
Creating a new CEP engine using cepconfigeng
Below is a flowchart for creating a new CEP engine using cepconfigeng.
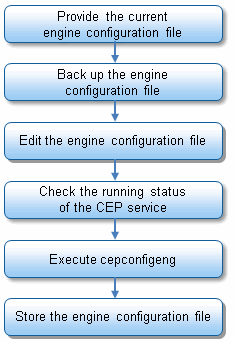
The procedure for creating a new CEP engine is explained below. For these tasks, log in as a superuser to execute the commands.
Provide the current engine configuration file.
An existing CEP engine must also be defined in the engine configuration file to be specified at cepconfigeng command execution. Therefore, define the settings of the CEP engine to be added based on the current stored engine configuration file.
Point
If an operation has been performed previously according to the execution example in "4.4.4.2 Changing CEP Engine Settings", the current engine configuration file will be the following file:
/etc/opt/FJSVcep/Engine.xmlNote
If the engine configuration file to be specified at cepconfigeng command execution does not include an existing CEP engine definition, cepconfigeng will delete the CEP engine which is not specified in the engine configuration file.
Back up the engine configuration file.
Before editing the current engine configuration file, create a backup of the engine configuration file. Always create a backup to avoid losing definition information erroneously.
Example
Example of backing up the engine configuration file
# cp /etc/opt/FJSVcep/Engine.xml /etc/opt/FJSVcep/Engine.bak.xml<ENTER>
Edit the engine configuration file.
Edit the engine configuration file using a command such as vi, and then define the settings for the new CEP engine to be added.
Use a CEP engine name that does not duplicate the name of another CEP engine. Refer to "9.1.1 Engine Configuration File" for information on the format of the engine configuration file.
Example
Example of creating a new CEP engine called "NewCepEngine"
Create a new CEP engine with the settings below, in addition to the initial CEP engine changed according to the example of executing changes to the settings of a CEP engine in "4.4.4.2 Changing CEP Engine Settings"
Item | Value to be set | Description |
|---|---|---|
CEP engine name | NewCepEngine | Use a CEP engine name that is unique. |
Logging type | Logging is not used, so do not set a value. | |
Directory name | Same as above | |
Number of open logging files | Same as above. | |
Logging cycle time | Same as above. | |
Socket adapter port | Socket communication is not performed, so do not set a value. | If not set, only a SOAP adapter or HTTP adapter can be used. |
Below is an example of defining an engine configuration file.
The part from "<engineConfig id="NewCepEngine">" to "</engineConfig>" will become the definition of the new CEP engine to be added.
The existing CEP engine definition will remain without change. The "CepEngine" that is displayed in the definition depends upon the CEP engine name specified at installation.
<?xml version="1.0" encoding="UTF-8" standalone="yes"?>
<subSystemConfig xmlns="urn:xmlns-fujitsu-com:cspf:bdcep:v1">
  <engineConfig id="CepEngine">
    <logging>
      <type>file</type>
    </logging>
    <socketAdapterPort>9600</socketAdapterPort>
  </engineConfig>
  <engineConfig id="NewCepEngine">
  </engineConfig>
</subSystemConfig>
Check the running status of the CEP service.
The CEP service must be running to execute cepconfigeng. Use cepdispserv to check the status of the CEP service. Refer to "8.5 cepdispserv" for details.
Execute cepconfigeng.
Specify the edited engine configuration file and execute cepconfigeng. When the command is executed, confirmation of the change is requested, so type "y" to continue execution. Execution of the command can be canceled by typing "n" or "q". Refer to "8.2 cepconfigeng" for details.
Example
Example of executing cepconfigeng
Below is an example of specifying "/etc/opt/FJSVcep/Engine.xml" as the edited engine configuration file.
# cepconfigeng -f /etc/opt/FJSVcep/Engine.xml<ENTER>
Are you sure you want to change the CEP Engine configuration? [y,n,q]:y<ENTER>
Command cepconfigeng executed successfully.
Store the engine configuration file.
The engine configuration file specified in cepconfigeng will be required in future for further additions or deletions of CEP engines or for changing settings, so store it in a safe place. Consider creating a backup on external media, as required.
Note
The backup creation method depends upon the management policy of the system. Always check with the system administrator.