When data is to flow between parent and subprocess, you map the UDA of the parent process definition to the corresponding UDA of the subprocess definition. Also, you specify in which directions values are to be passed between parent and subprocess definition.
Prerequisites:
You have specified User Defined Attributes (UDAs) that will be passed back and forth in the parent process definition and in the subprocess definition.
The UDAs you want to pass have the same data type in the parent process definition and subprocess definition.
You have connected the parent process definition and the subprocess definition. You have connected the parent process definition and the subprocess definition.
Auto data mapping for parent process definition and subprocess definition
When the pre-requisites mentioned above are fulfilled and you connect the parent process definition and the subprocess definition, data mapping between them is automatically completed. The UDAs of the parent process definition are mapped to the UDAs of the subprocess that have the same data types as that of the parent process definition. To view the automatically mapped UDAs, click the subprocess node of the parent process definition and select the Data Mapping tab. The mapped UDAs are displayed in All Data Mappings area along with their data flow directions.
Editing data mapping
To delete unwanted mappings, select them in All Data Mappings area and click the Delete button.
You need to manually edit the UDA mappings in the following scenarios:
If the mappings that were automatically created after connecting the parent and subprocess definition were incorrect and need to be changed
If you add or edit UDAs in the parent process definition and the subprocess definition after connecting them
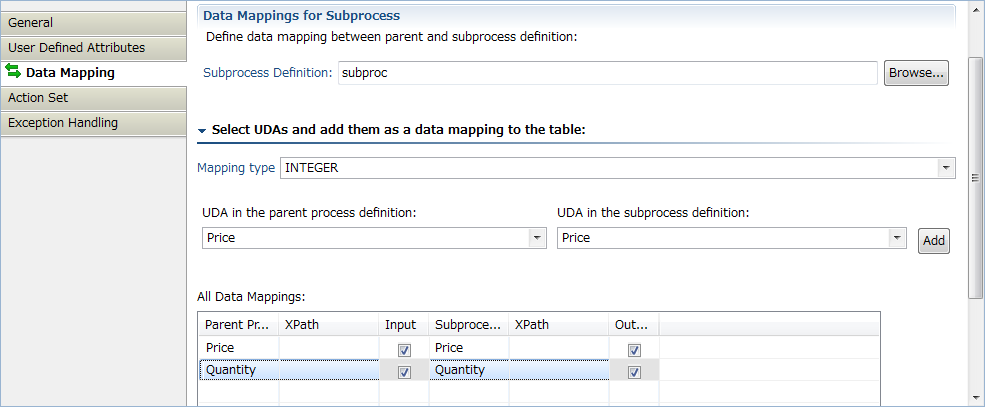
To manually edit UDA mappings
Select the Data Mapping tab of the subprocess node in the parent process definition.
To map a UDA:
From the Mapping Type drop-down list, select the data type of the UDA you want to map. This drop-down list displays all data types that occur in the parent process definition. The UDA in the parent process definition and UDA in the subprocess definition drop-down lists are populated with the UDAs of the same mapping type as selected in the Mapping Type drop-down list.
Select the UDA in the parent process definition and the corresponding UDA of the same type as that of the parent process definition UDA in the subprocess definition.
Click Add.
In the All Data Mappings area, the mapped UDAs are displayed.
If the UDA type is XML then click in the corresponding XPath column field. A drop-down list is displayed. Select from the drop-down list, the XPath expression that specifies where the data can be found in the XML string of the Source UDA. This field is active only if you have selected a UDA of type XML. The XPath expressions related to the selected UDA are displayed in the XPath drop-down list.
Optional: If you want to edit the XPath expression that you selected in the XPath drop-down list, click the ellipsis (...) button that is displayed next to the XPath drop-down list. XPath Editor dialog box is displayed with the selected XPath expression in its editor area. You can edit this XPath expression and click OK to use the edited XPath expression.
Note
The edited XPath expression is displayed as the latest XPath in the XPath drop-down list.
Note
The XPath expressions related to the selected XML UDA are displayed in the XPath drop-down list. When XML Schema is defined in selected UDA, the XPath list that can be used with this XML Schema is displayed. When Initial value is defined in selected UDA, the XPath list that can be used with this Initial value is displayed. When both are defined, Xpath list of XML Schema is displayed.
Note
XPath Editor only validates the syntax of the XPath. It does not check if the edited XPath expression exists or not.
In the All Data Mappings area, specify the data flow between process definitions:
When the data value passes from the parent to the subprocess, click Input.
When the data value passes from the subprocess to the parent process, click Output.
Figure 9.2 Defining Data Mappings