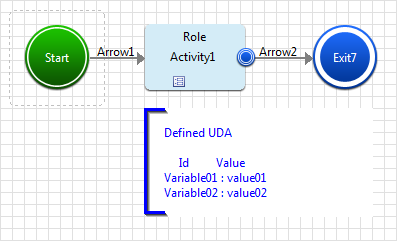
This section describes how to create a QuickForm so that the user can start a process instance. The figure below shows the process definitions that create a QuickForm.
Figure 8.3 Process definitions for creating a QuickForm
Step 1: Create a QuickForm.
From the process definition editor, open the process definitions for the Workflow Application project and click the Activity node to be associated.
Select QuickForm >> New from the popup menu.
Enter the filename (for details, refer to 8.1 Creating a QuickForm).
The QuickForm (.jsp file) is created in the Workflow Application project.
Step 2: Define UI parts that display UDA values
Define the UI parts that display the UDA values.
Figure 8.4 Method for defining the UI parts that display the UDA values
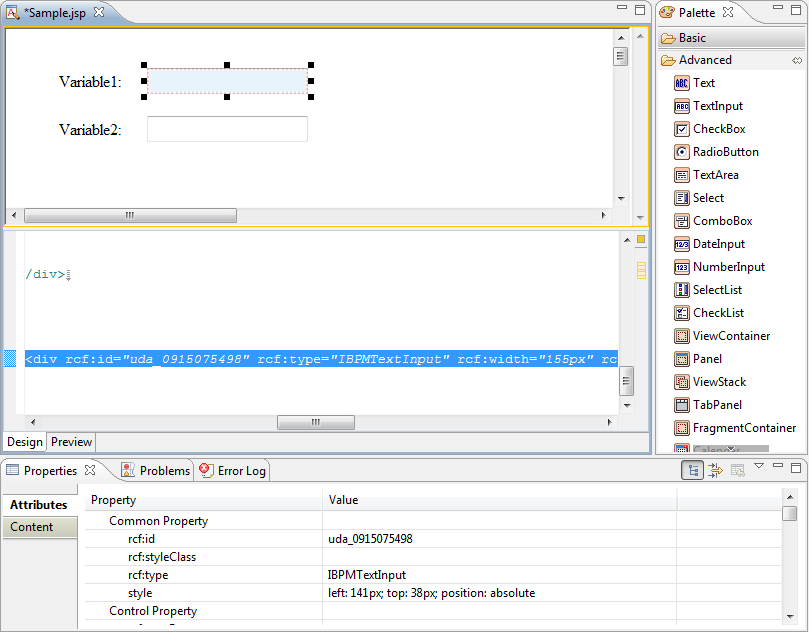
Select the Text part in the Advanced category in the palette view of the Ajax Page Editor and position it in the design view (the Text part is used as a label to identify the UDA).
Select the TextInput part in the Advanced category in the palette view and position it in the design view (the TextInput part is used to display the UDA values).
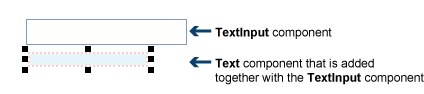
When the TextInput part is added, the Text part is added with it. If an incorrect operation (such as the user not entering a value when mandatory input is defined for this TextInput part, associating an unsupported UDA type with this part, or similar) is executed at the Console for this TextInput part, an error message is displayed in this Text part.
Figure 8.5 'Text' part added together with the 'TextInput' part
Repeat Steps a and b to add another Text part and TextInput part pair.
Select the first Text part added, then in the properties view enter "Variable01:" in the rcf:value field.
Select the second Text part added, then in the properties view enter "Variable02:" in the rcf:value field.
Select the first TextInput added, then in the properties view enter "uda_Variable01:" in the rcf:id field (the synopsis for this value is "uda_<UDA identifier>").
If the Text part that displays error messages is required, then select the Text part that displays error messages and in the properties view enter "error_Variable01:" in the rcf:id field (the synopsis for this value is "error_<UDA identifier>").
Select the second TextInput added, then in the properties view enter "uda_Variable02:" in the rcf:id field. If the Text part that displays error messages is not required, delete this Text part.
Information
When a TextInput part is placed in the design view, the Text part used to display error messages is added with it (refer to Step 2.). The border (surrounding the TextInput part and the Text part) is also added.
If the Text part used to display error messages is not required, the procedure for deleting this Text part and border and retaining only the TextInput part is shown below:
Select the unnecessary Text part and delete it.
The Text part is deleted, and the TextInput part and the border (surrounding the TextInput part) remains.
Delete the border. If a TextInput part is within the border area, the TextInput part will also be deleted. Use the procedure below to avoid deleting the TextInput part:
1) Select the TextInput part and move outside the area surrounded by the border.
2) Select and delete the border that surrounded the TextInput part.
3) Move the TextInput part to its original position.
If you want to delete a TextInput part and you select and delete the TextInput part, the Text part that displays error messages and the border (surrounding the TextInput part and the Text part) are not deleted with it. If you want to delete all of these, select the border and delete it. This deletes the border and also the TextInput part and Text part that are within the border area.
Note
In clients (QuickForms), the values entered in basic category UI parts are not validated - they are saved to the server without validation.
If multiple QuickForms are defined for a node, a tab is displayed at the Console for each. This Save button is defined in each of these tabs.
If the same UDA is used in multiple QuickForms associated with a particular node, then the same value must be set at the Console for all parts associated with the UDA.
For this reason, it is recommended to avoid associating each part with the same UDA.
Step 3: Save the QuickForm.
The jsp file will be saved in the Workflow Application project.
Step 4: Associate the QuickForm with a process definition.
Use the process definition editor to open the process definitions.
In the Navigator view, select the created QuickForm.
Drag and drop the QuickForm to the Start node of the process definitions.
For details, refer to 8.4.2 Associating a QuickForm with a Node.