Timers trigger certain actions when they expire. They may execute only once or repeatedly. You can use timers with the following elements:
Process Definitions
These timers start running whenever a new process instance is created from the process definition containing the timer.
Activity Nodes, Voting Activity Nodes, and Compound Activity Nodes
These timers start running when the node becomes active.
Delay Nodes
Timers are used with Delay Nodes to suspend process execution for a certain amount of time.
These timers start running when the Delay Node becomes active.
Note
In some environment that you use, setting time by timer and actually time which canceled timer, they may have a margin of error one minute per one hour.
Note
Before a timer starts, it calculates an expiration time based on its settings. The timer is supposed to execute at its expiration time, and it usually does. If, however, the calculated expiration time is in the past relative to the timer start time, timers that execute only once will execute upon starting, and a periodic timer will fail to execute. A timer having an expiration time before its start time is considered an error, so the timer's process instance will go into error state. Periodic Timers must have expiration times that are in the future because they represent a repeating loop that could become an infinite loop in such a case.
When defining a timer, you can choose between the following timer types:
Absolute: Absolute time can either be set in the UDAs (Year, Month, Day, Time format) or to the value defined in the Java Script expression. If you set absolute time in both (Year, Month, Day, Time format and Java Script expression) and for example, the Java Script expression returns the value of 4 hours then the Absolute timer will expire after 4 hours from the node activation time. If you do not define the Java Script expression or the Java Script expression returns an invalid value, Absolute timer will expire at the absolute time defined in the Year, Month, Day, Time format (UDAs).
Calendar: Sets the duration after which the timer will expire based on the regular calendar. The time is counted using all seven days of the week and 24 hours of the day. As such, they can expire outside the normal business hours. These timers start when the time set in the UDAs (days and hours) is elapsed after the node or process instance to which they are assigned becomes active. The time for Calendar timer can also be set relative to the value defined in the Java Script expression. If both the values (UDAs and Java Script expression) are set then the value returned by the Java Script expression will be taken as the reference and the value from the UDAs will be taken as the relative time. If Java Script expression is not set, timer will expire after the time set in the UDAs is elapsed from the time when the node to which it is assigned becomes active.
Business: Sets the duration after which the timer will expire based on a business calendar. These timers start when the node or process instance to which they are assigned becomes active. The time is counted using only business days and hours. These timers can expire only during normal business hours.
Note
Systemwalker Runbook Automation Studio determines business days and hours using a business calendar. Refer to section 6.22.4 Creating Your Own Business Calendars for more information on business calendars.
Advanced: Sets the timer according to an expression that you specify. The expression defines an absolute or relative timer. The time can be counted using the regular calendar or a business calendar.
To define a timer:
Do one of the following:
To define a timer for a process definition, click the empty space in the Process Definition Editor to display the Properties view for the process definition.
To define a timer for a node, select the node in the Process Definition Editor to display the Properties view for the node.
Point
You can also select the Delay Node from the Palette and drag and drop it on the relevant Activity Node or Voting Activity Node. Then you need to enter a name for the timer and define its properties later on using the Properties view for the node.
Select the Timers tab.
Click Add in the All Timers area, to add a new timer.
This displays the Timer Details area where you can customize the settings for the timer.
By default, the new timer is named as Timer1, you can modify the name in the Name field.
To modify details for the timer, ensure that the timer is selected in the All Timers list.
Optional: Describe the purpose of the timer in the Description field.
To set the timers, do any of the following per requirements:
If you want to set the Absolute timer based on the regular calendar:
Select Absolute timer in the Type drop-down list of the Timer Details area.
Enter year, month, day and time in Year, Month, Day and Time fields respectively. These are the UDA values for the timer.
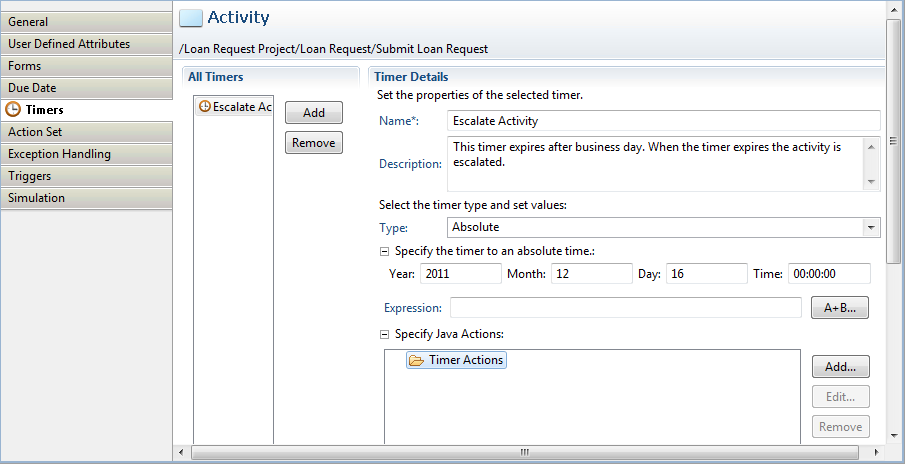
To define expiration time as an expression, enter the Java Script expression in the Expression field. Click the A+B... button to define the Java Script Expression. You can either directly enter the Java Script expression in the Expression field or click A+B... button to build it. Upon clicking the A+B... button, Interstage BPM Expression Builder dialog is displayed. Build the Java Script expression using the operands and operators in this dialog For example, DateAdd(Packages.java.util.Date(), 4, \"hh\").getTime()" will expire the Absolute timer after 4 hours from the node activation time. The following figure shows Expression and A+B... fields for Absolute timer.
Figure 6.31 Defining an Absolute Timer
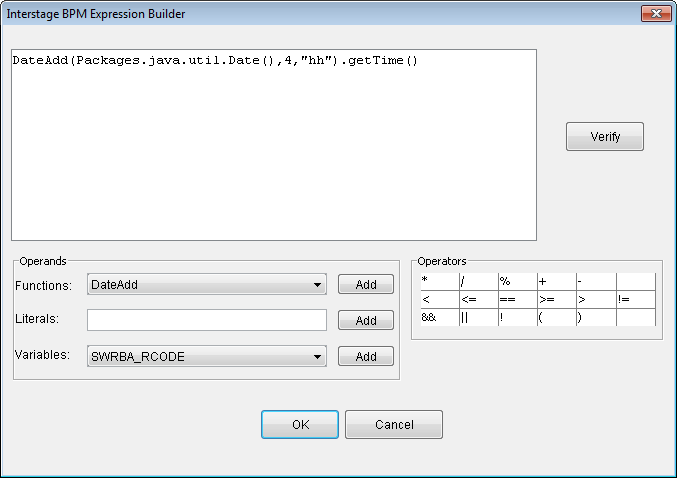
The following figure shows the Interstage BPM Expression Builder.
Figure 6.32 Building Java Script Expression
Note
While setting the Absolute time (Year, Month, Day, Time), if the value of time is larger than 24:00:00, it is converted as a day, and added to the Day field. The method used to set the timer is explained in relative time from when the node or process instance was activated.
If you want to set the Calendar (relative) timer based on the regular calendar:
Select Calendar timer in the Type drop-down list of the Timer Details area.
Specify after how many days and hours the timer needs to expire. For example, if you want the timer to expire after 2 days and 3 hours from the time when the node is activated or from the time defined by the reference value returned by the Java Script expression, enter 2 days and 03.00.00 in the respective fields.
To set the Calendar timer to execute repeatedly, select the Periodic checkbox. Specify the interval at which you want the timer to expire. Periodic Calendar timer is a periodic timer based on the regular calendar. If the Periodic checkbox is not selected, the Calendar timer executes only once.
If you want to set a reference value for the relative UDA values using the Java Script expression, define the expiration time as an expression as explained in the third step of the Absolute timer. Calendar timer will take the value returned by the expression as the reference value and add the UDA value to it to calculate the expiration time. For example, if you set 2 days in the Days field then uda.get("RequestDate") expires the Calendar timer after 2 days from the date returned by the UDA ("RequestDate"). The value of RequestDate is the long value shown in Date class.
Note
The maximum value of the Calendar timer (Day, Time) is the following: Calendar timer (Day, Time) is converted into the millisecond. This value is not to exceed the Long.MAX_VALUE.
If you want to set a relative timer based on the business calendar:
Select Business timer in the Type drop-down list of the Timer Details area.
Specify after how many business days and at what business time the timer is to expire. For the business time, you have different options. You can specify an absolute time, a time relative to the current time, a time relative to opening time, or a time relative to closing time.
To set the Business timer to execute repeatedly, select the Periodic checkbox. Specify the interval at which you want the timer to expire. Business timer is a periodic timer based on the business calendar. If the Periodic checkbox is not selected, the Business timer executes only once.
If you want to set an absolute or relative timer specified with an expression:
Select Advanced timer in the Type drop-down list of the Timer Details area and type the expression in the Set Expression field. For information on date codes that you can use in the expression, refer to section 6.22.3 Time and Day Codes for Advanced Due Dates and Timers.
To set the Advanced timer to execute repeatedly, select Advanced and select the Periodic checkbox. Specify the interval at which you want the timer to expire. If the Periodic checkbox is not selected, the Advanced timer executes only once.
Note
If you set the expression in Advanced timer and if this expression is expressible as Business timer then this expression is displayed as the Business timer.
Note
Periodic timers are always relative to a given event. The first operation of a periodic timer is relative to the time when the process instance or the node becomes active. Subsequent operations are relative to the last operation.
Click Add and select the Java Actions to be executed when the timer is expired.
You can add regular Java Actions, Error Actions, and Compensation Actions to the Action list.
For more information on Java Actions, refer to section 11.1 Using Java Actions.
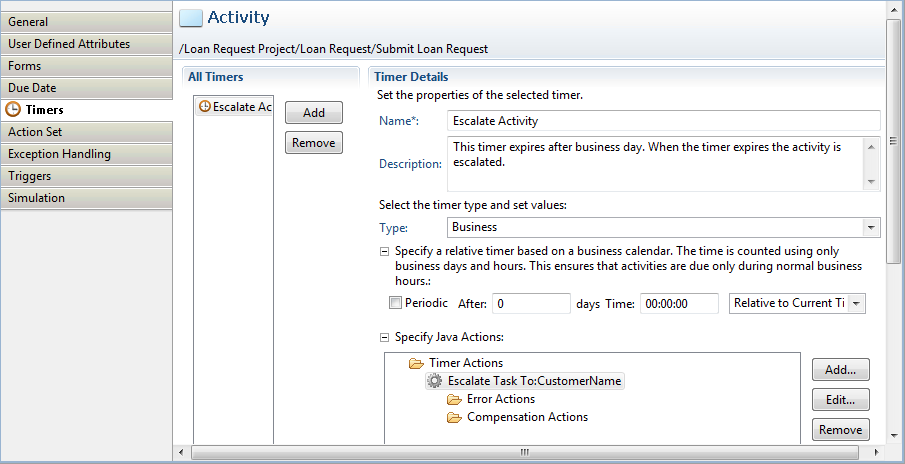
The following figure shows a timer that expires after one business day. When the timer expires, the activity is escalated.
Figure 6.33 Defining a Timer
For each timer that you define, one or multiple User Defined Attributes (UDAs) are created. The UDA
names identify the timer and the timer action.
For example, a typical UDA name might be __atmr_publication_time. The prefix __atmr identifies this as a timer, the middle term publication contains the name of the timer, and the suffix time identifies the function of the UDA.
These UDAs can be modified on a form, through a Java Action, or through a JavaScript.
When a Make Choice Java Action has been defined for a timer and an arrow name has been defined as the choice item for this Java Action, the following symbol is added to this arrow connecting the Activity Node or Voting Activity Node or Compound Activity Node with another node:
Figure 6.34 Timer symbol
![]()