If the slave server is added through cloning, the following two patterns exist, depending on the difference in the timing of the installation of the slave server.
Adding a slave server during initial installation
When performing the initial installation, collect the cloning image of the first slave server after installing it, then install all the other slave servers using cloning.
Adding slave servers after starting operation
Additionally installing slave servers after starting operation.
The procedures for these patterns are described in the following pages.
The procedure for adding a slave server when installing for the first time is shown below.
Installing the first slave server
Refer to "3.1.2 Installing the First Slave Server" to install the first additional slave server (the slave server whose cloning image is collected).
Registering a slave server
Registering the network parameter automatic configuration feature
Creating a cloning image
Cloning
DFS client addition/scale-out
To perform the cloning tasks, register all the slave servers that are expected to be installed in the master server.
The procedure for registering a slave server is shown below.
Create a cloning server definition file (clone.conf). In the cloning server definition file, specify the slave server whose cloning image is to be collected and all the slave servers to which the cloning image is to be distributed for installation.
This is explained using the example shown below.
| :slave1 |
| :slave2, slave3, slave4, slave5 |
Refer to "A.2.3 clone.conf" for information on the cloning server definition file.
Example
Example cloning server definition file (clone.conf):
RCXCSV,V3.4
[Server]
operation,chassis_name,slot_no,server_name,ip_address,mac_address,second_mac_address,snmp_community_name,ipmi_ip_address,ipmi_user_name,ipmi_passwd,ipmi_passwd_enc,admin_lan1_nic_number,admin_lan2_nic_number,admin_lan_nic_redundancy
new,,,slave1, 10.10.10.13,A0:A0:A0:A0:A0:A1,,public,192.168.1.13,admin,admin,plain,,,OFF <-- Server to be registered
new,,,slave2, 10.10.10.14,A0:A0:A0:A0:A0:A2,,public,192.168.1.14,admin,admin,plain,,,OFF <-- Server to be registered
new,,,slave3, 10.10.10.15,A0:A0:A0:A0:A0:A3,,public,192.168.1.15,admin,admin,plain,,,OFF <-- Server to be registered
new,,,slave4, 10.10.10.16,A0:A0:A0:A0:A0:A4,,public,192.168.1.16,admin,admin,plain,,,OFF <-- Server to be registered
new,,,slave5, 10.10.10.17,A0:A0:A0:A0:A0:A5,,public,192.168.1.17,admin,admin,plain,,,OFF <-- Server to be registered
[ServerAgent]
operation,server_name
new,slave1                                                          <-- Server whose cloning image is to be collected
Log in to the master server (primary) with root permissions.
Execute the bdpp_addserver command to register the slave server.
Refer to A.1.1 bdpp_addserver for information on the bdpp_addserevr command.
# /opt/FJSVbdpp/bin/bdpp_addserver {clone.conf file storage directory}/clone.conf <Enter>Use the bdpp_listserver command to check that the slave server has been registered successfully.
Refer to "A.1.8 bdpp_listserver" for information on the bdpp_listserver command.
# /opt/FJSVbdpp/bin/bdpp_listserver <Enter>
Example
Example of checking slave server registration:
> /opt/FJSVbdpp/bin/bdpp_listimage <Enter>
PHYSICAL_SERVER  SERVER                   ADMIN_IP        STATUS  MAINTENANCE
---------------  ------                   --------        ------  -----------
slave1           slave1                   192.168.1.21    normal  OFF
slave2           -                        192.168.1.22    stop    -
slave3           -                        192.168.1.23    stop    -
slave4           -                        192.168.1.24    stop    -
slave5           -                        192.168.1.25    stop    -
Create the public LAN network parameter definition beforehand so that the number of cloning images that are collected meets the whole number of slave servers. This makes it possible to automate the slave server public LAN configuration when the cloning images are distributed.
This section explains how to register the network parameter automatic configuration feature.
The procedure for registering the network parameter automatic configuration feature is shown below.
On the master server (primary), create the network parameter automatic configuration feature definition file (FJSVrcx.conf and ipaddr.conf).
Refer to "A.2.4 FJSVrcx.conf" for information on the FJSVrcx.conf configuration file.
The information about the public LAN for the slave server whose cloning image is to be collected and for all other slave servers to which the cloning image is to be distributed is specified in the definition file (ipaddr.conf). Refer to "A.2.5 ipaddr.conf" for details.
On the master server (primary), specify the IP address of the admin LAN of the slave server that will collect the cloning image, the definition file (FJSVrcx.conf) and the definition file (ipaddr.conf), then execute the bdpp_lanctl command.
Refer to "A.1.6 bdpp_lanctl" for information on the bdpp_lanctl command.
# /opt/FJSVbdpp/bin/bdpp_lanctl <admin LAN IP address> <FJSVrcx.conf file> <ipaddr.conf file> <Enter>
Create a cloning image from a slave server that is already installed.
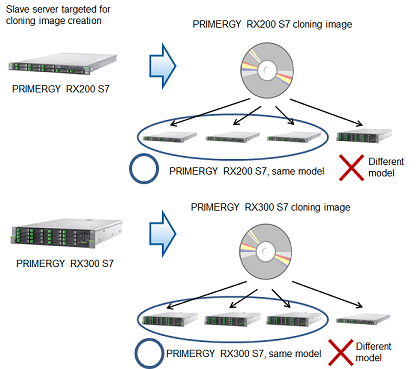
The server for which the cloning image is to be created and the server to be cloned must meet the following conditions. If the conditions differ, it is necessary to create groups for the cloning images where the conditions are the same.
The model name must be identical.
The hardware conditions must be the same (the same option cards and expansion boards and their locations).
BIOS settings must be the same, according to the settings described in "Server BIOS settings".
The LAN and SAN connections use the same redundancy method, have the same number of redundant paths, and have access to the same network devices and storage apparatuses. LAN switches and FC Switches that are cascade connected will be treated as one device.
The procedure for creating cloning images is shown below.
Check that the slave server whose cloning image is to be collected is properly connected to the master server before creating the cloning image.
Refer to "3.1.6 Checking the Connection to the First Slave Server" for information about how to check.
If the login to the master server (primary) has not been performed yet, log into the server with root permissions.
To change the image storage directory, execute the bdpp_changeimagedir command.
Refer to "A.1.2 bdpp_changeimagedir" for information on the bdpp_changeimagedir command.
# /opt/FJSVbdpp/bin/bdpp_changeimagedir {image directory} <Enter>Execute the bdpp_getimage command that the following were specified in: the name of the slave server for collecting the cloning image and the name of the cloning image.
Refer to "A.1.5 bdpp_getimage" for information on the bdpp_getimage command.
# /opt/FJSVbdpp/bin/bdpp_getimage {server name} {cloning image name} <Enter>Use the bdpp_listimage command to check that the cloning image could be collected successfully.
Refer to "A.1.7 bdpp_listimage" for information on the bdpp_listimage command.
# /opt/FJSVbdpp/bin/bdpp_listimage <Enter>
Example
Checking the cloning image collection status:
> /opt/FJSVbdpp/bin/bdpp_listimage <Enter>
IMAGEDIRECTORY
--------------
imagedir: /data/imagedir

NAME                             VERSION CREATIONDATE        COMMENT
----                             ------- ------------        -------
RX200img                         1       2012/04/20-22:39:59 -
RX300img                         1       2012/04/20-22:41:13 -
Reboot the slave server for collecting the cloning image.
# shutdown -r now <Enter>
The cloning procedure is shown below.
If the login to the master server (primary) has not been performed yet, log into the server with root permissions.
Execute the bdpp_deployimage command that the following were specified in: the image distribution destination server and the name of the cloning image.
Refer to "A.1.4 bdpp_deployimage" for information on the bdpp_deployimage command.
# /opt/FJSVbdpp/bin/bdpp_deployimage {name of server} {name of cloning image} <Enter>If the login to the image distribution destination slave server has not been performed yet, log into the server with root permissions.
Set the iscsi initiator name and IP address of the image distribution destination slave server. Refer to the "ETERNUS DX Disk Storage System User's Guide" for details on how to set these.
Reboot the image distribution destination slave server.
# shutdown -r now <Enter>
Refer to "E.3 Adding a Slave Server/Scaling Out" in "Appendix E DFS Operation Changes" for details on adding a slave server linkage server/scale-out.
The procedure for adding a slave server after operations have started shown below.
Steps 1 to 6 shown below are the same as the steps 1 to 6 described in "4.9.1.1 Adding a Slave Server During Initial Installation".
This section explains differences to the structure described in "Adding a Slave Server During Initial Installation", such as additional definition information, based on the following additional structures:
| :slave1, slave2, slave3, slave4, slave5 |
| :slave6 |
| :slave7, slave8, slave9, slave10 |
Slave server installation
Install using the same procedure as for "Adding a Slave Server During Initial Installation".
Registering slave servers
An example of definitions when adding is described in "Example of the cloning server definition file for registering a slave server after operations have started".
The procedure is the same as for "Adding a Slave Server During Initial Installation".
Registering the network parameter automatic configuration feature
The procedure is the same as for "Adding a Slave Server During Initial Installation".
Creating a cloning image
The procedure is the same as for "Adding a Slave Server During Initial Installation".
Cloning
The procedure is the same as for "Adding a Slave Server During Initial Installation".
Adding and scaling out the DFS client
An example of definitions when adding is described in "Example of the connection approval list file for registering a slave server after operations have started".
The procedure is the same as for "Adding a Slave Server During Initial Installation".
Editing and updating the slave server definition file
Refer to "4.9.1.2.1 Editing and Reflecting Slave Server Definition File".
Example of the cloning server definition file for registering a slave server after operations have started
Example
Example cloning server definition file (clone.conf):
RCXCSV,V3.4
[Server]
operation,chassis_name,slot_no,server_name,ip_address,mac_address,second_mac_address,snmp_community_name,ipmi_ip_address,ipmi_user_name,ipmi_passwd,ipmi_passwd_enc,admin_lan1_nic_number,admin_lan2_nic_number,admin_lan_nic_redundancy
-,,,slave1, 10.10.10.13,A0:A0:A0:A0:A0:A1,,public,192.168.1.13,admin,admin,plain,,,OFF
-,,,slave2, 10.10.10.14,A0:A0:A0:A0:A0:A2,,public,192.168.1.14,admin,admin,plain,,,OFF
-,,,slave3, 10.10.10.15,A0:A0:A0:A0:A0:A3,,public,192.168.1.15,admin,admin,plain,,,OFF
-,,,slave4, 10.10.10.16,A0:A0:A0:A0:A0:A4,,public,192.168.1.16,admin,admin,plain,,,OFF
-,,,slave5, 10.10.10.17,A0:A0:A0:A0:A0:A5,,public,192.168.1.17,admin,admin,plain,,,OFF
new,,,slave6, 10.10.10.18,A0:A0:A0:A0:A0:A6,,public,192.168.1.18,admin,admin,plain,,,OFF <-- Server to be registered
new,,,slave7, 10.10.10.19,A0:A0:A0:A0:A0:A7,,public,192.168.1.19,admin,admin,plain,,,OFF <-- Server to be registered
new,,,slave8, 10.10.10.20,A0:A0:A0:A0:A0:A8,,public,192.168.1.20,admin,admin,plain,,,OFF <-- Server to be registered
new,,,slave9, 10.10.10.21,A0:A0:A0:A0:A0:A9,,public,192.168.1.21,admin,admin,plain,,,OFF <-- Server to be registered
new,,,slave10, 10.10.10.22,A0:A0:A0:A0:A0:B0,,public,192.168.1.22,admin,admin,plain,,,OFF <-- Server to be registered
 [ServerAgent]
operation,server_name
new,slave6                                                           <-- Server whose cloning image is to be collected
Example of checking slave server registration:
> /opt/FJSVbdpp/bin/bdpp_listserver <Enter>
PHYSICAL_SERVER  SERVER                   ADMIN_IP        STATUS  MAINTENANCE
---------------  ------                   --------        ------  -----------
slave1           slave1                   192.168.1.13    normal  OFF
slave2           slave2                   192.168.1.14    normal  OFF
slave3           slave3                   192.168.1.15    normal  OFF
slave4           slave4                   192.168.1.16    normal  OFF
slave5           slave5                   192.168.1.17    normal  OFF
slave6           slave6                   192.168.1.18    normal  OFF
slave7           -                        192.168.1.19    stop    -
slave8           -                        192.168.1.20    stop    -
slave9           -                        192.168.1.21    stop    -
slave10          -                        192.168.1.22    stop    -
Example of the connection approval list file for registering a slave server after operations have started
Example
# cat /etc/pdfs/server.conf.1 <Enter>
#
# Copyright (c) 2012 FUJITSU LIMITED. All rights reserved.
#
#   /etc/pdfs/server.conf.<FSID>
#
# List of client hostnames of a file system.
#
# Notes:
#   Do not describe hostnames of management servers.
#
# example:
#CLIENT nodeac1
#CLIENT nodeac2
#CLIENT nodeac3
#CLIENT nodeac4
#CLIENT nodeac5
CLIENT slave1
CLIENT slave2
CLIENT slave3
CLIENT slave4
CLIENT slave5
CLIENT develop
CLIENT collaborate
CLIENT slave6         <--  Slave server to be added
CLIENT slave7         <--  Slave server to be added
CLIENT slave8         <--  Slave server to be added
CLIENT slave9         <--  Slave server to be added
CLIENT slave10        <--  Slave server to be added
The procedure for editing the slave server definition file and then effecting these changes is explained below.
If the login to the master server (primary) has not been performed yet, log into the server with root permissions.
Stop the Hadoop of the Interstage Big Data Parallel Processing Server if it is running before adding slave servers.
Use the bdpp_stop command to stop the Hadoop of the Interstage Big Data Parallel Processing Server.
Refer to "A.1.13 bdpp_stop" for details of the bdpp_stop command.
# /opt/FJSVbdpp/bin/bdpp_stop <Enter>
Define the slave server to be added by editing the slave server definition file(/etc/opt/FJSVbdpp/conf/slaves) and the TaskTracker definition file (/etc/hadoop/mapred.include).
Refer to "A.2.2 slaves" for details on the slave server definition file.
Example
Slave server definition file example:
slave1,slave2,slave3,slave4,slave5,slave6,slave7,slave8,slave9,slave10
Example TaskTracker definition file:
slave1
slave2
slave3
slave4
slave5
slave6
slave7
slave8
slave9
slave10
Note: The underlining indicates the added slave server.
Execute bdpp_changeslaves command to effect the changes that were made to the slave server definition file.
Refer to "A.1.3 bdpp_changeslaves" for information on the bdpp_changeslaves command.
# /opt/FJSVbdpp/bin/bdpp_changeslaves <Enter>
Copy the edited file to the master server (secondary), slave server and development server.
# scp -p /etc/opt/FJSVbdpp/conf/slaves root@master2:/etc/opt/FJSVbdpp/conf <Enter>
# scp -pr /etc/opt/FJSVbdpp/data root@master2:/etc/opt/FJSVbdpp/ <Enter>
# scp -p /etc/hadoop/mapred.include root@master2:/etc/hadoop <Enter>
  Also copy the edited file to the slave server and development server.
Start the Hadoop of the Interstage Big Data Parallel Processing Server.
Use the bdpp_start command to start the Hadoop of the Interstage Big Data Parallel Processing Server.
Refer to "A.1.11 bdpp_start" for details of the bdpp_start command.
# /opt/FJSVbdpp/bin/bdpp_start
Use the Interstage Big Data Parallel Processing Server status display to check whether or not TaskTracker is started at the targeted slave server.
After checking that the targeted slave server is started, use the bdpp_stat command to display the Hadoop status of the Interstage Big Data Parallel Processing Server.
Refer to "A.1.12 bdpp_stat" for details of the bdpp_stat command.
# /opt/FJSVbdpp/bin/bdpp_stat -all
cluster mapred  2420    jobtracker
slave1  mapred  29615   tasktracker
slave2  mapred  24417   tasktracker
slave3  mapred  16332   tasktracker
slave4  mapred   9042   tasktracker
slave5  mapred   5880   tasktracker
slave6  mapred  25126   tasktracker
slave7  mapred  18747   tasktracker
slave8  mapred  24467   tasktracker
slave9  mapred   6108   tasktracker
slave10  mapred  10425   tasktracker
bdpp: INFO : 003: bdpp Hadoop JobTracker is alive.