Perform upgrade of Systemwalker Runbook Automation.
Systemwalker Runbook Automation upgrades must be executed by a user with administrator privileges.
Point
Follow the steps described in this section, even if the Systemwalker Runbook Automation Management Server is to be installed in environments in which the following software is already installed.
Cloud Infrastructure Management Software V1.2.0
Systemwalker Software Configuration Manager V14.1.0A
ServerView Resource Orchestrator Cloud Edition V3.0.0
ServerView Resource Orchestrator Cloud Edition V3.1.0
Note that if any of the software above is already installed, the environment settings will have to be changed after installation, without restarting the operating system (refer to "Changing the Cloud Infrastructure Management Software/Systemwalker Software Configuration Manager Settings" and "Changing the ServerView Resource Orchestrator/Systemwalker Runbook Automation Settings" for details).
This section describes how to upgrade Systemwalker Runbook Automation installed on a Windows Management Server.
Note
If a terminal server is installed, change the terminal service to install mode:
CHANGE USER /INSTALL |
A random password will be generated for OS user "swrbajobuser" used by Systemwalker Runbook Automation - change it after the upgrade if required (refer to "Changing Operating System User Passwords Used by Systemwalker Runbook Automation").
When Systemwalker Runbook Automation will be installed in the environment that following software have benn installed, Stop these software in advance.
Cloud Infrastructure Management Software
Systemwalker Software Configuration Manager
ServerView Resource Orchestrator Cloud Edition
Systemwalker Service Quality Coordinator
Systemwalker Service Catalog Manager
For how to stop, refer to the following.
For stopping Cloud Infrastructure Management Software, refer to "Manager control command" in the Cloud Infrastructure Management Software User's Guide.
For stopping Systemwalker Software Configuration Manager, refer to "Stop/Start Systemwalker Software Configuration Manager" in the Systemwalker Software Configuration Manager Operation Guide.
For stopping ServerView Resource Orchestrator, refer to "Start and stop Manager" in the ServerView Resource Orchestrator Installation Guide.
For stopping Systemwalker Service Quality Coordinator, refer to "Stop and Start resident process" in the Systemwalker Service Quality Coordinator Installation Guide.
Before executing to upgrade, confirm whether event viewer has been displayed. If it is displayed, close it before upgrading.
Login using an account belonging to the Administrators group.
Start the installer.
Place the DVD-ROM below in the DVD-ROM device - installation will start automatically (if it does not, execute swsetup.exe):
Systemwalker Runbook Automation Media Pack (15.1.0) Disc No. 1/2
Note
If the system runs Windows Server 2008, execute as administrator.
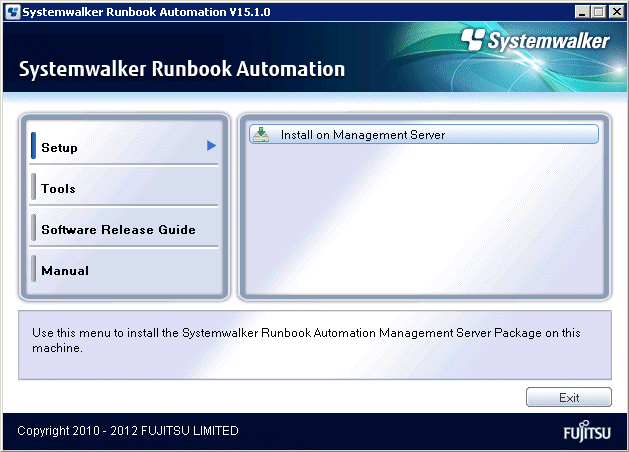
In the displayed window, select Install Management Server.
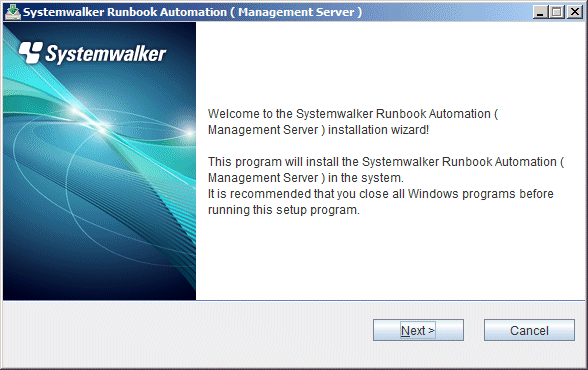
The Welcome dialog box will be displayed.
Make sure that the contents are correct, then click the Next button.
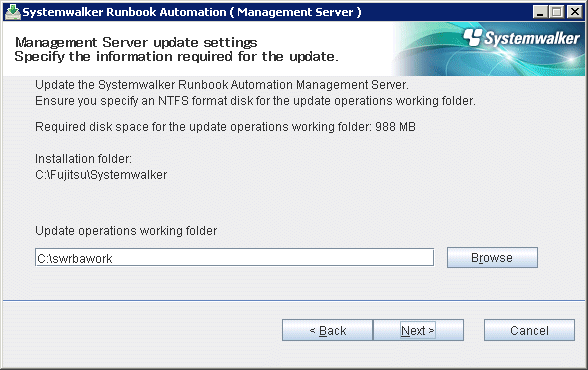
Specify the operation folder required for Systemwalker Runbook Automation update tasks.
Specify a directory that has enough disk space for the update operations.
Note
The update operation folder name can be up to 25 characters long.
Specify an NTFS disk for the update operation folder.
A relative path or a path beginning with "\\" cannot be specified.
Only half-width alphanumeric characters can be specified for the directory name.
Files and directories may exist in the work area when restarting after an error, but specify the same directory without deleting them. Refer to "If an error occurs" for details.
If you use Interstage Single Sign-On as authentication mechanism, or any of these are already installed, this windows is displayed.
Cloud Infrastructure Management Software V1.2.0
Systemwalker Software Configuration Manager V14.1.0A
Specify the SSO repository used by Interstage Single Sign-On that is built into the current environment.
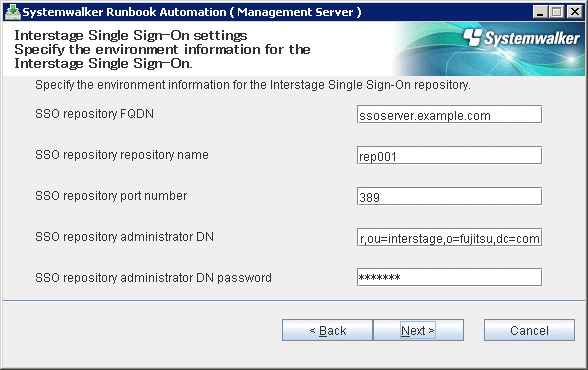
Point
Check the SSO repository information using the Interstage Management Console by clicking System > Security > Single Sign-on > Authentication Infrastructure > Repository Server > Settings.
Alternatively, click System > Security > Single Sign-on > Authentication Infrastructure > Repository Server > Protected resource, and confirm the FQDN.
The window below will be displayed if upgrading from one of these versions:
Systemwalker Runbook Automation V14g.V14.1.0 Management Server
Systemwalker Runbook Automation V14g.V14.1.0A Management Server
The window might also be displayed if any of these are already installed:
Cloud Infrastructure Management Software V1.2.0
Systemwalker Software Configuration Manager V14.1.0A
ServerView Resource Orchestrator Cloud Edition V3.0.0
Specify the port number used by Systemwalker Runbook Automation.
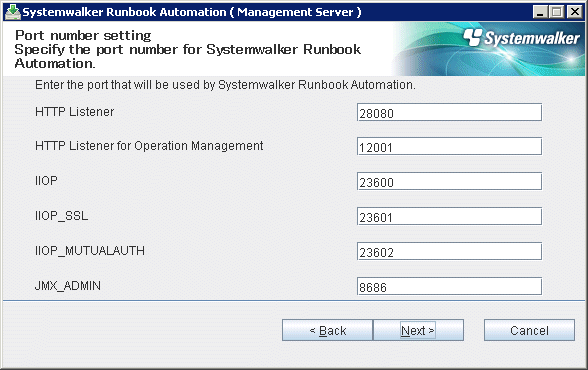
Note
Do not specify the port number currently operating - use the command below to check:
> netstat -a -n |
The specified port number may be in use elsewhere even if it is not currently operating (refer to "9.1 Port Numbers" for details).
The window below will be displayed if upgrading from this version:
Systemwalker Runbook Automation V14g.V14.1.0 Management Server
The window might also be displayed if any of these are already installed:
Cloud Infrastructure Management Software V1.2.0
Systemwalker Software Configuration Manager V14.1.0A
Specify the subsystem number, port number, or user used by the Scheduling.
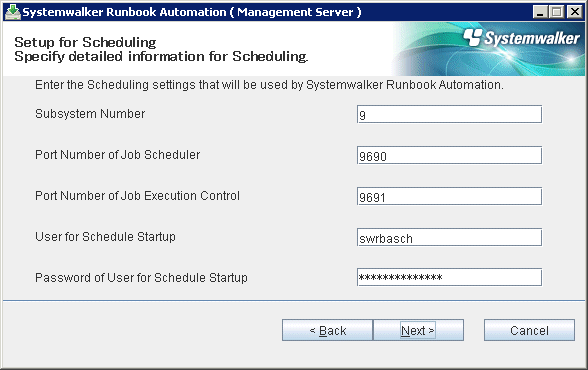
Note
Specify the port number if the default port number used by the schedule function is in use elsewhere.
Do not specify the port number currently operating - use the command below to check:
> netstat -a -n |
The specified port number may be in use elsewhere even if it is not currently operating (refer to "9.1 Port Numbers" for details).
The window below will be displayed if upgrading from this version and executing Management Server setup:
Systemwalker Runbook Automation V14g.V14.1.0 Management Server
Systemwalker Runbook Automation V14g.V14.1.0A Management Server
The window might also be displayed if any of these are already installed:
Cloud Infrastructure Management Software V1.2.0 (Note)
Systemwalker Software Configuration Manager V14.1.0A (Note)
ServerView Resource Orchestrator Cloud Edition V3.0.0
Note: The applications process is used
Specify the port number used by Systemwalker Runbook Automation.

Note
Do not specify the port number currently operating - use the command below to check:
> netstat -a -n |
The specified port number may be in use elsewhere even if it is not currently operating (refer to "9.1 Port Numbers" for details).
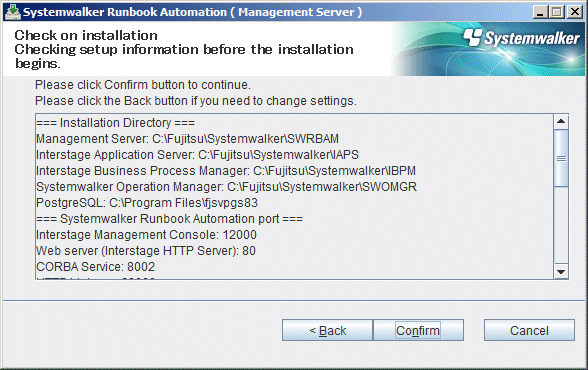
Confirm installation.
In the Confirm Installation window, make sure that the contents are correct, then click the Confirm button - installation will start (note that this window is only displayed when the parameter has actually been specified).
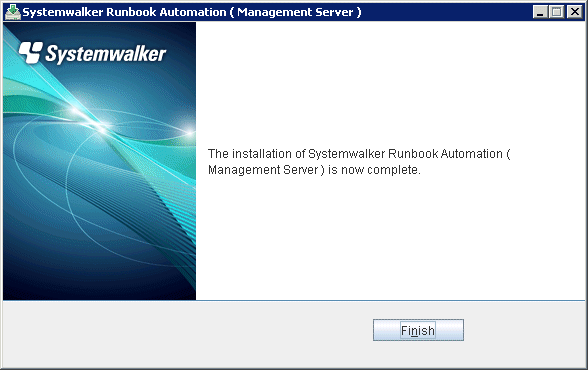
After installation is completed, the window below will be displayed.
Click the Finish button.
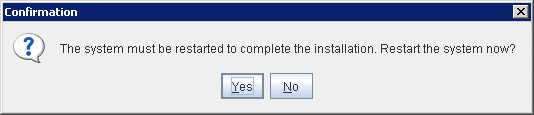
Reboot the machine.
Click the Yes button
Act according to the displayed message, then restart the installer and execute the upgrade. Do not delete files and directories in the work area.
This section describes how to upgrade Systemwalker Runbook Automation installed on a Linux Management Server.
Note
If the operating system that supports the installation media (DVD-ROM) and the operating system for the installation destination are different, "Management Server" is not displayed in the select server window of the installation destination. Use an installation media type that is supported on the operating system used to install Systemwalker Runbook Automation.
Log in to the system as superuser.
Place the DVD-ROM media in the DVD-ROM device.
Place the "Systemwalker Runbook Automation Media pack (15.1.0) Disc No. 1/2".
Mount the DVD-ROM.
Use the command below.
If the DVD-ROM is mounted automatically using the automatic mount daemon (autofs), because "noexec" is set in the mount options, attempts to start the installer will fail.
# mount -t iso9660 -r /dev/mnt <DVD-ROM mount point>
Start the installer.
Execute the install command (provided with this software) to install multiple packages at once.
# <DVD-ROM mount point>/swsetup
The Welcome window will be displayed - press Enter key.
================================================================================
                  Systemwalker Runbook Automation Setup
                                    V15.1.0
        All Rights Reserved, Copyright(c) FUJITSU LIMITED 2010-2012
================================================================================

Welcome to Systemwalker Setup!
Setup will install Systemwalker Runbook Automation.

Press ENTER.
The server selection window for the installation folder will be displayed - type "1" to select Management Server.
================================================================================
                  Systemwalker Runbook Automation Setup
                                    V15.1.0
        All Rights Reserved, Copyright(c) FUJITSU LIMITED 2010-2012
================================================================================
<<Select the installation folder>>

1. Management Server

================================================================================
Select one of the items above.
[q,number]
=>1
Type "y" to start the Management Server installer.
Preparing to install.
Please wait.
Systemwalker Runbook Automation (Management Server)
Do you want to start installation?
[y,n]
=> y
Specify the directory required for Systemwalker Runbook Automation update tasks.
Specify a directory with more disk space than the update operations working folder.
===<Information required for update tasks>===
Updating installed Systemwalker Runbook Automation.
Specify a directory that has more disk space than the update operations working folder.
Disk space required for the update operations: 1024MB
[ENTER:/var/tmp/swrbawork]
=>
Note
The update task directory name can be up to 25 characters long.
A relative path cannot be specified.
Only half-width alphanumeric characters can be specified for the directory name.
Files and directories may exist in the work area when restarting after an error, but specify the same directory without deleting them. Refer to "Strategies for abnormal operations" for details.
If you use Interstage Single Sign-On as authentication mechanism, or any of these are already installed, this message is displayed.
Cloud Infrastructure Management Software V1.2.0
Systemwalker Software Configuration Manager V14.1.0A
Specify the environment information of the SSO repository used by Interstage Single Sign-On that is built into the current environment.
=== Interstage Single Sign-On settings  ===
Input SSO repository FQDN
=> ssoserver.example.com

=== Interstage Single Sign-On settings  ===
Input SSO repository repository name
[ENTER:rep001]
=>

=== Interstage Single Sign-On settings  ===
Input SSO repository port number
[ENTER:389]
=>

=== Interstage Single Sign-On settings  ===
Input SSO repository administrator DN
[ENTER:cn=manager,ou=interstage,o=fujitsu,dc=com]
=>

=== Interstage Single Sign-On settings  ===
Input SSO repository administrator DN password
=>
Point
Check the SSO repository information using the Interstage Management Console from the repository server advanced settings by clicking System > Security > Single Sign-on > Authentication Infrastructure > Repository Server > Settings.
Alternatively, click System > Security > Single Sign-on > Authentication Infrastructure > Repository Server > Protected resource, and confirm the FQDN.
The prompts below will be displayed if upgrading from this version:
Systemwalker Runbook Automation V14g.V14.1.0 Management Server
The prompts might also be displayed if any of these are already installed:
Cloud Infrastructure Management Software V1.2.0
Systemwalker Software Configuration Manager V14.1.0A
ServerView Resource Orchestrator Cloud Edition V3.0.0
Specify the port number used by Systemwalker Runbook Automation.
=== <Systemwalker Runbook Automation port> ===
Enter the HTTP listener port number.
[ENTER:28080]
=>

=== <Systemwalker Runbook Automation port> ===
Enter the operation management HTTP listener port number.
[ENTER:12001]
=>

=== <Systemwalker Runbook Automation port> ===
Enter the IIOP port number.
[ENTER:23600]
=>

=== <Systemwalker Runbook Automation port> ===
Enter the IIOP_SSL port number.
[ENTER:23601]
=>

=== <Systemwalker Runbook Automation port> ===
Enter the IIOP_MUTUALAUTH port number.
[ENTER:23602]
=>

=== <Systemwalker Runbook Automation port> ===
Enter the JMX_ADMIN port number.
[ENTER:8686]
=>
Note
Do not specify the port number currently operating - use the command below to check:
> netstat -a -n |
The specified port number may be in use elsewhere even if it is not currently operating (refer to "9.1 Port Numbers" for details).
The prompts below will be displayed if upgrading from this version:
Systemwalker Runbook Automation V14g.V14.1.0 Management Server
The prompts might also be displayed if any of these are already installed:
Cloud Infrastructure Management Software V1.2.0
Systemwalker Software Configuration Manager V14.1.0A
Sets the subsystem number, port number, or user used by the schedule function.
=== <Systemwalker Runbook Automation Schedule Function Advanced Setup> ===
Enter the subsystem number.
[ENTER:9]
=>

=== <Systemwalker Runbook Automation Schedule Function Advanced Setup> ===
Enter the job scheduler port number.
[ENTER:9690]
=>

=== <Systemwalker Runbook Automation Schedule Function Advanced Setup> ===
Enter the Job Execution Control port number.
[ENTER:9691]
=>

=== <Systemwalker Runbook Automation Schedule Function Advanced Setup> ===
Enter the scheduled start user.
[ENTER:swrbasch]
=>

=== <Systemwalker Runbook Automation Schedule Function Advanced Setup> ===
Enter the password of the scheduled start user
.=>
Note
Specify the port number if the default port number used by the schedule function is in use elsewhere.
Do not specify the port number currently operating - use the command below to check:
> netstat -a -n |
The specified port number may be in use elsewhere even if it is not currently operating (refer to "9.1 Port Numbers" for details).
The prompts below will be displayed if upgrading from this version and executing Management Server setup:
Systemwalker Runbook Automation V14g.V14.1.0 Management Server
The prompts might also be displayed if any of these are already installed:
Cloud Infrastructure Management Software V1.2.0 (Note)
Systemwalker Software Configuration Manager V14.1.0A (Note)
ServerView Resource Orchestrator Cloud Edition V3.0.0
Note: The applications process is used
Specify the port number used by Systemwalker Runbook Automation.
=== <Port numbers used by Systemwalker Runbook Automation setup> ===
Enter the message broker port number.
[ENTER:7676]
=>

=== <Port numbers used by Systemwalker Runbook Automation setup> ===
Enter the port number for the server function.
[ENTER:23700]
=>
Note
Do not specify the port number currently operating - use the command below to check:
> netstat -a -n |
The specified port number may be in use elsewhere even if it is not currently operating (refer to "9.1 Port Numbers" for details).
Confirm installation.
In the Confirm Installation window, make sure that the contents are correct, then click the Confirm button - upgrade will start. If updating installation information, enter the item numbers that will perform the updates. (note that this window is only displayed when the parameter has actually been specified).
=== <Installation destination directory> ===
Program deployment destination (cannot be changed): /opt
Setup files deployment destination (cannot be changed): /etc/opt
Work files deployment destination (cannot be changed): /var/opt
===<Information required for update tasks>===
1. Update operations working directory: /var/tmp/swrbawork
=== <SSO repository environment information> ===
2. SSO repository FQDN: ssoserver.example.com
3. SSO repository name: rep001
4. SSO repository number: 389
5. SSO repository administrator DN: cn=manager,ou=interstage,o=fujitsu,dc=com
=== <Systemwalker Runbook Automation port> ===
7. HTTP Listener port number: 28080
8. Administrator HTTP listener port number: 12001
9. IIOP port number: 23600
10. IIOP_SSL port number: 23601
11. IIOP_MUTUALAUTH port number: 23602
12. JMX_ADMIN port number: 8686
=== <Detailed Scheduling settings for Systemwalker Runbook Automation> ===
13. Subsystem Number: 9
14. Job Scheduler Port Number: 9690
15. Job Execution Control Port Number: 9691
16. User for Schedule Startup: swrbasch
=== <Port numbers used by Systemwalker Runbook Automation setup> ===
17. Port number for the message broker: 7676
18. Server function port number: 23700

Install with these settings? If not, enter the number of the item to change.
[y,q,number]
=>y
Start the installation.
When preparation for the installation is ready, the prompt below will be displayed and installation will start.
Installation in p;rogress.
Reboot the system.
After installation is completed, the window below will be displayed - enter "y" to reboot.
Installation of Systemwalker Runbook Automation (Management Server) is complete.
Reboot now?
[y,n]=>y
Act according to the displayed message, then restart the installer and execute the upgrade. Do not delete files and directories in the work area.