The restoration function provided by the product carries the following Restoration Tool.
Set the restoration conditions on the GUI before restoring data.
The Restoration Tool can restore the data that is backed up through the following two methods:
Backup Tool
Backup commands
The following data can be restored by the Restoration Tool:
Management information
Log information (log data in the DB and command logs)
For details about the data to be restored, please see "3.1.1.2 User Assets ".
In addition, the time required by data restoration can be estimated according to the number of logs to be restored. The estimation is as follows:
5,000 per second (Xeon, 2.0 GHz, 2 GB memory, and RAID1 architecture)
*More time may be consumed, depending on the server performance and RAID architecture.
The operational status of the Restoration Tool will be output to event logs.
This section describes how to restore data from the database by using the Restoration Tool provided by the Systemwalker Desktop Keeper.
Note
Notes on using the Restoration Tool
When the Master Management Server or Management Server is running, please do not restore the "management information". If the "management information" is overwritten, it may result in incomplete "management information" and "log information".
These settings cannot be backed up by the Backup Tool (GUI) or backup commands. Therefore, please re-set these settings after the Restoration Tool restores the database.
After the management information is restored, the old information is overwritten. Please note that the difference between the old information and the restored information will not be displayed.
When adding and restoring the log information in the environment where log information already exists, index information will be created after restoration; therefore, restoration will take more time. (It is three times as long as the time used by log information restoration in the environment where there are no logs.)
Point
Logon history
The logon history will be output to event logs (application).
Restore the Database in Use
The procedure for using the Restoration Tool is as follows:
Log on the Windows OS as a user of the Administrators group or Domain Admins group. If there is another running application, exit it.
Select [All Programs]-[Systemwalker Desktop Keeper]-[Server]-[Operation Database Restoration Tool] from the [Start] menu on the computer installed with the Master Management Server or Management Server.
→The [Restoration Tool] window is displayed.
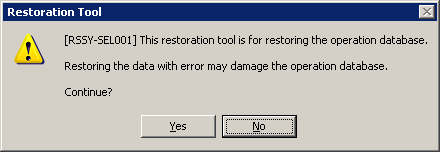
Click [Yes] to confirm restoration in the running database.
→The [Systemwalker Desktop Keeper - Operation Database Restoration Tool] window is displayed.
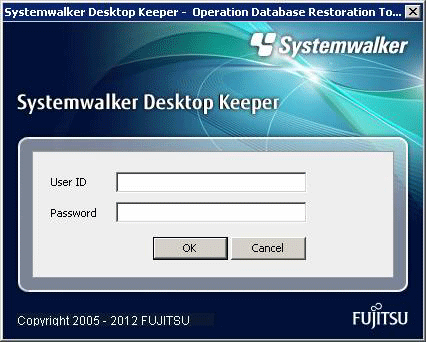
Log on by using the user ID (granted with the authority to back up and restore information) registered in the Server Settings Tool. (The user ID and password of the Primary Administrator can also be used for logon.)
Click [OK].
→The [Operation Database Restoration Tool] window is displayed.
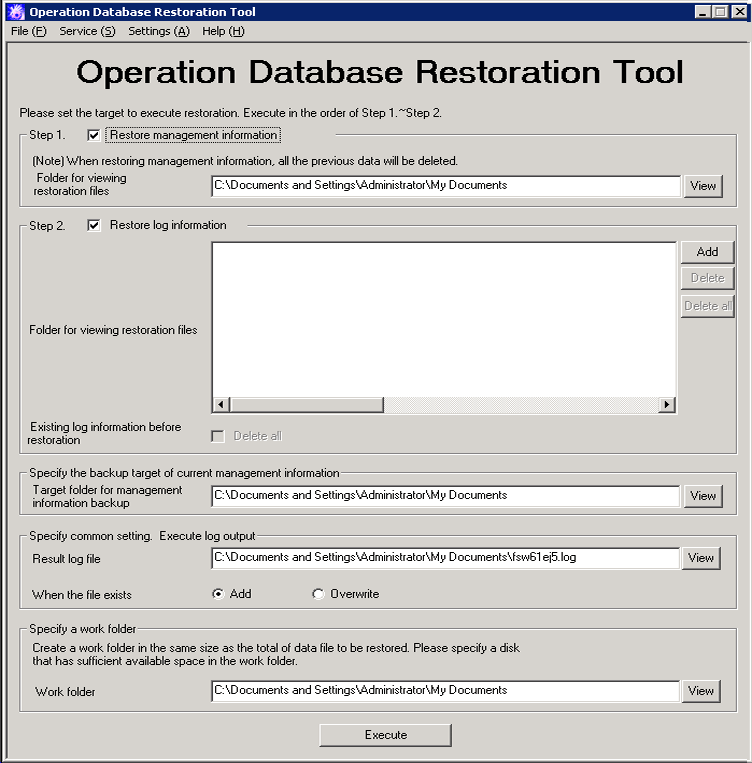
The following table describes the menu bar in the [Restoration Tool of database for viewing logs] window.
Menu Bar | Function Summary | ||
|---|---|---|---|
[File] | [Exit] | Exit the Restoration Tool. | |
[Service] | [Confirm Service Status] | Display the operational status of the "Level Control Service" and "Server Service" on the target server. | |
[Start Service] | Start the "Level Control Service" and "Server Service" on the target server. | ||
[Stop Service] | Stop the "Level Control Service" and "Server Service" on the target server. | ||
[Settings] | [Trace Restoration Tool] | [No] | Do not collect the traces of the Restoration Tool. |
[Summary] | Collect the traces of the Restoration Tool in summary mode. | ||
[Details] | Collect the traces of the Restoration Tool in details mode. | ||
[Help] | [Online Help] | Display the online help manual. | |
[Version Information] | Display the copyright information and version information. | ||
Before restoring the "management information" and "log information" by using the Restoration Tool, it is necessary to stop the "Level Control Service" and "Server Service" on the target server. Select [Stop Service] from the [Service] menu. A confirmation window is displayed. Click [OK] in the window to stop the services.
The operation result window is displayed. Click [OK] in the window.
In the [Restoration Tool of database for viewing logs] window, enter the information described in steps 1 and 2, common setting information, and working folder information.
Item Name | Description |
|---|---|
[Restore management information] | Select this when restoring the management information. |
[Folder for viewing restoration files] | Specify the folder that saves the files used for restoration. (Specify the folder that contains the LEVELTARGET.csv and LEVELCOMPOSITION.csv files backing up the management information.) There are two methods for specifying such a folder:
An absolute path can contain a maximum of 189 single-byte characters. The folder name should not contain the following symbols: "\" "/" ":" "*" "?" """ "<" ">" "|". |
Item Name | Description |
|---|---|
[Restore Log Information] | Select this when restoring the log information. |
[Folder for viewing restoration files] | Click [Add] and then specify the folder that saves the file used for restoration. Multiple files can be specified. (Specify the folder that contains the COMMONLOG1.csv and LOGKEWORDS.csv files backing up the log information.) The related buttons and check boxes are as follows:
An absolute path can contain a maximum of 189 single-byte characters. If an absolute path containing more than 189 characters is entered, only 189 characters are displayed. |
Item Name | Description |
|---|---|
[Target Folder for Backup Management Information] | Specify the target folder that saves the backup management information. (To avoid errors during management information restoration, back up the most recent management information before restoration is carried out.) There are two methods:
The [Viewing Folder] window is displayed. Select the folder that saves the management information used for restoration and then click [OK]. An absolute path can contain a maximum of 189 single-byte characters. The folder name should not contain the following symbols: "\" "/" ":" "*" "?" """ "<" ">" "|". |
Item Name | Description |
|---|---|
[Result Log File] | Specify the file for saving the execution results of the Restoration Tool. There are two methods for specifying such a file:
An absolute path can contain a maximum of 255 single-byte characters. The file name should not contain the following symbols: "\" "/" ":" "*" "?" """ "<" ">" "|". |
[When files exist] | Select the processing operation to be performed when the result log file exists at the location specified by [Result Log File].
|
Item Name | Description |
|---|---|
[Work folder] | Specify a folder for saving the working file. A working file with the same size as the data file to be restored will be created in the working folder; therefore, please ensure that there is sufficient space in the specified working folder. After restoration is completed, the working file will be deleted.
An absolute path can contain a maximum of 189 single-byte characters. The folder name should not contain the following symbols: "\" "/" ":" "*" "?" """ "<" ">" "|". |
After completing all the settings, click [Execute].
→The confirmation window is displayed.

Click [OK] to start execution. The [Restoration Status] window will be displayed and the restoration process will start.
When the restoration process is completed successfully, the process completion window is displayed. Click [OK] in the window.
After confirming the execution status, click [Close].
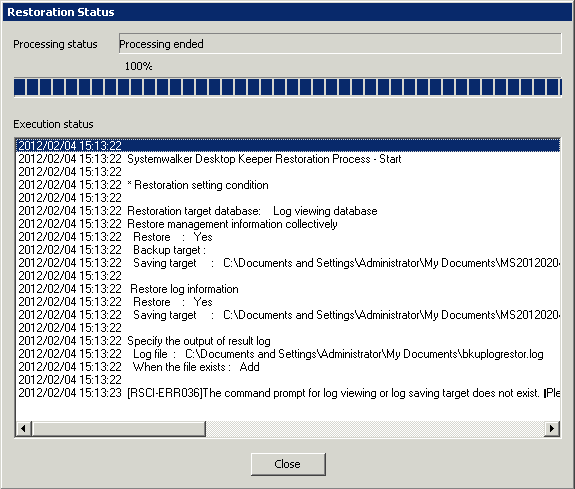
Re-set the following settings of the Server Settings Tool, which are recorded during backup:
[System settings]
[Setting of active directory linkage] *when the Active Directory linkage function is used
[Administrator notification settings]
[Management Server settings]
[Settings for tracing/folder/CT Self-version upgrade]
For details about how to display the windows of the Server Settings Tool, please see "2.2.5 Set Environment of Management Server/Master Management Server ".
Start the stopped "Level Control Service" and "Server Service". Select [Start Service] from the [Service] menu. The service startup confirmation window is displayed. Click [OK] in the window to start the services.
The operation result window is displayed. Click [OK] in the window.
Re-set the following settings in the [Terminal Operation Settings] window of the management console, which are recorded during backup.
Perform the following steps to display the [Terminal Operation Settings] window:
Start [Management Console].
Select [Terminal Operation Settings] from the [Operation Settings] menu.
→The [Terminal Operation Settings] window is displayed.
Restore the Database for Log Viewing
Log on the Windows OS as a user of the Administrators group or Domain Admins group. If there are other running applications, exit them.
Select [All Programs]-[Systemwalker Desktop Keeper]-[Server]-[Restoration Tool of Database for Log Viewing] from the [Start] menu on the computer installed with the Master Management Server or Management Server.
→The [Systemwalker Desktop Keeper - Operation Database Restoration Tool of Database for Log Viewing] window is displayed.

Log on by using the user ID (granted with the authority to back up and restore information) registered in the Server Settings Tool. (The user ID and password of the Primary Administrator can also be used for logon.)
Click [OK].
→The [Restoration Tool of database for viewing logs] window is displayed.
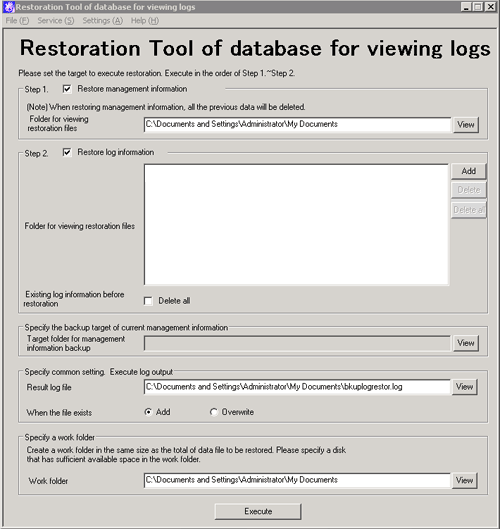
Except for certain items, the menu bar settings and input information of the Database Restoration Tool for Log Viewing are same as those of the Operation Database Restoration Tool. For details about the items that are the same for both tools, please see the description about the Operation Database Restoration Tool. The items that can be set only by the Database Restoration Tool for Log Viewing are described here.
Item Name | Description |
|---|---|
[Existing log information before restoration] | If the database for log viewing contains log information, delete all the log information from the database before restoration. |
After completing all the settings, click [Execute].
→The confirmation window is displayed.
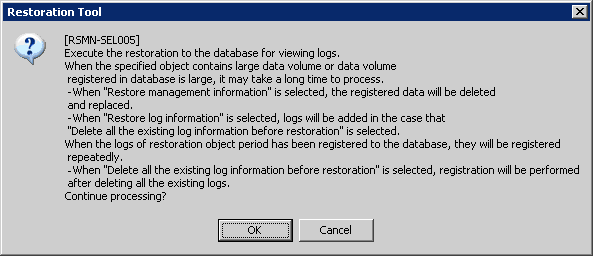
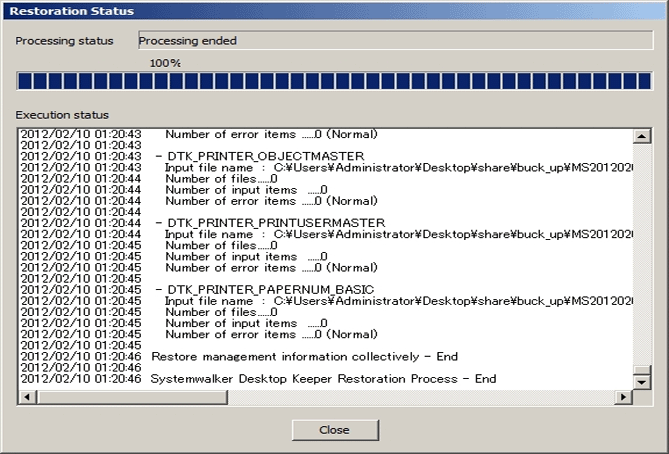
Click [OK] to start execution. The [Restoration Status] window will be displayed and the restoration process will start.
When the restoration process is completed successfully, the process completion window is displayed. Click [OK] in the window.
After confirming the execution status, click [Close].
Confirm Service Status
During the restoration process, the Restoration Tool must stop the Systemwalker Desktop Keeper services on the connected Management Server. Therefore, it is necessary to confirm the service status. This part describes how to confirm the status of the Systemwalker Desktop Keeper services by using the Restoration Tool.
Select [Confirm Service Status] from the [Service] menu.
The [Confirm Service Status] window is displayed, showing whether the services are running.

Click [OK] after confirmation.
Exit the Restoration Tool
This describes how to exit the Restoration Tool.
To exit the Restoration Tool, select [Exit] from the [File] menu.
→The exit confirmation window is displayed.

Select whether to save the conditions specified in the Restoration Tool window. Click [Yes] to exit with the conditions saved, click [No] to exit without saving the conditions, or click [Cancel] to cancel the exiting operation.
In addition, the menu settings ([Settings of Debugging Trace]) are saved when they are set.