This section describes how to newly install the Report Output Tool of Systemwalker Desktop Keeper.
Items to be confirmed before installation
Please refer to “Operating Environment” in “Systemwalker Desktop Keeper User’s Guide” to confirm “Products that cannot be used in Mixture”.
Please refer to “Port Number List” in “Systemwalker Desktop Keeper Reference Manual” to confirm the port number to be used.
When copying the installer of Systemwalker Desktop Keeper from CD-ROM to local disk, please make sure that the path of the copy target does not contain double-byte characters.
The steps to install Report Output Tool are as follows. In addition, please refer to the “Systemwalker Desktop Keeper User’s Guide” for the operating environment.
Log in to Windows with a user that belongs to the Administrators group or a user that belongs to the Domain Admins group.
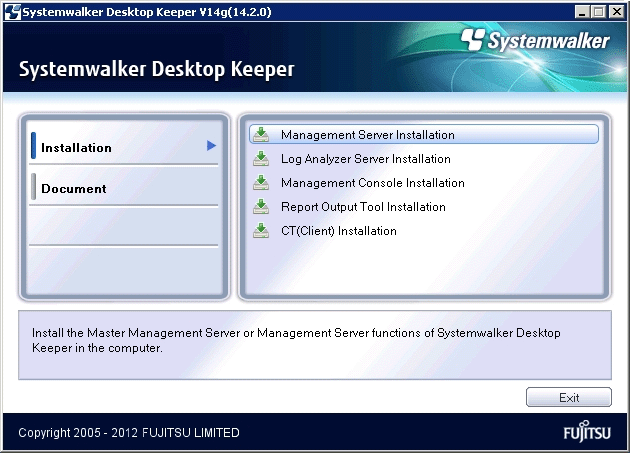
After the CD-ROM of Systemwalker Desktop Keeper is inserted into the PC, the following window will be displayed.
Please select “Report Output Tool Installation”.

If the above installer is not started, please start “swsetup.exe” in the CD-ROM drive.
After the “Welcome to Systemwalker Desktop Keeper Report Output Tool Setup” window is displayed, please click the [Next] button.
The “Select installation target” window of Report Output Tool function is displayed.
Please confirm the [Required Capacity/Available Capacity] displayed in [Installation Target Drive].
If the displayed installation target is not to be changed, click the [Next] button.
If the displayed installation target is to be changed, please click the [Browse] button of the folder expected to be changed, and click the [Next] button after the folder has been changed.
Multi-byte characters such as space, Hiragana, Katakana and Chinese characters cannot be specified in Report Output Tool. In addition, the following drives cannot be specified:
Root directory of drive (C:\, D:\, etc.)
Network drive
Drive not in NTFS format.
The settings cannot be changed during overwriting installation (the [Browse] button will be disabled).
The “Select installation target” window of database-related files is displayed. (When the Symfoware Client that can be used has already been installed, this setting window will not be displayed. Please continue with the following steps.)
Please confirm the [Required Capacity/Available Capacity] displayed in [Installation Target Drive].
If the displayed installation target is not to be changed, click the [Next] button.
If the displayed installation target is to be changed, please click the [Browse] button of the folder expected to be changed, and click the [Next] button after the folder has been changed.
Multi-byte characters such as space, Hiragana, Katakana and Chinese characters cannot be specified in database-related files. In addition, the following drives cannot be specified. Single-byte space cannot be specified either.
Root directory of drive (C:\, D:\, etc.)
Network drive
Drive not in NTFS format
The “Enter Log Analyzer Server information” window is displayed. Please set the IP address of Log Analyzer Server to be connected and the communication port number to be used, and click the [Next] button.
[IP Address]: Please set the IP address of the Log Analyzer Server to be connected.
[Communication Port]: Please set the value that is the same as the one specified in “Communication Port 3” used in Report Output Tool in the “Enter Port Number” window during the installation of Log Analyzer Server.
In addition, the settings cannot be changed during overwriting installation.
The “Start Copying Files” window is displayed.
Confirm the set contents. When the installation is started, please click the [Next] button to start installation.
When the setting is expected to be changed, please click the [Back] to reset.
Note
When relevant window of Data Execution Prevention is displayed
When the OS of “Report Output Tool” to be installed is “Microsoft® Windows® XP Professional Service Pack 2/3”, due to the Data Execution Prevention (DEP) function of Windows, the "Data Execution Prevention" window will be displayed.
When this window is displayed, please exclude the “F3CWDELA.EXE” program from the target of Data Execution Prevention (DEP) function according to the following procedure. In addition, the above window will not be displayed after the 2nd time.
Click the [Set] button of the performance column of the [Detailed Settings] tab of the [System Properties] window. The [Performance Options] window will be displayed.
Select the [Data Execution Prevention] tab in the [Performance Options] window.
Add the following contents to the list of programs in which DEP is disabled:
“Database Related File Installation Target”\ODOS\bin\F3CWDELA.exe
After the processing has completed normally, the “InstallShield Wizard completed.” window will be displayed.
To use this program, it is required to restart the system. Select one of the following items and click the [Finish] button:
[Yes, restart the computer immediately].
[No, restart the computer later.]
In addition, no indication for restart selection will be displayed when the Symfoware Client has been installed, so please click the [Finish] button directly.
After the Report Output Tool has been installed, the environment used for running the Report Output Tool should be set. (The information of the Log Analyzer Server to be connected will be effective after the environment setup has been performed.)
Please continue referring to “2.8.2 Set Environment of Report Output” to perform environment setup.