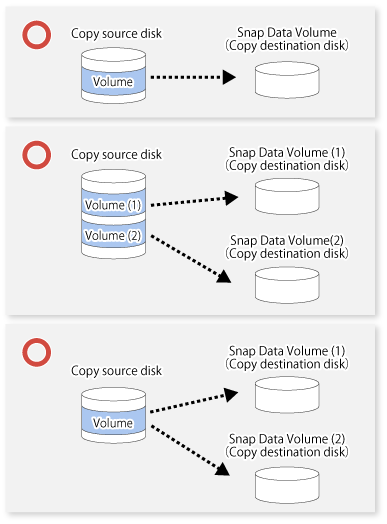
Only one session can be set up for each Snap Data Volume, which is the copy destination disk for SnapOPC/SnapOPC+.
Figure 6.13 If one session is set for the Snap Data Volume

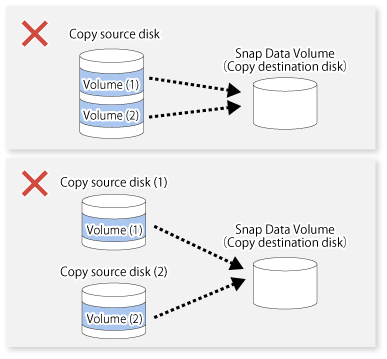
Accordingly, multiple sessions cannot be set up for a single Snap Data Volume, as shown in the following figure:
Figure 6.14 If multiple sessions are set for the Snap Data Volume

The following additional restrictions apply:
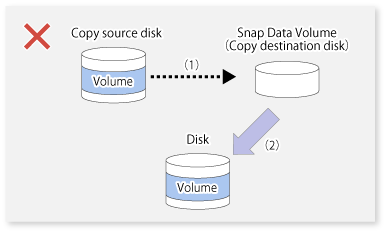
It is not possible to copy from the Snap Data Volume to a disk other than the copy source disk while SnapOPC/SnapOPC+ is running.
Figure 6.15 If copying from the Snap Data Volume to a disk other than the copy source

Create a Snap Data Volume by performing the following steps:
Calculate the physical capacity for the Snap Data Volume.
Define and initialize the Snap Data Volume.
Connect to the host.
Create partitions and file systems.
Calculate the physical capacity for the Snap Data Volume
The formula for estimating the physical capacity of Snap Data Volume is as follows:
Physical capacity = (number of updated blocks for the copy source volume) x (safety factor)
Strictly speaking, both the number of blocks that have been updated on the Snap Data Volume and the management area used by the hardware (about 0.1% of the logical capacity) should also be taken into account before the SnapOPC/SnapOPC+ is taken, however this can be covered by increasing the safety factor.
The number of blocks that have been updated on the copy source volume can be estimated using swstestupdate (Update volume measurement command).
Make this measurement using the following procedure:
Start measuring the update amount by configuring a pseudo session on the copy source volume.
# /opt/FJSVswsts/bin/swstestupdate start /dev/hdisk10 /dev/hdisk10 swstestupdate completed # |
Start transactions. Blocks that are updated by transactions will be recorded on the hardware.
After the measurement period has elapsed, check the number of blocks that have been updated.
# /opt/FJSVswsts/bin/swstestupdate status /dev/hdisk10 Volume-Name Update /dev/hdisk10 644333 # |
After the measurements are complete, cancel the pseudo session.
# /opt/FJSVswsts/bin/swstestupdate stop /dev/hdisk10 /dev/hdisk10 swstestupdate completed # |
Define and initialize the Snap Data Volume
Define and initialize the Snap Data Volume using ETERNUS Web GUI. At this point, set the logical capacity to that of the copy source disk (in order to use the same partition configuration for both the copy source disk and the copy destination disk).
Connect to the host
Connect the created Snap Data Volume to the host. Refer to the manual for the disk array device (the Server Connection Guide) for information on this procedure.
Create partitions and file systems
Create partitions and file systems so that a copy source volume can be created on the Snap Data Volume.
Note
Once file systems have been created, limit updates to the copy destination volume as much as possible, to avoid unnecessarily using up the physical capacity of the Snap Data Volume.
The Snap Data Pool is created using ETERNUS Web GUI.
Note the following points when creating the Snap Data Pool.
Note
In the basic operation, copying is completed inside the Snap Data Volume capacity estimated/calculated as appropriate for the copying capacity. The Snap Data Pool is only an auxiliary area; when copying, always make sure that area is added from the Snap Data Pool to the Snap Data Volume.
Estimate the updated amount for each copy source volume, and then decide the Snap Data Volume and the Snap Data Pool capacity. If an advance estimate is difficult, it is recommended that the Snap Data Volume capacity + the Snap Data Pool capacity is between 30-50% of the total copy source capacity (since this is only a recommended value, the Snap Data Pool capacity must be changed in accordance with the operation status).
When there is insufficient Snap Data Volume or Snap Data Pool capacity, it is not possible to access copy destination volume (the Snap Data Volume) (this status makes it impossible to read copy destination data or write data to the copy destination). In SnapOPC+, it is not possible to write the copy destination or copy destination generations before it.
For this reason, monitoring must be performed so that the Snap Data Volume or the Snap Data Pool capacity is not insufficient at the time of operations.
Using only the Snap Data Volume (when the Snap Data Pool is not set)
Specify "stat" as swstsdv (Snap Data Volume operation/reference command) subcommand, and regularly monitor whether there is insufficient Snap Data Volume capacity.
Using the Snap Data Pool (when the Snap Data Pool is set)
Specify "poolstat" as swstsdv (Snap Data Volume operation/reference command) subcommand, and regularly monitor whether there is insufficient Snap Data Pool capacity.
If there is an area in the Snap Data Pool for which the usage rate exceeds 50%, regardless of encryption, consider increasing the Snap Data Pool. Additionally, increase the Snap Data Pool monitoring frequency.
If there is an area in the Snap Data Pool for which the usage rate exceeds 70%, regardless of encryption, increase the Snap Data Pool immediately.
When there is insufficient Snap Data Volume or Snap Data Pool capacity, refer to "7.4.2.3 Troubleshooting when a lack of free space has occurred in the Snap Data Volume or Snap Data Pool".
Creating an access volume
When there is insufficient Snap Data Volume or Snap Data Pool capacity, it is not possible to access copy destination volume (Snap Data Volume).
In the following cases, it is not possible to access the Snap Data Volume copy destination volume either:
Access to the Snap Data Volume after the Snap Data Volume initialization
Access to the Snap Data Volume after the Disk management information initialization
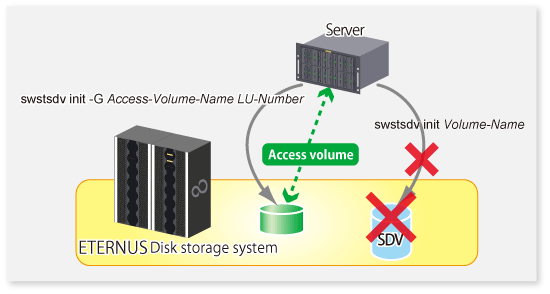
For this reason, it is recommended that you reserve a volume (access volume) that is separate from the Snap Data Volume.
The volume that is used as the access volume is created on the same ETERNUS Disk storage system as the Snap Data Volume. Since this is not used in the storage of data, there is no problem even if there is little capacity. Any size can be used for the creation of the access volume.
The following operations can be executed using the access volume:

Do not use Snap Data Volume as shared disks in a clustered system. This is to avoid the danger of the clustered system failing over when the physical capacity of the Snap Data Volume is insufficient.
In cluster operations, use the following methods to prevent the Snap Data Volume from being used as a shared disk:
Permit the Snap Data Volume to be referenced from all the nodes in the clustered system.
Use inter-server replication between the clustered system and a non-clustered system.