If any problem occurs in a system that uses this software, collect troubleshooting information according to "B.1 Troubleshooting information".
Back up (save) the environment for the Storage Cruiser's manager if an error has occurred in the Management Server.
All of the tasks for backup of Manager are performed in the Management Server.
Follow the procedure below to save the environment for the Storage Cruiser's manager.
Information
About description in the procedure
"$BAK_DIR" signifies the backup destination directory.
Stop the ETERNUS SF Manager Tomcat Service.
Execute the following shell script to stop the service.
/opt/FJSVesfcm/bin/stop-webservice.sh
Create the backup data.
Create the directory for the backup data.
mkdir -p $BAK_DIR/Common
Execute the following command to create the backup data. The backup data is then created using the file name designated in <filename>.
/opt/FJSVesfcm/postgres/bin/pg_dump -U esfpostgres -C --attribute-inserts -f $BAK_DIR/Common/<filename> esfdbA prompt is displayed with the server awaiting input. Input the following keyword.
master01!
Execute the following shell script to stop ETERNUS SF Manager services.
/opt/FJSVesfcm/bin/stopesf.sh
Note
Upon executing the shell script, multiple messages stating that the ETERNUS SF Manager Tomcat has already been stopped will be displayed. These messages do not pose a problem and can be ignored.
Backup the device management information.
In the normal backup operation, execute "Backup the device management information".
If upgrade from a previous version, execute "Upgrade from a previous version".
Backup the device management information
Create the directory for the backup data.
mkdir -p $BAK_DIR/var/opt/FJSVssmgr/current/opencimom/logr
Copy the files to the backup location.
cp -Rp /var/opt/FJSVssmgr/current/opencimom/logr/* $BAK_DIR/var/opt/FJSVssmgr/current/opencimom/logr/
Upgrade from a previous version
cimbackup.sh is used for backing up the device management information. For further information of cimbackup.sh, refer to "Appendix D Migrating from the Previous Version".
Create the directory for the backup data.
# mkdir -p $BAK_DIR/logr
Move to a directory that cimbackup.sh is stored, and execute cimbackup.sh.
# ./cimbackup.sh $BAK_DIR/logr
Back up the essential file.
Backup is not required if the files do not exist.
Create the directory for the backup data.
mkdir -p $BAK_DIR/var/opt/FJSVssmgr/current
Copy the file to the backup location.
cp -p /var/opt/FJSVssmgr/current/systemevent.csv $BAK_DIR/var/opt/FJSVssmgr/current/
Back up the files related to the performance management function.
This step can be skipped if you are not using the performance management function. Backup is not required if there are no subdirectories or files.
Note
If a pile of files related to the performance management function exists, calculate the backup time according to the amount of files.
Create the directories for the backup data.
mkdir -p $BAK_DIR/etc/opt/FJSVssmgr/current
mkdir -p $BAK_DIR/var/opt/FJSVssmgr/current/perf
Copy the subdirectories and files to the backup locations.
cp -p /etc/opt/FJSVssmgr/current/perf.conf $BAK_DIR/etc/opt/FJSVssmgr/current/
cp -Rp /var/opt/FJSVssmgr/current/perf/* $BAK_DIR/var/opt/FJSVssmgr/current/perf/
Back up the other files which can be customized.
It is unnecessary to back up the files or the directories which are not existed.
Create the directories for the backup data.
mkdir -p $BAK_DIR/etc/opt/FJSVssmgr/current
mkdir -p $BAK_DIR/etc/opt/FJSVssmgr/current/eventmail
Copy the subdirectories and files to the backup locations.
# cp -p /etc/opt/FJSVssmgr/current/sanma.conf $BAK_DIR/etc/opt/FJSVssmgr/current/
# cp -p /etc/opt/FJSVssmgr/current/ssmgr.conf $BAK_DIR/etc/opt/FJSVssmgr/current/
# cp -p /etc/opt/FJSVssmgr/current/trapop.sh $BAK_DIR/etc/opt/FJSVssmgr/current/
# cp -p /etc/opt/FJSVssmgr/current/traprm.sh $BAK_DIR/etc/opt/FJSVssmgr/current/
# cp -Rp /etc/opt/FJSVssmgr/current/eventmail/* $BAK_DIR/etc/opt/FJSVssmgr/current/eventmail/
Back up the SNMP Trap XML definition files.
This step can be skipped if you are not customizing the SNMP Trap XML definition files.
Below is an example for if the SNMP Trap XML definition file 1_3_6_1_1588_2_1_1_1.xml has been customized. As shown in this example, back up each customized file one at a time.
Create the directory for the backup data.
mkdir -p $BAK_DIR/etc/opt/FJSVssmgr/current/snmpth
Copy the file to the backup location.
# cp -p /etc/opt/FJSVssmgr/current/snmpth/1_3_6_1_1588_2_1_1_1.xml $BAK_DIR/etc/opt/FJSVssmgr/current/snmpth/
Back up the device polling setting files.
This step can be skipped if you are not customizing the device polling setting files.
Below is an example for if the device polling setting file, DP_config.xml, has been customized. As shown in this example, back up each customized file one at a time.
Create the directory for the backup data.
# mkdir -p $BAK_DIR/etc/opt/FJSVssmgr/current/devicepolling
Copy the file to the backup location.
# cp -p /etc/opt/FJSVssmgr/current/devicepolling/DP_config.xml $BAK_DIR/etc/opt/FJSVssmgr/current/devicepolling/
Back up the polling service setting file.
This step can be skipped if you are not customizing the polling service setting file.
If you have customized the polling service setting file pollingService.xml, back up this file using the step shown below.
Create the directory for the backup data.
# mkdir -p $BAK_DIR/etc/opt/FJSVssmgr/current/polling
Copy the file to the backup location.
# cp -p /etc/opt/FJSVssmgr/current/polling/pollingService.xml $BAK_DIR/etc/opt/FJSVssmgr/current/polling/
Save the files related to copy group and copy pair definitions.
Perform this step only if you are using the AdvancedCopy function.
Create the directories for the backup data.
mkdir -p $BAK_DIR/CCM/etc
mkdir -p $BAK_DIR/CCM/etc/db
mkdir -p $BAK_DIR/CCM/etc/db/cg
mkdir -p $BAK_DIR/CCM/etc/prop
mkdir -p $BAK_DIR/CCM/var/micc/database
Copy the subdirectories and files to the backup locations.
cp -p /etc/opt/FJSVccm/db/eternus.xml $BAK_DIR/CCM/etc/db
cp -p /var/opt/FJSVccm/micc/database/DeviceRegList.xml $BAK_DIR/CCM/var/micc/database
cp -p /etc/opt/FJSVccm/prop/user.properties $BAK_DIR/CCM/etc/prop
cp -p /etc/opt/FJSVccm/accc/etc/stxc.alias $BAK_DIR/CCM/etc
cp -p /etc/opt/FJSVccm/accc/etc/stxc_ext.alias $BAK_DIR/CCM/etc
cp -p /etc/opt/FJSVccm/accc/etc/stxcvolinf $BAK_DIR/CCM/etc
cp -Rp /etc/opt/FJSVccm/db/cg/* $BAK_DIR/CCM/etc/db/cg
Back up the license management database.
Create the directory for the backup data.
mkdir -p $BAK_DIR/LM
Execute the following command. The backup data is created using the file name specified in <filename>.
/opt/FJSVesflm/bin/esflm backup $BAK_DIR/LM/<filename>Back up the Optimization Option environment. (For Optimization Option only)
Create the directory for the backup data.
mkdir -p $BAK_DIR/etc/opt/FJSVssast/data/policy
mkdir -p $BAK_DIR/etc/opt/FJSVssast/data/pool
mkdir -p $BAK_DIR/var/opt/FJSVssast/data/perf
Copy the subdirectories and files to the backup locations.
cp -p /etc/opt/FJSVssast/data/policy/TierPolicy.xml $BAK_DIR/etc/opt/FJSVssast/data/policy/
cp -p /etc/opt/FJSVssast/data/pool/* $BAK_DIR/etc/opt/FJSVssast/data/pool/
cp -Rp /var/opt/FJSVssast/data/perf/* $BAK_DIR/var/opt/FJSVssast/data/perf/
Execute the following shell script to start the ETERNUS SF Manager services.
/opt/FJSVesfcm/bin/startesf.sh
For cluster environment, follow the procedure below to save the environment for the Storage Cruiser's manager.
Stop all cluster services which the Manager belongs to.
For details of cluster transaction, refer to "Cluster transaction and local transaction" in the "ETERNUS SF Cluster Environment Setup Guide."
Mount the shared disk on the primary node.
Perform steps 2 and step 4 to 13 of "8.1.1.2.1 Backup of Solaris OS Manager" on the primary node.
Unmount the shared disk mounted in step 2.
Start all cluster transactions which the Manager belongs to.
Since the procedure for backup of the Linux version of Manager is identical to that for backup of the Solaris OS version, refer to "8.1.1.2.1 Backup of Solaris OS Manager" to perform this operation.
Since the procedure for backup of the Linux version of Manager is identical to that for backup of the Solaris OS versions in cluster environment, refer to "8.1.1.2.2 Backup of Solaris OS Manager (cluster environment)" to perform this operation.
Follow the procedure below to save the environment for the Storage Cruiser's manager.
Information
About description in the procedure
$BAK_DIR means the backup destination directory.
$INS_DIR means "Program Directory" specified at the ETERNUS SF Manager installation.
$ENV_DIR means "Environment Directory" specified at the ETERNUS SF Manager installation.
$TMP_DIR means "Work Directory" specified at the ETERNUS SF Manager installation.
Stop the ETERNUS SF Manager Tomcat Service.
Open Service Control Manager and stop the following service.
ETERNUS SF Manager Tomcat Service
Create the backup data.
Create the following directory for the backup data in Explorer or a similar program.
$BAK_DIR\Common
Execute the following command to create the backup data. The backup data will be created with the name specified in <filename>.
$INS_DIR\Common\sys\postgres\bin\pg_dump -U esfpostgres -C --attribute-inserts -f $BAK_DIR\Common\<filename> esfdb |
A prompt is displayed, with the server awaiting input. Input the following keyword.
master01! |
Execute the following batch to stop the ETERNUS SF Manager services.
$INS_DIR\Common\bin\Stop_ESFservice.bat |
Note
Upon executing the batch, multiple messages stating that the ETERNUS SF Manager Tomact Service has already been stopped will be displayed. These messages do not pose a problem and can be ignored.
Back up the device management information.
In the normal backup operation, execute "Backup the device management information".
If upgrade from a previous version, execute "Upgrade from a previous version".
Backup the device management information
Create the following directory for the backup data using Explorer or a similar program.
$BAK_DIR\ESC\Manager\var\opt\FJSVssmgr\current\opencimom\logr
Using Explorer or a similar program, copy the files belonging to the following directory to the backup location.
Copy Source Directory | Copy Destination Directory |
|---|---|
$TMP_DIR\ESC\Manager\var\opt\FJSVssmgr\current\opencimom\logr | $BAK_DIR\ESC\Manager\var\opt\FJSVssmgr\current\opencimom\logr |
Upgrade from a previous version
cimbackup.bat is used for backing up the device management information. For further information of cimbackup.bat, refer to "Appendix D Migrating from the Previous Version".
Create the directory for the backup data as follows by using Explore.
$BAK_DIR\logr
In the command prompt, move to a directory that cimbackup.bat is stored, and then execute cimbackup.bat.
cimbackup.bat "$BAK_DIR\logr"
Back up the essential file.
Create the following directory for the backup data in Explorer or a similar program.
$BAK_DIR\ESC\Manager\var\opt\FJSVssmgr\current
Using Explorer or a similar program, copy the following file to the backup location.
Copy Source File | Copy Destination Directory |
|---|---|
$TMP_DIR\ESC\Manager\var\opt\FJSVssmgr\current\systemevent.csv | $BAK_DIR\ESC\Manager\var\opt\FJSVssmgr\current |
Back up the files related to the performance management function.
This step can be skipped if you are not using the performance management function.
This backup is also not required if there are no subdirectories or files.
Note
If a pile of files related to the performance management function exists, calculate the backup time according to the amount of files.
Create the following directories for the backup data in Explorer or a similar program.
$BAK_DIR\ESC\Manager\etc\opt\FJSVssmgr\current
$BAK_DIR\ESC\Manager\var\opt\FJSVssmgr\current\perf
Using Explorer or a similar program, copy the following file to the backup location.
Copy Source File | Copy Destination Directory |
|---|---|
$ENV_DIR\ESC\Manager\etc\opt\FJSVssmgr\current\perf.conf | $BAK_DIR\ESC\Manager\etc\opt\FJSVssmgr\current |
Using Explorer or a similar program, copy the subdirectories and files belonging to the following directories to their backup locations.
Copy Source Directory | Copy Destination Directory |
|---|---|
$TMP_DIR\ESC\Manager\var\opt\FJSVssmgr\current\perf | $BAK_DIR\ESC\Manager\var\opt\FJSVssmgr\current\perf |
Back up the other files which can be customized.
It is unnecessary to back up the files or the directories which are not existed.
Create the following backup directories in Explorer or a similar program.
$BAK_DIR\ESC\Manager\opt\FJSVssmgr\bin
$BAK_DIR\ESC\Manager\etc\opt\FJSVssmgr\current
$BAK_DIR\ESC\Manager\etc\opt\FJSVssmgr\current\eventmail
Using Explorer or a similar program, copy the following files to their backup locations.
Copy Source File | Copy Destination Directory |
|---|---|
$INS_DIR\ESC\Manager\opt\FJSVssmgr\bin\manager.ini | $BAK_DIR\ESC\Manager\opt\FJSVssmgr\bin |
$ENV_DIR\ESC\Manager\etc\opt\FJSVssmgr\current\sanma.conf | $BAK_DIR\ESC\Manager\etc\opt\FJSVssmgr\current |
$ENV_DIR\ESC\Manager\etc\opt\FJSVssmgr\current\ssmgr.conf | |
$ENV_DIR\ESC\Manager\etc\opt\FJSVssmgr\current\trapop.bat | |
$ENV_DIR\ESC\Manager\etc\opt\FJSVssmgr\current\traprm.bat |
Using Explorer or a similar program, copy the subdirectories and files belonging to the following directory to their backup location.
Copy Source Directory | Copy Destination Directory |
|---|---|
$ENV_DIR\ESC\Manager\etc\opt\FJSVssmgr\current\eventmail | $BAK_DIR\ESC\Manager\etc\opt\FJSVssmgr\current\eventmail |
Back up the SNMP Trap XML definition files.
This step can be skipped if you are not customizing the SNMP Trap XML definition files.
Below is an example for if the SNMP Trap XML definition file 1_3_6_1_1588_2_1_1_1.xml is being customized. As in this example, back up each file one at a time.
Create the following backup directory in Explorer or a similar program.
$BAK_DIR\ESC\Manager\etc\opt\FJSVssmgr\current\snmpth
Using Explorer or a similar program, copy the following file to its backup location.
Copy Source File | Copy Destination Directory |
|---|---|
$ENV_DIR\ESC\Manager\etc\opt\FJSVssmgr\current\snmpth\1_3_6_1_1588_2_1_1_1.xml | $BAK_DIR\ESC\Manager\etc\opt\FJSVssmgr\current\snmpth |
Back up the device polling setting files.
This step can be skipped if you are not customizing the device polling setting files.
Below is an example for if the device polling setting file DP_config.xml is being customized. As in this example, back up each file one at a time.
Create the following backup directory in Explorer or a similar program.
$BAK_DIR\ESC\Manager\etc\opt\FJSVssmgr\current\devicepolling
Using Explorer or a similar program, copy the following file to its backup location.
Copy Source File | Copy Destination Directory |
|---|---|
$ENV_DIR\ESC\Manager\etc\opt\FJSVssmgr\current\devicepolling\DP_config.xml | $BAK_DIR\ESC\Manager\etc\opt\FJSVssmgr\current\devicepolling |
Back up the polling service setting file.
This step can be skipped if you are not customizing the polling service setting file.
If customizing the polling service setting file pollingService.xml, follow the step below to back it up.
Create the following backup directory in Explorer or a similar program.
$BAK_DIR\ESC\Manager\etc\opt\FJSVssmgr\current\polling
Using Explorer or a similar program, copy the following file to its backup location.
Copy Source File | Copy Destination Directory |
|---|---|
$ENV_DIR\ESC\Manager\etc\opt\FJSVssmgr\current\polling\pollingService.xml | $BAK_DIR\ESC\Manager\etc\opt\FJSVssmgr\current\polling |
Back up the database.
Follow the procedure below to back up the database.
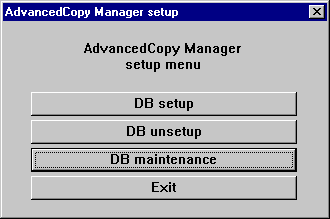
From the Start button, select [Programs]-[ETERNUS SF Manager]-[DB Setup Tools].
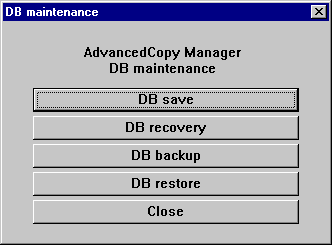
Once the screen shown below is displayed, click the [DB maintenance] button.
Once the DB Maintenance screen shown below is displayed, click the [DB save] button.
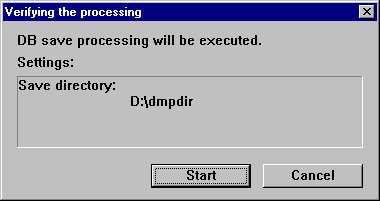
Once the input screen for the save destination directory is displayed, designate the backup destination directory and click the [OK] button. If overwriting to a directory to which data was already saved, check the checkbox for "Overwrite if backup data already exists in the backup destination."

Note
It is necessary to create the backup destination directory beforehand.
Once the confirmation screen for the processing is displayed, check that there are no mistakes in the input details and click the [Start] button.
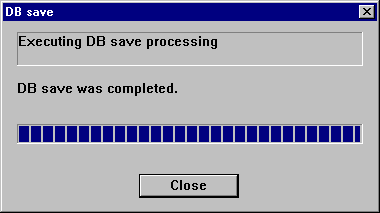
When the DB save is complete, the following completion screen will be displayed. Click the [Close] button.
Information
It is also possible to back up the database using commands.
Refer to "stgdbdmp (Database save command)" in the "ETERNUS SF AdvancedCopy Manager Operation Guide" for details on how to perform the operation with commands.
Back up the registry.
Create the following backup directory in Explorer or a similar program.
$BAK_DIR\ACM\etc
Using Explorer or a similar program, copy the following files to the backup location.
Copy Source File | Copy Destination Directory |
|---|---|
$ENV_DIR\ACM\etc\swnode.ini | $BAK_DIR\ACM\etc |
$ENV_DIR\ACM\etc\device.ini |
Save the files related to copy group and copy pair definitions.
Perform this step only if you are using the AdvancedCopy function.
Create the following directories for the backup data in Explorer or a similar program.
$BAK_DIR\CCM\etc
$BAK_DIR\CCM\etc\db
$BAK_DIR\CCM\etc\db\cg
$BAK_DIR\CCM\etc\prop
$BAK_DIR\CCM\var\micc\database
Using Explorer or a similar program, copy the following files to their backup locations.
Copy Source File | Copy Destination Directory |
|---|---|
$ENV_DIR\CCM\etc\db\eternus.xml | $BAK_DIR\CCM\etc\db |
$TMP_DIR\CCM\var\micc\database\DeviceRegList.xml | $BAK_DIR\CCM\var\micc\database |
If copy source files exist, copy the following files to their backup locations using Explorer or a similar program.
Copy Source File | Copy Destination Directory |
|---|---|
$ENV_DIR\CCM\etc\prop\user.properties | $BAK_DIR\CCM\etc\prop |
$ENV_DIR\CCM\etc\stxc.alias | $BAK_DIR\CCM\etc |
$ENV_DIR\CCM\etc\stxc_ext.alias | |
$ENV_DIR\CCM\etc\stxcvolinf |
Using Explorer or a similar program, copy the files belonging to the following directory to their backup location.
Copy Source Directory | Copy Destination Directory |
|---|---|
$ENV_DIR\CCM\etc\db\cg | $BAK_DIR\CCM\etc\db\cg |
Back up the license management database.
Create the following backup directory in Explorer or a similar program.
$BAK_DIR\LM
Execute the following command. The backup data will be created with the file name specified in <filename>.
$INS_DIR\LM\bin\esflm backup $BAK_DIR\LM\<filename> |
Back up the Optimization Option environment. (For Optimization Option only)
Create the following directories for the backup data in Explorer or a similar program.
$BAK_DIR\AST\Manager\etc\opt\FJSVssast\data\policy
$BAK_DIR\AST\Manager\etc\opt\FJSVssast\data\pool
$BAK_DIR\AST\Manager\var\opt\FJSVssast\data\perf
Using Explorer or a similar program, copy the following files to their backup locations.
Copy Source File | Copy Destination Directory |
|---|---|
$ENV_DIR\AST\Manager\etc\opt\FJSVssast\data\policy\TierPolicy.xml | $BAK_DIR\AST\Manager\etc\opt\FJSVssast\data\policy |
Using Explorer or a similar program, copy the subdirectories and files belonging to the following directory to their backup location.
Copy Source Directory | Copy Destination Directory |
|---|---|
$ENV_DIR\AST\Manager\etc\opt\FJSVssast\data\pool | $BAK_DIR\AST\Manager\etc\opt\FJSVssast\data\pool |
$TMP_DIR\AST\Manager\var\opt\FJSVssast\data\perf | $BAK_DIR\AST\Manager\var\opt\FJSVssast\data\perf |
Execute the following batch to start ETERNUS SF Manager services.
$INS_DIR\Common\bin\Start_ESFservice.bat |
For cluster environment, follow the procedure below to save the environment for the Storage Cruiser's manager.
Stop all cluster services which the Manager belongs to.
For details of cluster transaction, refer to "Cluster transaction and local transaction" in the "ETERNUS SF Cluster Environment Setup Guide."
Mount the shared disk on the primary node.
Perform steps 2 and step 4 to 15 of "8.1.1.2.5 Backup of Windows Manager" on the primary node.
Directory description in "8.1.1.2.5 Backup of Windows Manager" are replaced to the following directories.
$BAK_DIR means the backup destination directory.
$INS_DIR means "Program Directory" specified at the ETERNUS SF Manager installation.
$ENV_DIR means "Environment Directory" specified at the ETERNUS SF Manager installation.
$TMP_DIR means "Work Directory" as specified during installation.
Unmount the shared disk mounted in step 2.
Start all cluster transactions which the Manager belongs to.
Restore the environment for the Storage Cruiser's manager if an error has occurred in the Management Server.
All of the tasks for restoring Manager are performed in the Management Server.
Follow the procedure below to restore the environment for the Storage Cruiser's manager.
For restoration after reinstalling Manager, be sure to complete installation and setup before restoration. For installation and setup, see the sections "Installing ETERNUS SF Manager" and "Setting Up ETERNUS SF Manager" in the "ETERNUS SF Installation and Setup Guide."
Information
About description in the procedure
"$BAK_DIR" signifies the backup destination directory.
Re-setup Storage Cruiser's manager.
Install ETERNUS SF Manager and set it up as Storage Cruiser's manager.
For installation and setup, see the sections "Installing ETERNUS SF Manager" and "Setting Up ETERNUS SF Manager" in the "ETERNUS SF Installation and Setup Guide."
Stop the ETERNUS SF Manager Tomcat Service.
Execute the following shell script to stop the service.
/opt/FJSVesfcm/bin/stop-webservice.sh
Restore the backup data.
Execute the following command.
/opt/FJSVesfcm/postgres/bin/psql -U esfpostgres postgres
A prompt is displayed, with the server awaiting input. Input the following keywords in the sequence shown below.
master01!
drop database esfdb;
\q
Execute the following command to restore the backup data. For <filename>, input the file name specified when the backup data was created.
/opt/FJSVesfcm/postgres/bin/psql -U esfpostgres -f $BAK_DIR/Common/<filename> postgresA prompt is displayed, with the server awaiting input. Input the following keyword.
master01!
Execute the following shell script to stop the ETERNUS SF Manager services.
/opt/FJSVesfcm/bin/stopesf.sh
Note
Upon executing the shell script, multiple messages stating that the ETERNUS SF Manager Tomcat Service has already been stopped will be displayed. These messages do not pose a problem and can be ignored.
Restore the device management information.
In the normal restore operation, execute "Restore the device management information".
If upgrade from a previous version, execute "Upgrade from a previous version".
Restore the device management information
Delete the files belonging to the restore destination directory.
However, be sure not to delete the restore destination directory itself. If the restore destination directory does not exist, create one.
rm -rf /var/opt/FJSVssmgr/current/opencimom/logr/*
Copy the files from the backup location.
cp -Rp $BAK_DIR/var/opt/FJSVssmgr/current/opencimom/logr/* /var/opt/FJSVssmgr/current/opencimom/logr/
Upgrade from a previous version
cimrestore.sh is used for restoring the device management information. For further information of cimrestore.sh, refer to "Appendix D Migrating from the Previous Version".
Delete the files belonging to the restore destination directory.
However, be sure not to delete the restore destination directory itself. If the restore destination directory does not exist, create one.
rm -rf /var/opt/FJSVssmgr/current/opencimom/logr/*
Move to a directory that cimrestore.sh is stored, and execute cimrestore.sh.
./cimrestore.sh $BAK_DIR/logr
Restore the essential file.
Delete the restore destination file.
rm -f /var/opt/FJSVssmgr/current/systemevent.csv
Copy the file from the backup location. If there are no files to be copied, restore is not required.
cp -p $BAK_DIR/var/opt/FJSVssmgr/current/systemevent.csv /var/opt/FJSVssmgr/current/
Restore the files related to the performance management function.
This step can be skipped if you are not using the performance management function or the files related to the performance management function are not backed up.
Delete the subdirectories and files belonging to the restore destination directory.
However, be sure not to delete the restore destination directory itself. If the restore destination directory itself does not exist, create one.
rm -f /etc/opt/FJSVssmgr/current/perf.conf
rm -rf /var/opt/FJSVssmgr/current/perf/*
Copy the subdirectories and files from the backup location.
cp -p $BAK_DIR/etc/opt/FJSVssmgr/current/perf.conf /etc/opt/FJSVssmgr/current/
cp -Rp $BAK_DIR/var/opt/FJSVssmgr/current/perf/* /var/opt/FJSVssmgr/current/perf/
Restore the other files which can be customized.
This restoration is unnecessary for the files or the directories which have not been backed up.
Copy the subdirectories and files from the backup location.
# cp -p $BAK_DIR/etc/opt/FJSVssmgr/current/sanma.conf /etc/opt/FJSVssmgr/current/
# cp -p $BAK_DIR/etc/opt/FJSVssmgr/current/ssmgr.conf /etc/opt/FJSVssmgr/current/
# cp -p $BAK_DIR/etc/opt/FJSVssmgr/current/trapop.sh /etc/opt/FJSVssmgr/current/
# cp -p $BAK_DIR/etc/opt/FJSVssmgr/current/traprm.sh /etc/opt/FJSVssmgr/current/
# cp -Rp $BAK_DIR/etc/opt/FJSVssmgr/current/eventmail/* /etc/opt/FJSVssmgr/current/eventmail/
Restore the SNMP Trap XML definition files.
This restoration is unnecessary for the files which have not been backed up.
Copy the SNMP Trap XML definition files from the backup location.
# cp -p $BAK_DIR/etc/opt/FJSVssmgr/current/snmpth/*.xml /etc/opt/FJSVssmgr/current/snmpth/
Restore the device polling setting files.
This restoration is unnecessary for the files which have not been backed up.
Copy the files from the backup location.
# cp -p $BAK_DIR/etc/opt/FJSVssmgr/current/devicepolling/*.xml /etc/opt/FJSVssmgr/current/devicepolling/
Restore the polling service setting file.
This restoration is unnecessary for the files which have not been backed up.
Copy the file from the backup location.
# cp -p $BAK_DIR/etc/opt/FJSVssmgr/current/polling/*.xml /etc/opt/FJSVssmgr/current/polling/
Restore the files related to copy group and copy pair definitions.
Perform this step only if you are using the AdvancedCopy function.
Delete the subdirectories and files belonging to the restore destination directory.
rm -rf /etc/opt/FJSVccm/db/cg/*
rm -f /etc/opt/FJSVccm/prop/user.properties
rm -f /etc/opt/FJSVccm/accc/etc/stxc.alias
rm -f /etc/opt/FJSVccm/accc/etc/stxc_ext.alias
rm -f /etc/opt/FJSVccm/accc/etc/stxcvolinf
Copy the subdirectories and files from the backup location.
cp -p $BAK_DIR/CCM/etc/db/eternus.xml /etc/opt/FJSVccm/db
cp -p $BAK_DIR/CCM/var/micc/database/DeviceRegList.xml /var/opt/FJSVccm/micc/database
cp -p $BAK_DIR/CCM/etc/prop/user.properties /etc/opt/FJSVccm/prop
cp -p $BAK_DIR/CCM/etc/stxc.alias /etc/opt/FJSVccm/accc/etc
cp -p $BAK_DIR/CCM/etc/stxc_ext.alias /etc/opt/FJSVccm/accc/etc
cp -p $BAK_DIR/CCM/etc/stxcvolinf /etc/opt/FJSVccm/accc/etc
cp -Rp $BAK_DIR/CCM/etc/db/cg/* /etc/opt/FJSVccm/db/cg
Restore the license management database.
Execute the following command. For <filename>, input the file name which was specified when the backup data was created.
/opt/FJSVesflm/bin/esflm restore $BAK_DIR/LM/<filename>Restore the Optimization Option environment. (For Optimization Option only)
Delete the subdirectories and files belonging to the restore destination directory.
However, be sure not to delete the restore destination directory itself. If the restore destination directory itself does not exist, create one.
rm -f /etc/opt/FJSVssast/data/policy/TierPolicy.xml
rm -f /etc/opt/FJSVssast/data/pool/*
rm -rf /var/opt/FJSVssast/data/perf/*
Copy the subdirectories and files from the backup location.
cp -p $BAK_DIR/etc/opt/FJSVssast/data/policy/TierPolicy.xml /etc/opt/FJSVssast/data/policy/
cp -p $BAK_DIR/etc/opt/FJSVssast/data/pool/* /etc/opt/FJSVssast/data/pool/
cp -Rp $BAK_DIR/var/opt/FJSVssast/data/perf/* /var/opt/FJSVssast/data/perf/
Execute the following shell script to start ETERNUS SF Manager services.
/opt/FJSVesfcm/bin/startesf.sh
For cluster environment, follow the procedure below to restore the environment for the Storage Cruiser's manager.
For restoration after reinstalling Manager, be sure to complete installation and setup before restoration. For installation and setup, see the sections "Customization for Management Server Transaction" in the "ETERNUS SF Cluster Environment Setup Guide."
Stop all cluster transaction which the Manager belongs to.
For details of cluster transaction, refer to "Cluster transaction and local transaction" in the ""ETERNUS SF Cluster Environment Setup Guide."
Mount the shared disk on the primary node.
Perform steps 3 and step 5 to 14 of "8.1.1.3.1 Restoring Solaris OS Manager" on the primary node.
Unmount the shared disk mounted in step 2.
Start all cluster transactions which the Manager belongs to.
Since the procedure for restoring the Linux version of Manager is identical to that for restoring the Solaris OS versions, refer to "8.1.1.3.1 Restoring Solaris OS Manager" to perform this operation.
Since the procedure for restoring the Linux version of Manager is identical to that for restoring the Solaris OS versions in cluster environment, refer to "8.1.1.3.2 Restoring Solaris OS Manager (cluster environment)" to perform this operation.
Follow the procedure below to restore the environment for Storage Cruiser's manager.
For restoration after reinstalling Manager, be sure to complete installation and setup before restoration. For the installation and setup procedures, refer to the sections "Installing ETERNUS SF Manager" and "Setting Up ETERNUS SF Manager" in the "ETERNUS SF Installation and Setup Guide."
Information
About description in the procedure
$BAK_DIR means the backup destination directory.
$INS_DIR means "Program Directory" specified at the ETERNUS SF Manager installation.
$ENV_DIR means "Environment Directory" specified at the ETERNUS SF Manager installation.
$TMP_DIR means "Work Directory" specified at the ETERNUS SF Manager installation.
Re-setup Storage Cruiser's manager.
Install ETERNUS SF Manager and set it up as Storage Cruiser's manager.
For installation and setup procedures, refer to the sections "Installing ETERNUS SF Manager" and "Setting Up ETERNUS SF Manager" in the "ETERNUS SF Installation and Setup Guide."
Stop the ETERNUS SF Manager Tomcat Service.
Open the Service Control Manager and stop the following service.
ETERNUS SF Manager Tomcat Service
Restore the backup data.
Execute the following command.
$INS_DIR\Common\sys\postgres\bin\psql -U esfpostgres postgres |
A prompt is displayed, with the server awaiting input. Input the following keywords in the sequence shown below.
master01! drop database esfdb; \q |
Execute the following command to restore the backup data. For <filename>, input the file name which was specified when the backup data was created.
$INS_DIR\Common\sys\postgres\bin\psql -U esfpostgres -f $BAK_DIR\Common\<filename> postgres |
A prompt is displayed, with the server awaiting input. Input the following keyword.
master01! |
Execute the following batch to stop the ETERNUS SF Manager services.
$INS_DIR\Common\bin\Stop_ESFservice.bat |
Note
Upon executing the batch, multiple messages stating that the ETERNUS SF Manager Tomcat Service has already been stopped will be displayed. These messages do not pose a problem and can be ignored.
Restore the device management information.
In the normal restore operation, execute "Restore the device management information".
If upgrade from a previous version, execute "Upgrade from a previous version".
Restore the device management information
Using Explorer or a similar program, delete the files belonging to the following restore destination directory.
However, be sure not to delete the restore destination directory itself. If the restore destination directory does not exist, create it.
$TMP_DIR\ESC\Manager\var\opt\FJSVssmgr\current\opencimom\logr
Using Explorer or a similar program, copy the files belonging to the following directory from the backup location.
Copy Source Directory | Copy Destination Directory |
|---|---|
$BAK_DIR\ESC\Manager\var\opt\FJSVssmgr\current\opencimom\logr | $TMP_DIR\ESC\Manager\var\opt\FJSVssmgr\current\opencimom\logr |
Upgrade from a previous version
cimrestore.bat is used for restore the device management information. For further information of cimrestore.bat, refer to "Appendix D Migrating from the Previous Version".
Delete the files belonging to the restoration destination directory.
However, be sure not to delete the restoration destination directory itself. If the restoration destination directory does not exist, create one.
$TMP_DIR\ESC\Manager\var\opt\FJSVssmgr\current\opencimom\logr
In the command prompt, move to a directory that cimrestore.bat is stored, and then execute cimrestore.bat.
cimrestore.bat "$BAK_DIR\logr"
Restore the essential file.
Using Explorer or similar programs, delete the following restore destination file.
$TMP_DIR\ESC\Manager\var\opt\FJSVssmgr\current\systemevent.csv
Using Explorer or a similar program, copy the following file from the backup location.
Copy Source File | Copy Destination Directory |
|---|---|
$BAK_DIR\ESC\Manager\var\opt\FJSVssmgr\current\systemevent.csv | $TMP_DIR\ESC\Manager\var\opt\FJSVssmgr\current |
Restore the files related to the performance management function.
This step can be skipped if you are not using the performance management function or the files related to the performance management function are not backed up.
Using Explorer or a similar program, delete the subdirectories and files belonging to the following restore destination directory.
However, be sure not to delete the restore destination directory itself. If the restore destination directory itself does not exist, create it.
$TMP_DIR\ESC\Manager\var\opt\FJSVssmgr\current\perf
Using Explorer or a similar program, copy the following file from its backup location.
Copy Source File | Copy Destination Directory |
|---|---|
$BAK_DIR\ESC\Manager\etc\opt\FJSVssmgr\current\perf.conf | $ENV_DIR\ESC\Manager\etc\opt\FJSVssmgr\current |
Using Explorer or a similar program, copy the subdirectories and files belonging to the following directory from their backup location.
Copy Source Directory | Copy Destination Directory |
|---|---|
$BAK_DIR\ESC\Manager\var\opt\FJSVssmgr\current\perf | $TMP_DIR\ESC\Manager\var\opt\FJSVssmgr\current\perf |
Restore the other files which can be customized.
This restoration is unnecessary for the files or the directories which have not been backed up.
Using Explorer or a similar program, copy the following files from the backup locations.
Copy Source File | Copy Destination Directory |
|---|---|
$BAK_DIR\ESC\Manager\opt\FJSVssmgr\bin\manager.ini | $INS_DIR\ESC\Manager\opt\FJSVssmgr\bin |
$BAK_DIR\ESC\Manager\etc\opt\FJSVssmgr\current\sanma.conf | $ENV_DIR\ESC\Manager\etc\opt\FJSVssmgr\current |
$BAK_DIR\ESC\Manager\etc\opt\FJSVssmgr\current\ssmgr.conf | |
$BAK_DIR\ESC\Manager\etc\opt\FJSVssmgr\current\trapop.bat | |
$BAK_DIR\ESC\Manager\etc\opt\FJSVssmgr\current\traprm.bat |
Using Explorer or a similar program, copy the subdirectories and files belonging to the following directory from their backup location.
Copy Source Directory | Copy Destination Directory |
|---|---|
$BAK_DIR\ESC\Manager\etc\opt\FJSVssmgr\current\eventmail | $ENV_DIR\ESC\Manager\etc\opt\FJSVssmgr\current\eventmail |
Restore the SNMP Trap XML definition files.
This restoration is unnecessary for the files which have not been backed up.
Using Explorer or a similar program, copy the SNMP Trap XML definition files from their backup location.
Copy Source File | Copy Destination Directory |
|---|---|
$BAK_DIR\ESC\Manager\etc\opt\FJSVssmgr\current\snmpth\*.xml | $ENV_DIR\ESC\Manager\etc\opt\FJSVssmgr\current\snmpth |
Restore the device polling setting files.
This restoration is unnecessary for the files which have not been backed up.
Using Explorer or a similar program, copy the device polling setting file from its backup location.
Copy Source File | Copy Destination Directory |
|---|---|
$BAK_DIR\ESC\Manager\etc\opt\FJSVssmgr\current\devicepolling\DP_config.xml | $ENV_DIR\ESC\Manager\etc\opt\FJSVssmgr\current\devicepolling |
Restore the polling service setting file.
This restoration is unnecessary for the files which have not been backed up.
Using Explorer or a similar program, copy the polling service setting file from its backup location.
Copy Source File | Copy Destination Directory |
|---|---|
$BAK_DIR\ESC\Manager\etc\opt\FJSVssmgr\current\polling\pollingService.xml | $ENV_DIR\ESC\Manager\etc\opt\FJSVssmgr\current\polling |
Restore the database.
Follow the steps below to restore the database.
From the Start button, select [Programs]-[ETERNUS SF Manager]-[DB Setup Tools].
Once the screen shown below is displayed, click the [DB maintenance] button.

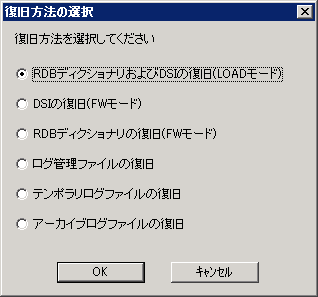
Once the DB Maintenance screen shown below is displayed, click the [Restore DB] button.

The recovery method selection is displayed. Select "DSI recovery [FW mode]" and click the [OK] button.
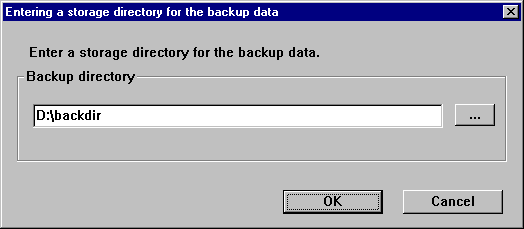
The screen for inputting the storage destination directory for the backup data is displayed. Specify the directory in which the backup data is stored and click the [OK] button.
Once the confirmation screen for the processing is displayed, check that there are no mistakes with the input details and click the [Start] button.

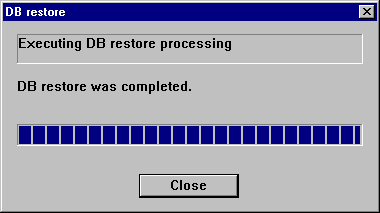
When the DB Recovery processing is complete, the following completion window will be displayed. Click the [Close] button.
Restore the registry.
Using Explorer or a similar program, copy the following files from their backup location.
Copy Source File | Copy Destination Directory |
|---|---|
$BAK_DIR\ACM\etc\swnode.ini | $ENV_DIR\ACM\etc |
$BAK_DIR\ACM\etc\device.ini |
Restore the files related to copy group and copy pair definitions.
Perform this step only if you are using the AdvancedCopy function.
Using Explorer or a similar program, delete the files belonging to the following restore destination directory.
$ENV_DIR\CCM\etc\db\cg
Delete the following files if they exist.
$ENV_DIR\CCM\etc\prop\user.properties
$ENV_DIR\CCM\etc\stxc.alias
$ENV_DIR\CCM\etc\stxc_ext.alias
$ENV_DIR\CCM\etc\stxcvolinf
Using Explorer or a similar program, copy the following files from their backup locations.
Copy Source File | Copy Destination Directory |
|---|---|
$BAK_DIR\CCM\etc\db\eternus.xml | $ENV_DIR\CCM\etc\db |
$BAK_DIR\CCM\var\micc\database\DeviceRegList.xml | $TMP_DIR\CCM\var\micc\database |
If copy source files exist, copy the following files from the backup location using Explorer or a similar program.
Copy Source File | Copy Destination Directory |
|---|---|
$BAK_DIR\CCM\etc\prop\user.properties | $ENV_DIR\CCM\etc\prop |
$BAK_DIR\CCM\etc\stxc.alias | $ENV_DIR\CCM\etc |
$BAK_DIR\CCM\etc\stxc_ext.alias | |
$BAK_DIR\CCM\etc\stxcvolinf |
Using Explorer or a similar program, copy the files belonging to the following directory from their backup location.
Copy Source Directory | Copy Destination Directory |
|---|---|
$BAK_DIR\CCM\etc\db\cg | $ENV_DIR\CCM\etc\db\cg |
Restore the license management database.
Execute the following command. For <filename>, input the file name which was specified when the backup data was created.
$INS_DIR\LM\bin\esflm restore $BAK_DIR\LM\<filename> |
Restore the Optimization Option environment. (For Optimization Option only)
Delete the subdirectories and files belonging to the restore destination directory.
However, be sure not to delete the restore destination directory itself. If the restore destination directory itself does not exist, create one.
$TMP_DIR\AST\Manager\var\opt\FJSVssast\data\perf
Using Explorer or a similar program, copy the following files from their backup locations.
Copy Source File | Copy Destination Directory |
|---|---|
$BAK_DIR\AST\Manager\etc\opt\FJSVssast\data\policy\TierPolicy.xml | $ENV_DIR\AST\Manager\etc\opt\FJSVssast\data\policy |
Using Explorer or a similar program, copy the subdirectories and files belonging to the following directory from their backup location.
Copy Source Directory | Copy Destination Directory |
|---|---|
$BAK_DIR\AST\Manager\etc\opt\FJSVssast\data\pool | $ENV_DIR\AST\Manager\etc\opt\FJSVssast\data\pool |
$BAK_DIR\AST\Manager\var\opt\FJSVssast\data\perf | $TMP_DIR\AST\Manager\var\opt\FJSVssast\data\perf |
Execute the following batch to start ETERNUS SF Manager services.
$INS_DIR\Common\bin\Start_ESFservice.bat |
For cluster environment, follow the procedure below to restore the environment for the Storage Cruiser's manager.
For restoration after reinstalling Manager, be sure to complete installation and setup before restoration. For installation and setup, see the sections "Installing ETERNUS SF Manager" and "Customization for Management Server Transaction" in the "ETERNUS SF Cluster Environment Setup Guide."
Stop all cluster transactions which the Manager belongs to.
For details of cluster transaction, refer to "Cluster transaction and local transaction" in the "ETERNUS SF Cluster Environment Setup Guide."
Mount the shared disk on the primary node.
Perform steps 3 and step 5 to 16 of "8.1.1.3.5 Restoring Windows Manager" on the primary node.
Directory description in "8.1.1.3.5 Restoring Windows Manager" are replaced to the following directories.
$BAK_DIR means the backup destination directory.
$INS_DIR means "Program Directory" specified at the ETERNUS SF Manager installation.
$ENV_DIR means "Environment Directory" specified at the ETERNUS SF Manager installation.
$TMP_DIR means "Work Directory" specified at the ETERNUS SF Manager installation.
Unmount the shared disk mounted in step 2.
Start all cluster transactions which the Manager belongs to.