The following section describes the Stocktaking Operation of management device in management ledger.
Procedures
The procedures for Stocktaking Operation are as follows.
In addition, by clicking the [Configuration] button, the procedures are described.
Click the [Configuration] button.
The following window will be displayed

Set the use method of inventory.
Set the following information and click the [OK] button.
Item Name | Descriptions |
|---|---|
[Stocktaking Start Date] | Set Inventory start date. It can be set between 180 days earlier than current date and the current date. The Stocktaking Operation between start date and current date has been checked. In addition, the configuration value will be used as initial value of report output inventory status. Please refer to “11.3 Output Stocktaking Status” for details. |
[Method to determine stocktaking status] | Set the method for judging the inventory status.
|
[Correction Result of Setup Place] | When the rectification results of setting location has been displayed in inventory list window, select [Display], and when it is not displayed, select [Not Display]. After selecting [Display], in the setting location item of each inventory list window, the rectified setting location will be displayed. |
After modifying [Method to determine stocktaking status], the [Inventory Status] (inventory is completed or not completed) of device executing the Stocktaking Operation automatically will be modified.
But the [Inventory Status] of device executing the Stocktaking Operation through the following operations cannot be modified.
Stocktaking Operation executed manually
The start date of facility will be set.
Perform inventory task.
Operate according to the following situations.
“Inventory task performed manually”
It is the inventory task performed through window operations.
When performing the inventory task manually, it should be set as [Judge Inventory Status by Using Stocktaking End Date] in [Judge Inventory Status] through the [Configuration] window.
“Inventory task performed automatically”
It is the inventory task performed automatically.
When performing the inventory task automatically, excluding [Judge Inventory Status by Using Stocktaking End Date] should be set in the [Configuration] window.
Besides, “Inventory task performed manually” can also be performed at this time.
Inventory task performed manually
It is described by displaying the operations in the window in “9.5.1.2 Confirm List of Stocktaking”.
Click the [Modify Status] button.
The following window will be displayed
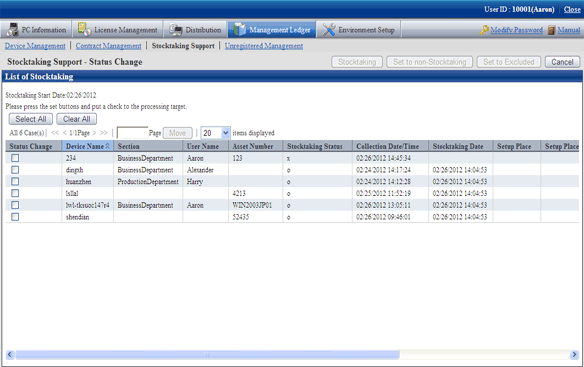
Select the device which has been made an inventory and click the [Set to Stocktaking Completed] button.
The following window will be displayed
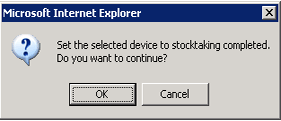
Set the device as inventory made.
Click the [OK] button.
[Inventory Status] is changed from [x] to [o].
Besides, the date and time when clicking [OK] in [Stocktaking End Date] is set.
Select the device which has not completed inventory, click the [Set to Stocktaking Uncompleted] button.
The following window will be displayed
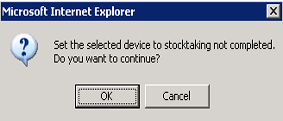
Set the device as inventory not completed.
Click the [OK] button.
[Inventory Status] is changed from [o] to [x].
Delete the device from the inventory object.
Select the device deleted from the inventory object and click the [Set to Excluded Stocktaking] button.
It is deleted from the list of inventory object.
The deleted device is moved to the [List of Non Inventory Object] window.
Take the device deleted from the inventory object as inventory object.
This part is described by displaying the operations in the window in “9.5.1.3 Confirm List of Excluded Stocktaking”.
Select the device deleted from the inventory object and click the “Set as Inventory Object” button.
It is deleted from the list of non inventory object.
The deleted device is moved to the [Inventory List] window.
Inventory task performed automatically
Take Inventory information collected in Systemwalker Desktop Patrol as the asset information (device information) managed by management ledger to register or modify it.
PC registered or modified after [Stocktaking Start Date] set in the [Inventory Use Setup] window will be set as inventory made.
For how to confirm the inventory status, please refer to “9.5.1 Confirm Stocktaking Status”.
The result of the inventory task performed automatically will be displayed in [Inventory List].
When “Display Result of Setting Location Rectification in Inventory List Window” is selected, the setting location (rectified value) will be displayed following the item of the setting location. The content displayed in the setting location (rectified value) is as follows:
Get the setting location information from the network segment information of the machine. The displayed content is as follows:
[Displayed (Setting Location Name Confirmed by IP Address is Displayed)]
When the network segment information and the setting location do not match
[Not Displayed]
When the network segment information matches the setting location or the network segment information does not exist
[*Network Segment Information is not Set]
When the setting location of network segment information has not been set though the network segment has been detected
Please determine whether to rectify and rectify the setting location as required.
Confirm device to be rectified the setting location in the [Inventory List] window.
If necessary, click the [Correction of Place] button.
The following window will be displayed
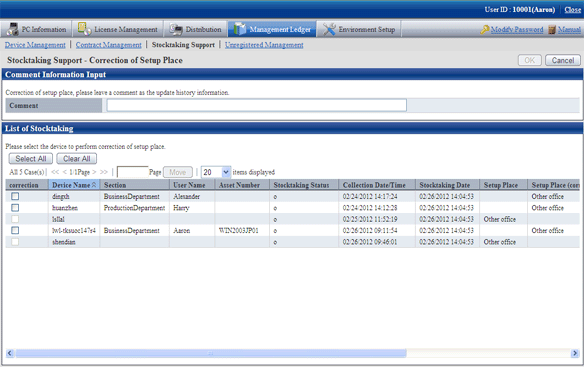
Even if the rectified value is displayed in the setting location (rectified value), the setting location might be moved temporarily. Please determine whether to rectify the setting location and select the device after the administrator has confirmed the actual situation.
After ranking according to the setting location (rectified value), the setting location where difference exists can be confirmed side by side merely.
Select annotation and device to be rectified in the setting location in the [Correction of Place] window.
*After setting [Annotation], it will also be reflected to [Annotation] of [History Information].
If omitted, as annotation, it will be set as “Modification by Rectifying Setting Location”.
Click the [OK] button.
Start to rectify the setting location.
The result of rectification will also be saved as history information.
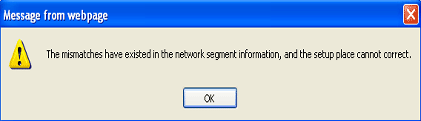
Due to organization modification, etc., modifications exist in building management information, and when network segment where setting location name has not been set for the network segment exists, the following message will appear.
At this time, please click the [Correction of Place] button by rectifying [Segment Management Information] in the [Segment Management] window.
The [Result of Setting Location Rectification] window is displayed after the rectification of setting location has been completed.
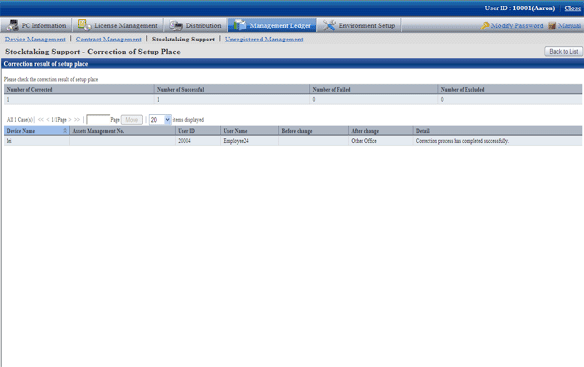
Confirm the content and click the [Return to Inventory List] button.
The [Inventory List] window is displayed again.
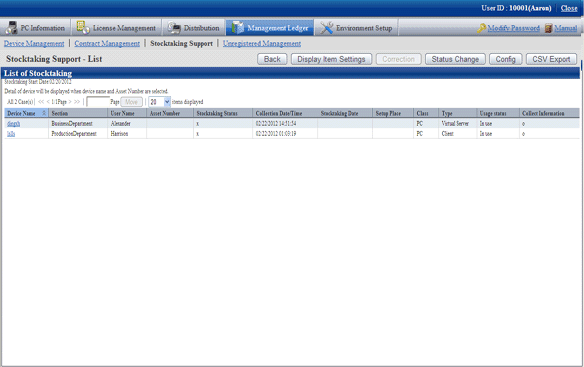
Confirm the setting location has been modified.
Besides, confirm the inventory result (“o” or “x” will be displayed in [Inventory Result).
When confirming the setting locations before and after modification, select [Confirm History Information] in the [Management Target] window.