This section describes how to install the Manager of AdvancedCopy Manager. The following two methods of installation are available:
Custom install
Default install
Custom install and default install are described below.
Custom install
With the custom install method, the user enters the various types of install information (install destination, startup account name, port numbers used for each service, and so on) in the windows.
Default install
The default install method uses the default install information. The input tasks that use windows can be omitted.
Default install information
[Install destination]
Program directory
<System drive>:\Win32app\AdvancedCopyManager\ |
Environment setup directory
<System drive>:\Win32app\AdvancedCopyManager\ |
Work directory
<System drive>:\Win32app\AdvancedCopyManager\ |
[Startup account name]
Account name: acmuser
Password: acmuser
Note: For Windows Server 2008 or Windows Server 2008 R2, use the following password: acm!123
Note
If the above account name and password cannot be used due to an OS security policy, use custom install to install the Manager.
For a user belonging to the domain Administrators group to perform the installation tasks under Windows Server 2008 or Windows Server 2008 R2, the Windows service "Computer Browser service" must be started.
The following table shows the intended users for user creation, user authentication, and service execution for each server type being used.
Server type | ||
|---|---|---|
Domain controller | Machine belonging to a domain | WORKGROUP |
Domain user | Local user | Local user |
Point
The following tables show the levels of operation support when the status of a Windows domain environment is either raised or lowered during AdvancedCopy Manager operations.
After implementation | |||||
|---|---|---|---|---|---|
DC (FSMO) | DC (non-FSMO) | Non-DC | Ordinary environment | ||
Before implementation | DC (FSMO) | - | - | - | - |
DC (non-FSMO) | Y | - | - | - | |
Non-DC | Y | N | - | - | |
Ordinary environment | Y | N | Y | - | |
Y : Can be raised
N : Cannot be raised
- : Not raised
After implementation | |||||
|---|---|---|---|---|---|
DC (FSMO) | DC (non-FSMO) | Non-DC | Ordinary environment | ||
Before implementation | DC (FSMO) | - | N | N | N |
DC (non-FSMO) | - | - | N | N | |
Non-DC | - | - | - | Y | |
Ordinary environment | - | - | - | - | |
Y : Can be lowered
N : Cannot be lowered
- : Not lowered
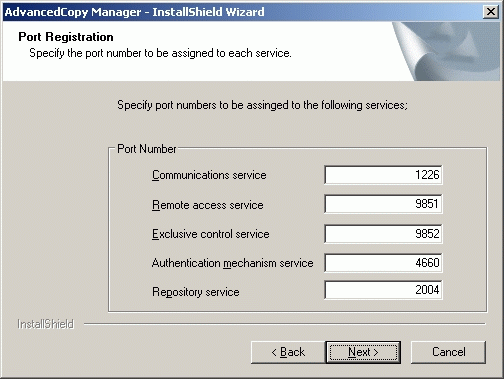
[Port numbers used for each service]
Service name | Port number |
|---|---|
Communication service | 1226 |
Remote access service | 9851 |
Exclusion control service | 9852 |
CB service | 4660 |
Repository service | 2004 |
Error checks
The following error checks are automatically performed for the default install information.
If the error checks detect an error, a warning dialog is displayed and the display returns to the [Welcome] window (install options selection window).
[Install destination]
Checks that the free disk space required for installation is available.
[Account name/Password]
If the default account name already exists in the system, checks that the password matches the default password.
Note: If the default account name does not exist in the system, a new user is created with the default account name and password.
[Port numbers]
Checks that the default port numbers are not being used for anything else.
Note: If an alias has been used to define an AdvancedCopy Manager service name, a warning dialog is displayed and a port number is not registered. The install process can be continued by clicking the [OK] button.
See
To operate a Storage Management Server in a cluster system:
Refer to "Installation of Manager function of AdvancedCopy Manager" in the "ETERNUS SF AdvancedCopy Manager Operator's Guide for cluster environment".
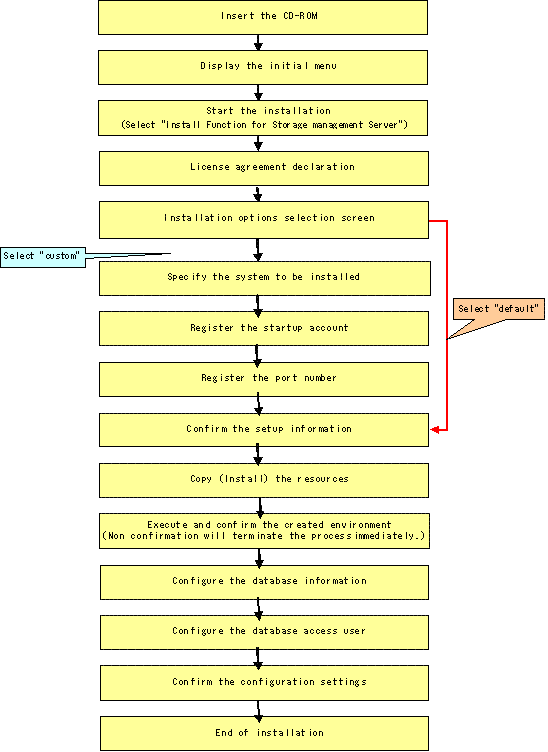
A flowchart outlining the installation process for the Manager agent of AdvancedCopy Manager is shown below:
Figure 2.1 Figure: Flow of installation
Note
Executing this process with the service listed below must be paid attention.
Terminal service (via a remote desktop connection)
If the Storage Management Server is running on Windows Server 2003, the Terminal Service must be used by making a console session connection to it. Refer to the following link for information on how to make console session connections:
http://support.microsoft.com/kb/947723
http://support.microsoft.com/kb/278845
Do not use service listed below, as it will not work properly.
Telnet server service
Install AdvancedCopy Manager, using the following procedure:
Logon to the system.
Logon as the user who has the Administrator's authority on the system where the AdvancedCopy Manager will be installed.
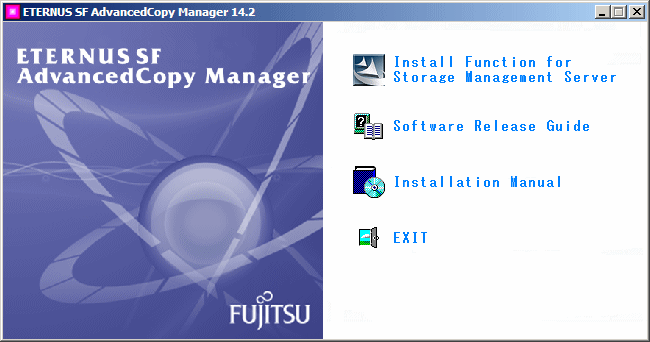
Insert the AdvancedCopy Manager CD-ROM (Manager Program) into the drive and an initial window will be displayed. Click [Install Function for Storage Management Server].
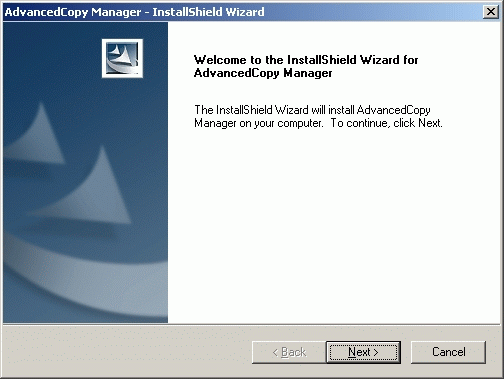
At the following (InstallShield) window, check the displayed contents, and then click the [Next] button.
Accept the license usage terms and conditions displayed on the [License Agreement] window.
Check the displayed contents, and then click the [Yes] button.

On the [Welcome] window, select the install option (default or custom).
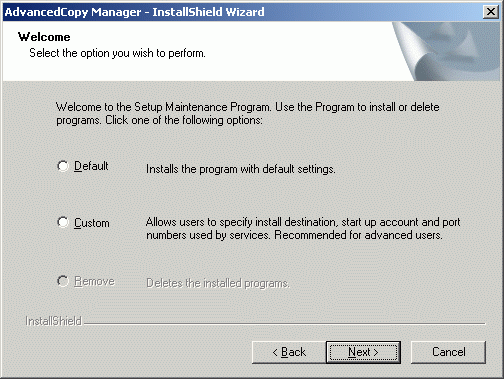
If [Default] is selected
The install information settings on the following windows can be omitted (the settings in steps 6 to 8 are not required):
[Specify installation directory] window
[Startup Account registration] window
[The registration of the port] window
Error checks are performed automatically for the default install information of the omitted windows.
If an error is detected:
A warning dialog is displayed and the display switches back to the main window.
If no errors are detected:
The [Start Copying Files] window is displayed.
If [Custom] is selected
Install information settings must be entered in each of the install windows.
Enter the required information as indicated for the display windows in step 6 and subsequent steps.
Specify the installation directory.
If this product is to be installed in directories other than those displayed (default directories), click the [Browse] button to select the desired directories. After all the proper directories have been selected, click the [Next] button.
Note
Directories with spaces in their names (e.g., Program Files) cannot be specified.
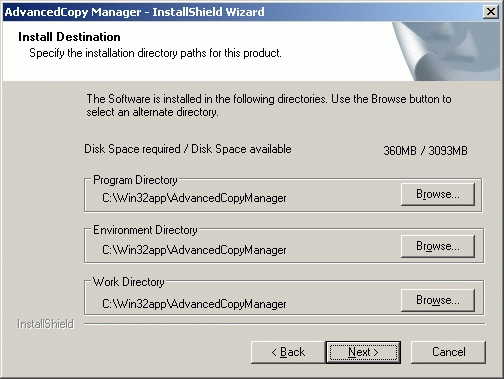
If the [Browse] button is clicked, the following screen is displayed.

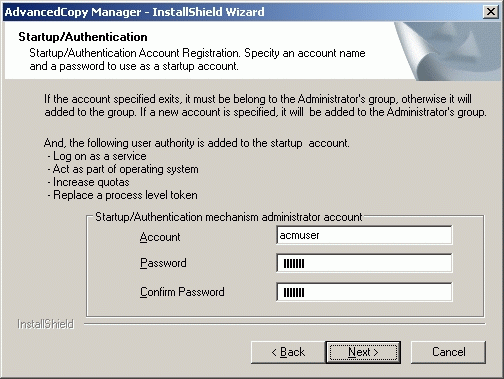
Specify the startup account on the [Startup/Authentication feature manager] window.
Enter the account name belonging to the Administrator's group with a password, and click the [Next] button. The account name and password must satisfy all of the validation requirements of the Windows OS naming convention the following conditions.
Note
In Windows Server 2008 or Windows Server 2008 R2
Environment dependent characters (Unicode) included in JIS X 0213:2004 (hereafter referred to as "JIS2004") cannot be used in the account name
For details of the startup account, see "2.1.3 Startup account".
If the account name is not registered, the system adds this account with Administrative rights with the password set not to expire. The system will also set the following user authority:
Log on as a service
Function as part of the operating system
Adding a quota
Replace the process level token
See
For the password changing of the startup account, refer to "Changing the startup account" in the "ETERNUS SF AdvancedCopy Manager Operator's Guide (Windows)".
Specify the port number to be allocated for the service in the [The registration of the port] window.
The first displayed numeric value is the recommended value for cluster operation, but it is not necessarily unique. Enter an appropriate port number that suits your operations.
If changing to a value other than the recommended value, enter a number in the following range:
From 5001 to 32767
For cluster operations in Windows Server 2003, change all port numbers to numbers in the above range.
After port number specification is complete, click the [Next] button.
The [The registration of the port] window will be redisplayed if the specified port number is already assigned elsewhere.
If the AdvancedCopy Manager service name is defined with an ALIAS, the following window will be displayed and the port number specified on the previous screen is ignored. The installation will proceed.
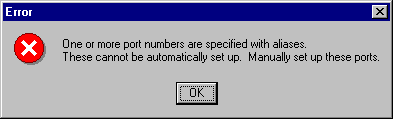
Edit the following file to set the port number manually:
C:\WINDOWS\system32\drivers\etc\Services |
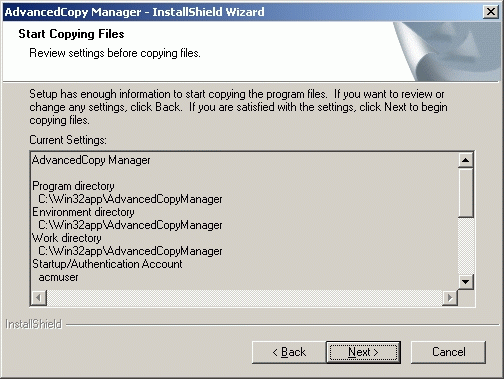
Confirm the settings on the [Start Copying Files] window.
If the information specified is correct, click the [Next] button, or to correct or modify any settings click the [Back] button.
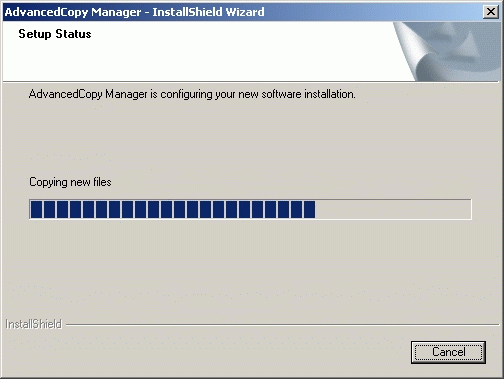
Start the copying.
The file transfer in progress can be viewed on the [Setup Status] window.
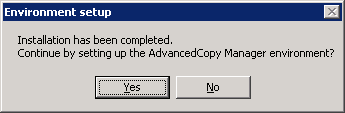
Confirm the environment settings.
In the [Environment setup] dialog click the [Yes] button to set up the environment now or [No] to do the settings after rebooting the system. If you click [No], the installation-completed window is displayed.
Click the [End] button and the [Environment setup] window will be automatically displayed after restarting the system.
For cluster operation of the storage management server, click [No].
Finish the Installer.
Click the [Finish] button to end the install process.

Confirm and Install the ETERNUS SF License Manager.
For Windows Server 2003
Double-click on the [Add or Remove Programs] icon in the Control Panel. On the "Add or Remove Programs" window, check whether [ETERNUS SF License Manager] is displayed or not.
For Windows Server 2008 or Windows Server 2008 R2
Double-click on the [Programs and Features] icon in the Control Panel. On the "Programs and Features" window, check whether [ETERNUS SF License Manager] is displayed or not.
If the [ETERNUS SF License Manager] is not displayed, install the ETERNUS SF License Manager by referring the "E.2.1 Installation on Windows environment".