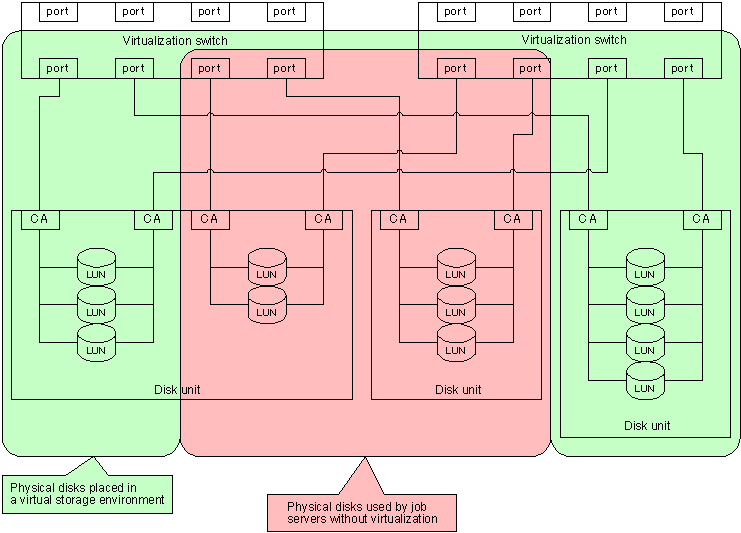
As shown in "Figure 3.2 Protecting physical disks" protect the physical disks that constitute virtual disks against direct access by transaction servers by mistake.
This section describes the protection procedure using ETERNUSmgr of the "ETERNUS3000 model 500". Depending on your model, the screens and operation procedures for ETERNUSmgr or GRmgr may vary. Refer to the "ETERNUSmgr User Guide -Settings/Maintenance-" and "GRmgr User Guide -Settings/Maintenance-" of your model.
See
"ETERNUSmgr User Guide -Settings/Maintenance-"
"GRmgr User Guide -Settings/Maintenance-"
Figure 3.2 Protecting physical disks

You can protect physical disks in the following two ways:
Use the zoning function of a virtualization switch to protect physical disks in a virtual storage environment against access from transaction servers.
Register with the zone the WWPN of the CA for the disk device connected to the virtualization switch and the virtual initiator for the virtualization switch.
See
For information on creating zones, refer to the "ETERNUS SN200 Model 540 Fibre Channel Switch Virtualization Blade and VS900 Model 300 Virtualization Switch System Build Procedure" or the "ETERNUS VS900 Model 200 Virtualization Switch Zoning User's Guide".
Finding the virtual initiator of each port of a virtualization switch
You can find the virtual initiator (World Wide Name) of each port of a virtualization switch by using the Maintenance Menu of the Virtual Storage Window. Select a virtualization switch shown in the window and click the <Detailed Information> button of the "Initiator" table.
Use "Host Table Settings Mode" of "Host Interface Management" of ETERNUS and GR to protect physical disks in a virtual storage environment against access from transaction servers.
Note
There are some devices (such as ETERNUS3000 model 50 and GR710) for which the WWPNs of servers that can be registered using "Set hosts for which to permit connection" are not sufficient for the ports of virtualization switches. This procedure cannot be used for such devices. In such cases, use the procedure described in "3.4.1.1 Using the zoning function of a virtualization switch".
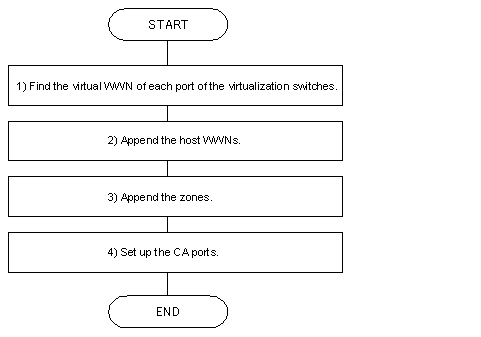
You can make the setting using "host table settings mode" as follows:

Finding the virtual initiator of each port of a virtualization switch
You can find the virtual initiator (World Wide Name) of each port of a virtualization switch by using the Maintenance Menu of the Virtual Storage Window. Select a virtualization switch shown in the window and click the <Detailed Information> button of the "Initiator" table.
Appending a host world wide name
On ETERNUSmgr, select "Setting RAID/Setting Host Menu" - "Host Interface Management" - "Append/Delete Host WorldWide Name(s)" to open the [Append/Delete Host WorldWide Name(s)] window.
Append the virtual initiator of each port of a virtualization switch that has been found (as described in " Finding the virtual initiator of each port of a virtualization switch") as the World Wide Name of a server that can be connected to the CA.
Append the virtual initiators of all ports (i.e., virtual initiators from Ports 0 to 15).
On ETERNUSmgr, select "Setting RAID/Setting Host Menu" - "Host Interface Management" - "Append/Delete Zone(s)" to open the [Append/Delete Zone(s)] window.
You can create zones for a virtual storage environment.
On ETERNUSmgr, select "Setting RAID/Setting Host Menu" - "Host Interface Management" - "Set CA Port" to open the [Set CA Port] window.
The connection to a virtualization switch is always a fabric connection. Therefore, set the CA port to FC-CA mode.
Open the [Set FC-CA Details] window and click [Fabric Connection] - [Host Table Settings Mode].
Click [Append/Delete Authorized Host(s)] to open the "Append/Delete Authorized Host(s)" window.
In the [Append/Delete Host WorldWide Name(s)] window, select the virtual initiator of each port of the appended virtualization switch, and then click the <Append> button.