The following sections explain the commands for managing the operating environment.
NAME
scsetup - creates administrative login account
SYNOPSIS
/opt/FJSVssmgr/bin/scsetup
DESCRIPTION
This command sets administrative login account and performs creation of a CLI encryption key.
Only OS administrator (root) user can execute this command. This command only can execute when admin server stop. Refer to "12.1.2.2 Starting and stopping the daemons of the administrative server at specific times" for the detail information.
OPTIONS
None.
USAGE
This command set the parameter by the following interface.
Input a new CLI crypt key [length:4-56]: any key

Are you sure? [y,n,q?] y

Input a new user name [length:1-16]: username

Input a new password [length:1-16]: password

Retype a new password [length:1-16]: password

Are you sure? [y,n,q?] y
Please enter the CLI encryption key to be used (between 4 and 56 characters). Double-byte characters, single-byte alphanumerical characters, symbols, and strings composed entirely of single or double-byte characters can be used. Notice that CLI encryption is required for ETERNUS SF Storage Cruiser internal use only, and users don't have to remember the key.
Enter the user name of the login account for administrators (between 1 and 16 characters). The name must start with an alphabetic character, and alphanumerical characters (including underscores, "_", periods, ""., and hyphens, "-") can be used.
Enter the password of the login account for administrators (between 1 and 16 characters). The password is a string of alphanumerical characters and symbols, but can not start with "{".
For password confirmation, enter the password of the administrator again.
EXAMPLES
# /opt/FJSVssmgr/bin/scsetup
NAME
sanadmsh chtraprcvip - changes SNMP Trap transmission place IP address
SYNOPSIS
/opt/FJSVssmgr/bin/sanadmsh chtraprcvip -h
/opt/FJSVssmgr/bin/sanadmsh chtraprcvip -all -oldip xxx.xxx.xxx.xxx [-newip yyy.yyy.yyy.yyy]
/opt/FJSVssmgr/bin/sanadmsh chtraprcvip DeviceID -oldip xxx.xxx.xxx.xxx [-newip yyy.yyy.yyy.yyy]
DESCRIPTION
After the IP address of the administrative server is changed, delete the old IP address of the administrative server that is the SNMP Trap transmission place from the devices registered with this software, and add the new IP address. Only OS administrator (root) user can execute this command.
Although the SNMP Trap transmission place setting for a device may be changed with the Management Software on the device, this software provides this command to facilitate changing of the transmission place.
OPTIONS
Displays help about the argument format of this command.
Applies SNMP Trap transmission place setting to all devices managed by this software. Executing the command specified with this argument outputs device names and execution results in execution order to the standard output. If the administrative server has more than one IP address, for example, if the management server is connected to multiple subnets, a device may not be set with the correct SNMP Trap transmission place. After this setting is performed, check whether the correct administrative server address is set as the SNMP Trap transmission place setting on the device side.
Applies SNMP Trap transmission place setting to the limited devices. Specify the device type according to the following tables. Afterwards, specify how to recognize the device.
Device type | Device recognition method (one of which must be specified) |
|---|---|
-host | ip:xxx.xxx.xxx.xxx sysname:SysName name of a device SNMP setting nickname:Device management name that is set for this software. |
Specify the old IP address of the administrative server. Delete this IP address from the SNMP transmission place address of managed devices.
Specify the new IP address of the new administrative server. Add this IP address to the SNMP transmission place address. If this argument is omitted, the IP address of the new administrative server is automatically specified. It is recommended to enter the argument considering the administrative server that has multiple IP afddresses.
USAGE
Execute the command after changing the IP address of Manager. The command may be executed for all devices managed by this software by the one command or for a specific device.
Devices that can be targets of the command are devices for which SNMP Trap transmission place settings can be defined automatically from this software.
The monitoring status of every target device must be normal.
EXAMPLES
Execute the SNMP Trap transmission place change on all managed devices that can automatically execute SNMP Trap transmission place setting.
# /opt/FJSVssmgr/bin/sanadmsh chtraprcvip -all -oldip 10.10.10.10 -newip 20.20.20.20
Execute the SNMP Trap transmission place change on server nodes that sysname is defined in host1.
# /opt/FJSVssmgr/bin/sanadmsh chtraprcvip -host sysname:host1 -oldip 10.10.10.10 -newip 20.20.20.20
NAME
swtraptest - tests of SNMP Trap
SYNOPSIS
/opt/FJSVssmgr/bin/swtraptest fibre-channel-switch-ip-addressDESCRIPTION
This command checks whether this software can receive an SNMP Trap correctly, display an event, and cooperate with Systemwalker Centric Manager and Shell.
A simulated Fibre Channel switch SNMP Trap (FC Port fault) is created and issued to the administrative server.
For fibre-channel-switch-ip-address, specify the IP address of the Fibre Channel switch which is to check the SNMP trap setting by this command.
The Fibre Channel switch must be a device managed by this software.
OPTIONS
None.
EXAMPLES
Executing this command for a Fibre Channel switch whose IP address is 11.11.11.11
# /opt/FJSVssmgr/bin/swtraptest 11.11.11.11
NOTES
Even the input IP address is not for a FC device, this command can be executed.
In this case, it executes as the event of device which IP address is input.
NAME
grtraptest - tests of SNMP Trap
SYNOPSIS
/opt/FJSVssmgr/bin/grtraptest storage-ip-addressDESCRIPTION
This command checks whether this software can receive an SNMP Trap correctly, display an event, and cooperate with Systemwalker Centric Manager and Shell.
The administrative server internally generates pseudo SNMP traps (FAN fault) of the ETERNUS8000, ETERNUS6000, ETERNUS4000, ETERNUS3000, ETERNUS2000, ETERNUS DX60/DX80 and GR device, and issues them to the administrative server itself.
For storage-ip-address, specify the IP address of the storage which is to check the SNMP trap setting by this command.
The storage device must be a device managed by this software.
OPTIONS
None.
EXAMPLES
Executing the command for a storage device whose IP address is 12.12.12.12
# /opt/FJSVssmgr/bin/grtraptest 12.12.12.12
NOTES
Even the input IP address is other than ETERNUS8000, ETERNUS6000, ETERNUS4000, ETERNUS3000, ETERNUS2000, ETERNUS DX60/DX80, GR series, this command can be executed.
In this case, it executes as the event of device which IP address is input.
NAME
storageadm zone - operates the host affinity and Fibre Channel switch zoning
SYNOPSIS
/opt/FJSVssmgr/sbin/storageadm zone add -storage cawwpn,affinitygroup -hba hbawwpn
/opt/FJSVssmgr/sbin/storageadm zone delete -storage cawwpn,affinitygroup -hba hbawwpn
/opt/FJSVssmgr/sbin/storageadm zone info [-ipaddr ipaddr[,ipaddr,...]]
DESCRIPTION
This command is used to set/delete/display the storage device host affinity and Fibre Channel switch zoning. Only OS administrator (root) user can execute this command.
Specify the storage device CA WWPN, affinity group, and WWPN of the set HBA in the command parameter to set/delete the storage device host affinity and Fibre Channel switch zoning. The set host affinity and zoning is also displayed.
The target storage device and Fibre Channel switch must be devices managed by this software.
OPERANDS
This sets the host affinity and zoning.
This deletes the host affinity and zoning.
This displays the host affinity and zoning.
Specify the storage device CA WWPN and affinity group for which the host affinity is set or deleted.
Specify the WWPN of the HBA set for host affinity and zoning.
Displays the host affinity information set in the specified IP address, Fibre Channel switch zoning information, or storage device CA.
To display more than one item of storage device information, specify the IP address using a comma (",").
If this omitted, all the storage device and Fibre Channel switch information registered in this software is displayed.
EXAMPLES
Adding the host affinity and zoning
# /opt/FJSVssmgr/sbin/storageadm zone add -storage 1111111111111111,3 -hba 2222222222222222
Deleting the host affinity and zoning
# /opt/FJSVssmgr/sbin/storageadm zone delete -storage 1111111111111111,3 -hba 2222222222222222
Displaying the host affinity and zoning
# /opt/FJSVssmgr/sbin/storageadm zone info
<<< FC Switch Zone Information >>>
DEVICE_NAME(IP_ADDRESS)        ZONE_NAME       ZONE_WWPN
------------------------------ --------------- ---------------------------------
Switch1(10.10.10.10)           SNM_0001        1111111111111111;2222222222222222
                               SNM_0002        3333333333333333;4444444444444444
--------------------------------------------------------------------------------

<<< FC CA Zone Information >>>
DEVICE_NAME(IP_ADDRESS)        CA_WWPN          AFFINITY_GROUP  HBA_WWPN
------------------------------ ---------------- --------------- ----------------
E4000M300(10.10.10.11)         1111111111111111 3               2222222222222222
--------------------------------------------------------------------------------
NOTES
The storage device and Fibre Channel switch for which set/delete/display is performed must have been registered in this software.
This command cannot be used to register Fibre Channel switches if zoning has not been set. Create a temporary zone and then register the Fibre Channel switch in this software. For details on creating a temporary zone, refer to "4.2.1.1 Setting".
Please execute this command after confirming the state of the server is below. (When the server where HBA specified for "-hba" option is installed is registered in this software.)
The server had to have started when "Add" option was specified.
The server had to have stopped when "Delete" option was specified.
Fibre Channel switch zoning is set for the Fibre Channel switch connected to the specified storage device CA.
The Fibre Channel switch and storage device must be connected using a Fibre Channel cable. If the Fibre Channel cable is not connected, Fibre Channel switch zoning is not set. Connect the Fibre Channel cable, and then re-execute the command.
Zone settings (creation of the AffinityGroup) must be configured in the ETERNUS disk array device in advance, using Storage Volume Configuration Navigator or ETERNUSmgr.
Only the ETERNUS SN200 (except model 250M) and Brocade (except AP7420) Fibre Channel switch and PRIMERGY BX600 switch blades are supported.
For ETERNUS VS900 model 300, only "info" operand is supported. When ETERNUS VS900 model 300 is specified at the "info" operand, the WPN of the virtual initiator of ETERNUS VS900 model 300 is displayed on the HBA_WWPN line of <<< FC CA Zone Information >>>.
The following conformation message is output when "delete" is specified. To continue, enter 'y'. To cancel, enter 'n'.
Are you sure? [y/n]:
NAME
storageadm perfdata - operates the performance information
SYNOPSIS
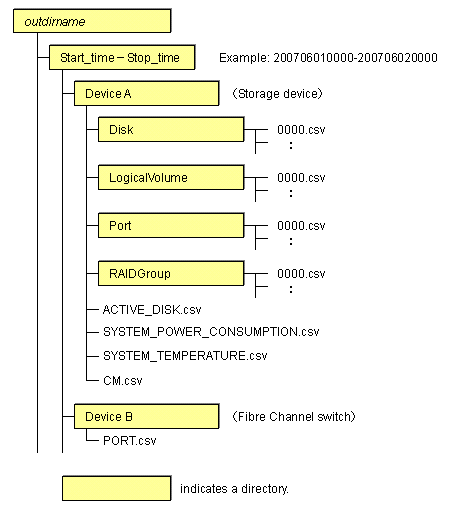
/opt/FJSVssmgr/sbin/storageadm perfdata export outdirname -ipaddr ipaddr [-date start_time[-end_time]]
DESCRIPTION
This command outputs the performance information of the storage devices and Fibre Channel switches. Only OS administrator (root) user can execute this command.
By specifying the IP address of the device that outputs the performance information and the date in the command operand, the storage device and Fibre Channel switch performance information is output in CSV format.
The target storage device and Fibre Channel switch must be devices managed by this software when performance monitoring is either still running or already completed.
The supported devices are as follows.
ETERNUS8000, ETERNUS4000 (except models 80 and 100), ETERNUS2000, ETERNUS DX60/DX80
The Fibre Channel switches and Fibre Channel switch blades which support the performance monitoring.
The details of CSV files are as follows.
Items | Explanation |
|---|---|
File name | PORT.csv |
Header line |
|
Data line | date,port0s,port0r,port0e, ... ,portNs,portNr,portNe The following information is output for each field. (After date, the information is repeated for the actual number of ports.) |
ETERNUS8000 models 700, 900, 1100 and 2100, ETERNUS4000 models 300 and 500, ETERNUS2000, ETERNUS DX60/DX80
Items | Explanation |
|---|---|
File name | CM.csv |
Header line | Date, CM0xXX:CPUX - CPU Use Rate, CM0xXX:CPUX - Copy Remain, ... |
Data line | date,CM00u,CM00r, ... ,CMNNu,CMNNr The following information is output for each field. (After date, the information is repeated for the actual number of CMs.) |
*1: The CPU number is not output when the storage device is ETERNUS2000.
ETERNUS8000 models 800, 1200 and 2200, ETERNUS4000 models 400 and 600
Items | Explanation |
|---|---|
File name | CM/nnnn.csv |
Header line | Date, CM0xXX:CPUX - CPU Use Rate, CM0xXX:CPUX(ROE) - CPU Use Rate, CM0xXX:CPUX - Copy Remain |
Data line | date,cpu,roe,remain The following information is output for each field. |
Items | Explanation |
|---|---|
File name | LogicalVolume/nnnn.csv |
Header line | Date, LogicalVolume0xXXXX - Read IOPS, LogicalVolume0xXXXX - Write IOPS, LogicalVolume0xXXXX - Read Throughput, LogicalVolume0xXXXX - Write Throughput, LogicalVolume0xXXXX - Read Response Time, LogicalVolume0xXXXX - Write Response Time, LogicalVolume0xXXXX - Read Cache Hit Rate, LogicalVolume0xXXXX - Write Cache Hit Rate, LogicalVolume0xXXXX - Prefetch Cache Hit Rate, |
Data line | date,read,write,through-r,through-w,resp-r,resp-w,hit-r,hit-w,fetch The following information is output for each field. |
Items | Explanation |
|---|---|
File name | RAIDGroup/nnnn.csv |
Header line | Date, RAIDGroup0x0xXXXX - Read IOPS, RAIDGroup0x0xXXXX - Write IOPS, RAIDGroup0x0xXXXX - Read Throughput, RAIDGroup0x0xXXXX- Write Throughput, RAIDGroup0x0xXXXX - Read Response Time, RAIDGroup0x0xXXXX - Write Response Time, RAIDGroup0x0xXXXX - Read Cache Hit Rate, RAIDGroup0x0xXXXX - Write Cache Hit Rate, RAIDGroup0x0xXXXX - Prefetch Cache Hit Rate, |
Data line | date,read,write,through-r,through-w,resp-r,resp-w,hit-r,hit-w,fetch The following information is output for each field. |
Items | Explanation |
|---|---|
File name | Disk/nnnn.csv |
Header line | Date, DE0xXX:SlotX - busy time, ... |
Data line | date,Disk0, ... ,DiskN The following information is output for each field. (After date, the information is repeated for the actual number of Disks.) |
Items | Explanation |
|---|---|
File name | Port/nnnn.csv |
Header line |
|
Data line | date,read,write,through-r,through-w The following information is output for each field. |
Items | Explanation |
|---|---|
File name | ACTIVE_DISK.csv |
Header line | Date, Total Disks, Active Disks |
Data line | date,total,active The following information is output for each field. |
Items | Explanation |
|---|---|
File name | SYSTEM_POWER_CONSUMPTION.csv |
Header line | Date, System Power Consumption |
Data line | date, power The following information is output for each field. |
Items | Explanation |
|---|---|
File name | SYSTEM_TEMPERATURE.csv |
Header line | Date, System Temperature |
Data line | date, temperature The following information is output for each field. |
OPERANDS
Outputs performance information for the specified date in CSV format.
Specify the directory that outputs performance information.
Performance information is output to the outdirname directory based on the following configuration.
OPTIONS
Specify the IP address of the device that outputs performance information.
The output target device must satisfy the following conditions:
Storage devices, Fibre Channel switches and Fibre Channel switch blades that output performance information must be registered in this software, and the device must be one of the following performance monitoring targets:
ETERNUS8000, ETERNUS4000 (except models 80 and 100), ETERNUS2000 and ETERNUS DX60/DX80
The Fibre Channel switches and Fibre Channel switch blades which support the performance monitoring.
For the settings of performance monitoring, refer to "7.2.2 Instruction for performance management".
Specify the start and end times for the output of performance information in YYYYMMDDhhmm format. The start and end times must be concatenated using a hyphen ("-"), as follows:
YYYYMMDDhhmm-YYYYMMDDhhmm
If the hyphen ("-") and end time are omitted, the command execution time will be the end time.
If this option is omitted, a time 30 minutes before the command execution time will be the start time, and the command execution time will be the end time.
EXAMPLES
Output of performance information from 00:00 on 01/01/2008 to 23:59 on 01/01/2008 for a device with IP address 10.101.12.13 to the /tmp/work directory:
# /opt/FJSVssmgr/sbin/storageadm perfdata export /tmp/work -ipaddr 10.101.12.13 -date 200801010000-200801012359
Output of performance information from 00:00 on 01/01/2008 to now for a device with IP address 10.101.12.13 to the /tmp/work directory:
# /opt/FJSVssmgr/sbin/storageadm perfdata export /tmp/work -ipaddr 10.101.12.13 -date 200801010000
NOTES
The full path of an existing directory must be specified in outdirname.
The time that is specified for the -date option start time must be earlier than the end time. Additionally, the time that is specified for the start and end times must be later than 00:00 on 01/08/2001, and earlier than the command execution time.
NAME
storageadm spindle - controls disks
SYNOPSIS
/opt/FJSVssmgr/sbin/storageadm spindle start -ipaddr ipaddr {-raid RAIDGroup_number[,RAIDGroup_number,...] | -server} [-sync [-time timeout]]
/opt/FJSVssmgr/sbin/storageadm spindle stop -ipaddr ipaddr {-raid RAIDGroup_number[,RAIDGroup_number,...] | -server} [-sync [-time timeout]] [-s] [-f]
/opt/FJSVssmgr/sbin/storageadm spindle info -ipaddr ipaddr [{-raid RAIDGroup_number[,RAIDGroup_number,...] | -server}]
DESCRIPTION
Starts or stops the storage device RAID disk rotation. Only OS administrator (root) user can execute this command.
If a storage device was specified when the status was displayed, the rotation status of the disk that was used to configure RAID is displayed.
If a server was specified, the storage device RAIDGroup number and volume number used by the server are displayed.
By specifying the storage device IP address and RAIDGroup number in the command operand, the rotation of the disk that was used to configure the storage device RAID is started or stopped.
By specifying the server IP address, the rotation of the storage device disk used by the server is started or stopped.
The target storage device and server must be devices managed by this software.
OPERANDS
Starts the disk that is used to configure the storage device RAIDGroup.
Stops the disk that is used to configure the storage device RAIDGroup.
Displays the storage device RAIDGroup Eco-mode information, or the storage device information used by the server.
OPTIONS
Specify the storage device or server IP address.
Specify the start target RAIDGroup number using hexadecimal notation. If more than one RAIDGroup number is specified, separate each number using a comma (",").
Specify this option when the storage device IP address has been specified in the -ipaddr option.
Specify this option to start rotation of the storage device disk used by the server.
Specify this option when the server IP address has been specified in the -ipaddr option.
When this option is specified, there is no return until processing is complete, or the time specified in the -time option has elapsed.
Specify the timeout value (unit: seconds) if the -sync option has been specified. Specify a number from 1 to 86400. If this option is omitted, the timeout value will be 600 seconds.
Specify the storage device or server IP address.
Specify the stop target RAIDGroup number using hexadecimal notation. If more than one RAIDGroup number is specified, separate each number using a comma (",").
Specify this option when the storage device IP address has been specified in the -ipaddr option.
Specify this option to stop rotation of the storage device disk used by the server.
Specify this option when the server IP address has been specified in the -ipaddr option.
When this option is specified, there is no return until processing is complete, or the time specified in the -time option has elapsed.
Specify the timeout value (unit: seconds) if the -sync option has been specified. Specify a number from 1 to 86400. If this option is omitted, the timeout value will be 600 seconds.
Processing continues without the output of a confirmation message.
Related RAIDGroup disks are forcibly stopped.
Specify the storage device or server IP address.
Specify the status display target RAIDGroup number using hexadecimal notation. If more than one RAIDGroup number is specified, separate each number using a comma (",").
Specify this option when the storage device IP address has been specified in the -ipaddr option.
If this option is omitted, the information for all the RAIDGroups in the specified storage device is displayed.
Specify this option when the server IP address is specified to display the storage device RAIDGroup Eco-mode information and volume number used by the server.
Specify this option when the server IP address has been specified in the -ipaddr option.
EXAMPLES
Starting the disk that is used to configure the RAIDGroup by specifying the storage device IP address and RAIDGroup number:
# /opt/FJSVssmgr/sbin/storageadm spindle start -ipaddr 10.10.10.10 -raid 0x0000,0x0001
Stopping the disk that is used to configure the RAIDGroup by specifying the storage device IP address and RAIDGroup number:
# /opt/FJSVssmgr/sbin/storageadm spindle stop -ipaddr 10.10.10.10 -raid 0x0001
Stopping the disk that is used by the server by specifying the server:
# /opt/FJSVssmgr/sbin/storageadm spindle stop -ipaddr 10.10.10.20 -server
Displaying the Eco-mode status of all storage device RAIDGroups:
# /opt/FJSVssmgr/sbin/storageadm spindle info -ipaddr 10.10.10.10
<<< ECO Mode RAID Group Information >>>
RAIDGROUP_NUMBER(NAME)   MODE DISK_STATUS         CONTROL SCHEDULE
------------------------ ---- ------------------- ------- ---------------
0x0000(data1)            ON   Idle                OFF     External
0x0001(data2)            ON   in the boot process ON      01-NAME0001
0x0002                   OFF  Active              -
0x0003                   -    Active              -
-------------------------------------------------------------------------
The explanation of the information displayed in each field is as follows.
Field title | Explanation |
|---|---|
RAIDGROUP_NUMBER(NAME) | Displays the RAIDGroup number by the hexadecimal number of four digits. When the name is set on the RAIDGroup, its name is displayed by enclosing in (). |
MODE | Displays the Eco-mode status that is set on the RAIDGroup. |
DISK_STATUS | Displays the status of disks that compose the RAIDGroup. |
CONTROL | Displays the disk control status set on the RAIDGroup. |
SCHEDULE | Displays the Eco-mode schedule set on RAIDGroup by the following format. The schedule name of External is displayed as "External". number-name The "number" is displayed in decimal number, and "name" is displayed in eight characters or less. |
Displaying the storage device RAIDGroup number and volume number that are used by the server:
# /opt/FJSVssmgr/sbin/storageadm spindle info -ipaddr 10.10.10.20 -server
<<< ECO Mode RAID GROUP information for Server >>>
IP_ADDRESS      RAID   MODE DISK_STATUS         CONTROL STOP
--------------- ------ ---- ------------------- ------- ----
10.10.10.10     0x0000 ON   Idle                OFF
                0x0001 ON   Active              ON      *
------------------------------------------------------------

<<< Disk use information on Server >>>
IP_ADDRESS      RAID   VOLUME
--------------- ------ --------------------------------------------------------
10.10.10.10     0x0000 0x0000,0x0001,0x0002,0x0003,0x0004,0x0005,0x0006,0x0007,
                       0x0008,0x0009,0x000A,0x000B,0x000C,0x000D,0x000E,0x000F
                0x0001 0x0010,0x0011,0x0012,0x0013,0x0014,0x0015,0x0016,0x0017,
                       0x0018,0x0019,0x001A,0x001B,0x001C,0x001D,0x001E,0x001F
-------------------------------------------------------------------------------
The explanation of the information displayed in each field is as follows.
Field title | Explanation |
|---|---|
Fields of <<< ECO Mode RAID GROUP information for Server >>> | |
IP_ADDRESS | Displays the IP address of the storage device connected with the specified server. |
RAID | Displays the RAIDGroup number by the hexadecimal number of four digits. The RAIDGroup including the volume used from the specified server is displayed. |
MODE | Displays the Eco-mode status that is set on the RAIDGroup. |
DISK_STATUS | Displays the status of disks that compose the RAIDGroup. |
CONTROL | Displays the disk control status set on the RAIDGroup. |
STOP | Although the stopping the disks used from the specified server is directed, when any disks in this RAIDGroup are used from other server or this RAIDGroup cannot be stopped because of any following states, displays "*".
|
Fields of <<< Disk use information on Server >>> | |
IP_ADDRESS | Displays the IP address of the storage device connected with the specified server. |
RAID | Displays the RAIDGroup number by the hexadecimal number of four digits. The RAIDGroup including the volume used from the specified server is displayed. |
VOLUME | Displays the volume number by the hexadecimal number of four digits. The volumes used from the specified server are displayed. |
NOTES
There are RAIDGroups that cannot do the Eco-mode operation. Refer to "Uncontrollable RAID groups" in the "1.3.4 Energy-saving operation for storage device".
The RAIDGroup Eco-mode must be ON to operate the RAIDGroup start/stop control. For details on the procedure for setting the RAIDGroup Eco-mode to ON, refer to "6.1.13 How to control the Eco-mode".
If disk rotation is started and stopped by specifying the server IP address, do not change the storage device connection.
For stopping the disk rotation by specifying the server IP address, if one or more share disks are contained on the stopped disks, the disk rotation cannot be stopped. Check the status of all servers that use their share disks, and judge whether share disks can be stopped or not. If share disks can be stopped, specify the -f option.
For stopping the disk rotation by specifying the server IP address, if the disks used from other server are included in the RAIDGroup that stop target disk exists, the disk rotation cannot be stopped. To stop the disk rotation, either specify server IP address for all servers that use the disk of its RAIDGroup, or specify the -f option. When you specify -f option, check the status of all related servers, and judge whether disks can be stopped or not. It is recommended that the server and the RAIDGroup be the compositions of couple 1.
For stopping the disk rotation by specifying the server IP address, if the RAIDGroup including unused disks, the disk rotation cannot be stopped. Re-execute either specify the -f option or specify the RAIDGroup.
For stopping the disk rotation by specifying the server IP address, if the RAIDGroup including the stop target disk is any of "Uncontrollable RAID groups", the disk rotation cannot be stopped.
If the volume that belongs to the specified stop target RAIDGroup is concatenated with a different RAIDGroup using the LUN concatenation functionality, the disk is not stopped even if the stop operand is specified. To stop all related RAIDGroup disks, either specify all of the related RAIDGroups, or specify the -f option. However, if the related RAIDGroup is any of "Uncontrollable RAID groups", the disk control cannot be executed.
The following confirmation message is output when the stop operand is specified. To continue, enter "y". To cancel, enter "n". This confirmation message is not output when the -s option is specified.
Are you sure? [y/n]:
The information of storage device that can control disks is displayed on the storage device information used by the server. The information of storage device that cannot control disks is not displayed. When both the disk controllable storage device and the disk uncontrollable storage device are connected with the server, the information of disk controllable storage device is only displayed.
The disk does not stop when the RAIDGroup status is as follows:
Part of the storage device controller module and the module for the disk drive access route contain a fault.
The disk drive that was used to configure the RAIDGroup is faulty.
There is AdvancedCopy copy data.
There is an EC/REC session (including when there is no copy data). The disk does, however, stop when the EC/REC status is Suspend.
There is a QuickOPC/SnapOPC session (including when there is no copy data).
NAME
storageadm virtualzone - Operates on the host affinities and zonings for virtualization switches
SYNOPSIS
/opt/FJSVssmgr/sbin/storageadm virtualzone add -storage cawwpn,affinitygroup -ipaddr ipaddr [-update all] [-f [-s]]
/opt/FJSVssmgr/sbin/storageadm virtualzone add -hba hbawwpn -vt vtwwpn [-update all] [-f [-s]]
/opt/FJSVssmgr/sbin/storageadm virtualzone delete -storage cawwpn,affinitygroup -ipaddr ipaddr [-s] [-update all]
/opt/FJSVssmgr/sbin/storageadm virtualzone delete -hba hbawwpn -vt vtwwpn [-s] [-update all]
DESCRIPTION
This command adds or deletes zonings for Fibre Channel switches and host affinities for storage devices associated with virtualization switches (virtual targets and virtual initiators).
Adds or deletes zonings between the HBA and a virtualization switch (virtual target)
Adds or deletes host affinities and zonings between the CA and a virtualization switch (virtual initiator)
Only OS administrator (root) user can execute this command.
The target storage devices and Fibre Channel switches must be devices managed by this software. The only Fibre Channel switch supported is ETERNUS VS900 model 300.
OPERANDS
Adds the host affinity and zoning.
Deletes the host affinity and zoning.
OPTIONS
Specify the channel adapter WWPN and the affinity group number of the storage device where the host affinity is to be set up.
Specify the channel adapter WWPN using 16 digits of hexadecimal notation, optionally separating pairs of digits by a colon (":") for a total of 23 characters in hexadecimal notation. An example using colons to separate digits is 11:11:11:11:11:11:11:11.
Specify the affinity group number using either decimal notation or hexadecimal notation. For example, affinity group number 16 can be specified using decimal notation as "-storage 1111111111111111,16" or in hexadecimal notation as "-storage 1111111111111111,0x10".
Specify the IP address of the virtualization switch to which the virtual initiator (to be set in host affinities and zonings) belongs.
Specify the WWPN for the HBA to be set in zonings.
Specify the WWPN for the HBA using 16 digits of hexadecimal notation, optionally separating pairs of digits by a colon (":") for a total of 23 characters in hexadecimal notation. An example using colons to separate digits is 22:22:22:22:22:22:22:22.
Specify the WWPN for the virtual target to be set in zonings.
Specify the WWPN for the virtual target using 16 digits of hexadecimal notation, optionally separating pairs of digits by a colon (":") for a total of 23 characters in hexadecimal notation. An example using colons to separate digits is 22:22:22:22:22:22:22:22.
Specify this option to update the information managed by this software after the settings are complete. Only "all" can be specified with the "-update" option. If this option is omitted, the information managed by this product will not be updated. To update information later, execute the "storageadm zone info" command without the "-fast" option.
This option is effective when only a few items are added. The "storageadm zone info" command is better for updating information after multiple settings have been made.
Specify this option to forcibly set up WWPN zoning on a Fibre Channel switch where zoning has not been set up.
When specifying this option, check the security settings for the Fibre Channel switch. Specify this option only when setting up WWPN zoning.
Note that specifying this option will have no effect in the following situation (the command will run in the same way as if the option were omitted):
When zoning settings have already been made on the target Fibre Channel switch
Processing continues without the output of a confirmation message.
Only when -f option is specified, this option can be specified.
Specify this option to update the information managed by this software after the settings are complete. Only "all" can be specified with the "-update" option. If this option is omitted, the information managed by this product will not be updated. To update information later, execute the "storageadm zone info" command without the "-fast" option.
This option is effective when only a few items are deleted. The "storageadm zone info" command is better for updating information after multiple settings have been deleted.
Processing continues without the output of a confirmation message.
EXAMPLES
Adding zoning settings between the HBA and a virtualization switch (virtual target)
# /opt/FJSVssmgr/sbin/storageadm virtualzone add -hba 1111111111111111 -vt 2222222222222222
Deleting zoning settings between the HBA and a virtualization switch (virtual target)
# /opt/FJSVssmgr/sbin/storageadm virtualzone delete -hba 1111111111111111 -vt 2222222222222222
Adding zonings and host affinities between a virtualization switch (virtual initiator) and a channel adapter
# /opt/FJSVssmgr/sbin/storageadm virtualzone add -storage 1111111111111111,3 -ipaddr 10.10.10.10
Deleting zonings and host affinities between a virtualization switch (virtual initiator) and a channel adapter.
# /opt/FJSVssmgr/sbin/storageadm virtualzone delete -storage 1111111111111111,3 -ipaddr 10.10.10.10
NOTES
The storage devices and Fibre Channel switches where settings are to be added or deleted must be registered with this software.
This command cannot make settings for Fibre Channel switches where zoning settings have not been made. To perform zoning for Fibre Channel switches using this command, create provisional zoning before registering the Fibre Channel switches with this software. Refer to "Zoning setting" under "4.2.1.1 Setting" for information about how to create provisional zoning.
If the -f option is specified, zoning settings can be made forcibly on Fibre Channel switches where zoning settings have not been made.
However, if provisional zoning is created, or if settings are made forcibly by specifying the -f option, all accesses to zones other than those specified by the -f option will be blocked. For this reason, this action should not be taken while the target Fibre Channel switch environment is operating. Take this action either before operations start immediately after the Fibre Channel switch environment has been installed, or while operations are stopped.
Fibre Channel switch zoning will be set up on the Fibre Channel switch equipped with the latest firmware in the fabric that contains the specified virtualization switch.
When the "add" operand is specified, the channel adapter specified by the -storage option and the virtualization switch specified by the -ipaddr option must be connected, otherwise host affinities will not be set up on the storage device, zoning settings will not be added to the Fibre Channel switch, and the command will terminate abnormally. Execute the command again after connecting the channel adapter and the virtualization switch with a Fibre Channel cable.
When the "add" operand is specified, the HBA specified by the -hba option and the virtual target specified by the -vt option must be connected, otherwise zoning settings will not be added to the Fibre Channel switch, and the command will terminate abnormally. Execute the command again after connecting the HBA and the virtual target with a Fibre Channel cable.
Before executing this command, zone settings must be made (an affinity group must be created) on the ETERNUS disk storage system using either Storage Volume Configuration Navigator or ETERNUSmgr.
This command only supports the ETERNUS VS900 model 300.
A confirmation message will be output in the situations below. Enter "y" to continue or "n" to cancel. The confirmation message can be suppressed by specifying the -s option.
If the -f option is specified with the "add" operand but the -s option is not specified
If the -s option is not specified with the "delete" operand
A confirmation message is as follows.
Are you sure? [y/n]:
SEE ALSO