Interstage Shunsaku Data Manager Installation Guide - Solaris(TM) Operating System -
Contents Index PreviousNext

Chapter 3 Shunsaku System Installation and Setup> 3.1 Installation and Setup for Systems Operating with Searchers on Separate Servers

3.1.1 Installing Shunsaku on the Director Server

The installation procedure is explained below.

The following two installation methods are available:

A superuser must perform the installation.

mark1Installation from the GUI

The procedure for installing Shunsaku APIs from the GUI is explained below.

  1. Start the Shunsaku installation script (install.sh).
    The "/dev/dsk/c0t4d0s2" device name will differ depending on the environment used.
    # mount -F hsfs -o ro /dev/dsk/c0t4d0s2 /cdrom/cdrom0
    # cd /cdrom/cdrom0/solaris
    # ./install.sh

    In the dialog displayed, click the Install button.
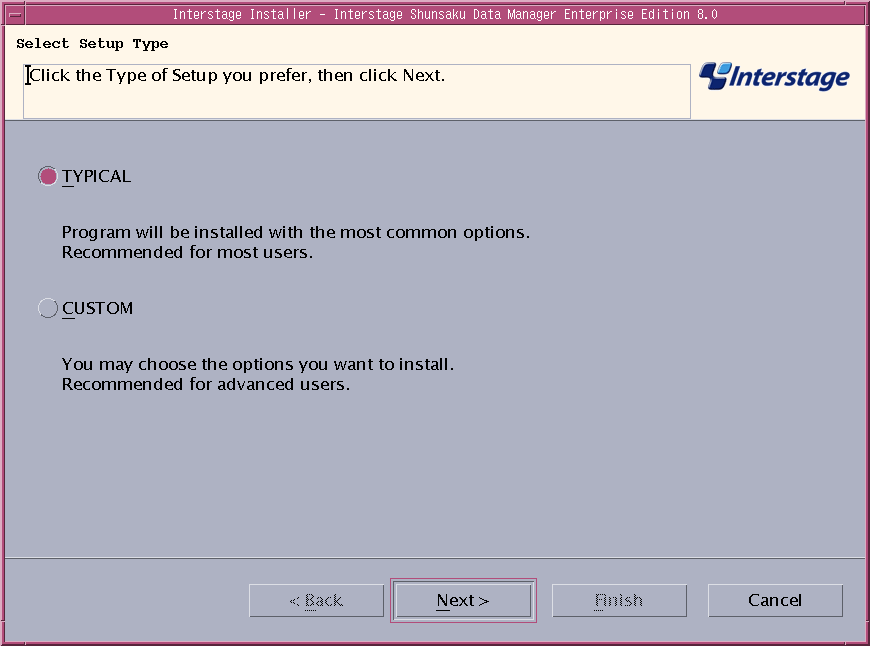
  2. In the Select Setup type dialog, select TYPICAL, then click the Next button.

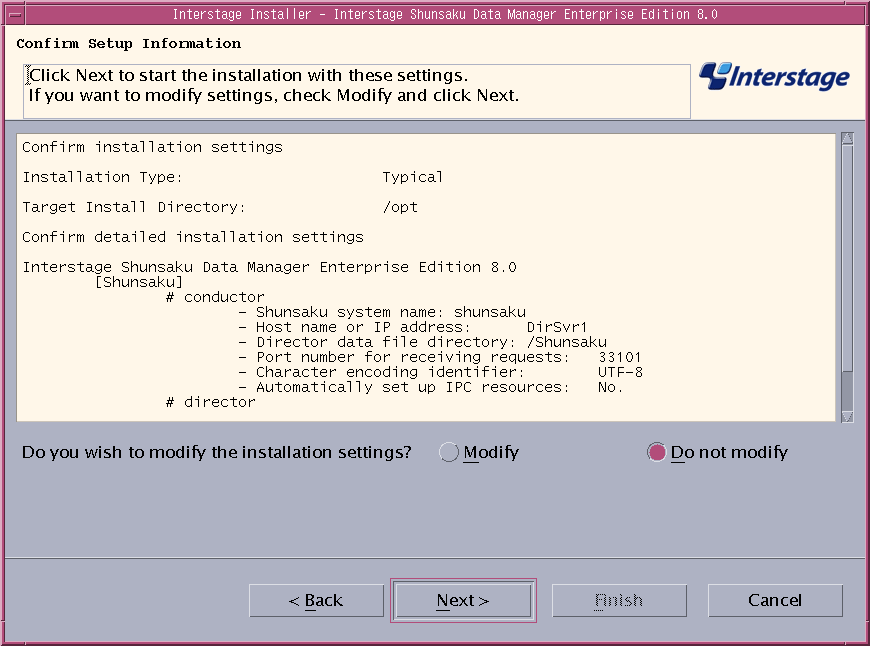
  3. In the Confirm Setup Information dialog, verify the settings:

    If the host name or IP address could not be acquired automatically, select Modify, to specify these settings manually.
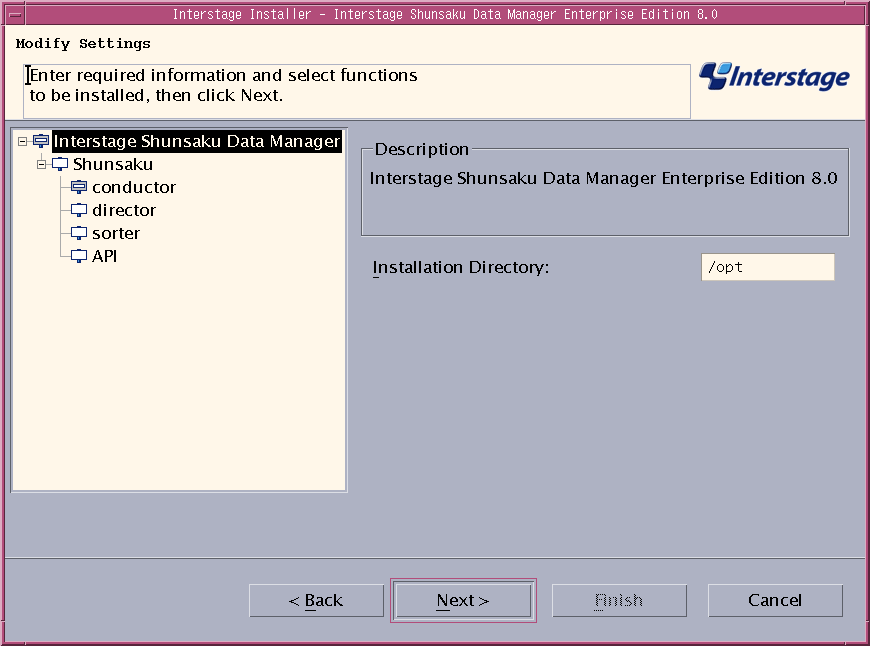
  4. In the Modify Settings dialog, select Interstage Shunsaku Data Manager, and specify the Installation Directory.

    The following table explains the item to be specified.

    Item name

    Explanation

    Installation directory

    Specify the absolute path of the directory where the package will be stored.
    Hash characters "#", blanks and multi-byte characters cannot be specified for the directory name.
    The directory specified here must already exist.
    If Java environments such as Java APIs or XML conversion functions are to be used, do not include ";", "%", "^", or "!" in the pathname of the installation directory. Depending on the Java environment used, use of these characters may lead to abnormal Shunsaku operation.

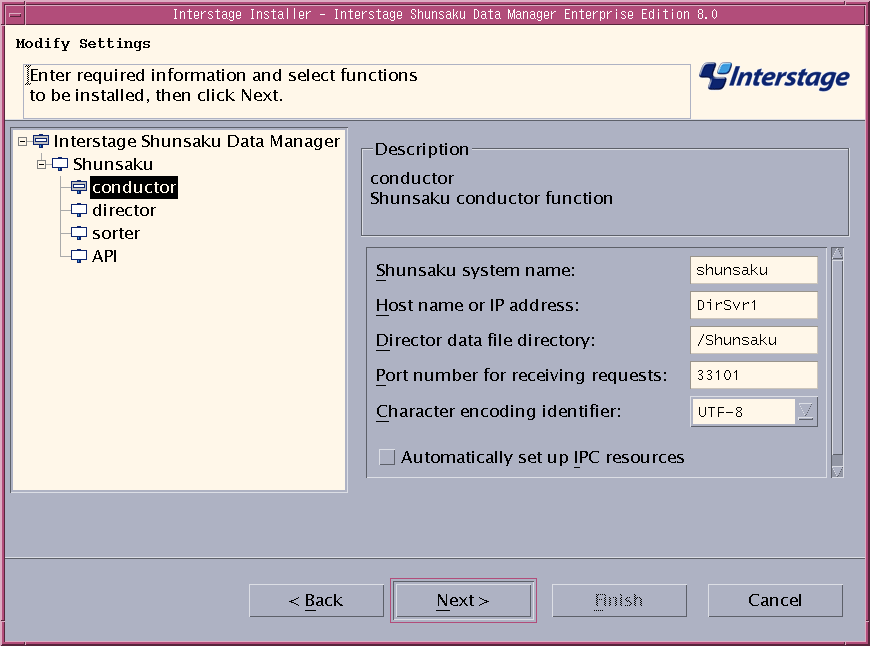
  5. In the Modify Settings dialog, select the conductor function. Specify the Shunsaku system name, the Host name or IP address, the Director data file directory, the Port number for receiving requests, and the Character encoding identifier. If necessary, check the option Automatically set up IPC resources. Then click the Next button.

    The following table explains the items to be specified.

    Item name

    Explanation

    Shunsaku system name

    Specify the name assigned to the Shunsaku system.
    Specify up to 8 bytes of alphanumeric characters.

    Host name or IP address

    Specify the host name or IP address of the server where the Shunsaku system will run.
    Loopback address "127.0.0.1" or the host name that represents "127.0.0.1" (usually "localhost") cannot be specified.

    Director data file directory

    Specify the name of the folder (absolute path) where the director data file is stored.
    Hash characters "#", blanks and multi-byte characters cannot be specified for the directory name.
    Shunsaku uses this directory, so do not place anything else in this location.

    Port number for receiving requests

    Specify the port number used to receive requests from the Shunsaku API.

    Character encoding identifier

    Specify the character encoding used in the character strings that are search targets.
    Select one of the following specifications:
    UTF-8: UTF-8
    SHIFT-JIS: Shift-JIS (Japanese)
    EUC: EUC-JP (Japanese)
    GB18030: GB18030 (Chinese)
    GB2312: GB2312 (Chinese)
    big5: Big5 (Chinese)
    KSC5601: KSC5601 (Korean)

    Automatically set up IPC resources

    If the server where Shunsaku is installed is used only for Shunsaku, check this option to automatically set up IPC resources. The parameters in the /etc/system file will be changed automatically.
    Clear this option if other products are to be installed on the same server as Shunsaku, or if IPC resources are set up using Solaris 10 resource management. For details on setting up IPC resources, refer to IPC Resource Settings under 3.3.2.4 Setting up the Operating System.

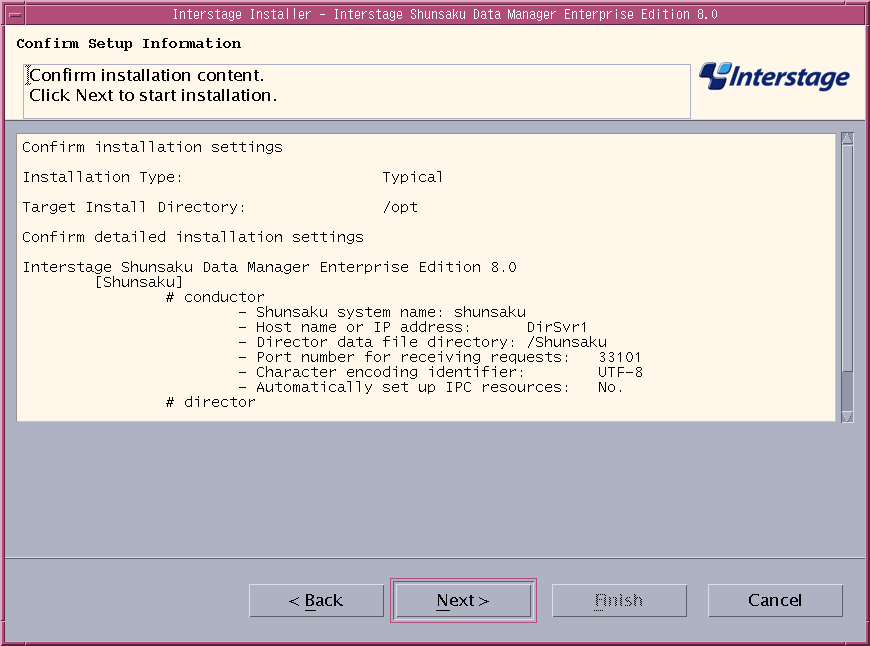
  6. If the information displayed in the Confirm Setup Information dialog is correct, click the Next button. The installation process will start.

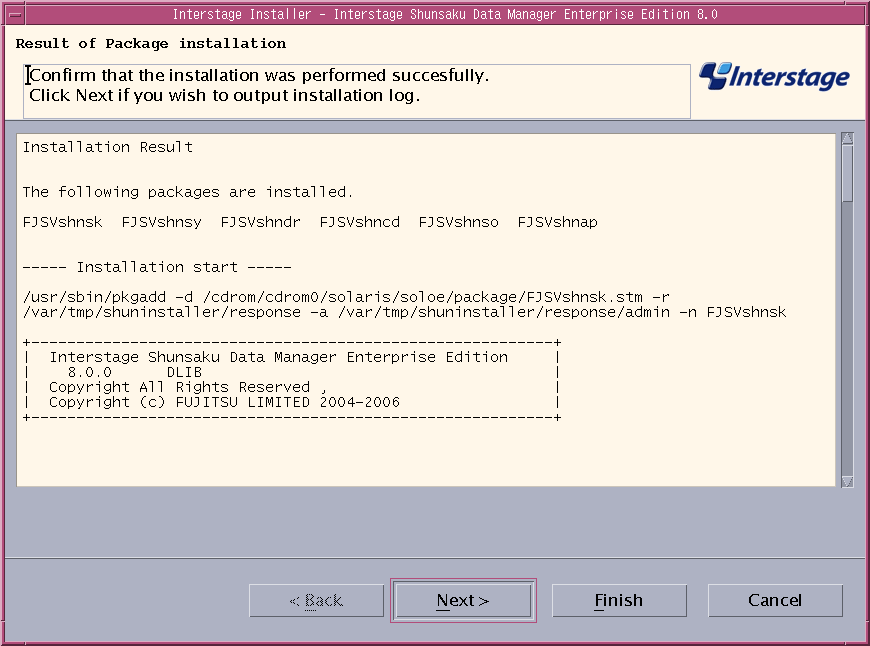
  7. After the installation process completes, in the Result of Package installation dialog, click the Next button to save the installation log.

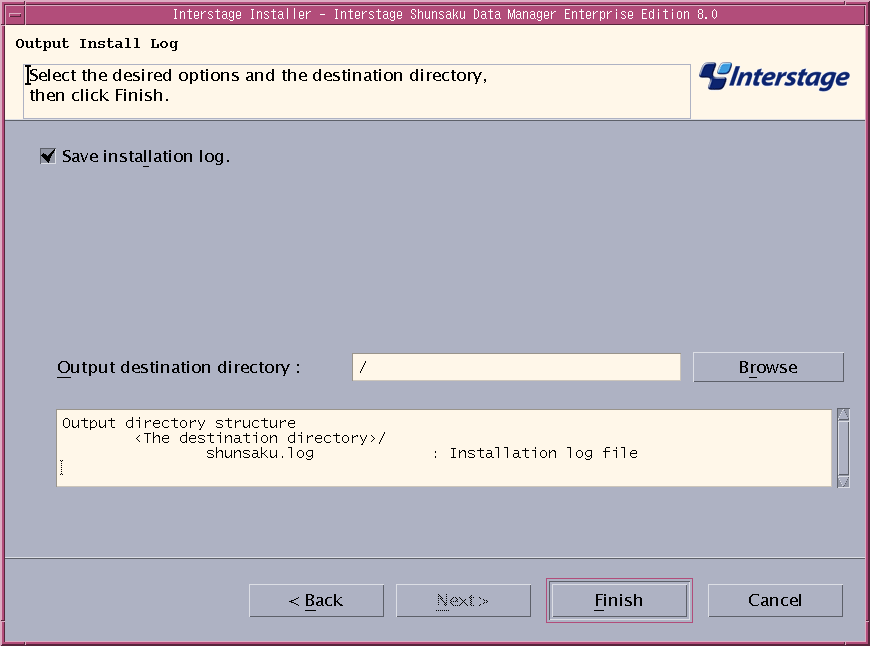
  8. In the Output Install Log dialog, ensure the Save installation log. checkbox is checked, specify the Output destination directory, and then click the Finish button.

  9. Restart the system if Automatically set up IPC resources has been checked in step 5.

mark1Installation without the GUI

The installation procedure when the GUI is not used is explained below.

  1. Start the Shunsaku installation script (cmdinstall.sh).
    (The "/dev/dsk/c0t4d0s2" device name will differ depending on the environment used.)
    # mount -F hsfs -o ro /dev/dsk/c0t4d0s2 /cdrom/cdrom0
    # cd /cdrom/cdrom0/solaris
    # ./cmdinstall.sh

  2. Select the installation method by entering 1 and pressing ENTER.
    ----------------------------------------------------------
      Interstage Shunsaku Data Manager Enterprise Edition
          8.0
      All Rights Reserved, Copyright(c)
          FUJITSU LIMITED 2003-2006
    ----------------------------------------------------------
    
    Please select the installation type. (1: typical, 2: custom) [1,2,q]:

  3. Specify the directory where the package will be stored. To install Shunsaku using the default value ("/opt"), press ENTER. To change the storage directory, specify the absolute path of the storage directory, then press ENTER.
    Please specify installation directory. (default: /opt) [?,q]:

  4. Specify the name to be assigned to the Shunsaku system. To perform installation using the default value ("shunsaku"), press ENTER. To change the name assigned to the Shunsaku system, specify a new name using up to eight alphanumeric characters, then press ENTER.
    Please specify the Shunsaku system name. (default: shunsaku) [?,q]:

  5. Specify the host name or IP address of the server where the Shunsaku system will run. To perform installation using the default value (the host name or IP address that is acquired automatically), press ENTER. To change the host name or IP address of the server where the Shunsaku system will run, specify the new host name or IP address, then press ENTER. In the following example, "DirSvr1" is a host name that is acquired automatically.
    Please specify the host name or the IP address. (default: DirSvr1) [?,q]:

    Loopback address "127.0.0.1" or the host name that represents "127.0.0.1" (usually "localhost") cannot be specified.
  6. Specify the name of the directory where the director data file is stored. To perform installation using the default value (/Shunsaku), press ENTER. To change the name of the directory where the director data file is stored, specify the absolute path of the new directory, then press ENTER.
    Please specify the Director data file directory. (default: /Shunsaku) [?,q]:

  7. Specify the port number for receiving requests from the Shunsaku APIs.
    To perform installation using the default value (the port number that is acquired automatically), press ENTER. To change the port number for receiving requests from the Shunsaku APIs, specify the new port number, then press ENTER. In the following example, "33101" is a port number that is acquired automatically.
    Please specify port number for receiving request. (default: 33101) [?,q]:

    Do not specify a port number that is already in use.
  8. Specify the character encoding used in the character strings to be searched.
    To perform installation using the default value (1. UTF-8), press ENTER. To change the character encoding used in the character strings to be searched, specify the number corresponding to the new character encoding, then press ENTER.
    Character encoding identifier:
    1. UTF-8
    2. SHIFT-JIS
    3. EUC
    4. GB18030
    5. GB2312
    6. big5
    7. KSC5601
    Please select character encoding identifier. (default: 1) [?,q]:

    The following table explains the items to be entered:

    Item name

    Explanation

    UTF-8

    UTF-8

    SHIFT-JIS

    Shift-JIS (Japanese)

    EUC

    EUC-JP (Japanese)

    GB18030

    GB18030 (Chinese)

    GB2312

    GB2312 (Chinese)

    big5

    Big5 (Chinese)

    KSC5601

    KSC5601 (Korean)

  9. Specify if IPC resources should be set up automatically.

  10. Enter "y" and press ENTER to start the installation process using the displayed information.
    Install information:
        Installation functions:
            director conductor sorter API
        Installation packages:
            FJSVshnsk FJSVshnsy FJSVshndr FJSVshncd FJSVshnso FJSVshnap 
        Installation directory:                      /opt
        Shunsaku system name:                        shunsaku
        Host name or IP address:                     DirSvr1
        Director data file directory:                /Shunsaku
        Port number for receiving requests:          33101
        Character encoding identifier:               UTF-8
        Automatically set up IPC resources:          No.
    
    Do you want to proceed with the installation ? [y,q]:

    The installation process will start.

    Installation of packages has started.
    
        Installation of <FJSVshnsk> was successful. 
                : 
    Installation of packages has ended.

    If there is a processing error, the following message will be displayed and the installation process will be terminated.

    Installation of "Interstage Shunsaku Data Manager Enterprise Edition" was terminated.

    If the installation is successful, a message will be displayed indicating that the installation process has completed. An installation log will be created in "/opt/FJSVshnsk/setup.log".

    Installation of "Interstage Shunsaku Data Manager Enterprise Edition" was successful.

  11. If Automatically set up IPC resources was specified in step 9, restart the system.

Contents Index PreviousNext

All Rights Reserved, Copyright(C) FUJITSU LIMITED 2006