| ETERNUS SF AdvancedCopy Manager Operator's Guide 13.0 -Solaris- |
|
Contents
Index
|
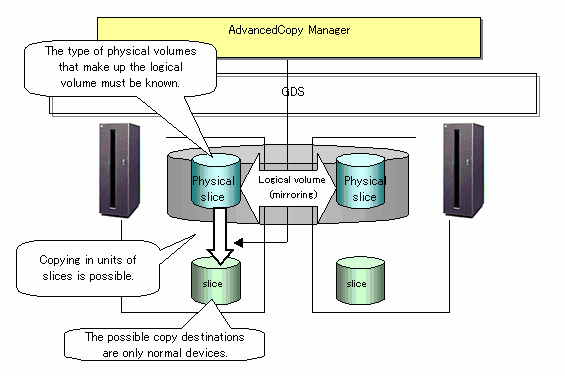
This chapter explains AdvancedCopy Manager replication in Solaris. AdvancedCopy Manager uses a slice as the replication unit. In this manual, the term "volume" is used instead of "slice."
This chapter explains the AdvancedCopy Manager replication function.
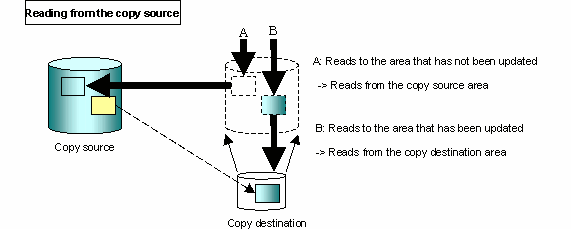
Using the advanced copy (OPC or EC) function of a disk array unit, the AdvancedCopy Manager replication function performs high-speed replication between volumes, regardless of the volume capacities.
Snapshot replication is replication that uses the One Point Copy (OPC) or Remote One Point Copy (ROPC) function of an ETERNUS storage system disk array unit. Replication that uses the Equivalent Copy (EC) or Remote Equivalent Copy (REC) function is called synchronized replication.
The replication function creates copies so that the information at a certain point of time can be used for different purposes. It can be used independently of or combined with the backup function.
Replicas are created by copying from an original volume to a replica volume using the OPC or ROPC function of an ETERNUS storage system disk array unit.
The snapshot replication performs the following two types of processing:
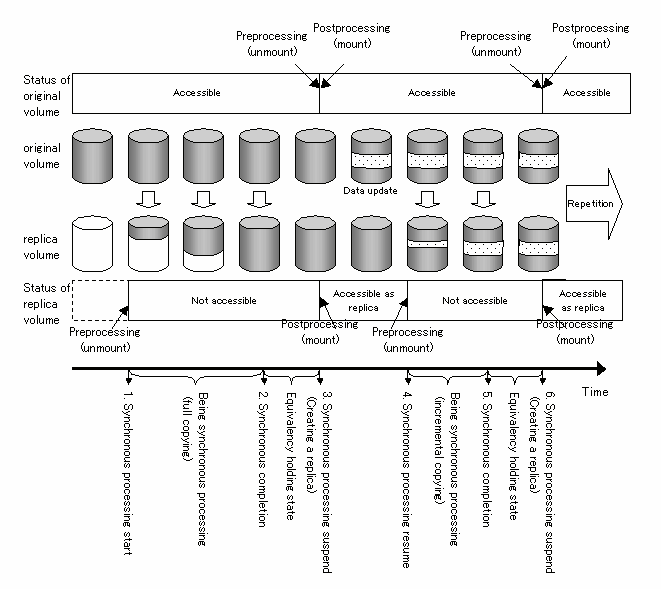
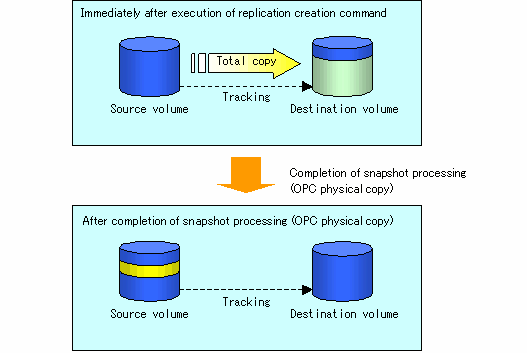
When a copy is created, the snapshot processing (OPC or ROPC) from the original volume to the replica volume is executed with the replication creation command (swsrpmake). The replication creation command dismounts or mounts the original volume. This processing determines the original data (for details, refer to " Preprocessing and Postprocessing of Replication "). ((1) to (4) in Figure 8.1)
If the user wants to recreate a replica, only the replication creation command is required. If the previous snapshot processing is in progress, it is stopped and new snapshot processing is started.
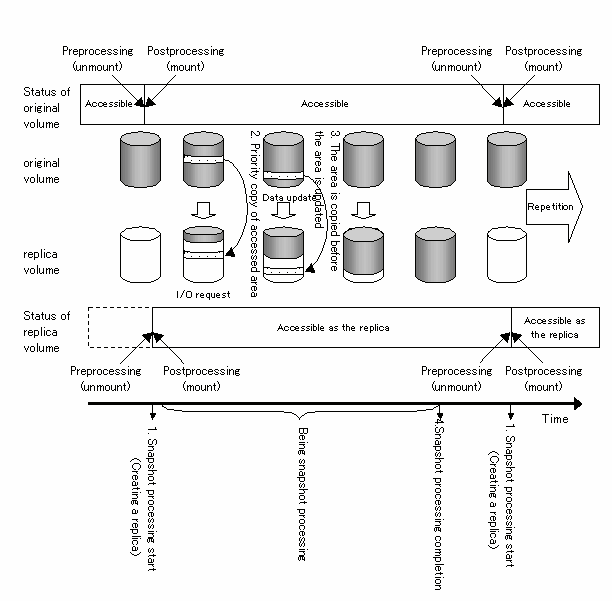
Snapshot replication is completed when the replication creation command is issued. The actual data is internally copied by the OPC or ROPC function of the ETERNUS storage system disk array unit.

Disk array devices must support the ROPC function in order to use it in the Advanced Copy function snapshot replication.
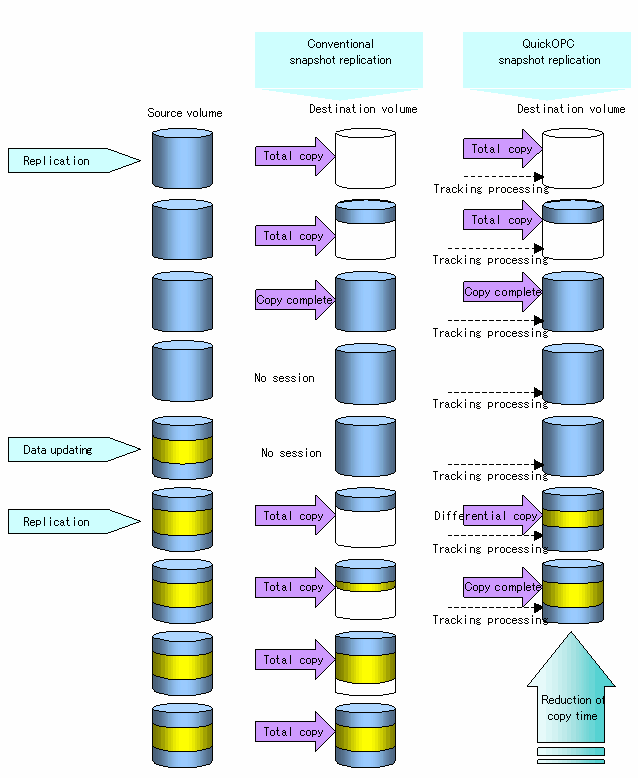
If the disk array supports the QuickOPC function, QuickOPC snapshot replication can be performed.
The QuickOPC function copies only the data generated after the previous physical copy. Snapshot high-speed backup using the QuickOPC function is called QuickOPC snapshot replication.
Ordinary snapshot replication performs a physical copy of the entire source volume to the destination volume every time replication (OPC) is activated. However, QuickOPC snapshot replication performs the copies only the data generated after the previous physical copy, which can greatly reduce physical copy time.
The comparison between ordinary snapshot replication and QuickOPC snapshot replication is shown below.

To execute differential snapshot replication using the QuickOPC function, hardware that supports the QuickOPC function is required.
The QuickOPC function can be used only for copying within a cabinet (OPC). The function cannot be used for copying between cabinets (ROPC).
The QuickOPC function also cannot be used for replicating SDX objects in the units of logical volumes.

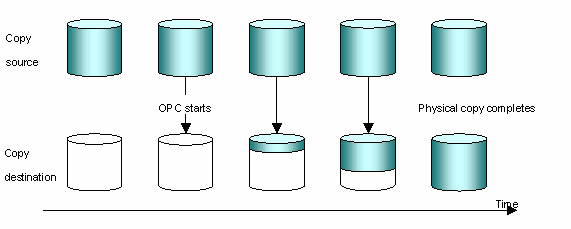
Hardware using the QuickOPC function records the updates made to the copy source or destination after the completion of OPC logical copying. The status in which the hardware records updates is referred to as the "tracking status."
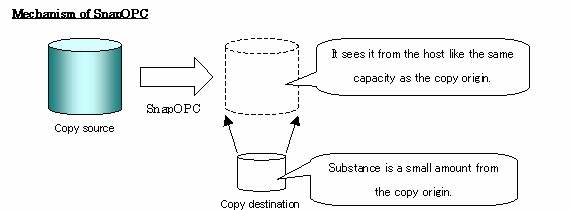
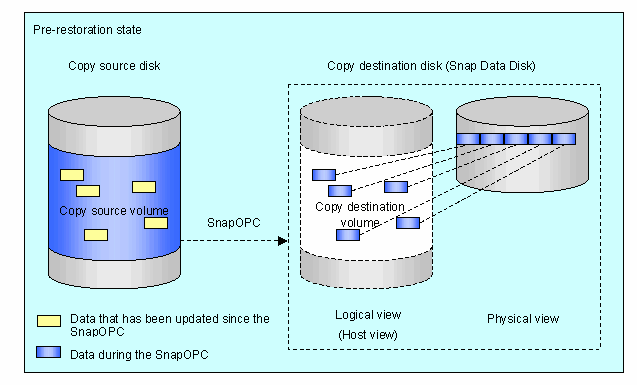
SnapOPC is a function that enables only data that has been updated to the copy source disk area since a certain point in time (logical copy) to be copied to the copy destination disk area.
Comparison of the ordinary snapshot replication (Normal OPC), the QuickOPC snapshot replication (QuickOPC), and the SnapOPC snapshot replication (SnapOPC) is shown below.
With normal OPCs, all data for a certain point in time(logical copy) is copied to the copy destination disk area.
The copy destination disk must have (at least) the same capacity as the copy source disk area.
The copy time is the time needed to copy all data.
With QuickOPCs, for the first copy, all data for a certain point in time (logical copy) is copied to the copy destination disk area.
For second and subsequent copies, only data that has been updated since the last copy is copied.
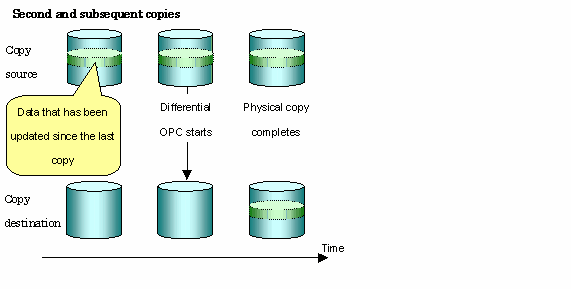
The copy destination disk must have (at least) the same capacity as the copy source disk area.
The copy time for second and subsequent copies is the time needed to copy differential data.
With SnapOPCs, only data that has been updated from the data at a certain point in time (logical copy) is copied to the copy destination disk area.
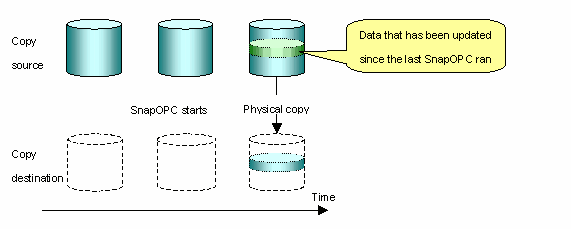
The copy destination disk area can be smaller than the copy source disk area.
The copy time is the time needed to copy data that has been updated.
Snapshot type replications that use SnapOPC are referred to as "SnapOPC snapshot type replications".
In some ways, SnapOPC is superior to conventional OPCs, since copy times are shorter and copy destination volumes have a smaller capacity. However, there are problems in terms of access performance and the reliability of copy data.
These points suggest that SnapOPC should be used as temporary areas for tape backups for systems where access performance is not an important consideration.
SnapOPC can only be used for replications (OPC) within a single cabinet. SnapOPC cannot be used for inter-cabinet replications (ROPC).
The disk at the copy destination of SnapOPC is called Snap Data Disk.
Replicas are created by copying from the original volume to the replica volume using the EC or REC function of an ETERNUS storage system disk array unit.
Synchronized replication uses two methods to create a copy: full copying and incremental copying. In full copying, all of the original volume is completely copied. In incremental copying, only the data from the previous copy that has been updated is copied.)
Creating replicas with full copying
Use this method to create the first copy in a replication.
Creating copies with incremental copying
Use this method to create later copies once a previous replica already exists.
Copies are created by copying the data that has been updated after an initial copy has been made (full copying and incremental copying).
The following steps comprise the procedure for synchronized replication:
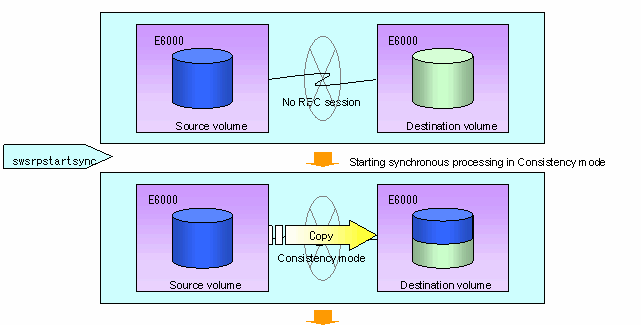
When synchronized processing using the synchronous processing start command (swsrpstartsync) starts from the original volume to the replica volume, full copying starts. ((1) in Figure 8.2)
Full copying is complete. The original volume and replica volume both enter the equivalence status. From this point on, updates in the original volume are sequentially reflected in the replica volume so that data equivalence is always maintained (equivalency holding state). (States in (2) and (3) in Figure 8.2)
Synchronized processing is temporarily stopped with the replication creation command (swsrpmake) to create a copy of the original volume. The replication creation command dismounts or mounts the original volume. This processing determines the original data (for details, refer to "Preprocessing and Postprocessing of Replication "). After execution of the replication creation command, the replica volume can be accessed (copy established status). (States in (3) and (4) in Figure 8.2)
To create another copy, the synchronized processing that has been temporarily stopped is restarted with the synchronous processing start command. For this copy, the only data copied to the replica volume is the (incremental) data on the original volume that has been updated since the previous copy was made until the restart of synchronized processing((4) in Figure 8.2).
When the replica volume has been updated after the previous copy is made, the content of the update of the replica volume is cleared.
When the incremental data has been copied, the status returns to the equivalency holding state again. (States in (5) and (6) in Figure 8.2)
When this status has been set, the copy is re-created with the replication creation command. ((6) in Figure 8.2)

To use using the EC or REC function in synchronized replication, disk array devices must support the EC or REC function.
The replication creation command cannot be executed unless both the original volume and replica volume are in the equivalence status.
This chapter explains the operation of AdvancedCopy Manager replication.
Design replication using the following procedures:
Refer to "Notes of the design in SnapOPC replication", when the SnapOPC snapshot replication is used.
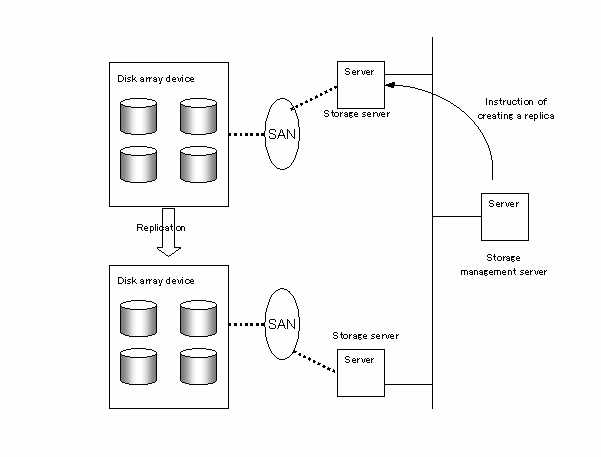
Determine the server that performs replication.
The following servers are used to perform replication:
Storage management server
Multiple storage servers are unified and operated centrally. The storage management server can also be used as a storage server.
Storage server
AdvancedCopy Manager operations are performed.

The following requirements apply when box-to-box replication is performed using the remote copying function (ROPC or REC) of an ETERNUS storage system disk array unit:
The ROPC or REC function must be installed in both boxes.
Both boxes must already be connected using an FC remote adapter (FCRA). In a connection that uses an FCRA, data flows only from the INIT side to the TARG side. For bi-directional copying, at least two FCRA connections are required.
Determine the original volume and replica volume to be used in the replication.

The original volume is the volume on which the data to be copied is stored.
The replica volume is the volume on which a copy of the data on the original volume is stored.
In addition, determine the following attributes to be assigned to the original volume and replica volume:
Copy direction
Determine the direction of copying used in replication. Specify one of the following directions:
bi-direction: Copying is bi-directional between the original volume and replica volume.
uni-direction: Data is copied only from the original volume to the replica volume. During this operation, copying from the replica to the original volume is to be disabled.
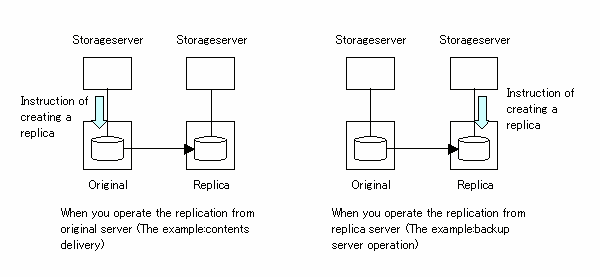
Operation servers (used only for server-to-server replication)
In replication between servers, you can specify whether to allow replication to be performed on only the copy source server or copy destination server, or on both servers:
"Original server": Sets the storage server with the original volume connected as the operation server.
"Replica server": Sets the storage server with the replica volume connected as the operation server.
"Both servers": Sets both the copy source server and copy destination server as operation servers.
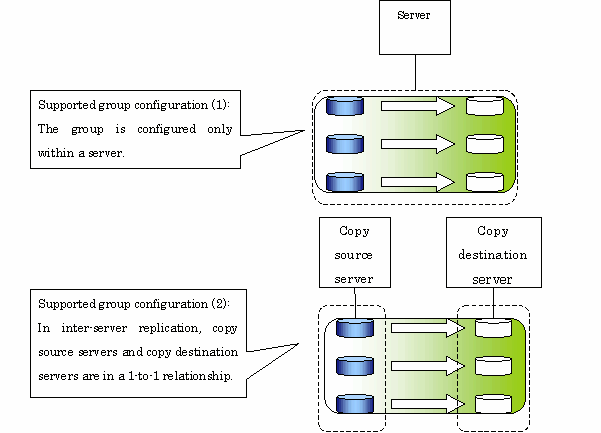
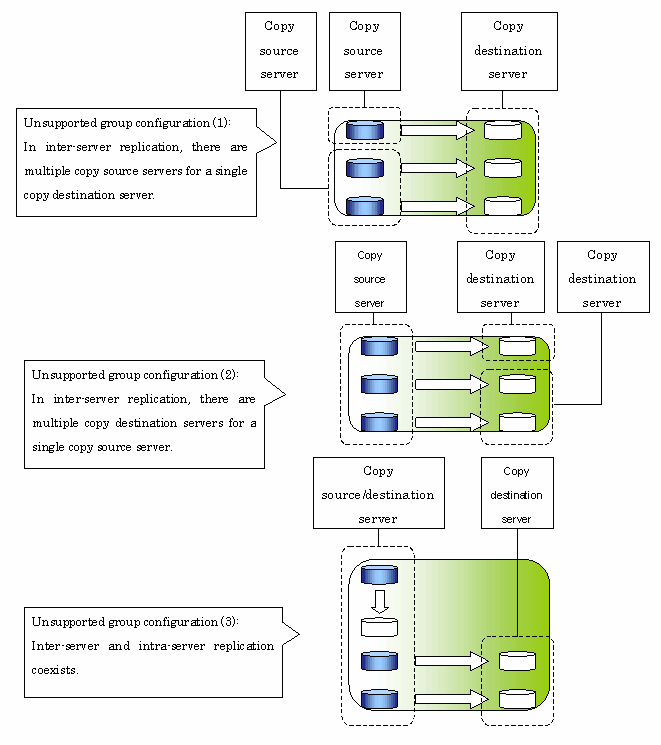
It is possible to create a group by arranging multiple copy source volumes and copy destination volumes. In addition, the operation for multiple copy source volumes and copy destination volumes can be performed in a unit of group. For details, refer to "Creating groups".
In this manual, a storage server used to perform replication is called the operation server. An original server or replica server is specified as the operation server.
An operation server can use all of the replication functions. In contrast, any other type of server can use only the information display function and operation release function.

Replication is not supported for the system disk or the disk where AdvancedCopy Manager is installed.

Refer to "General notes" of this manual as a point which it is careful of when deciding the candidate for backup.
Exclusion from Backup Targets or Replication Targets
Slice containing VTOC
Only one session can be set up for each Snap Data Disk.
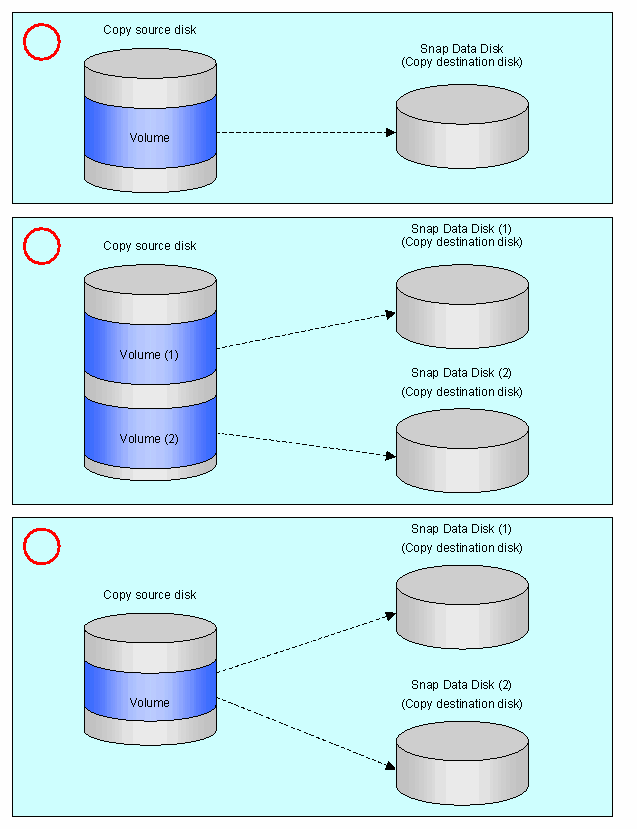
Accordingly, multiple sessions cannot be set up for a single Snap Data Disk, as shown in the following figure:
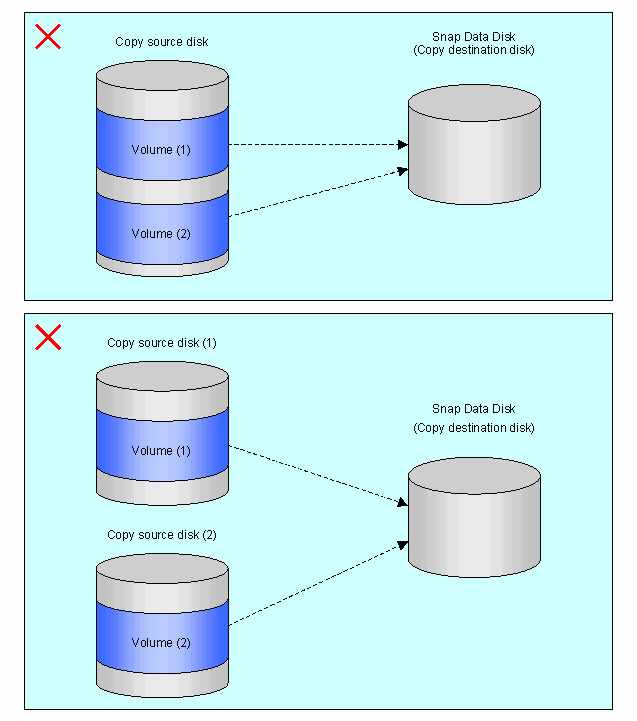
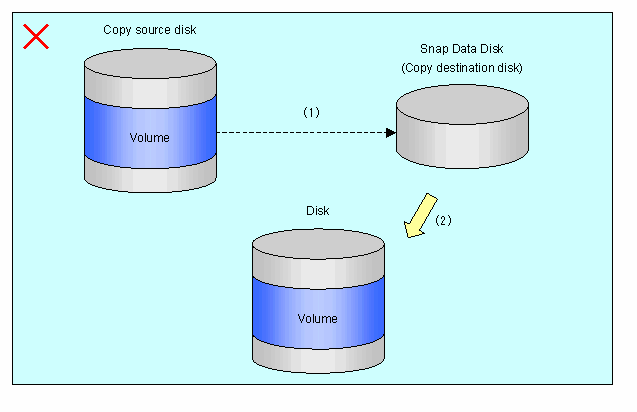
It is not possible to copy from the Snap Data Disk to a disk other than the copy source disk
Create a Snap Data Disk by performing the following steps:
Calculate the physical capacity for the Snap Data Disk.
Define and initialize the Snap Data Disk.
Connect to the host.
Create slices and file systems.
The formula for estimating the physical capacity of Snap Data Disks is as follows:
Physical capacity = (number of updated blocks for the copy source volume) x (safety factor) |
To be precise, both the number of blocks that have been updated on the Snap Data Disk before the SnapOPC is taken and the management area used by the hardware (about 0.1% of the logical capacity) should also be taken into account, however this can be covered by increasing the safety factor.
The number of blocks that have been updated on the copy source volume can be estimated using the update amount measurement command (swstestupdate).
Make this measurement using the following procedure:
Start measuring the update amount by setting up a pseudo SnapOPC session on the copy source volume.
# /opt/FJSVswsts/bin/swstestupdate start /dev/dsk/c1t0d0s1 /dev/dsk/c1t0d0s1 swstestupdate completed # |
Start transactions. Blocks that are updated by transactions will be recorded on the hardware.
After the measurement period has elapsed, check the number of blocks that have been updated.
# /opt/FJSVswsts/bin/swstestupdate status /dev/dsk/c1t0d0s1 Volume-Name Update /dev/dsk/c1t0d0s1 644333 # |
After the measurements are complete, cancel the pseudo SnapOPC session.
# /opt/FJSVswsts/bin/swstestupdate stop /dev/dsk/c1t0d0s1 /dev/dsk/c1t0d0s1 swstestupdate completed # |
Define and initialize the Snap Data Disk using ETERNUSmgr. At this point, set the logical capacity to that of the copy source disk (in order to use the same partition configuration for both the copy source disk and the copy destination disk).
Connect the created Snap Data Disk to the host. Refer to the manual for the disk array system (the Server Connection Guide) for information on this procedure.
Create slices and file systems so that a copy source volume can be created on the Snap Data Disk.
Once file systems have been created, limit updates to the copy destination volume as much as possible, to avoid unnecessarily using up the physical capacity of the Snap Data Disk.
Do not use Snap Data Disks as shared disks for cluster systems. This is to avoid the danger of the cluster system failing over when the physical capacity of the Snap Data Disk is exceeded.
For cluster operations, use one of the following methods to prevent the Snap Data Disk from being used as a shared disk.
Permit the Snap Data Disk to be referenced from all the nodes in the cluster system.
Use inter-server replication between the cluster system and a non-cluster system.
The following figure shows the flow of the replication operations.
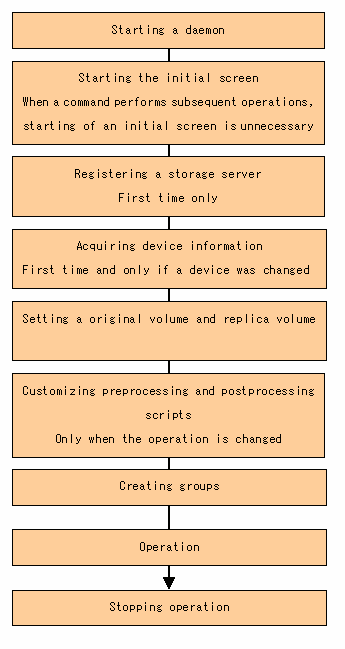
The following preparations are required before replication can start.
Before replication is started, the AdvancedCopy Manager daemon must be started on the storage management server and storage server. In general, the daemon is automatically started at system startup. However, if the daemon failed to start for some reason or has stopped, both servers must restart the daemon. For information about starting the daemon, refer to "Starting and Stopping daemons".
Use the following URL to start the AdvancedCopy Manager initial screen. In cluster operation, the URL is different. For details, please refer to "Initial Window," in the ETERNUS SF AdvancedCopy Manager User's Guide.
|
http:// storage-management-server-address(:port-number)/swstorage/index.html |
The following GUI (server list screen) will display.

When using the command line only, without using the GUI, it is not necessary to perform this step.

All AdvancedCopy Manager GUI operations are available on a Storage management server. For more about GUI operations, refer to "ETERNUS SF AdvancedCopy Manager User's Guide".
 When the storage management server is in cluster operation
When the storage management server is in cluster operation, you must configure an authentication-related file (refer to "Configuring the authentication-related file" in the ETERNUS SF AdvancedCopy Manager User's Guide) to use Web screens.
The Storage management server registers the Storage server to be managed. When the Storage server is operated as a Storage management server does not need to add a server.
Select the [Operation] menu, and then select [Add Server]. The following window displays.
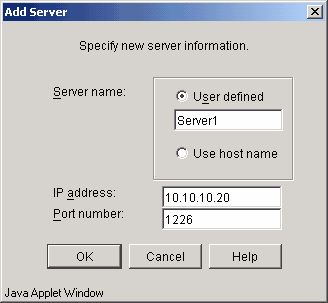
To add a storage server, specify a server name, IP address, and the port number required for communications. The port number was specified as the "communications daemon port number", when the Agent of AdvancedCopy Manager was installed.
In cluster operation, specify the logical IP address of the Storage server as the IP address. Also specify the port number of Storage server transactions registered at the time the cluster was setup.
Click [OK] after entering the information. The Storage server processing is then performed.
This processing can also be carried out by the server information addition command (stgxfwcmaddsrv).
Before the backup management can be performed, device information on a storage server must be temporarily stored to the repository. To acquire information on a device on the storage manager server, from the [Operation] menu, select [Refresh Server]. The following window displays:
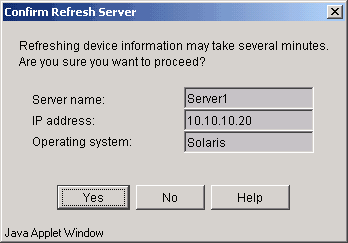
After checking the server from which device information should be acquired, click the [Yes] button.
After the device information has been obtained from each server, the following dialog box displays:
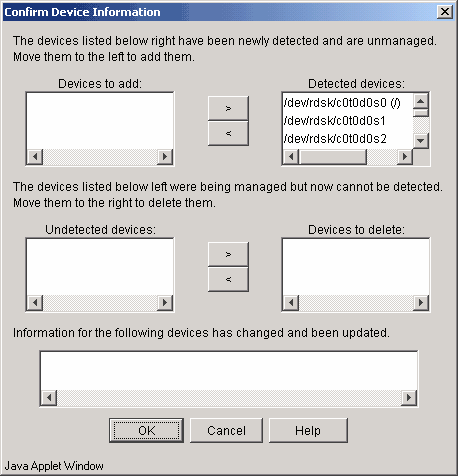
The new devices detected will be displayed in the 'Detected device' list box at the top of the dialog. Select a device to be managed and click the < button to move it to the 'Additional instruction device' list box on the left. The 'Device not detected list box'displays devices currently under management but not detected. Select any device that you no longer want to manage and click the > button to move it to the 'Device in deletion instruction'list box. The list box at the bottom of the dialog displays devices whose device information has been updated (e.g. the mount point name has been changed).
After completing the above taks, click the [OK] button to accept the configuration information.
This processing can also be carried out by the device information collection/reflection command (stgxfwcmsetdev).

The time required for this operation depends on the total number of devices defined on the Storage server. If the number of devices is large, perform this operation while the CPU load and I/O load are low. As a guideline for reference, each operation takes about 0.5 s per device (partition) under no-load conditions.
Use the replication volume information setting command (swsrpsetvol) to set the original volume and replica volume that will be used in the replication. The information on the registered original volume and replica volume can be checked with the replication volume information display command (swsrpvolinfo).
When specifying the volume of another storage server in server-to-server replication, specify the volume in the format "volume-name@storage-server-name."
In AdvancedCopy Manager, replication processing must be performed while volumes are unmounted. Therefore, when replication is executed, processing to mount and unmount the volume is performed by the preprocessing and postprocessing script.
The replication processing is not executed when the volume can not be unmounted.
For details of the preprocessing and postprocessing script, refer to "Preprocessing and Postprocessing of Replication."
If the operation is one of the following two, the replication preprocessing and postprocessing scripts need to be customized:
Due to operational requirements, you want to avoid the unmount/mount processing of the volume where a file system is constructed
You want to add special preprocessing and postprocessing to the preprocessing and postprocessing scripts
Refer to "Preprocessing and Postprocessing of Replication," for details on the customization.
When the replication about is done in each group, preprocessing and postprocessing is not done. Therefore, all volumes in the group are unmounted, done before the reproduction is made, and it is necessary to do the mount after the reproduction is made.
When AdvancedCopy Manager is upgraded
The script may be updated after the upgrade.
Therefore, customize the script after upgrade rather than reusing the script which was being used by the previous version.
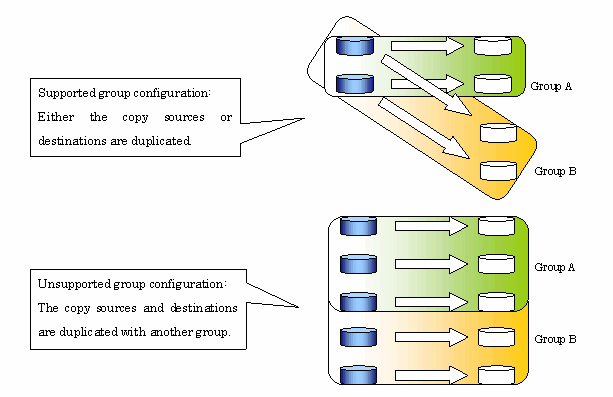
The replication volume information that makes up the group (the copy source volume and the copy destination volume pairs) must meet the following conditions:
The copy source servers and copy destination servers respectively must all match.
The operation servers and the copy directions respectively must all match. (The values for the operation servers and the copy directions can be checked using the "Op-Server" and "Copy" columns of the execution results of the replication volume information display command (swsrpvolinfo).
The replication volume information being registered must not be registered in any other group.
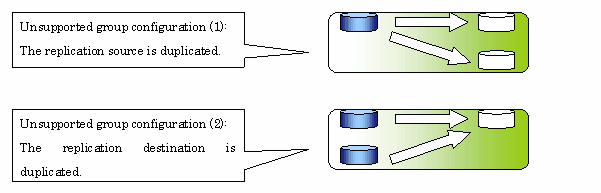
Copy source volumes and copy destination volumes must not be duplicated within the group.
Replication volume information for GDS logical volumes and volumes other than GDS logical volumes cannot be mixed.
[Condition 1]
[Condition 3]
[Condition 4]
Groups are created using the replication volume information setting command (swsrpsetvol).
Information for created groups can be displayed using the replication volume information display command(swsrpvolinfo).
[Execution example]
Two groups (GRP1) composed of an original volume and the replica volume are made.
# swsrpsetvol -Xgroup GRP1 /dev/dsk/c1t1d1s4@SRC /dev/dsk/c1t1d11s4@TARG-1 swsrpsetvol completed # swsrpsetvol -Xgroup GRP1 /dev/dsk/c1t1d2s4@SRC /dev/dsk/c1t1d12s4@TARG-1 swsrpsetvol completed # swsrpvolinfo -L Server Original-Volume Size Replica-Volume Size Copy Op-Server Group SRC /dev/dsk/c1t1d1s4@SRC 4.0Gbyte /dev/dsk/c1t1d11s4@TARG-1 4.0Gbyte bi-direction both GRP1 SRC /dev/dsk/c1t1d2s4@SRC 4.0Gbyte /dev/dsk/c1t1d12s4@TARG-1 4.0Gbyte bi-direction both GRP1 # |
This chapter explains AdvancedCopy Manager replication.
Before performing replication, see "Preparations," to set up the environment required for replication.
This section describes the operation by the command.Refer to "Replication Management Operations" of a "ETERNUS SF AdvancedCopy Manager User's Guide" about operation by the Web screen.
Use the replication creation command (swsrpmake) to perform snapshot replication. (Refer to "Snapshot replication processing" about explanation of snapshot replication.)
The operation status of a physical copy can be checked by executing the operation status display command (swsrpstat).
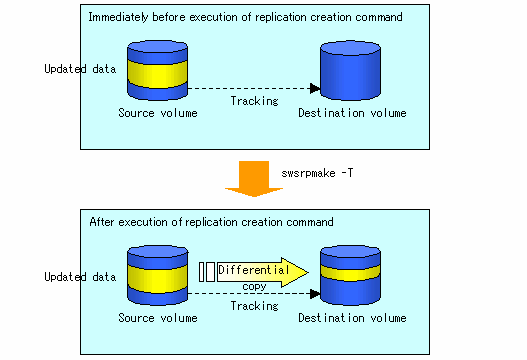
Execute QuickOPC snapshot replication by specifying the -T option in the replication creation command (swsrpmake).
If no OPC session exists when the replication creation command is executed, the command starts snapshot processing (OPC physical copying), and tracks processing from the source volume to the destination volume.

To check the execution status of physical copying, use the operation status display command (swsrpstat)in the same way as for an ordinary snapshot replication.
After snapshot processing (OPC physical copy) is complete, only tracking processing is active.
To check the tracking status, use the operation status display command (swsrpstat) with the -L option specified.
Entering the replication creation command (swsrpmake) with the -T option specified during tracking processing performs the physical copying of only the data that has been generated since the previous snapshot processing. This means that physical copying can be accomplished in a short period of time.
When you try to perform a restoration with a tracking processing being executed, you need to perform a restoration by OPC (you need to execute swsrpmake without -T option).
The replication operation using QuickOPC is done as follows:
[backup]
swsrpmake -T <original volume name> <replica volume name>
[restore] swsrpmake <replica volume name> <original volume name> |
Though a restoration is executed with OPC, not all the data but only the data that has been updated after the previous replication (it can be referred at 'Update' column of swsrpstat) is copied. Therefore, in replication operation using QuickOPC, not only a physical copy for backup but also that for restoration is completed in a short period of time.
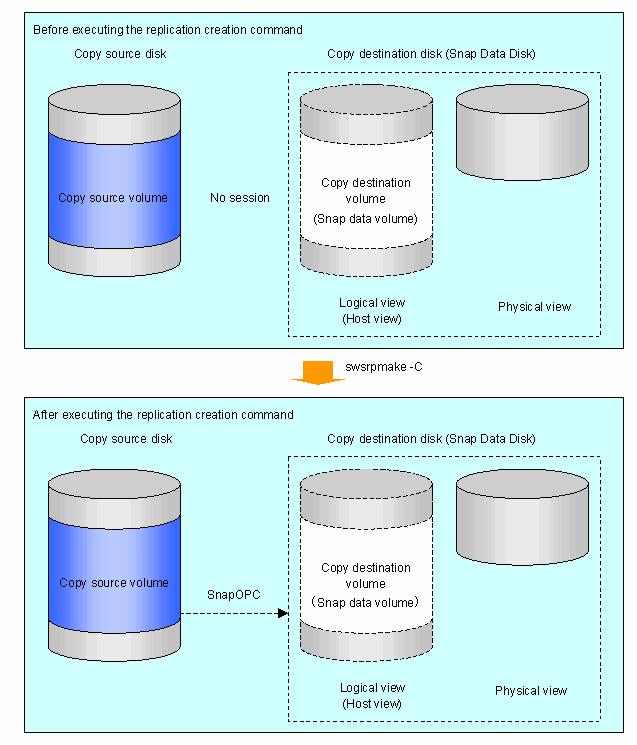
Execute SnapOPC type replications with the -C option specified in the replication creation command (swsrpmake).
When the replication creation command is executed, a SnapOPC session will be set up between the copy source volume and the copy destination volume.
[Execution example]
# /opt/FJSVswsrp/bin/swsrpmake -C /dev/dsk/c1t0d0s1 /dev/dsk/c1t0d11s1 FROM=/dev/dsk/c1t0d0s1@SV1,TO=/dev/dsk/c1t0d11s1@SV1 swsrpmake completed # |
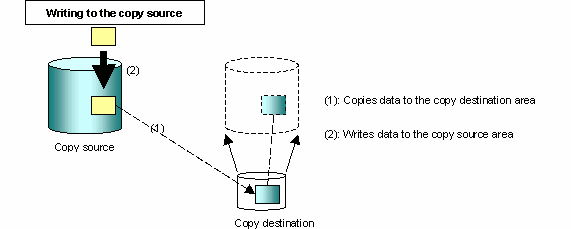
Unlike normal OPCs and QuickOPCs, SnapOPCs do not copy all of the data from the copy source volume, but instead copy only the data that has been updated on the copy source or copy destination since the SnapOPC started. This kind of copy processing is referred to as "Copy-on-Write".
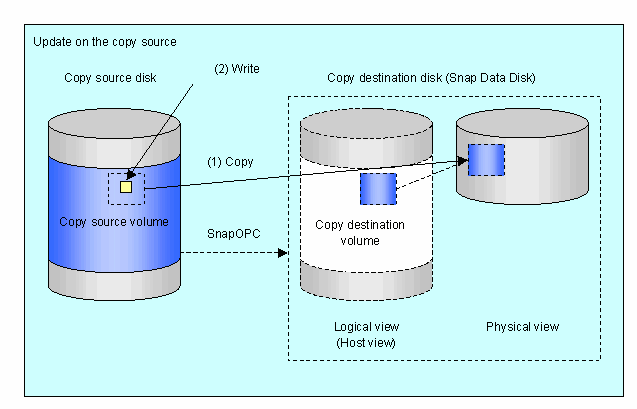
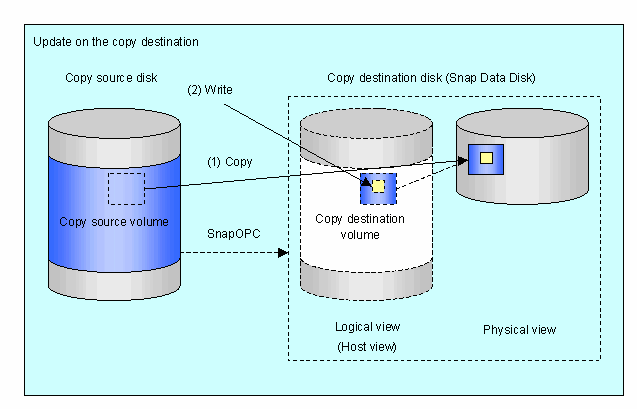
Note: The units for host I/O and storage device copies are different (512 bytes for host I/O and 8 kilobytes for storage device copies), and therefore data copies also occur when the copy destination is updated.
The status of SnapOPC sessions can be checked using the operation status display command (swsrpstat).
The following example shows the execution of the operation status display command immediately after a SnapOPC snapshot has started. While SnapOPC is being performed, "copy-on-write" is displayed in the Status field, and the amount of data updated since the last copy was created is displayed in the Update field as a percentage.
[Execution example]
# /opt/FJSVswsrp/bin/swsrpstat -L /dev/dsk/c1t0d0s1 Server Original-Volume Replica-Volume Direction Status Execute Trk Update Rcv Split Xfer SV1 /dev/dsk/c1t0d1s1@SV1 /dev/dsk/c1t0d11s1@SV1 regular copy-on-write ---- off 0% ---- ---- ---- # |
If the replication creation command is executed again during SnapOPC processing the SnapOPC session that has already been set up will be canceled, and a new SnapOPC session will be set up.
If the physical capacity of the Snap Data Disk is exceeded, the SnapOPC session will become error-suspended. This can be confirmed if "failed" is displayed in the Status field of the operation status display command.
[Execution example]
If the physical capacity of the Snap Data Disk is exceeded, the SnapOPC session must be canceled using the replication cancellation command (swsrpcancel), and extra physical capacity must be added to the Snap Data Disk.
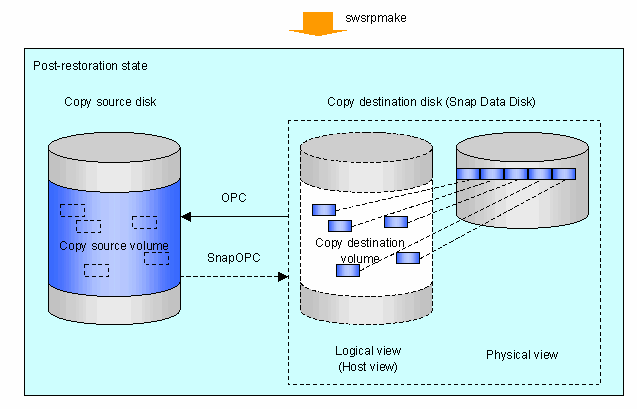
Perform restorations from Snap Data Volumes by running an OPC using the replication creation command (swsrpmake).
# /opt/FJSVswsrp/bin/swsrpmake /dev/dsk/c1t0d11s1 /dev/dsk/c1t0d0s1 FROM=/dev/dsk/c1t0d11s1@SV1,TO=/dev/dsk/c1t0d0s1@SV1 swsrpmake completed # |
When restorations are executed, the SnapOPC session from the copy source volume to the copy destination volume is maintained as is, and a normal OPC from the backup volume to the transaction volume is started. At this point, the time taken to restore the physical copy is reduced, because only data that has been updated since the last copy is copied.
The execution status of restorations can be checked by specifying the -E option with the operation status display command (swsrpstat).
# /opt/FJSVswsrp/bin/swsrpstat -E /dev/dsk/c1t0d0s1 Server Original-Volume Replica-Volume Direction Status Execute SV1 /dev/dsk/c1t0d1s1@SV1 /dev/dsk/c1t0d11s1@SV1 reverse snap 80% # |
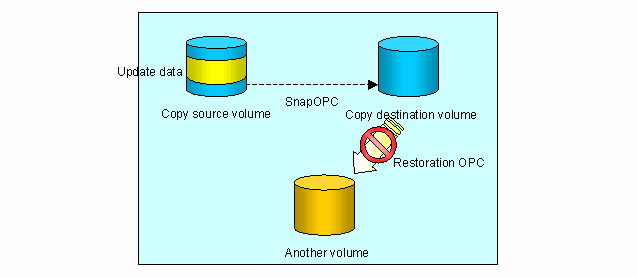
If a SnapOPC is being performed between the copy source volume and the copy destination volume, restorations to volumes other than the copy source volume cannot be executed. To restore to a volume other than the copy source volume, operating system copy functions (such as the cp command or the copy command) must be used.
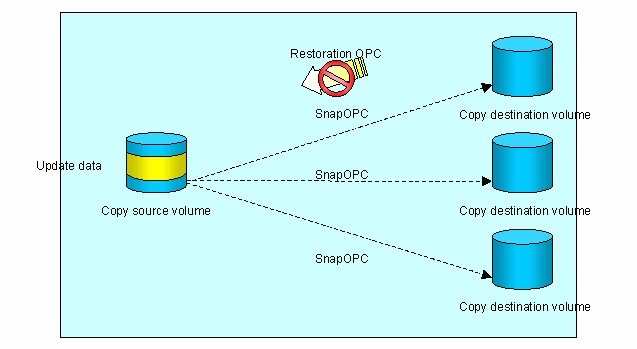
Additionally, if SnapOPCs are being performed to multiple copy destination volumes, restoration cannot be performed.
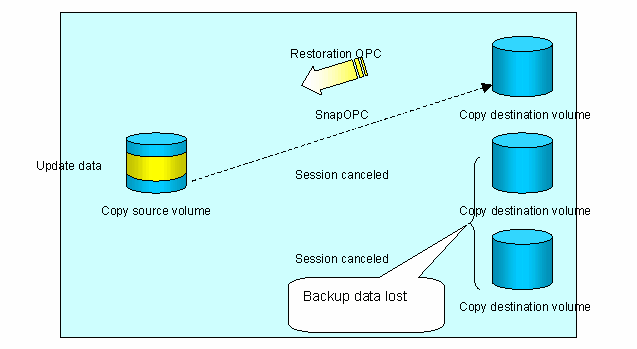
In this case, restoration using an OPC can be performed by canceling the other SnapOPCs. However, the backup data on the copy destination volumes whose SnapOPC sessions were canceled will be lost.
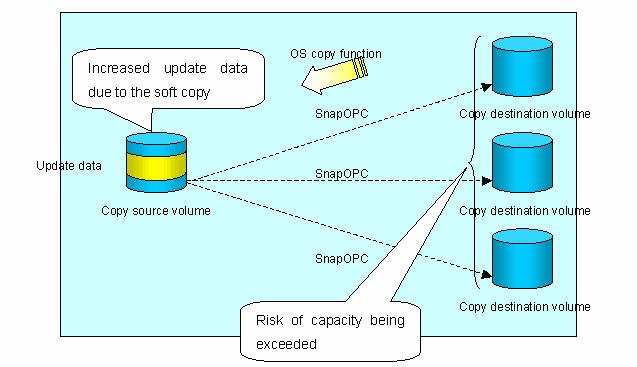
To perform a restoration while still maintaining all SnapOPC sessions, operating system copy functions (such as the cp command or the copy command) must be used for the restoration. However, if restoration is performed using operating system functions, the amount of updated data on the copy source volume will increase, and there is a risk that the capacity of the SnapOPC volume will be exceeded.
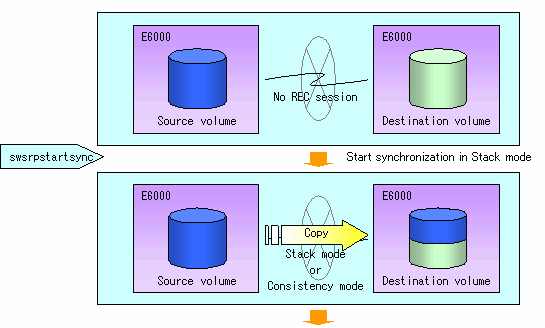
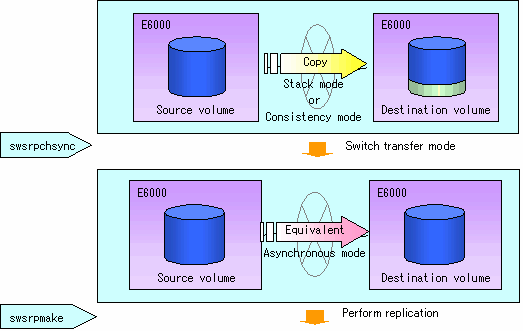
To perform synchronized replication, use the following procedure:
Start synchronized processing using the synchronous processing start command (swsrpstartsync). Use the replication cancellation command (swsrpcancel) to cancel synchronized processing that has already started.
After making sure that equivalency holding state has been established with the operation status display command (swsrpstat), temporarily stop synchronized processing with the replication creation command (swsrpmake) to create a replica of the original volume.
To copy the updated (incremental) data, restart synchronized processing with the synchronous processing start command (swsrpstartsync).
Intra-box synchronous replication creates a replication from a source volume to a destination volume by using the EC function of the disk array.
The EC function operates in a mode in which a copy is made to a destination volume in synchronization through a write to a source volume (in synchronous write mode).
Inter-box synchronous replication creates a replication from a source volume to a destination volume by using the REC function of the disk array.
The REC function provides three copy operation modes that can be selected for operation:
Transfer mode
Recovery mode
Split mode
In addition, the REC function enables the copy direction to be reversed in suspended status.
The transfer mode provides the REC data transmission modes described below.
|
Mode |
Description |
|---|---|
|
Synchronous |
When a write operation to a source volume occurs, this transfer mode returns the completion of write operation to the host after copying is completed. In synchronous transfer mode, the performance of a write response depends on the performance of the circuit between the boxes. Thus, any deterioration in circuit performance adversely affects the performance of a write response. |
|
Asynchronous |
This transfer mode starts sending data to a destination volume immediately after a response is made to a write operation to the source volume. The order of write operations is thus secured. If the volume of updates made to the source volume is excessive compared with transmission performance between the boxes, data to be copied remains stored, and write operations to the host are queued until the data is copied to some extent. To use asynchronous mode, the circuit must have at least the same performance as the update speed to source volumes. |
|
Stack |
This mode stores (stacks) data in the source box to be transferred and copies the data at irregular intervals to lower the speed of data transferred to the destination box. Update data on the source volume is transferred to the destination volume at irregular intervals, thus the order of write operations is not guaranteed. |
|
Consistency |
This transfer mode guarantees the order in which multiple synchronous processes reflect data. Data updates in multiple synchronous processes are copied periodically and collectively, thus the order of write operations can be secured among multiple synchronous processes. |
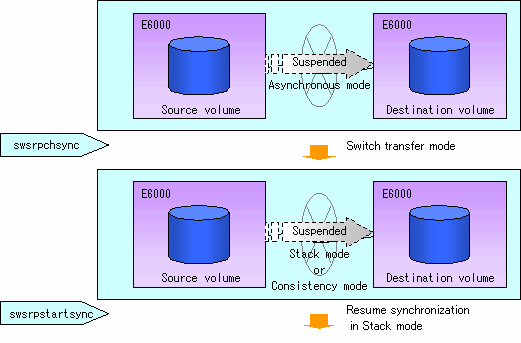
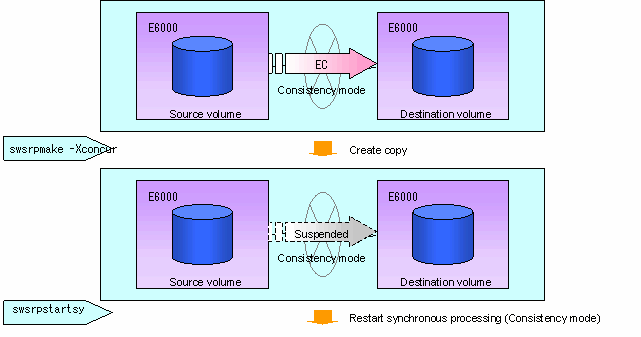
To perform a synchronous replication operation in Stack mode or Consistency mode, use the replication start command (swsrpstartsync), replication execution command (swsrpmake), and synchronization mode change command (swsrpchsync). The figures below show how synchronous replication operation is done in Stack mode or Consistency mode.
Recovery mode includes two modes to restart copying after recovery from an inter-box path error (halt status).
|
Mode |
Description |
|---|---|
|
Automatic Recovery |
In this mode, the REC session automatically switches from HALT status to regular status, and copy processing resumes when the inter-box FCRA path is recovered. |
|
Manual Recovery |
In this mode, the REC session remains in HALT status and copy processing does not resume even if the inter-box FCRA path is recovered. Manually resume copying. This mode is used, for example, when operating a standby database. |
Split mode includes two modes for write operation to the source volume when REC is used for synchronous transfer mode and for recovery from an inter-box path error (halt status).
|
Mode |
Description |
|---|---|
|
Automatic Split |
This split mode forcibly executes successful write operations to source volumes even if the inter-box FCRA path is fully blocked and HALT status occurs. This mode enables write operations to source volumes even if the inter-box FCRA path is fully blocked, thus this mode does not affect transactions. When the inter-box FCRA path is recovered, copy processing resumes according to the recovery mode settings. |
|
Manual Split |
This split mode rejects write operations to source volumes (returns an error) if the inter-box FCRA path is fully blocked and HALT status occurs. This mode enables source volumes and destination volumes to be fully synchronized even if the FCRA path is fully blocked. When the inter-box FCRA path is recovered, copy processing resumes according to the recovery mode settings. |
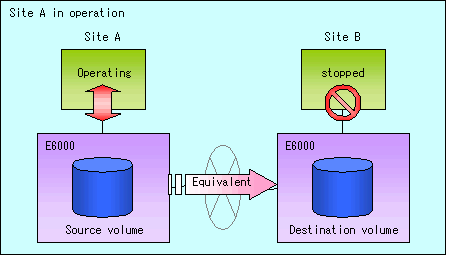
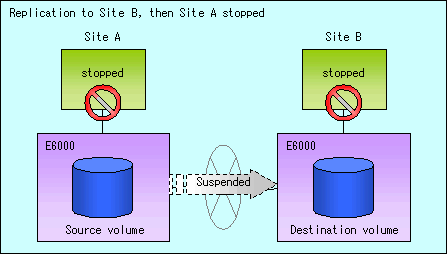
The copy direction reverser allows you to smoothly switch among center sites.
The following figures show an example of how to switch the copy direction:
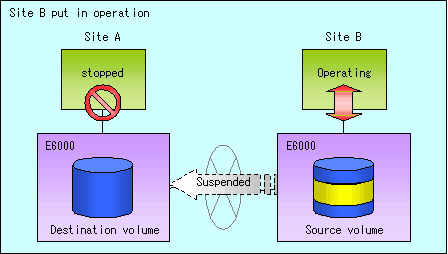
Assume that Site A is operating and REC is operating from Site A to Site B.
To switch the sites, execute the replication execution command to make a replication to Site B. Then, stop operating Site A.
Execute the synchronization reverse command to reverse the copy direction.
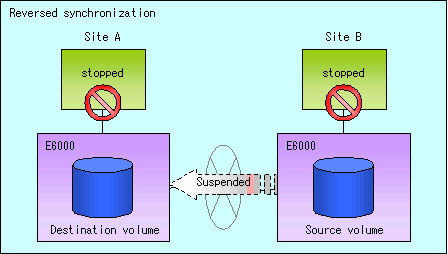
Put Site B into operation. At this stage, synchronization is still suspended, thus any update to the volume at Site B is not reflected at Site A.
Start (resume) synchronization from Site B to Site A. Updates made to the volume in Site B while synchronization is suspended are reflected into Site A with differential copies.

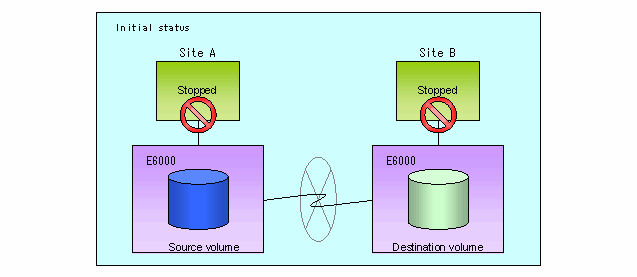
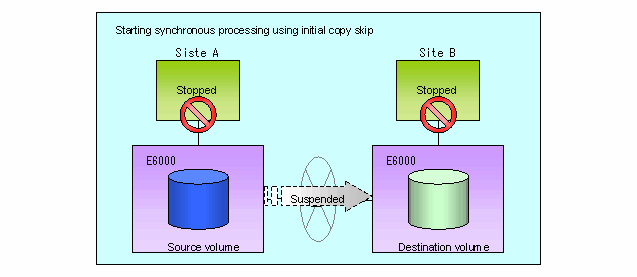
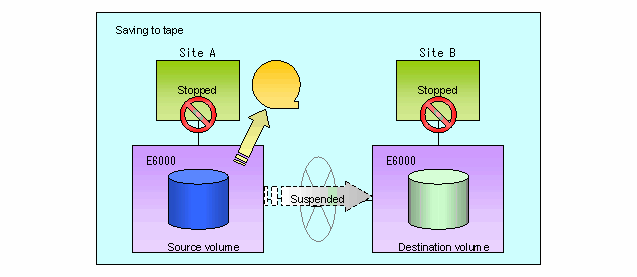
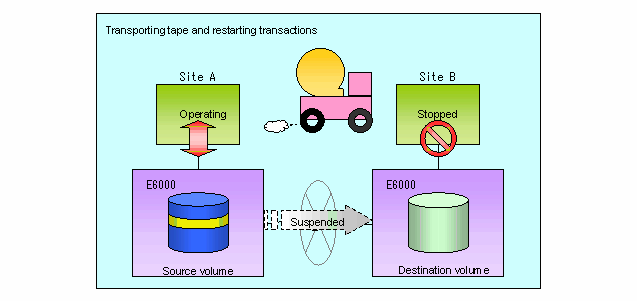
The initial copy skip function is used when the initial copy cannot be executed because of the insufficient line capacity. The following example shows the initial copy being skipped via tape transfer.
Suppose that operations at Site A have stopped.
Next, synchronous processing begins, using the initial copy skip function. At this point, an REC session is set up, and the status is Replication Established. Data is not copied to the copy destination volume.
Next, the data on the copy source volume is backed up to tape.
The tape medium is sent to Site B, and jobs at Site A restart.
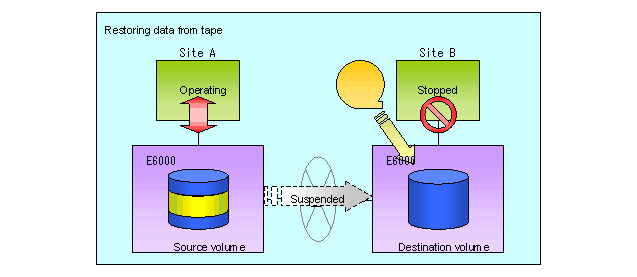
The data on the tape medium is restored to the copy destination volume. At this point, the data on the copy destination volume is the same as the data on the copy source volume that existed before operations restarted.
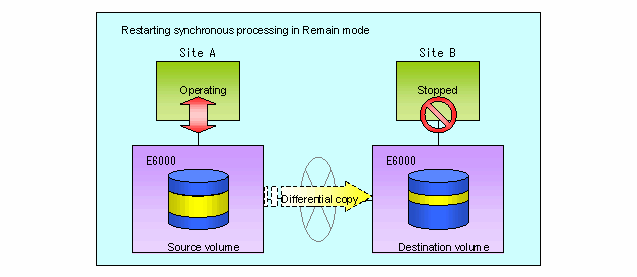
Synchronous processing restarts in Remain mode. Restarting synchronous processing in Remain mode means that only data that has been updated on the copy source volume is reflected on the copy destination volume. (If Remain mode is not used, all data on the copy source volume is copied.)
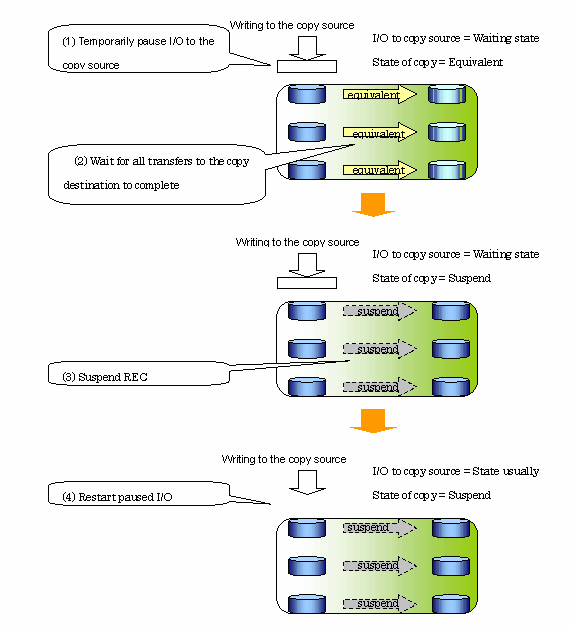
The concurrent suspension function simultaneously suspends multiple EC/REC sessions for disk array systems.
By using this function, the copy with consistency can be easily taken.
For example, it is useful for a database composed of multiple volumes.
The behavior that takes place within the disk array system is shown below.
Replication using the concurrent suspension function is performed by specifying the -Xconcur option for the replication creation command (swsrpmake ).
Additionally, if concurrent suspension is performed using the Consistency transfer mode, it is no longer necessary to make temporary mode changes during multiple creation processes. (Refer to the figure below.) Accordingly, the operating procedure used when concurrent suspension is executed in Consistency mode is the same as the procedure for asynchronous mode and synchronous mode.
Data can be restored from the replica volume to the original volume if a volume pair has been defined bi-direction copying with the replication volume information setting command (swsrpsetvol).
Restoration can be executed according to the following procedures.
Execute the replication cancellation command (swsrpcancel) when the target volume for restoration has a EC session.
Execute the replication creation command (swsrpmake). The specification of an original volume and the replica volume is reversed at time when the replication was executed. The reproduction making command is executed specifying neither -T option nor -C option at the backup operation that uses QuickOPC/SnapOPC.
When a storage server or device required in the replication operation has been changed, the information set in AdvancedCopy Manager must be changed. This chapter explains how to change the information set in AdvancedCopy Manager.
To change the attributes (copy direction, operation servers of server-to-server replication) of the otihinsl volume and replica volume that are set, delete the information with the replication volume information deletion command (swsrpdelvol) and then reexecute the replication volume information setting command (swsrpsetvol).
To delete the original volume or replica volume that are set, use the replication volume information deletion command (swsrpdelvol).
When making the size of device information and composition change which are used for an original / replica volume, a device composition is changed after deletion processing of the original / replica volume, and setting processing of the volume is performed.
Be sure to do the following work before making the size of an original / replica volume or a composition change. When not doing this work, deletion of the original / replica volume after device composition change may not be able to be performed.
Perform deletion processing to the original / replica volume for device change. For details, see "Deleting an original volume or replica volume".
Change the device composition.
Perform the additional processing of a device. For more information, see "Fetching device information from a storage server".
Perform setting of the original / replica volume.
To stop the replication processing, that is in progress, or to change the snapshot replication into the synchronized replication, use the replication cancellation command (swsrpcancel).
To stop replication operation, stop the daemons on the storage server. In general, the daemons stops when the system stops.
The daemon can be stopped independently if it needs to be stopped for some reason. For more information, see "Starting and Stopping Daemons".

When the daemon stops, all functions of AdvancedCopy Manager running on the storage server stop.
Before stopping the storage management server daemon, make sure that operations on all storage servers under management have stopped.
This section describes the replication operation of SDX objects.
A good understanding of the basic operation of normal volumes is required for this operation.
For details on GDS, refer to the "PRIMECLUSTER(TM) Global Disk Services User's Guide (Solaris(TM) Operating Environment)."
There are two types of the operation (with different copy units for each type):
Replication operation in units of logical volumes (method with GDS Snapshot)
Replication operation in units of slices (method without GDS Snapshot)
For details on how to confirm and select the type of operation, refer to the section titled "Setting the unit of SDX object operation". Replication in units of logical volumes (method with GDS Snapshot) is applicable only to replication within a server.
For replication between servers, use units of slices.

The two types of operation cannot be performed on a single Storage server.
SDX objects of GDS can be replicated in units of logical volumes.
Replication is performed in linkage with GDS Snapshot.
You can specify a GDS logical volume name as the target volume. Therefore, you need not consider the physical disk structure of the SDX object. (For operation in units of slices, all physical slices that make up the mirror volume must be specified, and the physical structure must be considered in the design and operation of replication.)

To specify a GDS logical volume in a AdvancedCopy Manager command, specify the name of the GDS logical volume.
dev/sfdsk/class-name/dsk/volume-name
 Configuration and conditions of unsupported SDX objects
The supported volume types are single volumes and mirror volumes.
AdvancedCopy Manager does not support the following SDX objects (volumes):
Volume of a shadow class
Stripe volume
Switch volume
Volume in a concatenation group
Stripe groups and concatenation groups, however, can be used as subordinate groups of a mirror group.
If the total number of the slices that make up the original volume and slices that make up all replica volumes associated with the original volume at the start of synchronous replication or snapshot-type replication is 33 or greater, copying cannot be processed.
Also, if the original volume is in the invalid state, copying cannot be processed.

To confirm the type of volume being used, which is single, mirror, stripe, concatenation, or switch, execute "sdxinfo -e long" and see the volume type attribute that is displayed (the value in the TYPE column on the line indicated for the volume in the OBJ column).
[Volume object type attributes]
single : Single volume (supported)
mirror : Mirror volume (supported)
stripe : Stripe volume (not supported)
concat : Volume in a concatenation group (not supported)
switch : Switch volume (not supported)
Note the following about performing the replication operation.
For replication with the function in linkage with GDS Snapshot, AdvancedCopy Manager processes binding and separation of volumes by using the GDS Snapshot function.
Therefore, the original and replica volumes must be SDX objects that can be used as a master object and proxy object of GDS Snapshot.
The copy source volume operates as a master object, and the copy destination volume as a proxy object.
Specify the GDS volume structure before registering a volume with AdvancedCopy Manager.
Therefore, note the similarity requirement described below for replication in units of physical slices. (For detailed conditions on what constitutes a master/proxy volume, refer to "Preconditions for Proxy Constitution" in Appendix A, "Cautions," in the "PRIMECLUSTER(TM) Global Disk Services User's Guide (Solaris(TM) Operating Environment).")
The original volume and replica volume must be the same type of SDX objects. Replication volume information based on logical volumes in a combination that includes slices or volumes of another OS cannot be set. When logical volumes are used, the original volume and replica volume must be the same size.
If the volumes are separated or there is no copy session, AdvancedCopy Manager assumes a non-replicated state. The following operations sets this state:
OPC is started by the replication creation command (swsrpmake) described in, and copy processing is completed.
The synchronous processing start command (swsrpstartsync) is executed with software-copy specified, and synchronous processing is suspended by the replication creation command (swsrpmake).
If a pair of separated replication volumes is specified, the synchronous processing start command (swsrpstartsync), the replication creation command (swsrpmake), and the replication volume information deletion command (swsrpdelvol) automatically clear the separated state.
To clear the separated state without a copy session for operational reasons, delete the replication volumes by using the replication volume information deletion command (swsrpdelvol) or the sdxproxy command, referring to "PRIMECLUSTER(TM) Global Disk Services User's Guide (Solaris(TM) Operating System)."
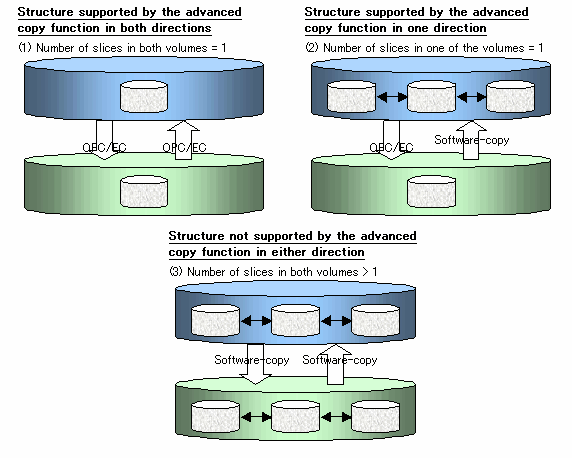
To use the advanced copy function, the structures of the original volume and replica volume must satisfy the following conditions.
To use the advanced copy function, the structure of the copy source volume must be one of the following:
Single volume
Not the root class
Mirror volume belonging to a mirror group that has no subordinate groups
For a mirror volume in a mirror group connected to a subordinate group, only software-copy can be used.
AdvancedCopy Manager does not support the following SDX objects (volumes):
Volume of a shadow class
Stripe volume
Switch volume
Volume in a concatenation group
Stripe groups and concatenation groups, however, can be used as subordinate groups of a mirror group.
If the total number of the slices that make up the original volume and slices that make up all replication volumes associated with the original volume at the start of synchronous processing or snapshot-type replication processing is 33 or greater, copying cannot be processed.
Also, if the copy source volume is in the invalid state, copying cannot be processed.
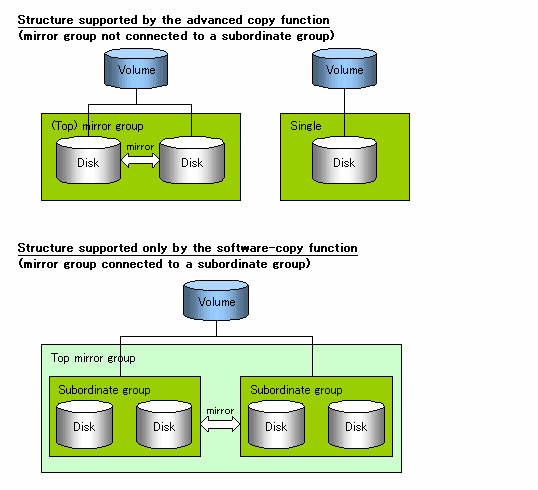
To use the advanced copy function, the structure of the copy destination volume must be one of the following:
Single structure
(This means that the type attribute of the volume is "single" or the type attribute is "mirror" and one disk makes up the disk group.)
Not the root class
If the copy destination volume is a mirror volume, only the software-copy function can be used. To use the advanced copy function in both directions, both volumes must be in a single structure. Neither a stripe nor concatenation volume can be used as the copy destination volume.
The two types of GDS Snapshot copy functions are described below. The availability of the functions depends on the SDX object structure.
Advanced copy: Copying with the hardware function of ETERNUS, Fujitsu's storage systems
Software-copy: Copying with the disk driver of PRIMECLUSTER GDS
The following table shows the relationship between SDX object structures and their available copy functions.
|
Replication structure |
Unit |
Copy source/ |
SDX object structure Stripe/concatenation/switch-types of objects cannot be copied. |
Available copy function |
|
|---|---|---|---|---|---|
|
Within |
Logical volume |
Copy source |
Single |
Advanced copy Software-copy |
|
|
Mirror |
No subordinate group exists. |
Advanced copy Software-copy |
|||
|
Subordinate groups exist. |
Software-copy |
||||
|
Copy destination |
Single |
Advanced copy Software-copy |
|||
|
Mirror |
This consists of one disk. |
Advanced copy Software-copy |
|||
|
This consists of multiple disks. |
Software-copy |
||||
To perform the replication operation with a Storage server and get information of a subordinate device of the Storage server, register the server.
For details on how to fetch the device information, refer to the section titled "Fetching device information from a Storage server."
Note the following about setting the original and replica volumes.
Confirm that the volume is in the structure described in the section titled "Supported logical volume structures."
Confirm that the original/replica volume is not a master volume or proxy volume.
Register GDS logical volumes as the original and replica volumes.
# swsrpsetvol -h SRC-SV /dev/sfdsk/CLS1/dsk/VOL1 /dev/sfdsk/CLS1/dsk/VOL2 swsrpsetvol completed # |
Note the following about performing replication of SDX objects.
To start or resume synchronous processing (swsrpstartsync) or to start snapshot processing (swsrpmake), the logical volume of the copy destination must be inactive.
If the logical volume of the copy destination is active when the command is executed, processing to stop the volume is performed within the command. (If the copy destination volume is a file system volume, the file system is unmounted during replication preprocessing and the volume is then stopped.)
If the volume cannot be stopped (such as when the volume is accessed by an application), the command was terminated abnormally.
Example of synchronous replication
# swsrpstartsync -h SRC-SV /dev/sfdsk/CLS1/dsk/VOL1 /dev/sfdsk/CLS1/dsk/VOL2
FROM=/dev/sfdsk/CLS1/dsk/VOL1, TO=/dev/sfdsk/CLS1/dsk/VOL2 swsrpstartsync completed
Equivalency holding state # swsrpmake -h SRC-SV /dev/sfdsk/CLS1/dsk/VOL1 /dev/sfdsk/CLS1/dsk/VOL2 FROM=/dev/sfdsk/CLS1/dsk/VOL1, TO=/dev/sfdsk/CLS1/dsk/VOL2 swsrpmake completed |
Example of snapshot replication
# swsrpmake -h SRC-SV /dev/sfdsk/CLS1/dsk/VOL1 /dev/sfdsk/CLS1/dsk/VOL2 FROM=/dev/sfdsk/CLS1/dsk/VOL1, TO=/dev/sfdsk/CLS1/dsk/VOL2 swsrpmake completed # |
Do not use the sdxproxy command directly to change the state of a volume registered for the replication function.
Otherwise, the sdxproxy command may create an inconsistency between the management information of the replication function and the actual volume state. In such cases, use the replication cancellation command (swsrpcancel) to cancel the replication operation.
SDX objects of GDS can be replicated in units of slices.
Replication is performed without linkage with GDS Snapshot.
This operation requires that the physical disks that make up the GDS logical volume be specified.
For details on GDS, refer to the "PRIMECLUSTER(TM) Global Disk Services User's Guide (Solaris(TM) Operating System)."

If mirroring between cabinets is enabled and copying to the original volume by OPC is required in the event of a cabinet failure, both mirrored systems must be replicated. In such cases, the required capacity of the replica volume is not the size of the logical volume but the size of the physical volume.
When specifying a name in the AdvancedCopy Manager command, use the following name format that combines a logical volume name and AdvancedCopy Manager device name.
dev/sfdsk/class-name/dsk/volume-name:DEVNAM value by sdxinfo
For notes on designing the replication operation, refer to the section titled "Notes on SDX object operations (replication management)."
Replication with the copy destination volume of a mirror slice is not yet supported. Consequently, if either the original volume or replica volume is a mirror slice, you can perform replication only from the mirror slice to a physical slice.
To copy data to a mirror slice, use the dd command (requires copying to all mirror slices that make up the logical volume).
To perform the replication operation with a Storage server and get information of a subordinate device of the Storage server, register the server.
For details on how to fetch the device information, refer to "Fetching device information from a Storage server."
Register the mirror slices that make up a mirror volume of GDS/SafeDISK as replication volumes.
# swsrpsetvol /dev/sfdsk/CLS1/dsk/VOL1:c1t0d1 /dev/sfdsk/CLS1/dsk/VOL2:c1t0d2 swsrpsetvol completed # |
Example of snapshot replication
# swsrpmake /dev/sfdsk/CLS1/dsk/VOL1:c1t0d1 /dev/sfdsk/CLS1/dsk/VOL2:c1t0d2 FROM=/dev/sfdsk/CLS1/dsk/VOL1:c1t0d1, TO=/dev/sfdsk/CLS1/dsk/VOL2:c1t0d2 swsrpmake completed # |
Replication can be performed when the SDX object that makes up the applicable logical volume is in one of the states listed below. If the object is in any other state, replication cannot be performed. (AdvancedCopy Manager checks the state of the SDX object by using the sdxinfo command of GDS/SafeDISK.)
The state of the mirror volume is ACTIVE or STOP.
The state of the physical disk is ENABLE.
The state of the mirror slice is ACTIVE or TEMP.
In the following case, the preprocessing and postprocessing scripts are not executed:
A slice of the SDX object is in the TEMP state.
This section describes the replication operation for volumes under VERITAS Volume Manager (VxVM).
AdvancedCopy Manager can replicate volumes under the control of VxVM (referred to as VxVM volumes in this document) in the following units:
Replication operation in units of logical volume
Replication operation in units of physical disks
When the VxVM volume configuration satisfy the conditions for operation in units of logical volumes, replication operation can be performed by operation in units of logical volumes.
Before starting this operation, be sure to understand the basic operation of ordinary volumes.
For the supported VxVM volume structures, refer to "Managing a Device on AdvancedCopy Manager."
The following two types of volumes can be used as a replica volume of a VxVM logical volume:
Logical volume of VxVM
Slice
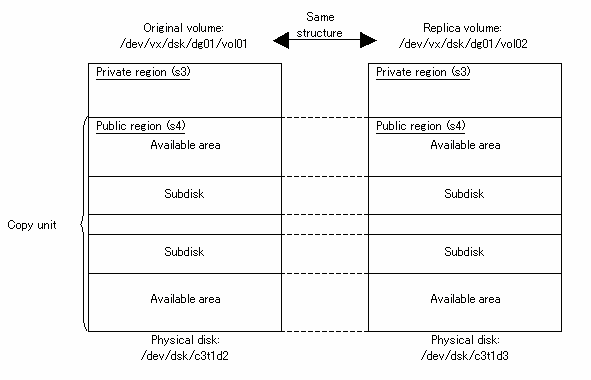
For this replica volume, however, use a VxVM logical volume in the same structure as that of the original volume, in anticipation of mounting of the replica volume or its use by other applications. The same volume structure means the following conditions are satisfied:
The size of the physical disk (LUN) is the same.
The size of the private region is the same.
The size of the public region is the same.
Each subdisk in the public region has a corresponding the start offset and size.
The logical volume and subdisks have a corresponding association.

If the replica volume is the same size as the public region, the replica volume of a VxVM volume can be made into a slice. However, the replica volume generally cannot be mounted or used by other applications.
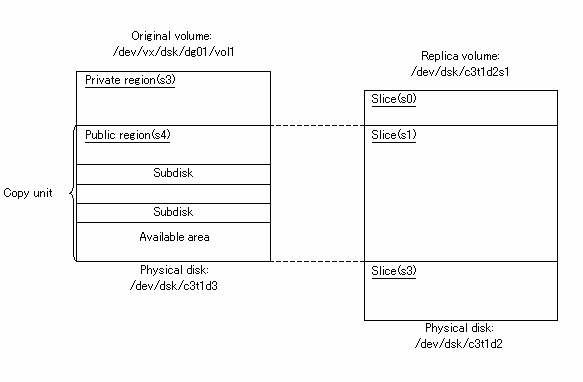
Similarly, a replica volume of a slice can be made into a VxVM volume. However, the replica volume cannot be mounted or used by other applications.
If the target VxVM logical volume satisfies the condition of logical volumes:VM disk = N:1 (N>1), use one of the logical volume names included with each VM disk to register an original or replica volume, and set the replication volume information.
As an example, assume the original volume and replica volume in the following volume structures:
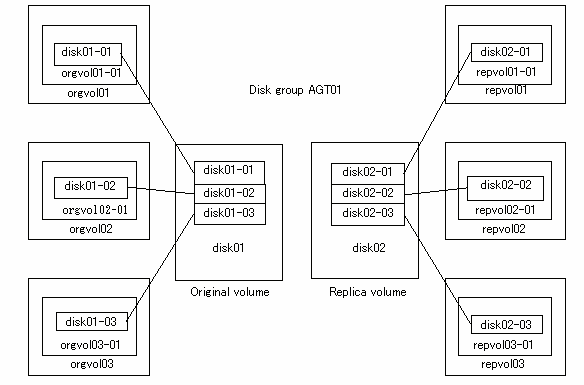
VM disk disk01 (original volume) has logical volumes named orgvol01, orgvol02, and orgvol03, and VM disk disk02 (replica volume) has logical volumes named repvol01, repvol02, and repvol03.
VM disks disk01 and disk02 have the same slice size. The subdisk structures of VM disks disk01 and disk02 are the same. (The subdisk structure can be checked by executing "vxprint -AGts".)
In the above example, use the logical volume names of orgvol01 and repvol01 when setting the replication volume information.
# /opt/FJSVswsrp/bin/swsrpsetvol /dev/vx/dsk/AGT01/orgvol01 /dev/vx/dsk/AGT01/repvol01 swsrpsetvol completed # |
The logical volume name specified in the replication volume information setting command is used to specify the VM disk (slice) for replication processing.
This means that orgvol02 or orgvol03 instead of orgvol01 can be set in the above example (and this is also true for repovol01). However, if replication volume information for the combination of orgvol01 and repvol01 is already set, replication volume information using another combination of volumes (e.g., orgvol02 and repvol02) cannot be set.
If the target VxVM logical volume satisfies the condition of logical volumes:VM disk = N:1 (N>2), the preprocessing or postprocessing script for unmount/mount processing cannot be used.
For this type of structure, unmount the file system before executing replication, and mount the file system after replication creation.
If the target VxVM logical volume satisfies the condition of logical volumes:VM disk = 1:1, the logical volume is unmounted and mounted in the same way as in operation with normal slices and the following procedure is not required.
[Procedure for synchronous replication]
# umount /global/AGT01/repvol01 <-- unmount repvol01 # umount /global/AGT01/repvol02 <-- unmount repvol02 # umount /global/AGT01/repvol03 <-- unmount repvol03 # swsrpstartsync /dev/vx/dsk/AGT01/orgvol01 /dev/vx/dsk/AGT01/repvol01 FROM=/dev/vx/dsk/AGT01/orgvol01@svr1,TO=/dev/vx/dsk/AGT01/repvol01@svr1 swsrpstartsync completed : : : (check equivalency holding state) # umount /global/AGT01/orgvol01 <-- unmount orgvol01 # umount /global/AGT01/orgvol02 <-- unmount orgvol02 # umount /global/AGT01/orgvol03 <-- unmount orgvol03 # swsrpmake /dev/vx/dsk/AGT01/orgvol01 /dev/vx/dsk/AGT01/repvol01 FROM=/dev/vx/dsk/AGT01/orgvol01@svr1,TO=/dev/vx/dsk/AGT01/repvol01@svr1 swsrpmake completed # mount -F ufs /dev/vx/dsk/AGT01/orgvol01 /global/AGT01/orgvol01 <-- mount orgvol01 # mount -F ufs /dev/vx/dsk/AGT01/orgvol02 /global/AGT01/orgvol02 <-- mount orgvol02 # mount -F ufs /dev/vx/dsk/AGT01/orgvol03 /global/AGT01/orgvol03 <-- mount orgvol03 # mount -F ufs /dev/vx/dsk/AGT01/repvol01 /global/AGT01/repvol01 <-- mount repvol01 # mount -F ufs /dev/vx/dsk/AGT01/repvol02 /global/AGT01/repvol02 <-- mount repvol02 # mount -F ufs /dev/vx/dsk/AGT01/repvol03 /global/AGT01/repvol03 <-- mount repvol03 |
[Procedure for snapshot replication]
# umount /global/AGT01/repvol01 <-- unmount repvol01 # umount /global/AGT01/repvol02 <-- unmount repvol02 # umount /global/AGT01/repvol03 <-- unmount repvol03 # umount /global/AGT01/orgvol01 <-- unmount orgvol01 # umount /global/AGT01/orgvol02 <-- unmount orgvol02 # umount /global/AGT01/orgvol03 <-- unmount orgvol03 # swsrpmake /dev/vx/dsk/AGT01/orgvol01 /dev/vx/dsk/AGT01/repvol01 FROM=/dev/vx/dsk/AGT01/orgvol01@svr1,TO=/dev/vx/dsk/AGT01/repvol01@svr1 swsrpmake completed # mount -F ufs /dev/vx/dsk/AGT01/orgvol01 /global/AGT01/orgvol01 <-- mount orgvol01 # mount -F ufs /dev/vx/dsk/AGT01/orgvol02 /global/AGT01/orgvol02 <-- mount orgvol02 # mount -F ufs /dev/vx/dsk/AGT01/orgvol03 /global/AGT01/orgvol03 <-- mount orgvol03 # mount -F ufs /dev/vx/dsk/AGT01/repvol01 /global/AGT01/repvol01 <-- mount repvol01 # mount -F ufs /dev/vx/dsk/AGT01/repvol02 /global/AGT01/repvol02 <-- mount repvol02 # mount -F ufs /dev/vx/dsk/AGT01/repvol03 /global/AGT01/repvol03 <-- mount repvol03 |
To prevent unmount/mount processing of the original volume for operational reasons, back up the volume by using the procedures described below.
[Procedure for synchronous replication (while preventing unmount/mount processing of the original volume)]
# umount /global/AGT01/repvol01 <-- unmount repvol01 # umount /global/AGT01/repvol02 <-- unmount repvol02 # umount /global/AGT01/repvol03 <-- unmount repvol03 # swsrpstartsync /dev/vx/dsk/AGT01/orgvol01 /dev/vx/dsk/AGT01/repvol01 FROM=/dev/vx/dsk/AGT01/orgvol01@svr1,TO=/dev/vx/dsk/AGT01/repvol01@svr1 swsrpstartsync completed : : : (chekc EC equivalent) # lockfs -w /global/AGT01/orgvol01 <-- lock file system orgvol01 # lockfs -w /global/AGT01/orgvol02 <-- lock file system orgvol02 # lockfs -w /global/AGT01/orgvol03 <-- lock file system orgvol03 # swsrpmake /dev/vx/dsk/AGT01/orgvol01 /dev/vx/dsk/AGT01/repvol01 FROM=/dev/vx/dsk/AGT01/orgvol01@svr1,TO=/dev/vx/dsk/AGT01/repvol01@svr1 swsrpmake completed # lockfs -u /global/AGT01/orgvol01 <-- unlock file system orgvol01 # lockfs -u /global/AGT01/orgvol02 <-- unlock file system orgvol02 # lockfs -u /global/AGT01/orgvol03 <-- unlock file system orgvol03 # fsck -n -F ufs /dev/vx/dsk/AGT01/repvol01 <-- check file system backvol01 # fsck -n -F ufs /dev/vx/dsk/AGT01/repvol02 <-- check file system backvol02 # fsck -n -F ufs /dev/vx/dsk/AGT01/repvol03 <-- check file system backvol03 # mount -F ufs /dev/vx/dsk/AGT01/repvol01 /global/AGT01/repvol01 <-- mount repvol01 # mount -F ufs /dev/vx/dsk/AGT01/repvol02 /global/AGT01/repvol02 <-- mount repvol02 # mount -F ufs /dev/vx/dsk/AGT01/repvol03 /global/AGT01/repvol03 <-- mount repvol03 |
[Procedure for snapshot replication (while preventing unmount/mount processing of the original volume)]
# umount /global/AGT01/repvol01 <-- unmount repvol01 # umount /global/AGT01/repvol02 <-- unmount repvol02 # umount /global/AGT01/repvol03 <-- unmount repvol03 # lockfs -w /global/AGT01/orgvol01 <-- lock file system orgvol01 # lockfs -w /global/AGT01/orgvol02 <-- lock file system orgvol02 # lockfs -w /global/AGT01/orgvol03 <-- lock file system orgvol03 # swsrpmake /dev/vx/dsk/AGT01/orgvol01 /dev/vx/dsk/AGT01/repvol01 FROM=/dev/vx/dsk/AGT01/orgvol01@svr1,TO=/dev/vx/dsk/AGT01/repvol01@svr1 swsrpmake completed # lockfs -u /global/AGT01/orgvol01 <-- unlock file system orgvol01 # lockfs -u /global/AGT01/orgvol02 <-- unlock file system orgvol02 # lockfs -u /global/AGT01/orgvol03 <-- unlock file system orgvol03 # fsck -n -F ufs /dev/vx/dsk/AGT01/repvol01 <-- check file system backvol01 # fsck -n -F ufs /dev/vx/dsk/AGT01/repvol02 <-- check file system backvol02 # fsck -n -F ufs /dev/vx/dsk/AGT01/repvol03 <-- check file system backvol03 # mount -F ufs /dev/vx/dsk/AGT01/repvol01 /global/AGT01/repvol01 <-- mount repvol01 # mount -F ufs /dev/vx/dsk/AGT01/repvol02 /global/AGT01/repvol02 <-- mount repvol02 # mount -F ufs /dev/vx/dsk/AGT01/repvol03 /global/AGT01/repvol03 <-- mount repvol03 |

Even if lockfs -w is used to flush the file system cache and restrict subsequent update, file contents are not guaranteed for the file in Write Open (excluding the database space of Oracle used to support on-line backup).
If there is a process under renewal of metadata, consistency of data of the file system itself is also not guaranteed because lockfs is specified.
To handle this problem, perform fsck processing after replication to check the consistency of the replication data.
Even if the following message is output in fsck processing, there is no problem with the consistency of the file system. Execute fsck -y for restoration.
To change the volume structure during the replication operation, follow the procedure given below.
Delete the replication volume. For details on how to delete a replication volume, refer to "Deleting the original volume or replica volume."
Change the structure of the logical volume.
On the initial screen, execute [Get and reflect information on all devices].
Set the replication volume again. For details on how to register a replication volume, refer to "Setting the original volume and replica volume."
Resume the replication operation.
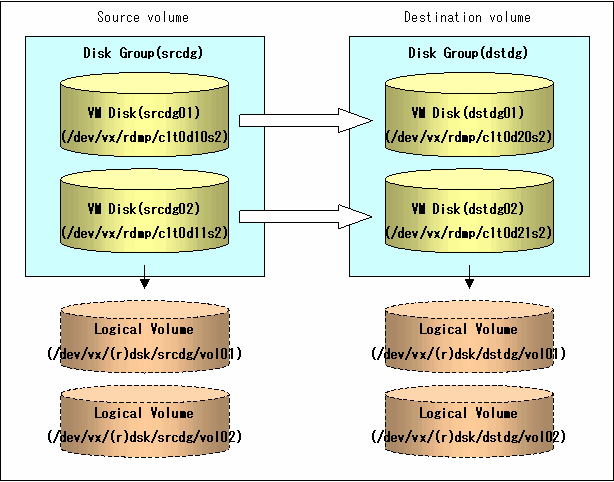
When the VxVM volume configuration does not satisfy the conditions for operation in units of logical volumes, backup operation can be performed by operation in units of physical disks.
When replication operation is performed in units of physical disks, disk group integrity must be maintained and, therefore, all the physical disks in the disk group must be operated synchronously.
Refer to "Device information display command (stgxfwcmdispdev)" of this manual, or the "Confirmation of devices in the save logical group" of a ETERNUS SF AdvancedCopy Manager User's Guide for the method of checking the physical volume which should take a synchronization.

It is only VM disk of the nopriv type that a physical slice becomes the unit of management.
Before starting this operation, be sure to understand the basic operation of ordinary volumes.
Snapshot backup is recommended in operation in units of physical disks. In the case of synchronized backup, the command (VxVM command etc.) which disk access produces to a copy destination disk during a copy cannot be executed.
Design the disk groups of the original and replica volumes. Observe the following conditions when designing the disk groups:
The number, sizes, and types of VM disks must be the same.
The configurations of logical volumes must be the same.
The disk group must be reconfigured in replication postprocessing. Confirm that a volume group configuration information file has been saved.
/etc/vx/cbr/bk/<disk group name>.<disk group ID>
When setting the original and replica volumes, specify all disks in the volume group.
Example:
# /opt/FJSVswsrp/bin/swsrpsetvol /dev/vx/dmp/c1t0d10s2 /dev/vx/dmp/c1t0d20s2 swsrpsetvol completed # /opt/FJSVswsrp/bin/swsrpsetvol /dev/vx/dmp/c1t0d11s2 /dev/vx/dmp/c1t0d21s2 swsrpsetvol completed # |
Perform operation by synchronizing all physical disks in the disk group.
Perform the required preprocessing or postprocessing work for each volume group before respectively after the replication operation. Disable preprocessing and postprocessing when operating individual physical disks.
Example of snapshot backup
(Perform preprocessing for the source and target volumes.) # /opt/FJSVswsrp/bin/swsrpmake -f -t /dev/vx/dmp/c1t0d10s2 /dev/vx/dmp/c1t0d20s2 FROM=/dev/vx/dmp/c1t0d10s2@SV1, TO=/dev/vx/dmp/c1t0d20s2@SV1 swsrpmake completed # /opt/FJSVswsrp/bin/swsrpmake -f -t /dev/vx/dmp/c1t0d11s2 /dev/vx/dmp/c1t0d21s2 FROM=/dev/vx/dmp/c1t0d11s2@SV1, TO=/dev/vx/dmp/c1t0d21s2@SV1 swsrpmake completed # (Perform postprocessing for the source and target volumes.) |
Example of synchronous replication
(Perform preprocessing for the target volume.) # /opt/FJSVswsrp/bin/swsrpstartsync -t /dev/vx/dmp/c1t0d10s2 /dev/vx/dmp/c1t0d20s2 FROM=/dev/vx/dmp/c1t0d10s2@SV1, TO=/dev/vx/dmp/c1t0d20s2@SV1 swsrpstartsync completed # /opt/FJSVswsrp/bin/swsrpstartsync -t /dev/vx/dmp/c1t0d11s2 /dev/vx/dmp/c1t0d21s2 FROM=/dev/vx/dmp/c1t0d11s2@SV1, TO=/dev/vx/dmp/c1t0d21s2@SV1 swsrpstartsync completed (After state of equivalency upkeep) (Perform preprocessing for the source volume.) # /opt/FJSVswsrp/bin/swsrpmake -f -t /dev/vx/dmp/c1t0d10s2 /dev/vx/dmp/c1t0d20s2 FROM=/dev/vx/dmp/c1t0d10s2@SV1, TO=/dev/vx/dmp/c1t0d20s2@SV1 swsrpmake completed # /opt/FJSVswsrp/bin/swsrpmake -f -t /dev/vx/dmp/c1t0d11s2 /dev/vx/dmp/c1t0d21s2 FROM=/dev/vx/dmp/c1t0d11s2@SV1, TO=/dev/vx/dmp/c1t0d21s2@SV1 swsrpmake completed # (Perform postprocessing for the source and target volumes.) |
The table below summarizes the preprocessing and postprocessing work to be performed before and after replication.
|
Preprocessing |
Postprocessing |
|
|---|---|---|
|
Source volume |
|
|
|
Target volume |
|
|
Reconfigure the disk group as follows:
Pre-commit analysis for restoration
# /etc/vx/bin/vxconfigrestore -p dstdg Diskgroup dstdg configuration restoration started ...... Installing volume manager disk header for c1t0d20s2 ... Installing volume manager disk header for c1t0d21s2 ... - dstdg's diskgroup configuration is restored (in precommit state). Diskgroup can be accessed in read only and can be examined using vxprint in this state. Run: vxconfigrestore -c dstdg ==> to commit the restoration. vxconfigrestore -d dstdg ==> to abort the restoration. # |
Commit the change required for restoring the configuration of the copy destination disk group.
# /etc/vx/bin/vxconfigrestore -c dstdg Committing configuration restoration for diskgroup dstdg .... dstdg's diskgroup configuration restoration is committed. # |
Import the disk group srcdg on the master server as disk group dstdg on the target server.
# /usr/sbin/vxdg -C -n dstdg import srcdg # |
When the disk group name is the same in the server of the source and the server of the destination, -n option is not specified.
Execute recovery processing for the volume in the disk group dstdg on the target server.
# vxrecover -g dstdg -sb # |

In case of a cluster system, when a disk group or a mount resource has been defined, instead of using the import/deport command for the disk group use the online/offline process, and instead of using the file system mount/unmount commands use the online/offline processing.

When performing a system disk exchange, there are cases when conflicting backup configuration information may exist.
In such cases, the disk group ID after executing the above command needs to be set instead of the disk group.

After this operation, in case the volumes within a disk group are needed to be run in synchronous mode in the background, then depending on the volume configuration it may take some time for synchronous processing.
It is also possible to use the volumes during this time.
|
Contents
Index
|