

| ETERNUS SF AdvancedCopy Manager User's Guide 13.0 -Microsoft(R) Windows(R) 2000/Microsoft(R) Windows Sever(TM) 2003-, -Solaris-, -HP-UX-, -Linux-, -AIX- |
Contents
Index
 
|
This chapter covers the Replication Management functions and how to operate its functions.

Only the manager and agent after ETERNUS SF AdvancedCopy Manager 13.0 can use a replication management screen.
The purpose of the Replication management is to reduce the load in Replication operation and management work in distribution systems. It provides the following functions through the Web browser:
Set Replication Information Screen
Replication processing is set up.
Synchronous replication function
Synchronous replication using EC/REC can be performed.
Snapshot replication function
Snapshot replication using OPC/QuickOPC/SnapOPC can be performed.
When [Replication Management] is selected from the AdvancedCopy Manager initial window, the Replication management server list is displayed.
A replication management screen can choose two kinds of following display methods.
View by Volume
View by Group
The display method can be changed by choosing "View by Volume", or "View by Group" in "View."
The Replication management tree view (Figure 4.1) shows the selection target items (1) to (8). Each item has its corresponding list view.

|
No. |
Selection target item |
List view |
|---|---|---|
|
1 |
Replication Management |
Server list view |
|
2 |
Storage server |
Original/Replica Volume view |
|
3 |
Storage server |
Original/Replica Volume view |
|
4 |
Storage server |
Original/Replica Volume view |
|
5 |
Original Volume (Folder) |
Original Volume list view |
|
6 |
Original Volume (Folder) |
Original Volume list view |
|
7 |
Storage server |
Group view |
|
8 |
Group |
Group details view |
The list of the servers registered into the Storage management server is displayed.
This view is displayed when [Replication Management] is selected on the tree view.
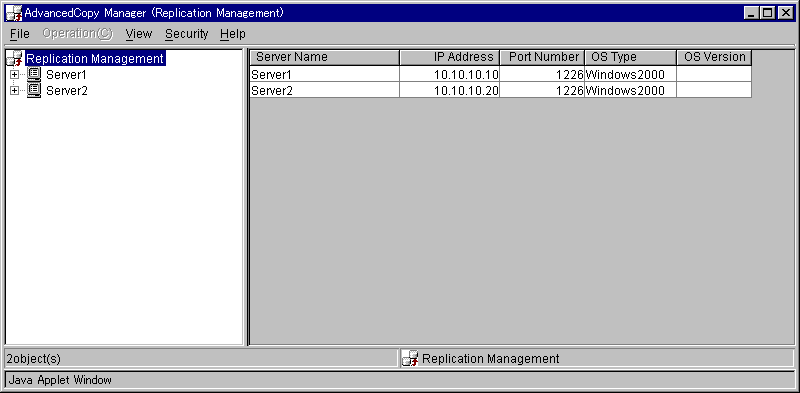
The item displayed is shown below.
|
No. |
Item name |
Explanation |
|---|---|---|
|
1 |
Server name |
Name of the managed server |
|
2 |
IP Address |
IP address of the managed server |
|
3 |
Port Number |
Port number used to communicate with the managed server |
|
4 |
OS Type |
Type of the installed OS |
|
5 |
OS Version |
Version of the installed OS |
Selecting the server on server list view enables execution of the following operations:
Set the replication volume information
The original volumes and the replica volumes used by replication operation can be set up.
If "Set Replication Volume Information" is chosen from "Operation", "Set Replication Volume Information window" is displayed.
For details, refer to "Set Replication Volume Information window".
Resource adjustment
Resource adjustment of replication management information is performed.
If "Resource Adjustment" is chosen from "Operation", "Perform Resource Adjustment window" is displayed.
For details, refer to "Perform Resource Adjustment window".
The original volumes and the replica volumes are displayed.
This view is displayed when the storage server is selected on the tree view of a volume unit.
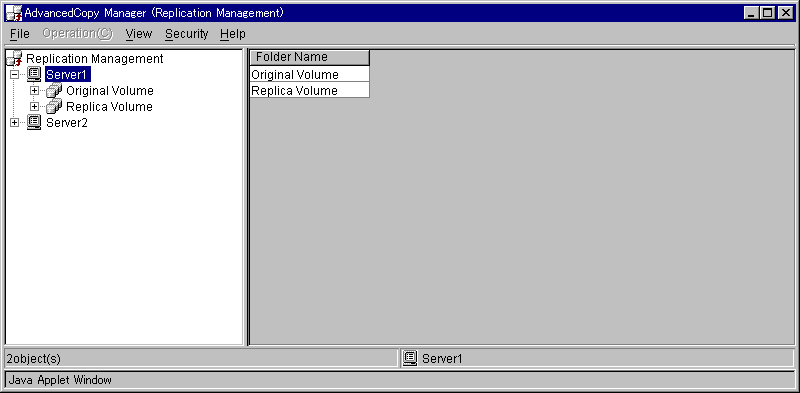
The item displayed is shown below.
|
No. |
Item name |
Explanation |
|---|---|---|
|
1 |
Folder Name |
The volume type of the following in the selected server is displayed.
|
There is no operation which can be carried out on this screen.
The original volumes and the replica volumes of Storage Server are displayed.
This view is displayed when "Original Volume" or "Replica Volume" is selected on the tree view of a volume unit.
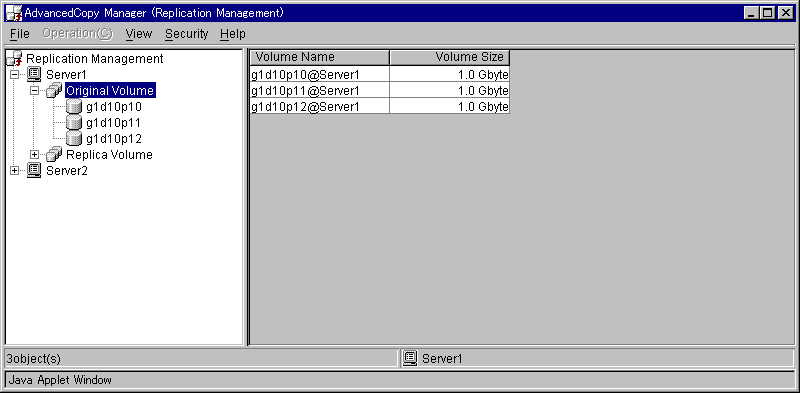
The item displayed is shown below.
|
No. |
Item name |
Explanation |
|---|---|---|
|
1 |
Volume Name |
Name of the original/replica volume which exists in the server selected in the tree |
|
2 |
Volume Size |
Displays the size of the volume |
Selecting the volume on Original/Replica Volume list view enables execution of the following operations:
Display the transfer buffer status
The buffer information used in the Consistency mode of REC is displayed.
If "Display the transfer buffer status" is chosen from "Operation", "Transfer Buffer Status window" is displayed.
For details, refer to "Transfer Buffer Status window".
Change the buffer setting
The buffer information used in the Consistency mode of REC is changed.
If "Change the transfer buffer setting" is chosen from "Operation", "Change Buffer Setting window" is displayed.
For details, refer to "Change Buffer Setting window".
The detailed information on "original volume" or "replica volume" is displayed.
This view is displayed when the original volume or the replica volume is selected on the tree view of a volume unit.
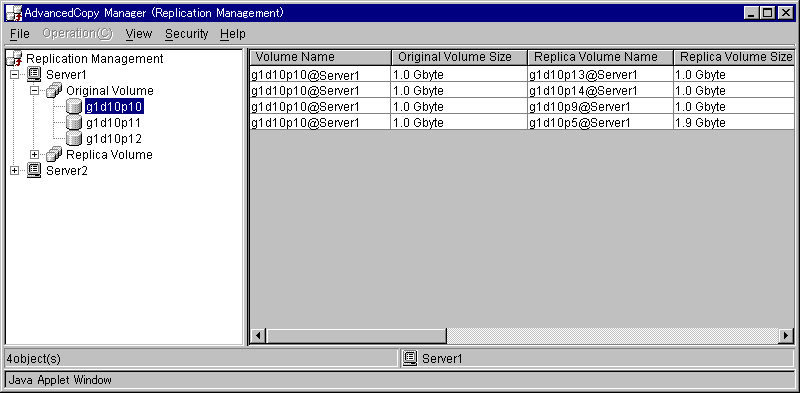
The item displayed is shown below.
|
No. |
Item name |
Explanation |
|---|---|---|
|
1 |
Volume Name |
Name of the volume selected in the tree |
|
2 |
Original/Replica Volume Size |
Displays the size of the volume |
|
3 |
Replica/Original Volume Name |
Name of the replica/original volume and its server name |
|
4 |
Replica/Original Volume Size |
Displays the size of the volume |
|
5 |
Copy |
Displays the copying direction
|
|
7 |
Op-Server |
Specifies the operation server.
|
|
8 |
Direction |
Specifies the copy direction.
|
|
9 |
Tracking |
Specifies the existence of tracking processing.
|
|
10 |
Update |
When it corresponds to either of the followings, displays the amount of data updated after the previous replica creation as a percentage.
In other than the above, it displays by "----." In GDS Snapshot, "----" is always displayed. |
|
11 |
Recovery Mode |
Indicates recovery mode for synchronous processing between cabinets.
|
|
12 |
Split Mode |
Indicates split mode for synchronous processing between cabinets.
|
|
13 |
Transfer Mode |
Indicates transfer mode for synchronous processing between cabinets.
|
|
14 |
Execute |
|
|
15 |
Status |
Displays the condition of currently ongoing process.
|

When displaying the status of the copy by the side of opposite in the case of bidirectional replication, it is necessary to put a check into "Displays the copy state of an opposite direction" option in "View" menu.
Selecting the replica volume on "Original/Replica Volume details view" enables execution of the following operations:
Start the synchronous process
Synchronous replication processing (EC/REC) is started or resumed.
If "Start Synchronous Processing" is chosen from "Operation", "Start Synchronous Processing window" is displayed.
For details, refer to "Start Synchronous Processing window".
Create the replicate
Snapshot replication processing (OPC/QuickOPC/SnapOPC) start or synchronous replication processing (EC/REC) is suspended.
If "Replicate" is chosen from "Operation", "Replicate window" is displayed.
For details, refer to "Replicate window".
Cancel the replication process
Snapshot replication processing (OPC/QuickOPC/SnapOPC) and synchronous replication processing (EC/REC) are canceled.
If "Cancel Replication Processing" is chosen from "Operation", "Cancel Replication Processing window" is displayed.
For details, refer to "Cancel Replication Processing window".
Change the synchronization mode
Transmission Mode of synchronous replication processing (EC/REC) is changed.
If "Change Synchronization Mode" is chosen from "Operation", "Change Synchronization Mode window" is displayed.
For details, refer to "Change Synchronization Mode window".
Reverse the synchronous processing direction
The copy direction of the case synchronous replication processing (EC/REC) which is in a suspension state is reversed.
If "Reverse Synchronous Processing Direction" is chosen from "Operation", "Reverse Synchronous Processing Direction window" is displayed.
For details, refer to "Reverse Synchronous Processing Direction window".
Delete the replication volume information
The original volume / replica volume used by replication operation can be deleted.
If "Delete Replication Volume Information" is chosen from "Operation", "Delete Replication Volume Information window" is displayed.
For details, refer to "Delete Replication Volume Information window".
The list of the groups registered is displayed.
This view is displayed when the storage server is selected on the tree view of a group unit.
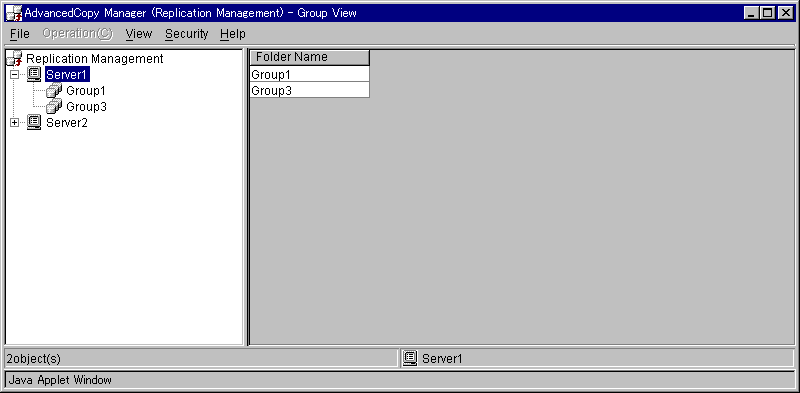
The item displayed is shown below.
|
No. |
Item name |
Explanation |
|---|---|---|
|
1 |
Folder Name |
Name of the group which exists in the server selected in the tree |
Selecting the group on "Group view" enables execution of the following operations:
Start the synchronous process
Synchronous replication processing (EC/REC) is started or resumed.
If "Start Synchronous Process" is chosen from "Operation", "Start Synchronous Processing window" is displayed.
For details, refer to "Start Synchronous Processing window".
Create the replicate
Snapshot replication processing (OPC/QuickOPC/SnapOPC) start or synchronous replication processing (EC/REC) is suspended.
If "Replicate" is chosen from "Operation", "Replicate window" is displayed.
For details, refer to "Replicate window".
Cancel the replication process
Snapshot replication processing (OPC/QuickOPC/SnapOPC) and synchronous replication processing (EC/REC) are canceled.
If "Cancel Replication Processing" is chosen from "Operation", "Cancel Replication Processing window" is displayed.
For details, refer to "Cancel Replication Processing window".
Change the synchronization mode
Transmission Mode of synchronous replication processing (EC/REC) is changed.
If "Change Synchronization Mode" is chosen from "Operation", "Change Synchronization Mode window" is displayed.
For details, refer to "Change Synchronization Mode window".
Reverse the synchronous processing direction
The copy direction of the case synchronous replication processing (EC/REC) which is in a suspension state is reversed.
If "Reverse Synchronous Processing Direction" is chosen from "Operation", "Reverse Synchronous Processing Direction window" is displayed.
For details, refer to "Reverse Synchronous Processing Direction window".
The detailed information of replication volume on the group is displayed.
This view is displayed when the group is selected on the tree view of a group unit.
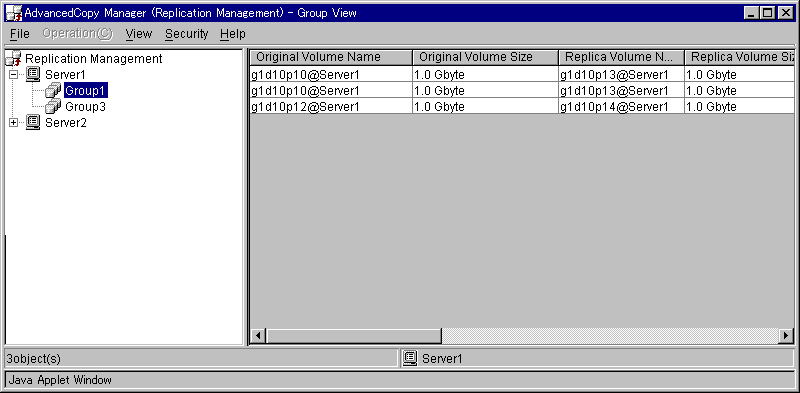
The item displayed is shown below.
|
No. |
Item name |
Explanation |
|---|---|---|
|
1 |
Volume Name |
Name of the volume which exists in the group selected in the tree |
|
2 |
Original Volume Size |
Displays the size of the volume |
|
3 |
Replica Volume Name |
Name of the Replica volume and its server name |
|
4 |
Replica Volume Size |
Displays the size of the volume |
|
5 |
Copy |
Displays the copying direction
|
|
7 |
Op-Server |
Specifies the operation server.
|
|
8 |
Direction |
Specifies the copy direction.
|
|
9 |
Tracking |
Specifies the existence of tracking processing.
|
|
10 |
Update |
When it corresponds to either of the followings, displays the amount of data updated after the previous replica creation as a percentage.
In other than the above, it displays by "----." In GDS Snapshot, "----" is always displayed. |
|
11 |
Recovery Mode |
Indicates recovery mode for synchronous processing between cabinets.
|
|
12 |
Split Mode |
Indicates split mode for synchronous processing between cabinets.
|
|
13 |
Transfer Mode |
Indicates transfer mode for synchronous processing between cabinets.
|
|
14 |
Execute |
|
|
15 |
Status |
Displays the condition of currently ongoing process.
|
|
16 |
Group Name |
Specifies the group name. "----" is displayed when not registering with a group. |

When displaying the status of the copy by the side of opposite in the case of bidirectional replication, it is necessary to put a check into "Displays the copy state of an opposite direction" option in "View" menu.
Selecting the replica volume on "Group details view" enables execution of the following operations:
Start the synchronous process
Synchronous replication processing (EC/REC) is started or resumed.
If "Start Synchronous Process" is chosen from "Operation", "Start Synchronous Processing window" is displayed.
For details, refer to "Start Synchronous Processing window".
Create the replicate
Snapshot replication processing (OPC/QuickOPC/SnapOPC) start or synchronous replication processing (EC/REC) is suspended.
If "Replicate" is chosen from "Operation", "Replicate window" is displayed.
For details, refer to "Replicate window".
Cancel the replication process
Snapshot replication processing (OPC/QuickOPC/SnapOPC) and synchronous replication processing (EC/REC) are canceled.
If "Cancel Replication Processing" is chosen from "Operation", "Cancel Replication Processing window" is displayed.
For details, refer to "Cancel Replication Processing window".
Change the synchronization mode
Transmission Mode of synchronous replication processing (EC/REC) is changed.
If "Change Synchronization Mode" is chosen from "Operation", "Change Synchronization Mode window" is displayed.
For details, refer to "Change Synchronization Mode window".
Reverse the synchronous processing direction
The copy direction of the case synchronous replication processing (EC/REC) which is in a suspension state is reversed.
If "Reverse Synchronous Processing Direction" is chosen from "Operation", "Reverse Synchronous Processing Direction window" is displayed.
For details, refer to "Reverse Synchronous Processing Direction window".
Delete the replication volume information
The original volume / replica volume used by replication operation can be deleted.
If "Delete Replication Volume Information" is chosen from "Operation", "Delete Replication Volume Information window" is displayed.
For details, refer to "Delete Replication Volume Information window".
The following operation windows are available for Replication management
Original volume and replica volume are set up.
Operation of either of the followings displays "Set Replication Volume Information window."
In the "Server list view", select a server and click the right mouse button. A popup menu appears. From the popup menu, select "Set Replication Information".
In the "Server list view", select "Set Replication Information" on "Operation" menu.
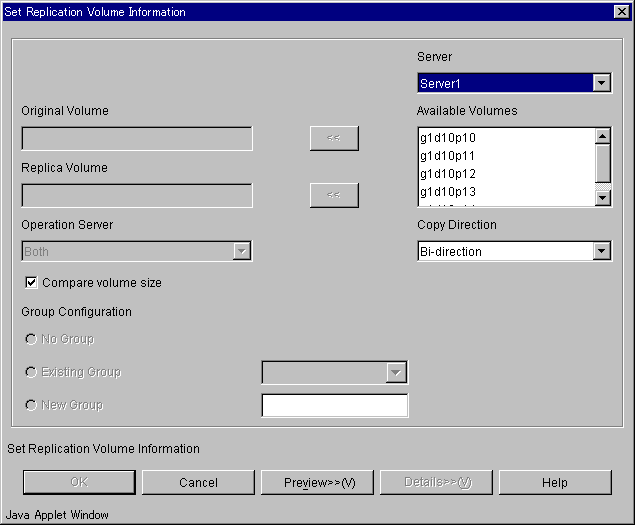
For a chosen server, the available volumes are displayed.
Select any of these volumes as "Original/Replica" volumes.
Set up each option and clicks [OK] button.
The selected original volume and replica volume is set as replication volume and can be used for replication process.
A setting item and a display item are shown below.
|
No. |
Item name |
Explanation |
|---|---|---|
|
1 |
Server |
Select the server to which volume is connected. The volume name is displayed on a list box. |
|
2 |
Available Volumes |
List of volumes available in the server selected. Only one selection can be made at any point of time. |
|
3 |
Original Volume |
This original volume is shown in volume_name@server_name format. Only one is displayed. This control is not editable. |
|
4 |
Replica Volume |
This replica volume is shown in volume_name@server_name format. Only one is displayed. This control is not editable. |
|
5 |
<< |
This button is clicked to set the selected entity from the "Available Volumes" list box as the "Original/ Replica" volume. |
|
6 |
Operation Server |
Specifies the operation server. When the servers to which original volume and replica volume belong differ, this combo box is effective.
|
|
7 |
Copy Direction |
Specifies the copying direction.
|
|
8 |
Compare volume size |
Check the size of original volume and replica volume by checking the checkbox. When sizes differ, a setup of replication volume cannot be performed. |
|
9 |
Group Configuration |
Specifies the group name.
|
Start and restart the synchronous replication processing (EC/REC).
Operation of either of the followings displays "Start Synchronous Processing window."
In the "Original/Replica Volume details view", select original volume or replica volume, and click the right mouse button. A popup menu appears. From the popup menu, select "Start Synchronous Processing".
In the "Original/Replica Volume details view", select an original volume or a replica volume, and select "Start Synchronous Processing" on "Operation" menu.
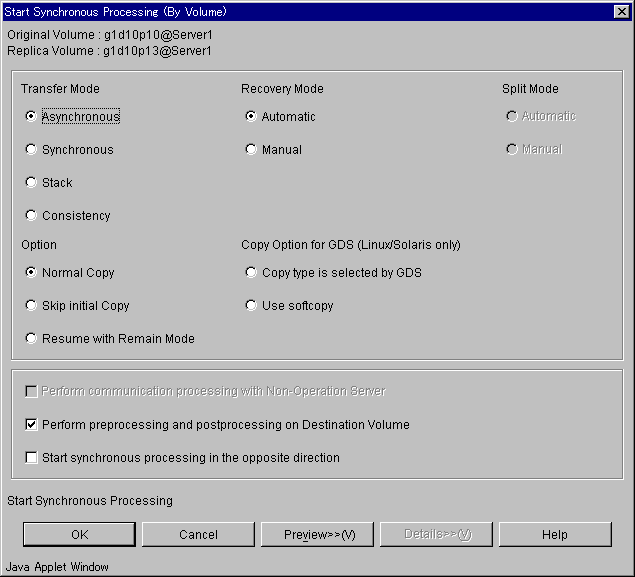
Set up each option and clicks [OK] button.
Start synchronous processing. The state of replication is displayed on the status field.

This operation cannot be performed on non-operation server.
A setting item and a display item are shown below.
|
No. |
Item name |
Explanation |
|---|---|---|
|
1 |
Original Volume |
The original volume is shown in volume_name@server_name format. |
|
2 |
Replica Volume |
The replica volume is shown in volume_name@server_name format. |
|
3 |
Transfer Mode |
Specifies the transfer mode of synchronous processing between cabinets. When status is "Replicated", it cannot set up.
|
|
4 |
Recovery Mode |
Specifies the recovery mode of synchronous processing between cabinets. When status is "Replicated", it cannot set up.
|
|
5 |
Split Mode |
Specifies the split mode of synchronous processing between cabinets. When status is "Replicated", it cannot set up.
|
|
6 |
Option |
Specifies the option of a synchronous processing start.
|
|
7 |
Copy Option for GDS (Linux/Solaris only) |
Specifies the option in the case of operating a SDX object per logic volume.
|
|
8 |
Perform communication processing with Non-Operation Server |
Check the following volume state in non-operation server by checking the checkbox.
When the servers to which original volume and replica volume belong differ, this combo box is effective. |
|
9 |
Perform preprocessing and postprocessing on Destination Volume |
Check the replica volume state before synchronous processing and after synchronous processing by checking the checkbox. |
|
10 |
Start synchronous processing in the opposite direction |
Start the Synchronous processing from replica volume to original volume by checking the checkbox. |
Operation of either of the followings displays "Start Synchronous Processing window."
In the "Original/Replica Volume details view", select original volume or replica volume, and click the right mouse button. A popup menu appears. From the popup menu, select "Start Synchronous Processing".
Select "Start Synchronous Processing" on "Operation" menu.
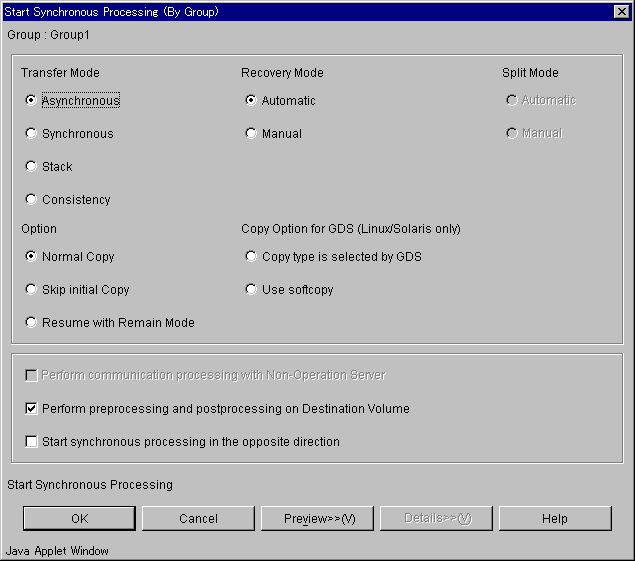
Set up each option and clicks [OK] button.
Start synchronous processing. The state of replication is displayed on the status field.

This operation cannot be performed on non-operation server.
A setting item and a display item are shown below.
|
No. |
Item name |
Explanation |
|---|---|---|
|
1 |
Group |
The group name is shown. |
|
2 |
Transfer Mode |
Specifies the transfer mode of synchronous processing between cabinets. When status is "Replicated", it cannot set up.
|
|
3 |
Recovery Mode |
Specifies the recovery mode of synchronous processing between cabinets. When status is "Replicated", it cannot set up.
|
|
4 |
Split Mode |
Specifies the split mode of synchronous processing between cabinets. When status is "Replicated", it cannot set up.
|
|
5 |
Option |
Specifies the option of a synchronous processing start.
|
|
6 |
Copy Option for GDS (Linux/Solaris only) |
Specifies the option in the case of operating a SDX object per logic volume.
|
|
7 |
Perform communication processing with Non-Operation Server |
Check the following volume state in non-operation server by checking the checkbox.
When the servers to which original volume and replica volume belong differ, this combo box is effective. |
|
8 |
Perform preprocessing and postprocessing on Destination Volume |
Check the replica volume state before synchronous processing and after synchronous processing by checking the checkbox. |
|
9 |
Start synchronous processing in the opposite direction |
Start the Synchronous processing from replica volume to original volume by checking the checkbox. |
Change the transmission mode of synchronous replication processing (EC/REC).
Operation of either of the followings displays "Change Synchronization Mode window."
In the "Original/Replica Volume details view", select original volume or replica volume, and click the right mouse button. A popup menu appears. From the popup menu, select "Change Synchronization Mode".
Select "Change Synchronization Mode" on "Operation" menu.
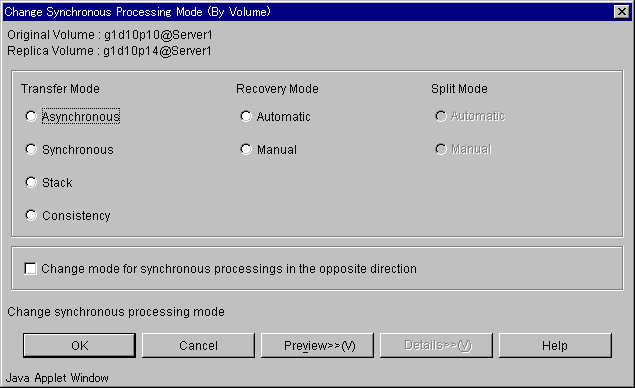
Set up each option and clicks [OK] button.

This operation cannot be performed on a non-operation server.
When "Change Synchronization Mode window" is displayed, all the values previously set will be shown.
A setting item and a display item are shown below.
|
No. |
Item name |
Explanation |
|---|---|---|
|
1 |
Original Volume |
The original volume is shown in volume_name@server_name format. |
|
2 |
Replica Volume |
The replica volume is shown in volume_name@server_name format. |
|
3 |
Transfer Mode |
Specifies the transfer mode of synchronous processing between cabinets.
|
|
3 |
Recovery Mode |
Specifies the recovery mode of synchronous processing between cabinets.
|
|
5 |
Split Mode |
Specifies the split mode of synchronous processing between cabinets. When the transfer mode is "Synchronous", it can set up.
|
|
6 |
Change mode for synchronous processing in the opposite direction |
Change mode for synchronous processing from replica volume to original volume by checking the checkbox. |
Operation of either of the followings displays "Change Synchronization Mode window."
In the "Group details view", select original volume or replica volume, and click the right mouse button. A popup menu appears. From the popup menu, select "Change Synchronization Mode".
Select "Change Synchronization Mode" on "Operation" menu.
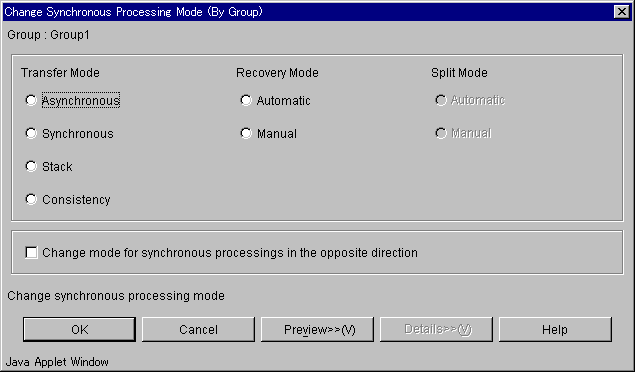
Set up each option and clicks [OK] button.

This operation cannot be performed on a non-operation server.
When "Change Synchronization Mode window" is displayed, all the values previously set will be shown.
A setting item and a display item are shown below.
|
No. |
Item name |
Explanation |
|---|---|---|
|
1 |
Group Name |
The group name is shown. |
|
2 |
Transfer Mode |
Specifies the transfer mode of synchronous processing between cabinets.
|
|
3 |
Recovery Mode |
Specifies the recovery mode of synchronous processing between cabinets.
|
|
4 |
Split Mode |
Specifies the split mode of synchronous processing between cabinets. When the transfer mode is "Synchronous", it can set up.
|
|
5 |
Change mode for synchronous processing in the opposite direction |
Change mode for synchronous processing from replica volume to original volume by checking the checkbox. |
Start snapshot replication processing (OPC/QuickOPC/SnapOPC) or suspend synchronous replication processing (EC/REC).
Synchronous processing is not performed.
Snapshot replication processing (OPC/QuickOPC/SnapOPC) can be started.
Synchronous processing is performed.
When synchronous processing is in an equivalence maintenance state, synchronous replication processing (EC/REC) can be suspended.
Operation of either of the followings displays "Replicate window."
In the "Original/Replica Volume details view", select original volume or replica volume, and click the right mouse button. A popup menu appears. From the popup menu, select "Replicate".
Select "Replicate" on "Operation" menu.
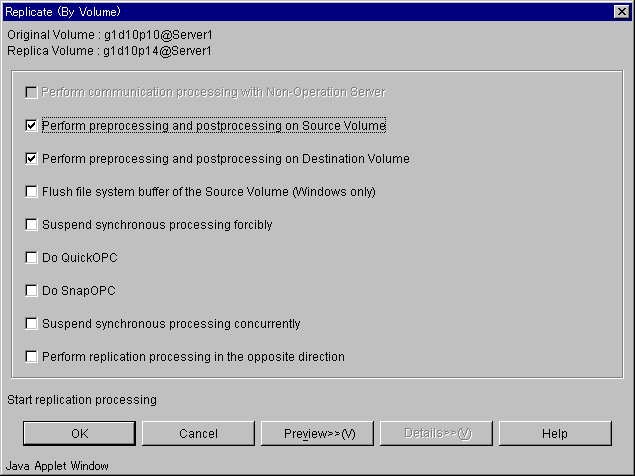
Set up each option and clicks [OK] button.

This operation cannot be performed on non-operation server.
A setting item and a display item are shown below.
|
No. |
Item name |
Explanation |
|---|---|---|
|
1 |
Original Volume |
The original volume is shown in volume_name@server_name format. |
|
2 |
Replica Volume |
The replica volume is shown in volume_name@server_name format. |
|
3 |
Perform communication processing with Non-Operation Server |
Check the following volume state in non-operation server by checking the checkbox.
When the servers to which original volume and replica volume belong differ, this combo box is effective. |
|
4 |
Perform preprocessing and postprocessing on Source Volume |
Perform preprocessing and postprocessing on original volume by checking the checkbox. |
|
5 |
Perform preprocessing and postprocessing on Destination Volume |
Perform preprocessing and postprocessing on replica volume by checking the checkbox. |
|
6 |
Flush file system buffer of the Source Volume (Windows only) |
Flushing processing is performed to the file system buffer of the original volume by checking the checkbox. |
|
7 |
Suspend synchronous processing forcibly |
Suspend synchronous processing forcibly by checking the checkbox. The following conditions make this check box effective.
When this check box is checked, a check goes into "Perform preprocessing and postprocessing on Source Volume" and "Perform preprocessing and postprocessing on Destination Volume" and change is impossible. |
|
8 |
Do QuickOPC |
Perform QuickOPC processing by checking the checkbox. |
|
9 |
Do SnapOPC |
Perform SnapOPC processing by checking the checkbox. In the following cases, this check box cannot be specified.
|
|
10 |
Suspend synchronous processing concurrently |
Suspend synchronous processing concurrently by checking the checkbox. |
|
11 |
Perform replication processing in the opposite direction |
Perform replication processing in the opposite direction by checking the checkbox. |
Operation of either of the followings displays "Replicate window."
In the "Group details view", select original volume or replica volume, and click the right mouse button. A popup menu appears. From the popup menu, select "Replicate".
Select "Replicate" on "Operation" menu.
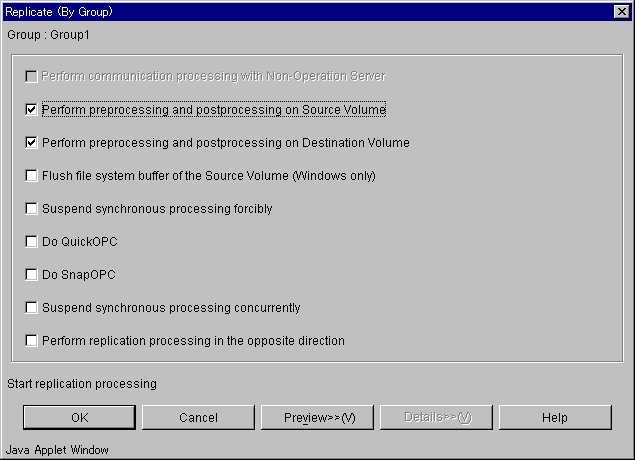
Set up each option and clicks [OK] button.

This operation cannot be performed on non-operation server.
A setting item and a display item are shown below.
|
No. |
Item name |
Explanation |
|---|---|---|
|
1 |
Group Name |
The group name is shown. |
|
2 |
Perform communication processing with Non-Operation Server |
Check the following volume state in non-operation server by checking the checkbox.
When the servers to which original volume and replica volume belong differ, this combo box is effective. |
|
3 |
Perform preprocessing and postprocessing on Source Volume |
Perform preprocessing and postprocessing on original volume by checking the checkbox. |
|
4 |
Perform preprocessing and postprocessing on Destination Volume |
Perform preprocessing and postprocessing on replica volume by checking the checkbox. |
|
5 |
Flush file system buffer of the Source Volume (Windows only) |
Flushing processing is performed to the file system buffer of the original volume by checking the checkbox. |
|
6 |
Suspend synchronous processing forcibly |
Suspend synchronous processing forcibly by checking the checkbox. The following conditions make this check box effective.
When this check box is checked, a check goes into "Perform preprocessing and postprocessing on Source Volume" and "Perform preprocessing and postprocessing on Destination Volume" and change is impossible. |
|
7 |
Do QuickOPC |
Perform QuickOPC processing by checking the checkbox. |
|
8 |
Do SnapOPC |
Perform SnapOPC processing by checking the checkbox. In the following cases, this check box cannot be specified.
|
|
9 |
Suspend synchronous processing concurrently |
Suspend synchronous processing concurrently by checking the checkbox. |
|
10 |
Perform replication processing in the opposite direction |
Perform replication processing in the opposite direction by checking the checkbox. |
Snapshot replication processing (OPC/QuickOPC/SnapOPC) and synchronous replication processing (EC/REC) are canceled.
Operation of either of the followings displays "Cancel Replication Processing window."
In the "Original/Replica Volume details view", select original volume or replica volume, and click the right mouse button. A popup menu appears. From the popup menu, select "Cancel Replication Processing".
Select "Cancel Replication Processing" on "Operation" menu.
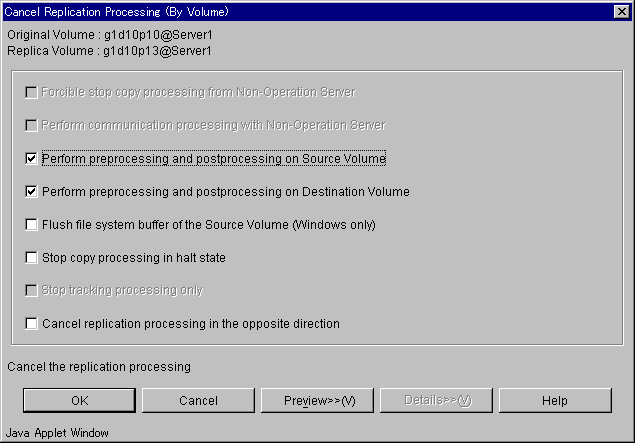
Set up each option and clicks [OK] button.
Cancel replication processing or tracking processing carrying out with the option to specify.

This operation can be performed on non-operation server.
A setting item and a display item are shown below.
|
No. |
Item name |
Explanation |
|---|---|---|
|
1 |
Original Volume |
The original volume is shown in volume_name@server_name format. |
|
2 |
Replica Volume |
The replica volume is shown in volume_name@server_name format. |
|
3 |
Forcibly stop copy processing from Non-Operation Server |
Forcibly stop copy processing from non-operation server by checking the checkbox. The following conditions make this check box effective.
|
|
4 |
Perform communication processing with Non-Operation Server |
Check the following volume state in non-operation server by checking the checkbox.
When the servers to which original volume and replica volume belong differ, this combo box is effective. |
|
5 |
Perform preprocessing and postprocessing on Source Volume |
Perform preprocessing and postprocessing on original volume by checking the checkbox. This check box cannot be specified, except when the copy state is "equivalent". |
|
6 |
Perform preprocessing and postprocessing on Destination Volume |
Perform preprocessing and postprocessing on replica volume by checking the checkbox. This check box cannot be specified, except when the copy state is "equivalent". |
|
7 |
Flush file system buffer of the Source Volume (Windows only) |
Flushing is processed to the file system buffer of the original volume instead of the lock processing by checking the checkbox. This check box cannot be specified, except when the copy state is "equivalent". |
|
8 |
Stop copy processing in "halt" status |
Stop copy processing in "halt" status by checking the checkbox. This check box cannot be specified, except when the copy state is "halt". |
|
9 |
Stop tracking processing only |
Stop tracking processing only by checking the checkbox. As for this option, only not the snapshot processing but the tracking processing interrupts. The following conditions make this check box effective.
|
|
10 |
Cancel replication processing in the opposite direction |
Cancel replication processing from replica volume to original volume by checking the checkbox. |
Operation of either of the followings displays "Cancel Replication Processing window."
In the "Group details view", select original volume or replica volume, and click the right mouse button. A popup menu appears. From the popup menu, select "Cancel Replication Processing".
Select "Cancel Replication Processing" on "Operation" menu.
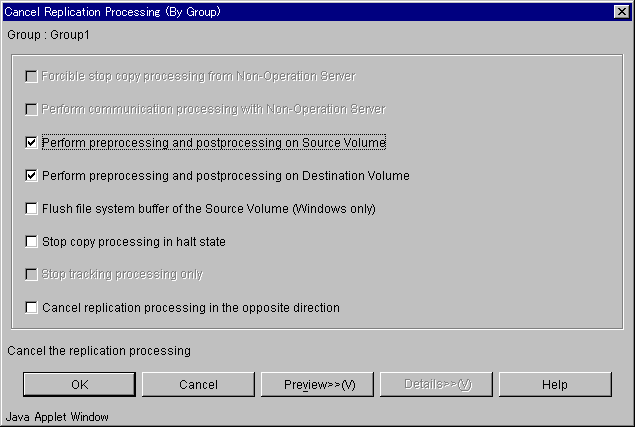
Set up each option and clicks [OK] button.
Cancel replication processing or tracking processing carrying out with the option to specify.

This operation can be performed on non-operation server.
A setting item and a display item are shown below.
|
No. |
Item name |
Explanation |
|---|---|---|
|
1 |
Group Name |
The group name is shown. |
|
2 |
Forcibly stop copy processing from Non-Operation Server |
Forcibly stop copy processing from non-operation server by checking the checkbox. The following conditions make this check box effective.
|
|
3 |
Perform communication processing with Non-Operation Server |
Check the following volume state in non-operation server by checking the checkbox.
When the servers to which original volume and replica volume belong differ, this combo box is effective. |
|
4 |
Perform preprocessing and postprocessing on Source Volume |
Perform preprocessing and postprocessing on original volume by checking the checkbox. This check box cannot be specified, except when the copy state is "equivalent". |
|
5 |
Perform preprocessing and postprocessing on Destination Volume |
Perform preprocessing and postprocessing on replica volume by checking the checkbox. This check box cannot be specified, except when the copy state is "equivalent". |
|
6 |
Flush file system buffer of the Source Volume (Windows only) |
Flushing is processed to the file system buffer of the original volume instead of the lock processing by checking the checkbox. This check box cannot be specified, except when the copy state is "equivalent". |
|
7 |
Stop copy processing in "halt" status |
Stop copy processing in "halt" status by checking the checkbox. This check box cannot be specified, except when the copy state is "halt". |
|
8 |
Stop tracking processing only |
Stop tracking processing only by checking the checkbox. As for this option, only not the snapshot processing but the tracking processing interrupts. The following conditions make this check box effective.
|
|
9 |
Cancel replication processing in the opposite direction |
Cancel replication processing from replica volume to original volume by checking the checkbox. |
The copy direction of the case synchronous replication processing (EC/REC) which is in a suspension state is reversed.
Operation of either of the followings displays "Reverse Synchronous Processing Direction window."
In the "Original/Replica Volume details view", select original volume or replica volume, and click the right mouse button. A popup menu appears. From the popup menu, select "Reverse Synchronous Processing Direction".
Select "Reverse Synchronous Processing Direction" on "Operation" menu.
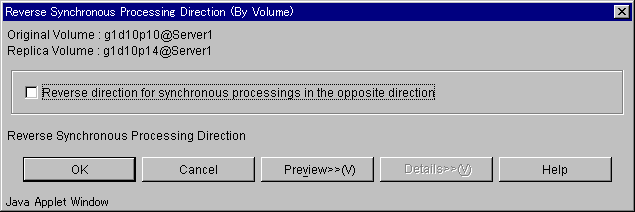
When [OK] button clicks, the direction of the replication is reversed.

The synchronous processing reversing is effective only for the following conditions.
The status of the replication volume is "replicated".
The copy direction type is "Bi-directional".
The synchronous processing reversing can be executed only with the operation server.
A setting item and a display item are shown below.
|
No. |
Item name |
Explanation |
|---|---|---|
|
1 |
Original Volume |
The original volume is shown in volume_name@server_name format. |
|
2 |
Replica Volume |
The replica volume is shown in volume_name@server_name format. |
|
3 |
Reverse direction for synchronous processing in the opposite direction |
Reverse direction for synchronous processing in the opposite direction by checking the checkbox. |
Operation of either of the followings displays "Reverse Synchronous Processing Direction window."
In the "Group details view", select original volume or replica volume, and click the right mouse button. A popup menu appears. From the popup menu, select "Reverse Synchronous Processing Direction".
Select "Reverse Synchronous Processing Direction" on "Operation" menu.

When [OK] button clicks, the direction of the replication is reversed.

The synchronous processing reversing is effective only for the following conditions.
The status of the replication volume is "replicated".
The copy direction type is "Bi-directional".
The synchronous processing reversing can be executed only with the operation server.
A setting item and a display item are shown below.
|
No. |
Item name |
Explanation |
|---|---|---|
|
1 |
Group Name |
The group name is shown. |
|
2 |
Reverse direction for synchronous processing in the opposite direction |
Reverse direction for synchronous processing in the opposite direction by checking the checkbox. |
The original volume / replica volume used by replication operation can be deleted.
Operation of either of the followings displays "Delete Replication Volume Information window."
In the "Group details view", select original volume or replica volume, and click the right mouse button. A popup menu appears. From the popup menu, select "Delete Replication Volume Information".
Select "Change Synchronization Mode" on "Operation" menu.
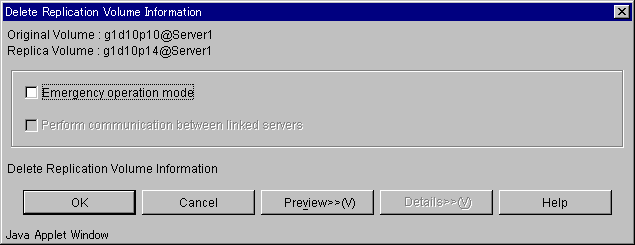
Set up each option and clicks [OK] button.
Replication volume information is deleted.

The replication volume information deletion processing can be executed only with the operation server.
A setting item and a display item are shown below.
|
No. |
Item name |
Explanation |
|---|---|---|
|
1 |
Original Volume |
The original volume is shown in volume_name@server_name format. |
|
2 |
Replica Volume |
The replica volume is shown in volume_name@server_name format. |
|
3 |
Emergency operation mode |
Replica volume information is deleted without the execution state of the advanced copy by checking the checkbox. |
|
4 |
Perform communication between linked servers |
Communicates between servers of the reproduction volume while processing the deletion by checking the checkbox. Use the option only when recovery of one of the linked servers cannot be expected. The option is valid only for replication between servers. |
Execute recovery to make replication management information consistent if a system failure or other problem has made the replication management information inconsistent.
Operation of either of the followings displays "Perform Resource Adjustment window."
In the "Server list view", select a server and click the right mouse button. A popup menu appears. From the popup menu, select "Perform Resource Adjustment".
Select "Perform Resource Adjustment" on "Operation" menu.
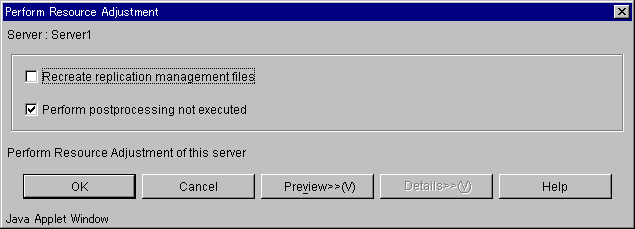
Set up each option and clicks [OK] button.
A setting item and a display item are shown below.
|
No. |
Item name |
Explanation |
|---|---|---|
|
1 |
Original Volume |
The original volume is shown in volume_name@server_name format. |
|
2 |
Replica Volume |
The replica volume is shown in volume_name@server_name format. |
|
3 |
Recreate replication management files |
When put the check in this check box, replication management information in the storage management server repository is downloaded to the storage server, and the replication management information is restored. |
|
4 |
Perform postprocessing not executed |
Perform any postprocessing that has not been performed by checking the checkbox. |
Displays information for the transfer buffer when REC is performed in Consistency mode.
Operation of either of the followings displays "Transfer Buffer Status window."
In the "Original/Replica Volume list view", select volume, and click the right mouse button. A popup menu appears. From the popup menu, select "Transfer Buffer Status".
In the "Original/Replica Volume list view", select volume, and select "Transfer Buffer Status" on "Operation" menu.
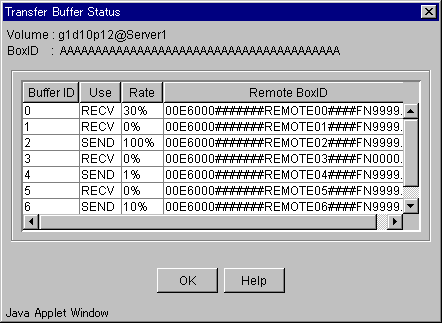
Confirms the information and clicks [OK] button.

The display of the transfer buffer status can be executed only at the replication between different servers.
The buffer's rate for the reception is always displayed as 0%.
A setting item and a display item are shown below.
|
No. |
Item name |
Explanation |
|---|---|---|
|
1 |
Volume |
The volume is shown in volume_name@server_name format. |
|
2 |
BoxID |
Display the box identifier for the cabinet specified the volume. |
|
3 |
Buffer ID |
Display the buffer identifier. |
|
4 |
Use |
Display the usage in the buffer. |
|
5 |
Rate |
Display the use rate of the buffer by percent. |
|
6 |
Remote BoxID |
Display the case identifier of the case set as a connection destination. |
Changed the setting of the buffer used in a Consistency mode of REC.
Operation of either of the followings displays "Change Buffer Setting window."
In the "Original/Replica Volume list view", select volume, and click the right mouse button. A popup menu appears. From the popup menu, select "Change Buffer Setting".
In the "Original/Replica Volume list view", select volume, and select "Change Buffer Setting" on "Operation" menu.
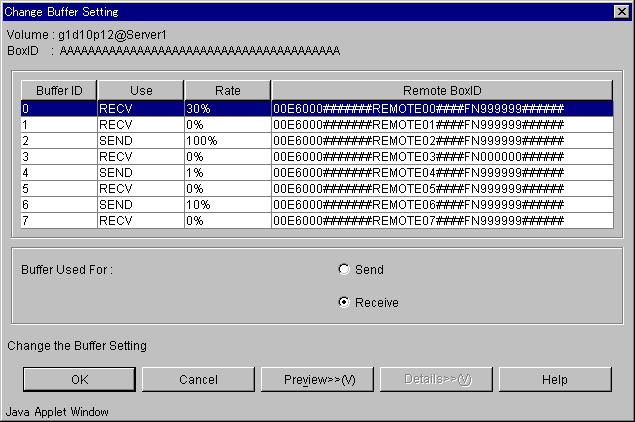
Changing a set value and clicks [OK] button.

The buffer setting change can be executed only at the replication between different servers. Moreover, it is necessary to set the buffer beforehand.
The buffer's rate for the reception is always displayed as 0%.
A setting item and a display item are shown below.
|
No. |
Item name |
Explanation |
|---|---|---|
|
1 |
Volume |
The volume is shown in volume_name@server_name format. |
|
2 |
BoxID |
Display the box identifier for the cabinet specified the volume. |
|
3 |
Buffer ID |
Display the buffer identifier. |
|
4 |
Use |
Display the usage in the buffer. |
|
5 |
Rate |
Display the use rate of the buffer by percent. |
|
6 |
Remote BoxID |
Display the case identifier of the case set as a connection destination. |
|
7 |
Buffer Used For |
Set the usage in the changed buffer.
|
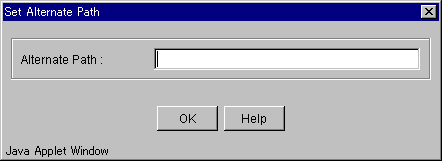
When the volume selected in "Original/Replica Volume list view" is a logical volume of the SDX object, an alternative passing is specified on the following window.
This section describes the access permission required for the backup window. See "Authentication Feature Window Operations" for details of the access permission.
|
Operation name |
Write permission |
Execute permission |
Read permission |
|---|---|---|---|
|
Window display |
Yes |
Yes |
Yes |
|
Transfer Buffer Status |
Yes |
Yes |
Yes |
|
Start Synchronous Processing |
Yes |
Yes |
No |
|
Change Synchronization Mode |
Yes |
Yes |
No |
|
Replicate |
Yes |
Yes |
No |
|
Cancel Replication Processing |
Yes |
Yes |
No |
|
Reverse Synchronous Processing Direction |
Yes |
Yes |
No |
|
Perform Resource Adjustment |
Yes |
Yes |
No |
|
Set Replication Volume Information |
Yes |
No |
No |
|
Delete Replication Volume Information |
Yes |
No |
No |
|
Change Buffer Setting |
Yes |
No |
No |
Yes:Operation enabled No:Operation disabled
Contents
Index
 
|