

| PRIMECLUSTER Global Link Services Configuration and Administration Guide: Redundant Line Control Function 4.1 (for Linux) |
|
Contents
Index
|
| Chapter 4 Operation | > 4.5 Active maintenance (addition/removal/swapping) | > 4.5.1 Active maintenance by PCI Hot Plug |
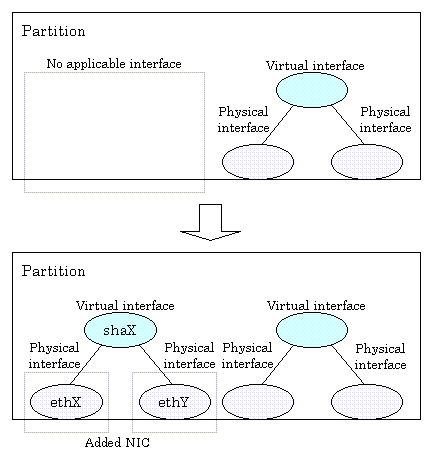
This section describes the procedure for adding NICs and creating a virtual interface to make the added NICs redundant.
If the PCI Hot Plug driver is not installed, install it according to "B.2.2 Installation of a PCI Hot Plug driver" of the "PRIMEQUEST 480/440 Operation Manual".
Confirmation procedure
# lsmod | grep shpchp shpchp 203816 0 |
Installation procedure
|
# modprobe shpchp |
For details, see "B.2.3.1 Checking the power status" of the "PRIMEQUEST 480/440 Operation Manual".
|
# cat /sys/bus/pci/slots/"<slot-number>"/power |
For details, see "B.2.3.2 Power-on and power-off procedures" of the "PRIMEQUEST 480/440 Operation Manual".
|
# echo 1 > /sys/bus/pci/slots/"<slot-number>"/power |
An interface (ethX) is created for the added NIC when power is turned on. Execute the ifconfig (8) command to check the hardware address of the added NIC (HWaddr). To add more NICs, repeat steps 2 to 5.
1) The added NICs must be activated at system startup. For this purpose, make the settings shown below in each interface setting file (/etc/sysconfig/network-scripts/ifcfg-eth<x>). Specify the hardware address that was checked in Step 5 for "HWADDR". Also specify "HOTPLUG=no".
ifcfg-ethX
|
DEVICE=ethX |
ifcfg-ethY
|
DEVICE=ethY |
2) Activate the added NICs.
|
# /sbin/ifup ethX |
3) If necessary, specify subnet mask information for the virtual interface.
|
# /opt/FJSVhanet/usr/sbin/hanetmask create -i network_address -m netmask |
4) Make the virtual interface settings to make the NICs redundant.
|
# /opt/FJSVhanet/usr/sbin/hanetconfig create -n shaX -m t -i ipaddress -t ethX,ethY |
5) Activate the virtual interface.
|
# /opt/FJSVhanet/usr/sbin/strhanet -n shaX |
If the PCI Hot Plug driver is not installed, install it according to "B.2.2 Installation of a PCI Hot Plug driver" of the "PRIMEQUEST 480/440 Operation Manual".
Confirmation procedure
# lsmod | grep shpchp shpchp 203816 0 |
Installation procedure
|
# modprobe shpchp |
For details, see "B.2.3.1 Checking the power status" of the "PRIMEQUEST 480/440 Operation Manual".
|
# cat /sys/bus/pci/slots/"<slot-number>"/power |
For details, see "B.2.3.2 Power-on and power-off procedures" of the "PRIMEQUEST 480/440 Operation Manual".
|
# echo 1 > /sys/bus/pci/slots/"<slot-number>"/power |
An interface (ethX) is created for the added NIC when power is turned on. Execute the ifconfig (8) command to check the hardware address of the added NIC (HWaddr). To add more NICs, repeat steps 2 to 5.
1) The current NIC must be activated and the standby NIC must be deactivated at system startup. For this purpose, write each interface setting file (/etc/sysconfig/network-scripts/ifcfg-eth<x>) so that "ONBOOT=yes" is specified for the current NIC and "ONBOOT=no" is specified for the standby NIC. Specify the hardware address that was checked in Step 5 for "HWADDR". Specify "HOTPLUG=no" for both NICs.
ifcfg-ethX (Primary interface)
|
DEVICE=ethX |
ifcfg-ethY (Secondary interface)
|
DEVICE=ethY |
2) Change the interface names of the added NICs to the names specified in the interface setting files (/etc/sysconfig/network-scripts/ifcfg-eth<x>). Specify the same interface names and MAC addresses in the nameif (8) command as those in "DEVICE" and "HWADDR" in the ifcfg-ethX and ifcfg-ethY files that were set in 1) of step 6. When the nameif (8) command is executed, the specified interface must be deactivated.
|
# /sbin/nameif ethX XX:XX:XX:XX:XX:XX |
3) If necessary, specify subnet mask information for the virtual interface.
|
# /opt/FJSVhanet/usr/sbin/hanetmask create -i network_address -m netmask |
4) Make the virtual interface settings to make the NICs redundant.
|
# /opt/FJSVhanet/usr/sbin/hanetconfig create -n shaX -m d -i ipaddress1 -e ipaddress2 -t ethX,ethY |
5) Specify hub monitoring destination information.
|
# /opt/FJSVhanet/usr/sbin/hanetpoll create -n shaX -p ipaddr1,ipaddr2 |
6) If necessary, set the standby patrol function.
|
# /opt/FJSVhanet/usr/sbin/hanetconfig create -n shaY -m p -t shaX |
7) Restart GLS to enable the changed settings. This restart also activates the virtual interface and starts its monitoring.
|
# /opt/FJSVhanet/usr/sbin/resethanet -s |
|
Contents
Index
|