

| PRIMECLUSTER Global Link Services Configuration and Administration Guide: Redundant Line Control Function 4.1 (for Solaris(TM) Operating System) |
|
Contents
Index
|
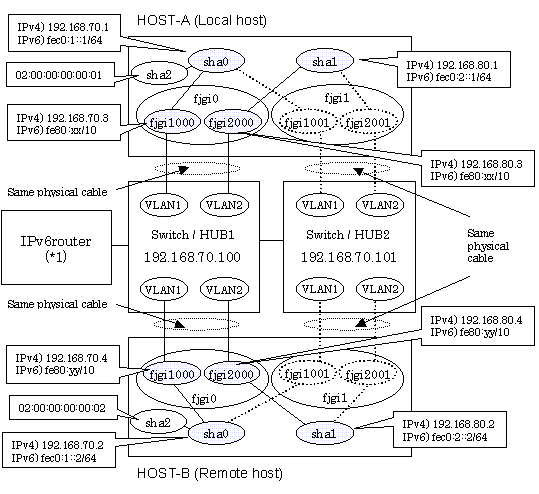
| Appendix B Examples of configuring system environments | > B.8 Example of configuring NIC switching mode (IPv4/IPv6) |
This section describes an example configuration procedure of the network shown in the diagram below.
The xx, yy in the figure below are assigned automatically by the automatic address configuration.
If the Standby patrol monitoring function is not used, omit 6) in the procedure for setting up on each host.

An example of configuring /etc/inet/ndpd.conf to use Solaris server as an IPv6 router is described below:
For details on /etc/inet/ndpd.conf, refer to the Solaris manual.
ifdefault AdvSendAdvertisements true # Every interface sends a router advertisement. prefix fec0:1::0/64 fjgi1000 # fjgi1000 sends Prefix "fec0:1::0/64". prefix fec0:2::0/64 fjgi2000 # fjgi2000 sends Prefix "fec0:2::0/64". |
1-1) Define IP addresses and hostnames in /etc/inet/hosts file.
192.168.70.1 hosta # HOST-A Virtual IP 192.168.70.3 host71 # HOST-A Physical IP (Tagged VLAN interface) 192.168.80.1 hostb # HOST-A Virtual IP 192.168.80.3 host81 # HOST-A Physical IP (Tagged VLAN interface) 192.168.70.2 hostc # HOST-B Virtual IP 192.168.70.4 host72 # HOST-B Physical IP (Tagged VLAN interface) 192.168.80.2 hostd # HOST-B Virtual IP 192.168.80.4 host82 # HOST-B Physical IP (Tagged VLAN interface) 192.168.70.100 swhub1 # primary Switch/HUB IP 192.168.70.101 swhub2 # secondary Switch/HUB IP |
1-2) Write the hostnames defined above in /etc/hostname."interface-name" files. If a file does not exist, create a new file.
- Contents of /etc/hostname.fjgi1000
|
host71 |
- Contents of /etc/hostname.fjgi2000
|
host81 |
1-3) Define the subnet mask in /etc/inet/netmasks file.
192.168.70.0 255.255.255.0 192.168.80.0 255.255.255.0 |
1-4) Create /etc/hostname6.fjgi1000 and /etc/hostname6.fjgi2000 file as an empty file.
1-5) Define IP addresses and hostnames in /etc/inet/ipnodes file.
fec0:1::1 v6hosta1 # HOST-A Virtual IP(1) fec0:2::1 v6hosta2 # HOST-A Virtual IP(2) fec0:1::2 v6hostb1 # HOST-B Virtual IP(1) fec0:2::2 v6hostB2 # HOST-B Virtual IP(2) |
/opt/FJSVhanet/usr/sbin/hanetconfig create -n sha0 -m d -i 192.168.70.1 -e 192.168.70.3 -t fjgi1000,fjgi1001
/opt/FJSVhanet/usr/sbin/hanetconfig create -n sha1 -m d -i 192.168.80.1 -e 192.168.80.3 -t fjgi2000,fjgi2001
Ensure that the physical IP address specified using option '-e' is the same IP address configured in /etc/hostname.fjgi1000 and /etc/hostname.fjgi2000.
/opt/FJSVhanet/usr/sbin/hanetconfig copy inet6 -n sha0,sha0 -i fec0:1::1/64
/opt/FJSVhanet/usr/sbin/hanetconfig copy inet6 -n sha1,sha1 -i fec0:2::1/64
/opt/FJSVhanet/usr/sbin/hanetpoll create -n sha0 -p 192.168.70.100,192.168.70.101 -b on
/opt/FJSVhanet/usr/sbin/hanetpoll copy -n sha0,sha1
Please define only one Standby patrol monitoring function.
/opt/FJSVhanet/usr/sbin/hanetconfig create -n sha2 -m p -a 02:00:00:00:00:01 -t sha0
Run the following command to reboot the system. Make sure fjgi1000 and fjgi2000 are enabled as IPv4/IPv6 interfaces after rebooting the system.
/usr/sbin/shutdown -y -i6 -g0
1-1) Define IP addresses and hostnames in /etc/inet/hosts file. Defined information is the same as for HOST-A.
1-2) Write the hostnames defined above in /etc/hostname."interface-name" files. If a file does not exist, create a new file.
- Contents of /etc/hostname.fjgi1000
|
host72 |
- Contents of /etc/hostname.fjgi2000
|
host82 |
1-3) Define the subnet mask in /etc/inet/netmasks file. Defined content is same as HOST-A.
1-4) Create /etc/hostname6.fjgi1000 and /etc/hostname6.fjgi2000 file as an empty file.
1-5) Define IP addresses and hostnames in /etc/inet/ipnodes file. Defined content is same as HOST-A.
/opt/FJSVhanet/usr/sbin/hanetconfig create -n sha0 -m d -i 192.168.70.2 -e 192.168.70.4 -t fjgi1000,fjgi1001
/opt/FJSVhanet/usr/sbin/hanetconfig create -n sha1 -m d -i 192.168.80.2 -e 192.168.80.4 -t fjgi2000,fjgi2001
Ensure that the physical IP address specified using option '-e' is the same IP address configured in /etc/hostname.fjgi1000 and /etc/hostname.2000.
/opt/FJSVhanet/usr/sbin/hanetconfig copy inet6 -n sha0,sha0 -i fec0:1::2/64
/opt/FJSVhanet/usr/sbin/hanetconfig copy inet6 -n sha1,sha1 -i fec0:2::2/64
/opt/FJSVhanet/usr/sbin/hanetpoll create -n sha0 -p 192.168.70.100,192.168.70.101 -b on
/opt/FJSVhanet/usr/sbin/hanetpoll copy -n sha0,sha1
Please define only one Standby patrol monitoring function.
/opt/FJSVhanet/usr/sbin/hanetconfig create -n sha2 -m p -a 02:00:00:00:00:02 -t sha0
Run the following command to reboot the system. Make sure fjgi1000 and fjgi2000 are enabled as IPv4/IPv6 interfaces after rebooting the system.
/usr/sbin/shutdown -y -i6 -g0
|
Contents
Index
|