This section explains the customization procedure for secondary nodes.
Follow the procedure below to prepare a generic script to be used on the secondary node.
In the ETERNUS SF Manager program directory on the secondary node, store the generic script file that you created in "4.1 Confirmation of Customization Items".
Set up the access privilege for the stored generic script file.
Execute the following command by specifying the stored generic script file in fileName.
>cacls fileName /P "NT AUTHORITY\SYSTEM:F" "BUILTIN\Administrators:F"
Example
The command execution example is as follows.
C:\ETERNUS_SF>cacls apache.vbs /P "NT AUTHORITY\SYSTEM:F" "BUILTIN\Administrators:F"
  Are you sure (Y/N)?y
  Processing file: C:\ETERNUS_SF\apache.vbs
Move the Quorum disk, the shared disk that is used by ETERNUS SF Manager, and transactions.
Refer to your cluster software manuals for information on how to move them.
Use Explorer or a similar tool to rename the following directories:
The programDir is "Program Directory" specified at the ETERNUS SF Manager installation, the envDir is "Environment Directory", and the workDir is "Working Directory".
programDir\Common\sys\apache\conf
programDir\Common\sys\apache\logs
programDir\Common\sys\tomcat\conf
programDir\Common\sys\tomcat\logs
programDir\Common\sys\tomcat\webapps\esf\WEB-INF\log
envDir\Common\etc\db
envDir\Common\etc\message
envDir\ESC\Manager\etc
envDir\AST\Manager\etc\opt\FJSVssast\data
workDir\Common\var
workDir\ESC\Manager\var
workDir\AST\Manager\var\opt\FJSVssast\data
Note
If another program is using any files in the above directories, rename of the directory may fail.
If rename of the directory fails, reboot the server and try again.
On the secondary node, create symbolic links to the directories of the shared disk for shared data.
Create symbolic links from the following directories on the local disks on the secondary node to the directories on the shared disk.
Link | Target |
|---|---|
programDir\Common\sys\apache\conf | storeDirForCommonData\apache\conf |
programDir\Common\sys\apache\logs | storeDirForCommonData\apache\logs |
programDir\Common\sys\tomcat\conf | storeDirForCommonData\tomcat\conf |
programDir\Common\sys\tomcat\logs | storeDirForCommonData\tomcat\logs |
programDir\Common\sys\tomcat\webapps\esf\WEB-INF\log | storeDirForCommonData\tomcat\webapps\esf\WEB-INF\log |
envDir\Common\etc\db | storeDirForCommonData\db |
envDir\Common\etc\message | storeDirForCommonData\message |
envDir\ESC\Manager\etc | storeDirForEscData\ESC\Manager\etc |
envDir\AST\Manager\etc\opt\FJSVssast\data | storeDirForAstData\AST\etc\data |
workDir\Common\var | storeDirForCommonData\var |
workDir\ESC\Manager\var | storeDirForEscData\ESC\Manager\var |
workDir\AST\Manager\var\opt\FJSVssast\data | storeDirForAstData\AST\var\data |
Symbolic links can be created by using the "mklink" command of Windows.
Example
The example of creating a symbolic link from programDir\Common\sys\apache\conf to storeDirForCommonData\apache\conf is shown below.
>mklink /d programDir\Common\sys\apache\conf storeDirForCommonData\apache\conf
Create backup directories for AdvancedCopy Manager CCM environment setup files.
On the secondary node, create the following directories:
The programDir is "Program Directory" specified at the ETERNUS SF Manager installation.
programDir\CCM\noncluster\bin
programDir\CCM\noncluster\micc\sys
programDir\CCM\noncluster\sys
Back up AdvancedCopy Manager CCM environment setup files.
On the secondary node, copy the following files to the copy destination.
Copy Source File | Copy Destination File |
|---|---|
programDir\CCM\micc\sys\.install.sys | programDir\CCM\noncluster\micc\sys\.install.sys |
programDir\CCM\bin\.stxc_install.sys | programDir\CCM\noncluster\bin\.stxc_install.sys |
programDir\CCM\sys\sys.properties | programDir\CCM\noncluster\sys\sys.properties |
Note
The copied files are required for "Chapter 13 Deletion of Cluster Environment for Management Server Transactions".
Edit AdvancedCopy Manager CCM environment setup files
On the secondary node, edit the path name from *1 to *4 of files below:
[programDir\CCM\micc\sys\.install.sys file]
stxs_optdir= (Do not modify these settings!)
stxs_etcdir= (Do not modify these settings!)
stxs_vardir=*1
stxs_jredir= (Do not modify these settings!)
[programDir\CCM\bin\.stxc_install.sys file]
stxc_optdir= (Do not modify these settings!)
stxc_etcdir=*2
stxc_jredir= (Do not modify these settings!)
[programDir\CCM\sys\sys.properties file]
com.fujitsu.eternussf.acm.ccm.optpath= (Do not modify these settings!)
com.fujitsu.eternussf.acm.ccm.etcpath=*3
com.fujitsu.eternussf.acm.ccm.varpath=*4
com.fujitsu.eternussf.acm.ccm.micc.path= (Do not modify these settings!)
com.fujitsu.eternussf.acm.ccm.grapi.path= (Do not modify these settings!)
com.fujitsu.eternussf.acm.ccm.language= (Do not modify these settings!)
Note
In *3 and *4, use "\:" as a drive separate character.
In *3 and *4, use "\\" as a path separate character of storeDirForCcmData.
The setting values from *1 to *4 are as follows.
The sample setting values use "G:\ccmdata" for storeDirForCcmData.
Setting Item | Setting Value | Sample Setting |
|---|---|---|
*1 | storeDirForCcmData\var\micc | G:\ccmdata\var\micc |
*2 | storeDirForCcmData\etc | G:\ccmdata\etc |
*3 | storeDirForCcmData\\etc\\ | G\:\\ccmdata\\etc\\ |
*4 | storeDirForCcmData\\var\\ | G\:\\ccmdata\\var\\ |
Edit the registry.
As described below, change the path, that is written in the registry key, of the "var" directory of the license manager function by using the registry editor.
The workDir is "Working Directory" specified at the ETERNUS SF Manager installation.
Before Change | After Change |
|---|---|
workDir\LM\var | storeDirForCommonData\LM\var |
[Sample display for registry key]
HKEY_LOCAL_MACHINE
  SOFTWARE
    Fujitsu
      ETERNUS SF License Manager
        CurrentVersion
VarPathNameSet up the access privilege for the ETERNUS SF Manager database directory that you copied to the shared disk.
On the secondary node, execute the following command.
>cacls storeDirForCommonData\db\data /T /G "esfpostgres:C" /E
Follow the procedure below to set up a secondary node.
Note
Perform the procedures using Administrator privileges. The Windows "Computer Browser service" must be activated if a user belonging to the Administrators of the domain wants to perform customization. If the other products are not using "Computer Browser Service", after this operation is completed, "Computer Browser Service" can be stopped without causing any problems.
Install the Failover Cluster Command Interface before performing the cluster setup.
Do not use the Telnet Server service.
Instruct the start of the cluster setup.
On the secondary node, execute the following cluster setup command.
The programDir is "Program Directory" specified at the ETERNUS SF Manager installation.
programDir\ACM\bin\stgclset_mscs
Select the node type and shared disk.
The initial window of the cluster setup command is displayed.
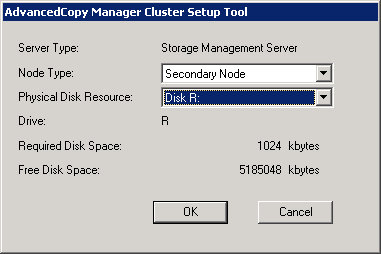
Each item is explained below. Make the required entries and then click OK.
Item | Explanation |
|---|---|
Server Type | Confirm that the server is a "Storage Management Server". |
Node Type | Select "Secondary Node". |
Physical Disk Resource | Select the resource for the shared disk for shared data. |
Drive | The drive letter corresponding to the physical disk resource is displayed. |
Required Disk Space | The minimum disk size required for the cluster environment is displayed. |
Free Disk Space | The amount of free disk space of the specified drive is displayed. |
Confirm the cluster information for the secondary node.
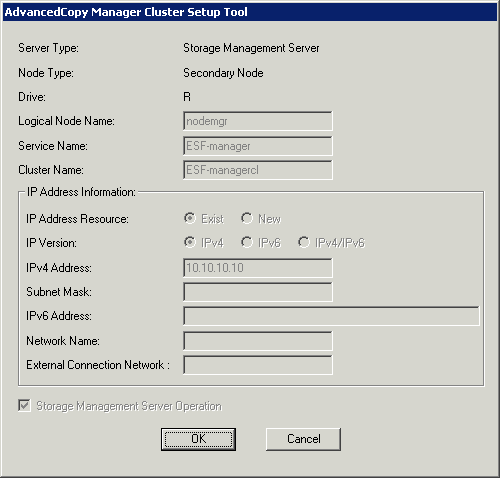
The values set for the primary node is displayed (Only the Node Type needs to be changed to "Secondary Node".).
After confirming each item, click OK.
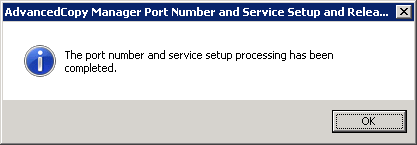
Set the port number and service.
The following page displays the value that was set for the primary node. If a port number and service has already been set, this page is not displayed.

Click OK.
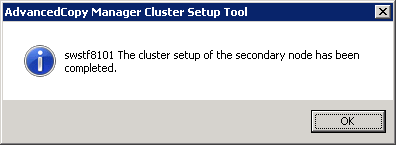
The following page is displayed. Click OK.
The cluster setup of the secondary node has been completed.
When the cluster setup completion window is displayed, click OK.
To manage the ETERNUS DX S2 series, follow the procedure below on the secondary node.
Back up the settings file.
Copy the following file to the backup destination directory.
File to be Backed up | Backup Destination Directory |
|---|---|
$INS_DIR\Common\jre\conf\security\java.security | $INS_DIR\Common\sys\tomcat\webapps\esf\WEB-INF\config |
$INS_DIR\CCM\jre\conf\security\java.security | $INS_DIR\CCM\tools |
$INS_DIR is "Program Directory" specified at the ETERNUS SF Manager installation.
Copy the following file over the copy destination file.
Copy Source File | Copy Destination File |
|---|---|
$INS_DIR\Common\sys\tomcat\webapps\esf\WEB-INF\config\java.security.forS2.windows | $INS_DIR\Common\jre\conf\security\java.security |
$INS_DIR\CCM\tools\java.security.forS2.windows | $INS_DIR\CCM\jre\conf\security\java.security |
$INS_DIR is "Program Directory" specified at the ETERNUS SF Manager installation.
Point
To delete the registration of the ETERNUS DX S2 series from the product after the settings in this section are performed and operations are started, the settings content must be restored. For the procedure to restore the settings content, refer to "Work Required After Device Deletion of the ETERNUS DX S2 series" in the Installation and Setup Guide.