This section explains the procedural flow for expansion of /, /usr, and /var file systems with the snapshot functions of GDS Snapshot that can be performed while operations are running.
This procedure can be executed when the system volume is a file system whose capacity can be expanded. For details on the availability of file system expansion, see the manual of the file system.
[Procedure]
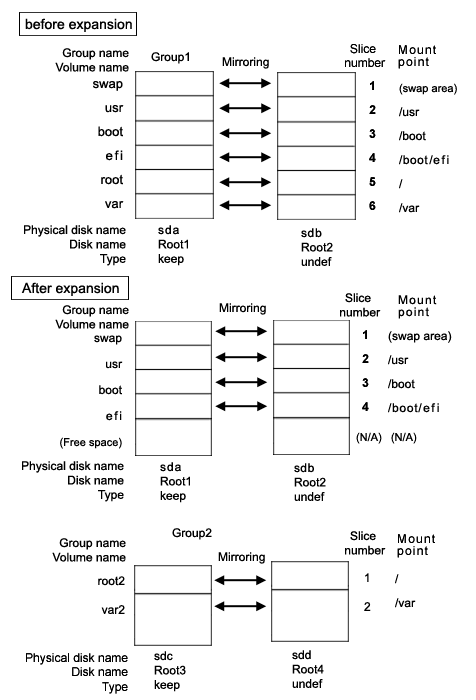
Assuming the configuration as below, the procedures for expanding /var file system space are explained.
As shown in the following figure, the / file system must be transferred to another volume no matter whether or not it is expanded.
Note
The cylinder sizes of keep disks Root1 and Root3 must match.
Information
System disk mirroring is not a requirement. The configuration without sdb and sdd that are shown in the figure above is also supported. However, in systems that require high availability, it is recommended to use the mirroring configuration as above.
1) Mirroring the system disk
1-1) Stop the running application programs.
In order to ensure mirroring definition, all the running application programs must be stopped. When higher safety is required, create system disk backups.
1-2) Register the system disk to the root class.
# sdxdisk -M -c System -a type=root -d sda=Root1:keep,sdb=Root2:undef |
1-3) Connect the system disk to a group.
# sdxdisk -C -c System -g Group1 -d Root1,Root2 -v 1=swap:on,2=usr:on,3=boot:on,4=efi:on, 5=root:on,6=var:on |
1-4) Check that mirroring definition is completed.
# sdxroot -M -c System -d Root1 |
1-5) Reboot the system.
# shutdown -r now |
1-6) Check that mirroring is in effect.
Using the mount(8) command and the sdxinfo command, make sure that the system disk has been mirrored properly.
2) Creating proxy volumes
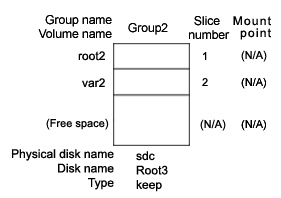
Create proxy volumes for the / file system and the expanded /var file system. At this point, one keep disk only should be connected to the group that will include the proxy volumes. This example shows the procedure for creating proxy volumes in the following configuration.
Point
The disk must have sufficient free disk space following the last block of the proxy volume for the /var file system to be expanded.
2-1) Check the current volume sizes.
# sdxinfo -V -c System
OBJ    NAME    CLASS   GROUP   SKIP JRM 1STBLK   LASTBLK  BLOCKS   STATUS
------ ------- ------- ------- ---- --- -------- -------- -------- --------
volume swap    System  Group1  off  on         0  1049759  1049760 ACTIVE
volume *       System  Group1  *    *    1049760  1071359    21600 PRIVATE
volume *       System  Group1  *    *    1071360  2946239  1874880 FREE
volume usr     System  Group1  off  on   2946240  2965679    19440 ACTIVE
volume boot    System  Group1  off  on   2965680  3096899   131220 ACTIVE
volume efi     System  Group1  off  on   3096900  3228119   131220 ACTIVE
volume root    System  Group1  off  on   3228120  3403079   174960 ACTIVE
volume var System Group1 off on 3403080 3638519 235440 ACTIVE |
For the volume sizes, check the BLOCKS field displayed with the sdxinfo -V command. In this example, the root size is 174960 blocks and the var size is 235440 blocks.
2-2) Register the disk with the root class.
# sdxdisk -M -c System -d sdc=Root3:keep,sdd=Root4:undef |
Note
When registering multiple keep disks with a class together, as many or more undefined disks must also be registered.
2-3) Connect only one keep disk with a group.
# sdxdisk -C -c System -g Group2 -d Root3 |
2-4) Create volumes.
The volume sizes should be those shown in step 2-1).
# sdxvolume -M -c System -g Group2 -v root2 -s 174960 # sdxvolume -M -c System -g Group2 -v var2 -s 235440 |
2-5) Check the created volume sizes.
Make sure that the sizes of the volumes created in step 2-4) match the sizes shown in step 2-1).
# sdxinfo -V -c System |
3) Joining the proxy volumes
Join the created proxy volumes with the volumes for / and /var (master volumes) to copy data in / and /var to the proxy volumes. This example shows the procedure for joining the proxy volumes in the following configuration.
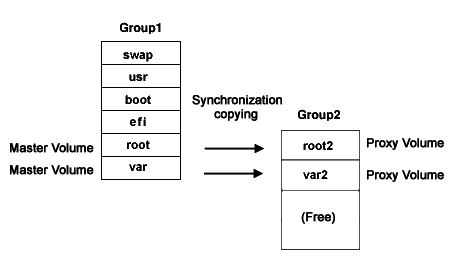
3-1) Join the proxy volumes.
# sdxvolume -F -c System -v root2,var2 # sdxproxy Join -c System -m root -p root2 # sdxproxy Join -c System -m var -p var2 |
3-2) Check that synchronization copying is completed.
# sdxinfo -S -c System |
If the synchronization copying is in progress, "COPY" will be displayed in the STATUS field for the proxy volume slice. If "STOP" is displayed, synchronization copying is completed.
4) Parting the proxy volumes
With successful synchronization copying, the master volumes and the proxy volumes become equivalent. By parting those master volumes and proxy volumes, snapshots of the master volumes can be created on the proxy volumes.
4-1) Secure consistency of the file systems.
In order to secure consistency of snapshot file systems, it is necessary to prevent file system update. However, some file systems such as /, /usr, and /var are required for system operation and cannot be cancel the mounting statuses during system operation. There, use the following methods to minimize writing to the system disk and writing not updated on the system disk.
Boot the system in single user mode (optional)
Stop application programs having write access to the system disks (optional)
Execute the sync(1) command to write file system data updated on the memory but not written yet.
Even if a., b., and c. are all put in action, file system update will not be completely prevented. Therefore, snapshot file systems may have inconsistency as in the case with after system panic occurrence.
When a., b., c. are all put in action, the snapshot file systems will be like those after system panic occurrence in single user mode.
When only c. is put in action skipping a. and b., the snapshot file systems will be like those after system panic occurrence during system operation.
In both situations, inconsistency may occur in the file systems, and it is necessary to check and repair consistency as instructed in step 5-1).
4-2) Part the proxy volumes.
# sdxproxy Part -c System -p root2,var2 |
4-3) When the system was rebooted in single user mode as instructed in step 4-1) a., reboot it in multi-user mode.
4-4) When the application programs were stopped as instructed in step 4-1) b., start them.
5) Configuring the alternative boot environment
Configure the environment to boot from the proxy volumes.
5-1) Check and repair the file systems on the proxy volumes.
The file systems on the proxy volumes may have inconsistency, and it is necessary to check and repair them with the fsck(8) command.
# fsck /dev/sfdsk/System/dsk/root2 # fsck /dev/sfdsk/System/dsk/var2 |
5-2) Configure the alternative boot environment.
# sdxproxy Root -c System -p root2,var2 |
With successful alternative boot environment configuration, the following message will be output.
SDX:sdxproxy: INFO: completed definitions of alternative boot environment:
     current-boot-device=Root1 Root2
alternative-boot-device=Root3 |
Be sure to take a note of the output boot device names for the current boot environment (current-boot-device values) and those for the alternative boot environment (alternative-boot-device values).
6) Expanding snapshots
6-1) Cancel the master-proxy relationship.
# sdxproxy Break -c System -p root2 # sdxproxy Break -c System -p var2 |
6-2) Expand the snapshot volume size.
This example shows the procedure for expanding the size of the snapshot volume for /var to 706320 blocks.
# sdxvolume -S -c System -v var2 -s 706320 |
6-3) Expand the snapshot file system size.
See
For details on how to expand the size of file system, see the manual of the file system.
7) Mirroring snapshots
Add a disk to the group that includes the snapshot volumes to mirror the snapshot volumes.
# sdxdisk -C -c System -g Group2 -d Root4 |
8) Switching to the alternative boot environment
By switching the environment to the alternative boot environment, replace the /var file system with the expanded volume.
8-1) Boot the system from the alternative boot environment.
Among boot devices shown in the EFI boot manager's boot option selection screen, select one from the boot devices for the alternative boot environment indicated by the message in step 5-2).
Root1 Root2 Root3 <- Select |
8-2) Check that the boot was successful.
Using the mount(8) command the sdxinfo command, check that the system was booted normally in the alternative boot environment and that no errors exist in the GDS object statuses. As needed, check also that the file systems for the alternative boot environment are correct and that applications can run properly.
Information
If the system was not booted normally, restore the original boot environment. To restore the original boot environment, among boot devices shown in the EFI boot manager's option selection screen, select one from the boot devices for the current boot environment indicated by the message in step 5-2).
Root1 <- Select Root2 Root3 |
9) Deleting unnecessary volumes
After checking that the system was booted normally in the alternative boot environment, delete the volumes for the / file system and the original /var file system that build the previous boot environment.
# sdxvolume -F -c System -v root,var # sdxvolume -R -c System -v root # sdxvolume -R -c System -v var |