This sub-section describes the method of backing up data from and restoring data back to logical volumes in the primary domain through a backup server in another domain.
The following is an example of backing up and restoring a stripe volume. Mirror volumes, single volumes, and volumes in concatenation groups can also be backed up and restored in a similar manner. However, for backing up mirror volumes, the method described in "7.12.2 Backing Up and Restoring through Snapshot by Slice Detachment" is recommended.
Figure 7.70 System Configuration
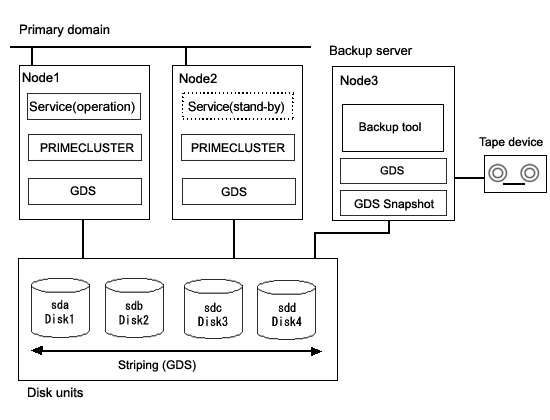
GDS: Global Disk Services
GDS Snapshot: Global Disk Services Snapshot
Note
Physical Device Name
Different physical device names (such as sda) may be assigned to the identical physical disk in the primary domain and the backup server.
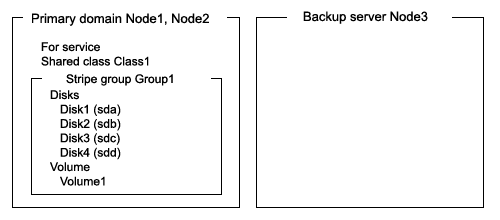
Figure 7.71 Object Configuration in Normal Operation
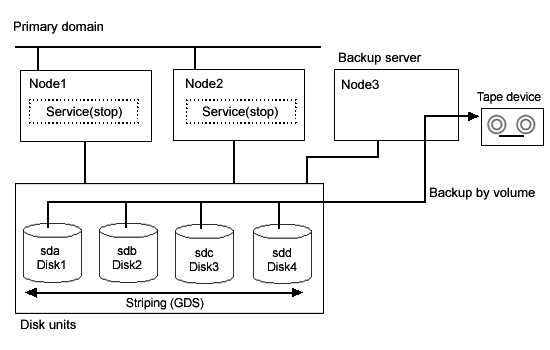
Backups can be created while the services are stopped and the application volume is not in use.
Figure 7.72 Backup
GDS: Global Disk Services
Figure 7.73 Object Configuration When Backing Up

Figure 7.74 Backup Schedule

If volume data is damaged, it can be restored from tape. Data can be restored while the services are stopped and the application volume is not in use.
Figure 7.75 Restore

GDS: Global Disk Services
Figure 7.76 Object Configuration When Restoring
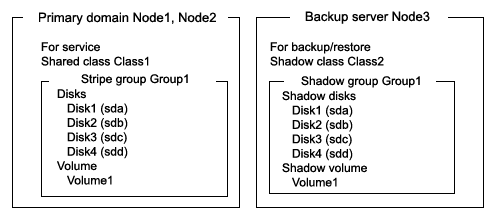
Figure 7.77 Restore Schedule
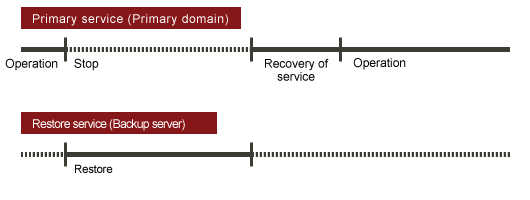
Figure 7.78 Outline of the Configuration Procedure

Figure 7.79 Outline of the Backup Procedure
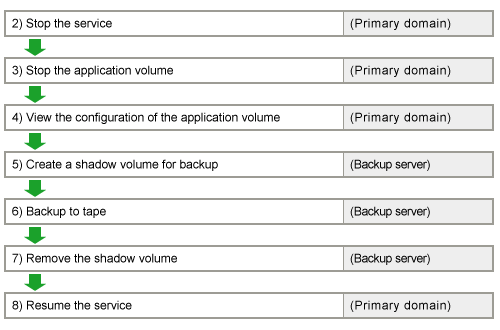
Figure 7.80 Outline of the Restore Procedure
Note
Resource Registration
If the backup server resides in a cluster domain (called a backup domain), those disks that are registered as resources in the primary domain or are to be registered with a shadow class in the backup domain may not be involved in the resource registration in the backup domain. For details on the resource registration, see "6.3 Shared Disk Resource Registration."
1) Creating an application volume
Create a stripe volume used for the services on disks sda, sdb, sdc, and sdd. The following settings are necessary on Node1 or Node2 in the primary domain.
1-1) Registering disks
Register disks sda, sdb, sdc, and sdd with shared class Class1 that is shared on Node1 and Node2, and name them Disk1, Disk2, Disk3, and Disk4 respectively.
# sdxdisk -M -c Class1 -a type=shared,scope=Node1:Node2 -d sda=Disk1,sdb=Disk2,sdc=Disk2,sdd=Disk4 |
1-2) Creating a stripe group
Connect disks Disk1, Disk2, Disk3, and Disk4 to stripe group Group1.
# sdxdisk -C -c Class1 -g Group1 -d Disk1,Disk2,Disk3,Disk4 -a type=stripe,width=256 |
1-3) Creating a stripe volume
Create stripe volume Volume1 to stripe group Group1.
# sdxvolume -M -c Class1 -g Group1 -v Volume1 -s 1048576 -a pslice=off |
2) Stopping the services
Exit all applications accessing the application volume Volume1 in the primary domain on Node1 and Node2.
When Volume1 is used as a file system, it should be unmounted.
3) Stopping the application volume
To write-lock volume Volume1, inactivate Volume1 on Node1 and Node2 in the primary domain. Execute the following command on Node1 or Node2.
# sdxvolume -F -c Class1 -v Volume1 -e allnodes |
4) Viewing the configuration of the application volume
On Node1 or Node2 in the primary domain, view the configuration of application volume Volume1 that is the backup target.
Check the underlined parts.
# sdxinfo -c Class1 OBJ NAME TYPE CLASS GROUP DEVNAM DEVBLKS DEVCONNECT STATUS ------ ------- ------ ------- ------- ------- -------- ---------------- ------- disk Disk1 stripe Class1 Group1 sda 8380800 Node1:Node2 ENABLE disk Disk2 stripe Class1 Group1 sdb 8380800 Node1:Node2 ENABLE disk Disk3 stripe Class1 Group1 sdc 8380800 Node1:Node2 ENABLE disk Disk4 stripe Class1 Group1 sdd 8380800 Node1:Node2 ENABLE OBJ NAME CLASS DISKS BLKS FREEBLKS SPARE
------ ------- ------- ------------------------ --------- -------- -----
group Group1 Class1 Disk1:Disk2:Disk3:Disk4 32964608 31850496 *OBJ NAME CLASS GROUP SKIP JRM 1STBLK LASTBLK BLOCKS STATUS ------ ------- ------- ------- ---- --- ------- -------- -------- -------- volume * Class1 Group1 * * 0 65535 65536 PRIVATE volume Volume1 Class1 Group1 * * 65536 1114111 1048576 STOP volume * Class1 Group1 * * 1114112 32964607 31850496 FREE OBJ CLASS GROUP DISK VOLUME STATUS ------ ------- ------- ------- ------- -------- slice Class1 Group1 * Volume1 STOP |
If application volume Volume1 belongs to a stripe group, also pay attention to the stripe width.
Check the underlined parts.
# sdxinfo -G -c Class1 -o Group1 -e long OBJ NAME CLASS DISKS BLKS FREEBLKS SPARE MASTER TYPE WIDTH ACTDISK ----- ------ ------ ----------------------- -------- -------- ----- ------ ------ ----- ------- group Group1 Class1 Disk1:Disk2:Disk3:Disk4 32964608 31850496 * * stripe 256 * |
5) Creating a shadow volume for backup
On backup server Node3, create a backup volume (shadow volume) in the same configuration as the application volume found in step 4). The following settings are necessary on backup server Node3.
Note
Application volume data may be damaged if data is written into a shadow volume in incorrect configuration. Be sure to confirm that the shadow volume configuration is correct in step 5-4).
5-1) Registering shadow disks
Register disks sda, sdb, sdc, and sdd with shadow class Class2, and name them Disk1, Disk2, Disk3, and Disk4 respectively.
# sdxshadowdisk -M -c Class2 -d sda=Disk1,sdb=Disk2,sdc=Disk3,sdd=Disk4 |
Point
The disk names must correspond to the disk names assigned in step 1-1). The disk names assigned in 1-1) can be viewed in the NAME field for disk information displayed with the sdxinfo command in step 4).
The class can be assigned any name.
5-2) Creating a shadow group
Connect shadow disks Disk1, Disk2, Disk3, and Disk4 to stripe type shadow group Group1.
# sdxshadowdisk -C -c Class2 -g Group1 -d Disk1,Disk2,Disk3,Disk4 -a type=stripe,width=256 |
Point
If the application volume belongs to a stripe group or a concatenation group, the order of connecting shadow disks to a shadow group must correspond to the order of connecting disks to a group in step 1-2). The order of connecting disks in step 1-2) can be viewed in the DISKS field for group information displayed with the sdxinfo command in step 4).
When the application volume belongs to a stripe group, the stripe width of a shadow group must correspond to the stripe width specified in step 1-2). The stripe width specified in step 1-2) can be viewed in the WIDTH field for group information displayed with the sdxinfo -e long command in step 4).
The group can be assigned any name.
5-3) Create a shadow volume.
Create shadow volume Volume1 to shadow group Group1.
# sdxshadowvolume -M -c Class2 -g Group1 -v Volume1 -s 1048576 |
Point
The volume must be created in the size corresponding to the volume size in step 1-3). The size of a volume created in step 1-3) can be viewed in the BLOCKS field for volume information displayed with the sdxinfo command in step 4).
If there are multiple volumes, the corresponding shadow volumes must be created in the order of ascending values (first block numbers) in the 1STBLK field for volume information displayed with the sdxinfo command in step 4).
The volume can be assigned any name.
5-4) Viewing the shadow volume configuration
Using the sdxinfo command, confirm that the group configuration and the volume configuration are correct based on group information in the DISKS field, volume information in the 1STBLK field and in the BLOCKS field and so on.
Check the underlined parts.
# sdxinfo -c Class2 OBJ NAME TYPE CLASS GROUP DEVNAM DEVBLKS DEVCONNECT STATUS ------ ------- ------ ------- ------- ------- -------- ------------- ------- disk Disk1 stripe Class2 Group1 sda 8380800 Node3 ENABLE disk Disk2 stripe Class2 Group1 sdb 8380800 Node3 ENABLE disk Disk3 stripe Class2 Group1 sdc 8380800 Node3 ENABLE disk Disk4 stripe Class2 Group1 sdd 8380800 Node3 ENABLE OBJ NAME CLASS DISKS BLKS FREEBLKS SPARE
------ ------- ------- ------------------------ -------- -------- -----
group Group1 Class2 Disk1:Disk2:Disk3:Disk4 32964608 31850496 *OBJ NAME CLASS GROUP SKIP JRM 1STBLK LASTBLK BLOCKS STATUS ------ ------- ------- ------- ---- --- ------- -------- -------- -------- volume * Class2 Group1 * * 0 65535 65536 PRIVATE volume Volume1 Class2 Group1 * * 65536 1114111 1048576 ACTIVE volume * Class2 Group1 * * 1114112 32964607 31850496 FREE OBJ CLASS GROUP DISK VOLUME STATUS ------ ------- ------- ------- ------- -------- slice Class2 Group1 * Volume1 ACTIVE |
For a stripe volume, see also the stripe width.
Check the underlined parts.
# sdxinfo -G -c Class2 -o Group1 -e long |
6) Backing up to tape
On backup server Node3, back up data from the shadow volume to tape. In the following examples, back up data in shadow volume Volume1 to a tape medium of tape device /dev/st0.
See
For details on the backup method, see the manuals of file systems to be backed up and used commands.
Information
In a GFS Shared File System
Back up through the method as described in step 6a).
6a) When backing up data with the dd(1) command
# dd if=/dev/sfdsk/Class2/dsk/Volume1 of=/dev/st0 bs=32768 |
6b) When backing up the ext4 file system with the tar(1) command
6b-1) Mount the ext4 file system on shadow volume Volume1 on /mnt1, a temporary mount point, in read only mode.
# mkdir /mnt1 # mount -t ext4 -o ro /dev/sfdsk/Class2/dsk/Volume1 /mnt1 |
6b-2) Back up data held in the file system to tape.
# cd /mnt1 # tar cvf /dev/st0 . |
6b-3) Unmount the file system mounted in step 6b-1).
# cd / |
7) Removing the shadow volume
After the backup process is complete, remove the shadow volume to prevent improper access to it. The following procedure must be performed on backup server Node3.
7-1) Stopping the shadow volume
Stop shadow volume Volume1.
# sdxshadowvolume -F -c Class2 -v Volume1 |
7-2) Removing the shadow volume
Remove shadow volume Volume1.
# sdxshadowvolume -R -c Class2 -v Volume1 |
7-3) Removing the shadow group
Remove shadow group Group1.
# sdxshadowgroup -R -c Class2 -g Group1 |
7-4) Removing the shadow disks
Remove shadow disks Disk1, Disk2, Disk3, and Disk4.
# sdxshadowdisk -R -c Class2 -d Disk1 # sdxshadowdisk -R -c Class2 -d Disk2 # sdxshadowdisk -R -c Class2 -d Disk3 # sdxshadowdisk -R -c Class2 -d Disk4 |
8) Resuming the services
Resume the services in the primary domain. The following procedure must be performed on the node that runs the services.
8-1) Activating the application volume
Activate application volume Volume1.
# sdxvolume -N -c Class1 -v Volume1 |
8-2) Resuming the services
When the file system on application volume Volume1 was unmounted in step 2), mount it again.
Start the applications using Volume1.
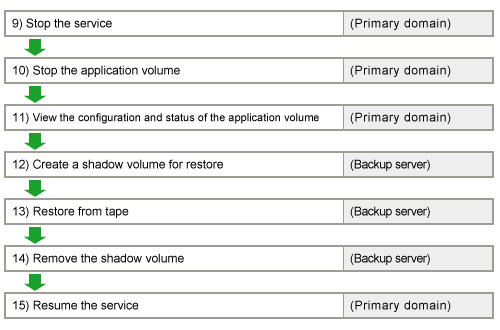
9) Stopping the services
Exit all applications accessing application volume Volume1 on Node1 and Node2 in the primary domain.
When Volume1 is used as a file system, it should be unmounted.
10) Stopping the application volume
To write-lock application volume Volume1, inactivate Volume1 on Node1 and Node2 in the primary domain. Execute the following command on Node1 or Node2.
# sdxvolume -F -c Class1 -v Volume1 -e allnodes |
11) Viewing the configuration and status of the application volume
On Node1 or Node2 in the primary domain, view the configuration and status of application volume Volume1 that is the restore target. Confirm that Volume1 is in the STOP status. If the volume status is invalid, repair it referencing to "D.1.3 Volume Status Abnormality"
Check the underlined parts.
# sdxinfo -c Class1 OBJ NAME TYPE CLASS GROUP DEVNAM DEVBLKS DEVCONNECT STATUS ------ ------- ------ ------- ------- ------- -------- ------------- ------- disk Disk1 stripe Class1 Group1 sda 8380800 Node1:Node2 ENABLE disk Disk2 stripe Class1 Group1 sdb 8380800 Node1:Node2 ENABLE disk Disk3 stripe Class1 Group1 sdc 8380800 Node1:Node2 ENABLE disk Disk4 stripe Class1 Group1 sdd 8380800 Node1:Node2 ENABLE OBJ NAME CLASS DISKS BLKS FREEBLKS SPARE
----- ------- ------- ------------------------- -------- -------- -----
group Group1 Class1 Disk1:Disk2:Disk3:Disk4 32964608 31850496 *
OBJ    NAME    CLASS   GROUP   SKIP JRM  1STBLK  LASTBLK    BLOCKS   STATUS
------ ------- ------- ------- ---- ---  ------- --------   -------- --------
volume *       Class1  Group1  *    *          0    65535      65536 PRIVATE
volume Volume1 Class1  Group1  *    *      65536  1114111    1048576 STOP
volume *       Class1  Group1  *    *    1114112 32964607   31850496 FREE
OBJ CLASS GROUP DISK VOLUME STATUS ------ ------- ------- ------- ------- -------- slice Class1 Group1 * Volume1 STOP |
If application volume Volume1 belongs to a stripe group, also pay attention to the stripe width.
Check the underlined parts.
# sdxinfo -G -c Class1 -o Group1 -e long |
12) Creating a shadow volume for restoration
On backup server Node3, create a volume for restoration (shadow volume) in the same configuration as the application volume found in step 11). The following settings are necessary on backup server Node3. A shadow volume for restoration and a shadow volume for backup are common. When it has already been created, simply change the access mode as described in step 12-4).
Note
Application volume data may be damaged if data is written into a shadow volume in incorrect configuration. Be sure to confirm that the shadow volume configuration is correct in step 12-5).
12-1) Registering shadow disks
Register disks sda, sdb, sdc, and sdd with shadow class Class2, and name them Disk1, Disk2, Disk3, and Disk4 respectively.
# sdxshadowdisk -M -c Class2 -d sda=Disk1,sdb=Disk2,sdc=Disk3,sdd=Disk4 |
Point
The disk names must correspond to the disk names assigned in step 1-1). The disk names assigned in 1-1) can be viewed in the NAME field for disk information displayed with the sdxinfo command in step 11).
The class can be assigned any name.
12-2) Creating a shadow group
Connect shadow disks Disk1, Disk2, Disk3, and Disk4 to stripe type shadow group Group1.
# sdxshadowdisk -C -c Class2 -g Group1 -d Disk1,Disk2,Disk3,Disk4 -a type=stripe,width=256 |
Point
If the application volume belongs to a stripe group or a concatenation group, the order of connecting shadow disks to a shadow group must correspond to the order of connecting disks to a group in step 1-2). The order of connecting disks in step 1-2) can be viewed in the DISKS field for group information displayed with the sdxinfo command in step 11).
If the application volume belongs to a stripe group, the stripe width of a shadow group must correspond to the stripe width specified in step 1-2). The stripe width specified in step 1-2) can be viewed in the WIDTH field for group information displayed with the sdxinfo -e long command in step 11).
The group can be assigned any name.
12-3) Creating a shadow volume
Create shadow volume Volume1 to Group1.
# sdxshadowvolume -M -c Class2 -g Group1 -v Volume1 -s 1048576 |
Point
The volume must be created in the size corresponding to the volume size in step 1-3). The size of a volume created in step 1-3) can be viewed in the BLOCKS field for volume information displayed with the sdxinfo command in step 11).
If there are multiple volumes, the corresponding shadow volumes must be created in the order of ascending values (first block numbers) in the 1STBLK field for volume information displayed with the sdxinfo command in step 11).
The volume can be assigned any name.
12-4) Setting the access mode of the shadow volume
Activate shadow volume Volume1 in the read and write access mode (rw).
# sdxshadowvolume -F -c Class2 -v Volume1 # sdxshadowvolume -N -c Class2 -v Volume1 -e mode=rw |
12-5) Viewing the shadow volume configuration
Using the sdxinfo command, confirm that the group configuration and the volume configuration are correct based on group information in the DISKS field, volume information in the 1STBLK field and in the BLOCKS field and so on.
Check the underlined parts.
# sdxinfo -c Class2
OBJ    NAME    TYPE     SCOPE       SPARE
------ ------- -------- ----------- -----
class  Class2  local    Node3       0
OBJ NAME TYPE CLASS GROUP DEVNAM DEVBLKS DEVCONNECT STATUS ------ ------- ------ ------- ------- ------- -------- ------------- ------- disk Disk1 stripe Class2 Group1 sda 8380800 Node3 ENABLE disk Disk2 stripe Class2 Group1 sdb 8380800 Node3 ENABLE disk Disk3 stripe Class2 Group1 sdc 8380800 Node3 ENABLE disk Disk4 stripe Class2 Group1 sdd 8380800 Node3 ENABLE OBJ NAME CLASS DISKS BLKS FREEBLKS SPARE
------ ------- ------- ------------------------- -------- -------- -----
group Group1 Class2 Disk1:Disk2:Disk3:Disk4 32964608 31850496 *OBJ NAME CLASS GROUP SKIP JRM 1STBLK LASTBLK BLOCKS STATUS ------ ------- ------- ------- ---- --- ------- -------- -------- -------- volume * Class2 Group1 * * 0 65535 65536 PRIVATE volume Volume1 Class2 Group1 * * 65536 1114111 1048576 ACTIVE volume * Class2 Group1 * * 1114112 32964607 31850496 FREE OBJ CLASS GROUP DISK VOLUME STATUS ------ ------- ------- ------- ------- -------- slice Class2 Group1 * Volume1 ACTIVE |
For a stripe volume, see also the stripe width.
# sdxinfo -G -c Class2 -o Group1 -e long |
13) Restoring from tape
On backup server Node3, restore shadow volume data from tape to which it was backed up in step 6). In the following examples, restore data held in shadow volume Volume1 from a tape medium of tape device /dev/st0.
See
For details on the restore method, see the manuals of file systems to be restored and used commands.
Information
In a GFS Shared File System
Restore through the method as described in step 13a).
13a) When restoring data with the dd(1) command
# dd if=/dev/st0 of=/dev/sfdsk/Class2/dsk/Volume1 bs=32768 |
13b) When restoring the ext4 file system with the tar(1) command
13b-1) Create the ext4 file system on Volume1.
# mkfs -t ext4 /dev/sfdsk/Class2/dsk/Volume1 |
13b-2) Mount the ext4 file system on shadow volume Volume1 on /mnt1, a temporary mount point.
# mkdir /mnt1 |
13b-3) Restore data held in the file system from tape.
# cd /mnt1 # tar xvf /dev/st0 |
13b-4) Unmount the file system mounted in step 13b-3).
# cd / # umount /mnt1 |
14) Removing the shadow volume
After the restore process is complete, remove the shadow volume to prevent improper access to it. The following procedure must be performed on backup server Node3.
14-1) Stopping the shadow volume
Stop shadow volume Volume1.
# sdxshadowvolume -F -c Class2 -v Volume1 |
14-2) Removing the shadow volume
Remove shadow volume Volume1.
# sdxshadowvolume -R -c Class2 -v Volume1 |
14-3) Removing the shadow group
Remove shadow group Group1.
# sdxshadowgroup -R -c Class2 -g Group1 |
14-4) Removing the shadow disks
Remove shadow disks Disk1, Disk2, Disk3, and Disk4.
# sdxshadowdisk -R -c Class2 -d Disk1 # sdxshadowdisk -R -c Class2 -d Disk2 # sdxshadowdisk -R -c Class2 -d Disk3 |
15) Resuming the services
Resume the services in the primary domain. The following procedure must be performed on the node that runs the services.
15-1) Activating the application volume
Activate application volume Volume1.
# sdxvolume -N -c Class1 -v Volume1 |
15-2) Resuming the services
When the file system on application volume Volume1 was unmounted in step 9), mount it again.
Start the applications using Volume1.