If data on a transaction volume has been updated since the latest backup, then if a restore is performed from the backup volume, recently updated data is overwritten.
Figure 9.1 Notes on Restoration of AdvancedCopy Manager
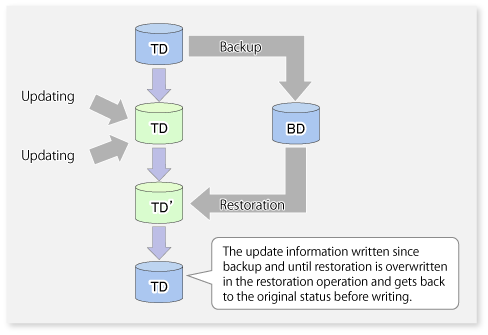
TD: Transaction volume
BD: Backup volume
AIX uses LVM to manage all devices. Therefore, executing backup rewrites the LVM management information in the backup volume with that in the transaction volume. As a result, the backup volume cannot be activated and the logical volume of the backup volume cannot be mounted.
To mount the backup volume, the LVM management information in the backup volume must be rewritten. However, this operation is not recommended because it results in an inability to use the normal procedure to restore the transaction volume. If circumstances require mounting of the backup volume, the procedure given below can be used to mount the backup volume. Follow the procedure very carefully; otherwise, transaction data may be destroyed. For information on each command, refer to the AIX manuals. Also, see the following section; "Restoration procedure after LVM management information in the backup volume is rewritten".
Using, for example, the lspv command, specify the physical volume name of the backup volume.
# /usr/sbin/lspv
hdisk0         0004f10aa92e686c    rootvg
hdisk1         0004f10a1c7879c5    vg01
In the above example, the volume group name of the backup volume is vg01, and the physical volume name is hdisk1.
Use the chdev command to temporarily remove the backup volume from LVM.
# /usr/sbin/chdev -l hdisk1 -a pv=clear
Use the exportvg command to export the backup volume.
# /usr/sbin/exportvg vg01
Use the recreatevg command to rewrite the LVM management information in the backup volume.
# /usr/sbin/recreatevg -y vg01 hdisk1
Executing the recreatevg command changes the logical volume name in the volume group. Use the lsvg command to confirm the new logical volume name.
# /usr/sbin/lsvg -l vg01
vg01:
LV NAME             TYPE       LPs   PPs   PVs  LV STATE      MOUNT POINT
fslv01              jfs        2     2     1    closed/syncd  N/A
Mount a file system by specifying the logical volume name confirmed in step 5. Unmount the logical volume before the next time that backup is performed. If the logical volume in the backup volume is mounted, backup fails.
Rewriting the LVM management information in the backup volume makes it inconsistent with that in the transaction volume and prevents use of the normal procedure to restore the backup volume. In such cases, follow the procedure given below to restore it. Follow the procedure very carefully; otherwise, transaction data may be destroyed. For information on each command, refer to the AIX manuals.
Refer to "Appendix A Pre-processing and Post-processing of Backup and Restoration" and edit the post-processing script for restoration.
Execute restore processing. The transaction volume is now inactive because of the action taken in step 1.
Using, for example, the lspv command, display the physical volume name of the transaction volume.
# /usr/sbin/lspv
hdisk0         0004f10aa92e686c    rootvg
hdisk1         0004f10a1c7879c5    vg01
In the above example, the volume group name of the transaction volume is vg01, and the physical volume name is hdisk1.
Use the chdev command to temporarily remove the transaction volume from LVM.
# /usr/sbin/chdev -l hdisk1 -a pv=clear
Use the exportvg command to export the transaction volume.
# /usr/sbin/exportvg vg01
Use the recreatevg command to rewrite the LVM management information in the transaction volume.
# /usr/sbin/recreatevg -y vg01 hdisk1
Executing the recreatevg command changes the logical volume name in the volume group. Use the lsvg command to confirm the new logical volume name.
# /usr/sbin/lsvg -l vg01
vg01:
LV NAME             TYPE       LPs   PPs   PVs  LV STATE      MOUNT POINT
fslv01              jfs        2     2     1    closed/syncd  N/A
Mount a file system by specifying the logical volume name confirmed in step 7.
When a backup volume is restored to a volume other than a transaction volume, the pre-processing and post-processing scripts for restoration are not executed. This operation also makes the LVM management information in the backup volume inconsistent with that in the restoration destination volume. In this case, the LVM management information must be rewritten. For these reasons, to restore a backup volume to a volume other than a transaction volume, follow the procedure given below. Follow the procedure very carefully; otherwise, transaction data may be destroyed. For information on each command, refer to the AIX manuals.
Unmount all logical volumes in the volume group of the restoration destination volume.
Use the varyoffvg command to deactivate the volume group of the restoration destination volume. The execution example shown below uses a volume group named vg01 for the restoration destination volume.
# /usr/sbin/varyoffvg vg01
Execute restoration for the restoration destination volume. For the procedure, refer to "3.5.3 Restoring Data".
Using, for example, the lspv command, display the physical volume name of the restoration destination volume.
# /usr/sbin/lspv
hdisk0         0004f10aa92e686c    rootvg
hdisk1         0004f10a1c7879c5    vg01
In the above example, the volume group name of the restoration destination volume is vg01, and the physical volume name is hdisk1.
Use the chdev command to temporarily remove the restoration destination volume from LVM.
# /usr/sbin/chdev -l hdisk1 -a pv=clear
Use the exportvg command to export the restoration destination volume.
# /usr/sbin/exportvg vg01
Use the recreatevg command to rewrite the LVM management information in the restoration destination volume.
# /usr/sbin/recreatevg -y vg01 hdisk1
Executing the recreatevg command changes the logical volume name in the volume group. Use the lsvg command to confirm the new logical volume name.
# /usr/sbin/lsvg -l vg01
vg01:
LV NAME             TYPE       LPs   PPs   PVs  LV STATE      MOUNT POINT
fslv01              jfs        2     2     1    closed/syncd  N/A
Mount a file system by specifying the logical volume name confirmed in step 8.