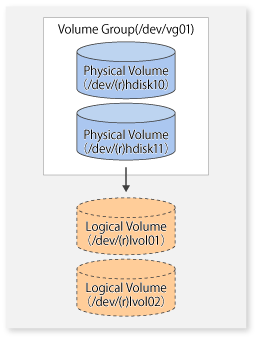
When the volume group configuration does not satisfy the conditions for operation in units of volume groups, replication can be performed by operation in units of physical disks.
When backup is performed in units of physical disks, volume group integrity must be maintained and, therefore, all physical disks in the volume group must be operated synchronously.
Point
Physical volumes that should be operated synchronously can be checked by using Web Console or the stgxfwcmdispdev command.
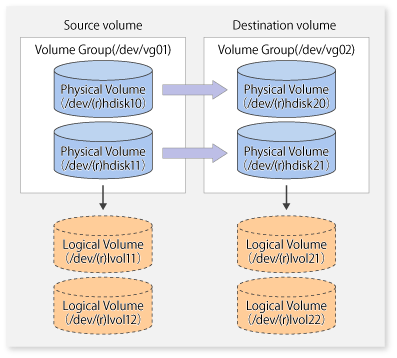
Figure 6.48 Sample Configuration for Operation in Units of Physical Disks

To use the replica volume after replication in the situation when a source volume is a volume group, the replica volume must have the same logical volume configuration as the source volume and must be a volume group of the same physical size.

When configuring the source and replica volumes, specify all of the physical disks in the volume group.
[Execution Example]
# /opt/FJSVswsrp/bin/swsrpsetvol /dev/hdisk10 /dev/hdisk20
swsrpsetvol completed
# /opt/FJSVswsrp/bin/swsrpsetvol /dev/hdisk11 /dev/hdisk21
swsrpsetvol completed
#
Perform the operation by synchronizing all physical disks in the volume group.
Perform the required pre-processing and post-processing work for each volume group before and after (respectively) the replication. Disable pre-processing and post-processing when operating individual physical disks.
[Example of Snapshot Replication]
(Perform pre-processing for the source and target volumes.)

# /opt/FJSVswsrp/bin/swsrpmake -f -t /dev/hdisk10 /dev/hdisk20
FROM=/dev/hdisk10@SV1, TO=/dev/hdisk20@SV1 swsrpmake completed
# /opt/FJSVswsrp/bin/swsrpmake -f -t /dev/hdisk11 /dev/hdisk21
FROM=/dev/hdisk11@SV1, TO=/dev/hdisk21@SV1 swsrpmake completed
#

(Perform post-processing for the source and target volumes.)
[Example of Synchronous Replication]
(Perform pre-processing for the target volume.)

# /opt/FJSVswsrp/bin/swsrpstartsync -t /dev/hdisk10 /dev/hdisk20
FROM=/dev/hdisk10@SV1, TO=/dev/hdisk20@SV1 swsrpstartsync completed
# /opt/FJSVswsrp/bin/swsrpstartsync -t /dev/hdisk11 /dev/hdisk21
FROM=/dev/hdisk11@SV1, TO=/dev/hdisk21@SV1 swsrpstartsync completed
#

(After equivalency maintenance state)
(Perform pre-processing for the source volume.)

# /opt/FJSVswsrp/bin/swsrpmake -f -t /dev/hdisk10 /dev/hdisk20
FROM=/dev/hdisk10@SV1, TO=/dev/hdisk20@SV1 swsrpmake completed
# /opt/FJSVswsrp/bin/swsrpmake -f -t /dev/hdisk11 /dev/hdisk21
FROM=/dev/hdisk11@SV1, TO=/dev/hdisk21@SV1 swsrpmake completed
#

(Perform post-processing for the source and target volumes.)
The table below summarizes the pre-processing and post-processing work to be performed before and after replication.
Pre-processing | Post-processing | |
|---|---|---|
Source |
| If file systems are included, remount the volumes that were unmounted by pre-processing. |
Target volume |
|
|
Deactivate Volume Group
Deactivate the volume group as follows:
# /usr/sbin/varyoffvg vg02
#
Reconfiguring Volume Group
Reconfigure the volume group as follows:
Use the chdev command to temporarily remove the target volume from LVM.
# /usr/sbin/chdev -l hdisk20 -a pv=clear
# /usr/sbin/chdev -l hdisk21 -a pv=clear
Use the exportvg command to export the target volume.
# /usr/sbin/exportvg vg02
Create the logical volume list file in following format.
lvol11:lvol21
loglv11:loglv21
lvol12:lvol22
loglv12:loglv22
Use the recreatevg command to rewrite the LVM management information in the target volume.
# /usr/sbin/recreatevg -l <logical volume list file> -L /fs -y vg02 hdisk20 hdisk21
Use the chfs command to change the mount point.
# /usr/sbin/chfs -m /mnt21 /fs/mnt11
# /usr/sbin/chfs -m /mnt22 /fs/mnt12