If a VxVM volume is the backup target, execute backup in the physical disk units that comprise the VxVM volume.
When backup operation is performed in units of physical disks, disk group integrity must be maintained and, therefore, all the physical disks in the disk group must be processed synchronously.
Point
For the physical volume which should be synchronized, confirm it by using either Web Console or the stgxfwcmdispdev command.
Note
Before starting this operation, be sure to understand the basic operation of ordinary volumes.
Snapshot backup is recommended for backing up in units of physical disks. In the case of synchronized backup, commands that access the destination volume, such as VxVM commands cannot be used during full copy or differential copy.
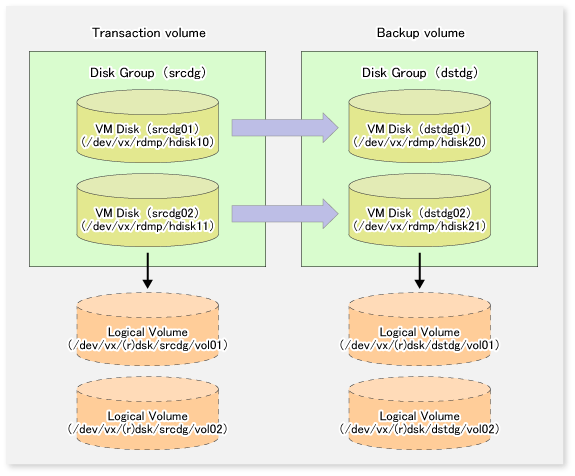
Configure disk groups that are to be used as transaction volumes or backup volumes.
Observe the following conditions when configuring the disk groups:
The number, sizes, and types of VM disks must be the same.
The configurations of logical volumes must be the same.
Figure 3.17 Transaction Volume and Backup Volume

The disk group must be reconfigured in backup post-processing. Confirm that a volume group configuration information file has been saved in the following format.
/etc/vx/cbr/bk/<disk group name>.<disk group ID>
When configuring the transaction and backup volumes, all disks in the volume group must be specified.
# /opt/FJSVswsts/bin/swstdevinfoset -t /dev/vx/dmp/hdisk10
swstdevinfoset completed
# /opt/FJSVswsts/bin/swstdevinfoset -t /dev/vx/dmp/hdisk11
swstdevinfoset completed
# /opt/FJSVswsts/bin/swstdevinfoset -b /dev/vx/dmp/hdisk20
swstdevinfoset completed
# /opt/FJSVswsts/bin/swstdevinfoset -b /dev/vx/dmp/hdisk21
swstdevinfoset completed
#
For the backup operation of a VxVM volume, a device map file must be created because a backup volume in the same volume structure as the transaction volume must be specified.
# Transaction volume           Backup volume
/dev/vx/dmp/hdisk10            /dev/vx/dmp/hdisk20
/dev/vx/dmp/hdisk11            /dev/vx/dmp/hdisk21
For details on the device map file, refer to "3.4.9 Preparing Device Map File".
Before performing backup operation, all physical disks in the disk group must be synchronized.
Perform the required pre-processing and/or post-processing work for each volume group. Disable pre-processing and post-processing when operating individual physical disks.
(Perform pre-processing for the transaction and backup volumes.)

# /opt/FJSVswsts/bin/swstbackup /dev/vx/dmp/hdisk10 -Xdevmap /acm/devmap.txt
/dev/vx/dmp/hdisk10 swstbackup completed
# /opt/FJSVswsts/bin/swstbackup /dev/vx/dmp/hdisk11 -Xdevmap /acm/devmap.txt
/dev/vx/dmp/hdisk11 swstbackup completed
#

(Perform post-processing for the transaction and backup volumes.)
(Perform pre-processing for the backup volumes.)

# /opt/FJSVswsts/bin/swststartsync /dev/vx/dmp/hdisk10 -Xdevmap /acm/devmap.txt
/dev/vx/dmp/hdisk10 swststartsync completed
# /opt/FJSVswsts/bin/swststartsync /dev/vx/dmp/hdisk11 -Xdevmap /acm/devmap.txt
/dev/vx/dmp/hdisk11 swststartsync completed
#

(After state of equivalency upkeep)
(Perform preprocessing for the transaction volumes.)

# /opt/FJSVswsts/bin/swstbackup /dev/vx/dmp/hdisk10
/dev/vx/dmp/hdisk10 swstbackup completed
# /opt/FJSVswsts/bin/swstbackup /dev/vx/dmp/hdisk11
/dev/vx/dmp/hdisk11 swstbackup completed
#

(Perform post-processing for the transaction and backup volumes.)
The table below summarizes the pre-processing and post-processing work to be performed before and after backup.
Volume Type | Pre-processing | Post-processing |
|---|---|---|
Transaction |
| If file systems are included, mount the volumes that were unmounted during preprocessing. |
Backup |
|
|
Reconfiguring Disk Group
Reconfigure the disk group as follows:
Pre-commit analysis for restoration
# /etc/vx/bin/vxconfigrestore -p dstdg
Diskgroup dstdg configuration restoration started ......

Installing volume manager disk header for hdisk20 ...
Installing volume manager disk header for hdisk21 ...
-
dstdg's diskgroup configuration is restored (in precommit state).
Diskgroup can be accessed in read only and can be examined using
vxprint in this state.

Run:
  vxconfigrestore -c dstdg ==> to commit the restoration.
  vxconfigrestore -d dstdg ==> to abort the restoration.
#
Commit the change required for restoring the configuration of the copy destination disk group.
# /etc/vx/bin/vxconfigrestore -c dstdg
Committing configuration restoration for diskgroup dstdg ....

dstdg's diskgroup configuration restoration is committed.
#
Note
When performing a system disk exchange, there are cases when conflicting backup configuration information may exist.
In such cases, the disk group ID needs to be reset after executing the above command.
After this operation, where the volumes within a disk group are required to be run in synchronous mode in background, synchronous processing may take some time depending on the volume configuration.
It is also possible to use the volumes during this time.
All physical disks in the disk group must first be synchronized to perform this operation.
Perform the required pre-processing or post-processing work for each disk group as necessary. Disable pre-processing and post-processing when using individual physical disks.
(Perform pre-processing for the transaction and backup volumes.)

# /opt/FJSVswsts/bin/swstrestore /dev/vx/dmp/hdisk10
/dev/vx/dmp/hdisk10 swstrestore completed
# /opt/FJSVswsts/bin/swstrestore /dev/vx/dmp/hdisk11
/dev/vx/dmp/hdisk11 swstrestore completed
#
(Perform post-processing for the transaction and backup volumes.)
The table below summarizes the pre-processing and post-processing work to be performed before and after restoration.
Volume Type | Pre-processing | Post-processing |
|---|---|---|
Backup |
| Post-processing is not required. |
Restoration |
|
|
Reconfiguring Disk Group
Reconfigure the disk group as follows:
Restoration pre-commit analysis
# /etc/vx/bin/vxconfigrestore -p srcdg
Diskgroup srcdg configuration restoration started ......

Installing volume manager disk header for hdisk10 ...
Installing volume manager disk header for hdisk11 ...
-
srcdg's diskgroup configuration is restored (in precommit state).
Diskgroup can be accessed in read only and can be examined using
vxprint in this state.

Run:
  vxconfigrestore -c srcdg ==> to commit the restoration.
  vxconfigrestore -d srcdg ==> to abort the restoration.
#
Commit the change required for restoring the configuration of the copy destination disk group.
# /etc/vx/bin/vxconfigrestore -c srcdg
Committing configuration restoration for diskgroup srcdg ....

srcdg's diskgroup configuration restoration is committed.
#
Note
When performing a system disk exchange, there are cases when conflicting backup configuration information may exist.
In such cases, the disk group ID needs to be reset after executing the above command.
After this operation, where the volumes within a disk group are required to be run in synchronous mode in background, synchronous processing it may take some time depending on the volume configuration.
It is also possible to use the volumes during this time.