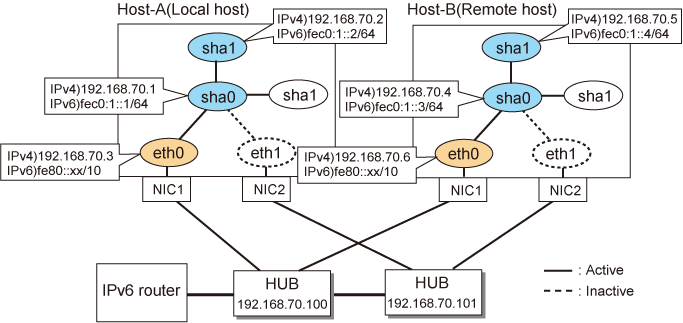
This section describes an example configuration procedure of the network shown in the diagram below.
The xx in the figure below are assigned automatically by the automatic address configuration.
For the network configuration other than GLS, refer to "3.2.2 Network configuration".
The dotted line indicates that the interface is inactive.

[HOST-A]
1) Setting up the system
1-1) Define IP addresses and hostnames in /etc/hosts file. Note that it is not necessary to define an IPv6 address, which automatically allocates address by the Stateless Address Autoconfiguration feature.
192.168.70.1 hosta1 # HOST-A Virtual IP 192.168.70.2 hosta2 # HOST-A Virtual IP 192.168.70.3 host11 # HOST-A Physical IP 192.168.70.4 hostb1 # HOST-B Virtual IP 192.168.70.5 hostb2 # HOST-B Virtual IP 192.168.70.6 host21 # HOST-B Physical IP 192.168.70.100 swhub1 # Primary HUB IP 192.168.70.101 swhub2 # Secondary HUB IP fec0:1::1 v6hosta1 # HOST-A Virtual IP fec0:1::2 v6hosta2 # HOST-A Virtual IP fec0:1::3 v6hostb1 # HOST-B Virtual IP fec0:1::4 v6hostb2 # HOST-B Virtual IP |
1-2) Describe the IP address defined in the above in the /etc/sysconfig/network-scripts/ifcfg-ethX (X is 0,1) file.
Contents of /etc/sysconfig/network-scripts/ifcfg-eth0
DEVICE=eth0 BOOTPROTO=static HOTPLUG=no IPADDR=192.168.70.3 NETMASK=255.255.255.0 ONBOOT=yes TYPE=Ethernet |
Contents of /etc/sysconfig/network-scripts/ifcfg-eth1
DEVICE=eth1 BOOTPROTO=static HOTPLUG=no ONBOOT=yes TYPE=Ethernet |
2) Reflecting system setting
Run the following command and reboot the system. After rebooting the system, verify eth0 is enabled as an IPv4/IPv6 interface using the ip command.
/sbin/shutdown -r now
3) Setting a subnet mask
/opt/FJSVhanet/usr/sbin/hanetmask create -i 192.168.70.0 -m 255.255.255.0
4) Creation of IPv4 virtual interface
/opt/FJSVhanet/usr/sbin/hanetconfig create -n sha0 -m d -i 192.168.70.1 -e 192.168.70.3 -t eth0,eth1
/opt/FJSVhanet/usr/sbin/hanetconfig copy -n sha0,sha1 -i 192.168.70.2
Note
Ensure that the physical IP address specified using option '-e' is the same IP address configured in /etc/sysconfig/network-scripts/ifcfg-eth0.
5) Creation of IPv6 virtual interface
/opt/FJSVhanet/usr/sbin/hanetconfig create inet6 -n sha0 -m d -i fec0:1::1/64 -t eth0,eth1
/opt/FJSVhanet/usr/sbin/hanetconfig copy inet6 -n sha0,sha1 -i fec0:1::2/64
6) Setting up the HUB monitoring function
/opt/FJSVhanet/usr/sbin/hanetpoll create -n sha0 -p 192.168.70.100,192.168.70.101 -b off
/opt/FJSVhanet/usr/sbin/hanetpoll copy -n sha0,sha1
7) Setting up the Standby patrol monitoring function
/opt/FJSVhanet/usr/sbin/hanetconfig create -n sha2 -m p -t sha0
8) Activating thevirtual interfaces
/opt/FJSVhanet/usr/sbin/strhanet -n sha0
/opt/FJSVhanet/usr/sbin/strhanet -n sha1
9) Starting the HUB monitoring function
/opt/FJSVhanet/usr/sbin/hanetpoll on
[HOST-B]
1) Setting up the system
1-1) Define IP addresses and hostnames in /etc/hosts file. Defined content is same as HOST-A.
1-2) Describe the IP address defined in the above in the /etc/sysconfig/network-scripts/ifcfg-ethX (X is 0,1) file.
Contents of /etc/sysconfig/network-scripts/ifcfg-eth0
DEVICE=eth0 BOOTPROTO=static HOTPLUG=no IPADDR=192.168.70.6 NETMASK=255.255.255.0 ONBOOT=yes TYPE=Ethernet |
Contents of /etc/sysconfig/network-scripts/ifcfg-eth1
DEVICE=eth1 BOOTPROTO=static HOTPLUG=no ONBOOT=yes TYPE=Ethernet |
2) Reflecting system setting
Run the following command and reboot the system. After rebooting the system, verify eth0 is enabled as an IPv4/IPv6 interface using the ip command.
/sbin/shutdown -r now
3) Setting a subnet mask
/opt/FJSVhanet/usr/sbin/hanetmask create -i 192.168.70.0 -m 255.255.255.0
4) Creation of IPv4 virtual interface
/opt/FJSVhanet/usr/sbin/hanetconfig create -n sha0 -m d -i 192.168.70.4 -e 192.168.70.6 -t eth0,eth1
/opt/FJSVhanet/usr/sbin/hanetconfig copy -n sha0,sha1 -i 192.168.70.5
Note
Ensure that the physical IP address specified using option '-e' is the same IP address configured in /etc/sysconfig/network-scripts/ifcfg-eth0.
5) Creation of IPv6 virtual interface
/opt/FJSVhanet/usr/sbin/hanetconfig create inet6 -n sha0 -m d -i fec0:1::3/64 -t eth0,eth1
/opt/FJSVhanet/usr/sbin/hanetconfig copy inet6 -n sha0,sha1 -i fec0:1::4/64
6) Setting up the HUB monitoring function
/opt/FJSVhanet/usr/sbin/hanetpoll create -n sha0 -p 192.168.70.100,192.168.70.101 -b off
/opt/FJSVhanet/usr/sbin/hanetpoll copy -n sha0,sha1
7) Setting up the Standby patrol monitoring function
/opt/FJSVhanet/usr/sbin/hanetconfig create -n sha2 -m p -t sha0
8) Activating the virtual interfaces
/opt/FJSVhanet/usr/sbin/strhanet -n sha0
/opt/FJSVhanet/usr/sbin/strhanet -n sha1
9) Starting the HUB monitoring function
/opt/FJSVhanet/usr/sbin/hanetpoll on