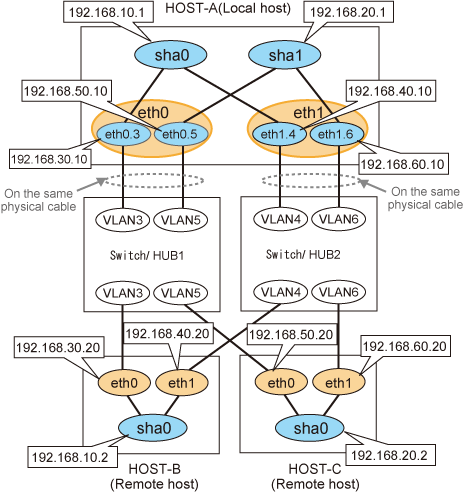
This section describes an example configuration procedure of the network shown in the diagram below.

[HOST-A]
1) Setting up the system
1-1) Define IP addresses and hostnames in the /etc/hosts file.
192.168.10.1 hosta1 # HOST-A Virtual IP 192.168.20.1 hosta2 # HOST-A Virtual IP 192.168.30.10 hosta3 # HOST-A Physical IP (Tagged VLAN interface) 192.168.40.10 hosta4 # HOST-A Physical IP (Tagged VLAN interface) 192.168.50.10 hosta5 # HOST-A Physical IP (Tagged VLAN interface) 192.168.60.10 hosta6 # HOST-A Physical IP (Tagged VLAN interface) 192.168.10.2 hostb1 # HOST-B Virtual IP 192.168.30.20 hostb3 # HOST-B Physical IP 192.168.40.20 hostb4 # HOST-B Physical IP 192.168.20.2 hostc2 # HOST-C Virtual IP 192.168.50.20 hostc5 # HOST-C Physical IP 192.168.60.20 hostc6 # HOST-C Physical IP |
1-2) Configure the /etc/sysconfig/network-scripts/ifcfg-ethX (X is 0,1) file as follows.
For RHEL7
Contents of /etc/sysconfig/network-scripts/ifcfg-eth0
DEVICE=eth0 BOOTPROTO=static HOTPLUG=no ONBOOT=yes TYPE=Ethernet |
Contents of /etc/sysconfig/network-scripts/ifcfg-eth1
DEVICE=eth1 BOOTPROTO=static HOTPLUG=no ONBOOT=yes TYPE=Ethernet |
For RHEL8 or later
Contents of /etc/sysconfig/network-scripts/ifcfg-eth0
DEVICE=eth0 BOOTPROTO=none ONBOOT=yes TYPE=Ethernet |
Contents of /etc/sysconfig/network-scripts/ifcfg-eth1
DEVICE=eth1 BOOTPROTO=none ONBOOT=yes TYPE=Ethernet |
1-3) Configure the /etc/sysconfig/network-scripts/ifcfg-ethX.Y (X is 0,1. Y is 3,4,5,6) file as follows.
For RHEL7
Contents of /etc/sysconfig/network-scripts/ifcfg-eth0.3
DEVICE=eth0.3 BOOTPROTO=static IPADDR=192.168.30.10 NETMASK=255.255.255.0 ONBOOT=yes VLAN=yes |
Contents of /etc/sysconfig/network-scripts/ifcfg-eth1.4
DEVICE=eth1.4 BOOTPROTO=static IPADDR=192.168.40.10 NETMASK=255.255.255.0 ONBOOT=yes VLAN=yes |
Contents of /etc/sysconfig/network-scripts/ifcfg-eth0.5
DEVICE=eth0.5 BOOTPROTO=static IPADDR=192.168.50.10 NETMASK=255.255.255.0 ONBOOT=yes VLAN=yes |
Contents of /etc/sysconfig/network-scripts/ifcfg-eth1.6
DEVICE=eth1.6 BOOTPROTO=static IPADDR=192.168.60.10 NETMASK=255.255.255.0 ONBOOT=yes VLAN=yes |
For RHEL8 or later
Contents of /etc/sysconfig/network-scripts/ifcfg-eth0.3
DEVICE=eth0.3 BOOTPROTO=none IPADDR=192.168.30.10 PREFIX=24 ONBOOT=yes VLAN=yes |
Contents of /etc/sysconfig/network-scripts/ifcfg-eth1.4
DEVICE=eth1.4 BOOTPROTO=none IPADDR=192.168.40.10 PREFIX=24 ONBOOT=yes VLAN=yes |
Contents of /etc/sysconfig/network-scripts/ifcfg-eth0.5
DEVICE=eth0.5 BOOTPROTO=none IPADDR=192.168.50.10 PREFIX=24 ONBOOT=yes VLAN=yes |
Contents of /etc/sysconfig/network-scripts/ifcfg-eth1.6
DEVICE=eth1.6 BOOTPROTO=none IPADDR=192.168.60.10 PREFIX=24 ONBOOT=yes VLAN=yes |
2) Reflecting system setting
For RHEL7
Run the following command to reboot the system. After rebooting the system, verify eth0.3, eth0.5, eth1.4 and eth1.6 are active using the ip command.
/sbin/shutdown -r now
For RHEL8 or later
Run the following commands to reload the connection profiles. After reloading the profiles, verify eth0.3, eth0.5, eth1.4 and eth1.6 are active using the ip command.
/usr/bin/nmcli connection reload
/usr/bin/nmcli connection up filename /etc/sysconfig/network-scripts/ifcfg-eth0
/usr/bin/nmcli connection up filename /etc/sysconfig/network-scripts/ifcfg-eth1
3) Setting subnet masks
/opt/FJSVhanet/usr/sbin/hanetmask create -i 192.168.10.0 -m 255.255.255.0
/opt/FJSVhanet/usr/sbin/hanetmask create -i 192.168.20.0 -m 255.255.255.0
4) Creating virtual interfaces
/opt/FJSVhanet/usr/sbin/hanetconfig create -n sha0 -m t -i 192.168.10.1 -t eth0.3,eth1.4
/opt/FJSVhanet/usr/sbin/hanetconfig create -n sha1 -m t -i 192.168.20.1 -t eth0.5,eth1.6
5) Activating the virtual interfaces
/opt/FJSVhanet/usr/sbin/strhanet
5) Reboot
Run the following command to reboot the system.
/sbin/shutdown -r now
[HOST-B]
1) Setting up the system
1-1) Define IP addresses and hostnames in the /etc/hosts file. Defined content is same as HOST-A.
1-2) Configure the /etc/sysconfig/network-scripts/ifcfg-ethX (X is 0,1) file as follows.
For RHEL7
Contents of /etc/sysconfig/network-scripts/ifcfg-eth0
DEVICE=eth0 BOOTPROTO=static HOTPLUG=no IPADDR=192.168.30.20 NETMASK=255.255.255.0 ONBOOT=yes TYPE=Ethernet |
Contents of /etc/sysconfig/network-scripts/ifcfg-eth1
DEVICE=eth1 BOOTPROTO=static HOTPLUG=no IPADDR=192.168.40.20 NETMASK=255.255.255.0 ONBOOT=yes TYPE=Ethernet |
For RHEL8 or later
Contents of /etc/sysconfig/network-scripts/ifcfg-eth0
DEVICE=eth0 BOOTPROTO=none IPADDR=192.168.30.20 PREFIX=24 ONBOOT=yes TYPE=Ethernet |
Contents of /etc/sysconfig/network-scripts/ifcfg-eth1
DEVICE=eth1 BOOTPROTO=none IPADDR=192.168.40.20 PREFIX=24 ONBOOT=yes TYPE=Ethernet |
2) Reflecting system setting
For RHEL7
Run the following command to reboot the system. After rebooting the system, verify eth0 and eth1 are active using the ip command.
/sbin/shutdown -r now
For RHEL8 or later
Run the following commands to reload the connection profiles. After reloading the profiles, verify eth0 and eth1 are active using the ip command.
/usr/bin/nmcli connection reload
/usr/bin/nmcli connection up filename /etc/sysconfig/network-scripts/ifcfg-eth0
/usr/bin/nmcli connection up filename /etc/sysconfig/network-scripts/ifcfg-eth1
3) Setting a subnet mask
/opt/FJSVhanet/usr/sbin/hanetmask create -i 192.168.10.0 -m 255.255.255.0
4) Creating a virtual interface
/opt/FJSVhanet/usr/sbin/hanetconfig create -n sha0 -m t -i 192.168.10.2 -t eth0,eth1
5) Activating the virtual interface
/opt/FJSVhanet/usr/sbin/strhanet
5) Reboot
Run the following command to reboot the system.
/sbin/shutdown -r now
[HOST-C]
1) Setting up the system
1-1) Define IP addresses and hostnames in the /etc/hosts file. Defined content is same as HOST-A.
1-2) Configure the /etc/sysconfig/network-scripts/ifcfg-ethX (X is 0,1) file as follows.
For RHEL7
Contents of /etc/sysconfig/network-scripts/ifcfg-eth0
DEVICE=eth0 BOOTPROTO=static HOTPLUG=no IPADDR=192.168.50.20 NETMASK=255.255.255.0 ONBOOT=yes TYPE=Ethernet |
Contents of /etc/sysconfig/network-scripts/ifcfg-eth1
DEVICE=eth1 BOOTPROTO=static HOTPLUG=no IPADDR=192.168.60.20 NETMASK=255.255.255.0 ONBOOT=yes TYPE=Ethernet |
For RHEL8 or later
Contents of /etc/sysconfig/network-scripts/ifcfg-eth0
DEVICE=eth0 BOOTPROTO=none HOTPLUG=no IPADDR=192.168.50.20 PREFIX=24 ONBOOT=yes TYPE=Ethernet |
Contents of /etc/sysconfig/network-scripts/ifcfg-eth1
DEVICE=eth1 BOOTPROTO=none HOTPLUG=no IPADDR=192.168.60.20 PREFIX=24 ONBOOT=yes TYPE=Ethernet |
2) Reflecting system setting
For RHEL7
Run the following command to reboot the system. After rebooting the system, verify eth0 and eth1 are active using the ip command.
/sbin/shutdown -r now
For RHEL8 or later
Run the following commands to reload the connection profiles. After reloading the profiles, verify eth0 and eth1 are active using the ip command.
/usr/bin/nmcli connection reload
/usr/bin/nmcli connection up filename /etc/sysconfig/network-scripts/ifcfg-eth0
/usr/bin/nmcli connection up filename /etc/sysconfig/network-scripts/ifcfg-eth1
3) Setting a subnet mask
/opt/FJSVhanet/usr/sbin/hanetmask create -i 192.168.20.0 -m 255.255.255.0
4) Creating a virtual interface
/opt/FJSVhanet/usr/sbin/hanetconfig create -n sha0 -m t -i 192.168.20.2 -t eth0,eth1
5) Activating the virtual interface
/opt/FJSVhanet/usr/sbin/strhanet
5) Reboot
Run the following command to reboot the system.
/sbin/shutdown -r now