This section describes the PCI Hot Plug for redundant NIC by Redundant line control function.
The target devices for PCI Hot Plug provided by PRIMEQUEST are as follows. The procedures vary depending on the target to be swapped:
SB
IOU
PCI Express card
For details, see the following manual:
PRIMEQUEST 2000 Series
"Hot Maintenance in Red Hat Enterprise Linux 7" in "PRIMEQUEST 2000 Series Administration Manual"
PRIMEQUEST 3000 Series
"Hot Maintenance in Red Hat Enterprise Linux 7 or later" in "PRIMEQUEST 3000 Series Administration Manual"
Note
Make sure to check the procedure for the PCI Hot Plug in the latest manual before performing the hot maintenance for NIC.
The following table shows the compatibility of PCI Hot Plug for the redundant line control function.
Mode | System configuration | PCI Hot Plug | ||
|---|---|---|---|---|
Add | Remove | Swap | ||
Fast switching mode | Single | A | A | A |
Cluster | B (*1) | B (*2) | A | |
NIC switching mode | Single | A | A | A |
Cluster | B (*1) | B (*2) | A | |
Virtual NIC mode | Single | A | A | A |
Cluster | B (*1) | B (*2) | A | |
GS linkage mode | Single | N | N | A |
Cluster | N | N | A | |
[Meaning of the alphabets]
A: The hot maintenance is enabled when GLS is running.
B: The hot maintenance is enabled after GLS is stopped.
N: Not supported.
Add NIC.
For details, see the following manuals.
PRIMEQUEST 2000 Series
"Hot Maintenance in Red Hat Enterprise Linux 7" in "PRIMEQUEST 2000 Series Administration Manual"
PRIMEQUEST 3000 Series
"Hot Maintenance in Red Hat Enterprise Linux 7 or later" in "PRIMEQUEST 3000 Series Administration Manual"
Add the configuration for virtual interfaces.
'For details, see "5.2.1 Adding configuration".
Delete virtual interfaces.
For details, see "5.2.3 Deleting configuration".
Delete NIC.
For details, see the following manuals.
PRIMEQUEST 2000 Series
"Hot Maintenance in Red Hat Enterprise Linux 7" in "PRIMEQUEST 2000 Series Administration Manual"
PRIMEQUEST 3000 Series
"Hot Maintenance in Red Hat Enterprise Linux 7 or later" in "PRIMEQUEST 3000 Series Administration Manual"
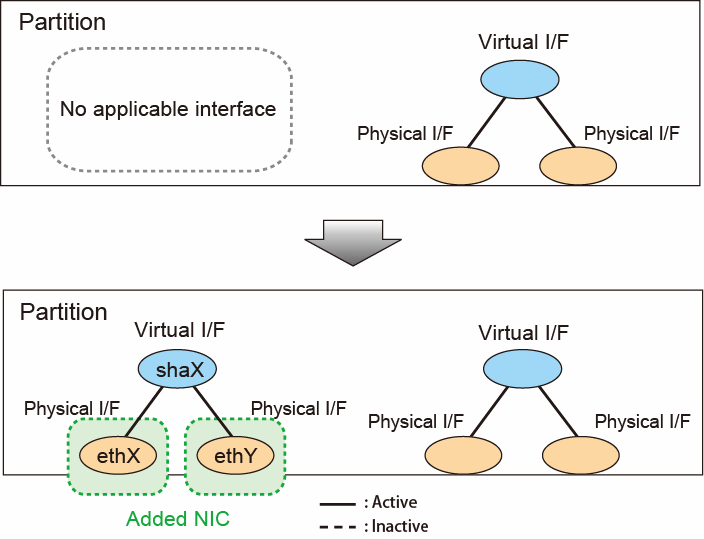
This section describes the procedure for adding NICs and creating a virtual interface to make the added NICs redundant.
Figure 6.1 Addition of a virtual interface for making the added NICs (ethX, ethY) redundant

Adding NIC
Add NIC. For procedures, see the following manuals:
PRIMEQUEST 2000 Series
"Hot Maintenance in Red Hat Enterprise Linux 7" in "PRIMEQUEST 2000 Series Administration Manual"
PRIMEQUEST 3000 Series
"Hot Maintenance in Red Hat Enterprise Linux 7 or later" in "PRIMEQUEST 3000 Series Administration Manual"
Creating virtual interface
Refer to "3.3 Additional system setup" and create a virtual interface to duplicate the added NIC.
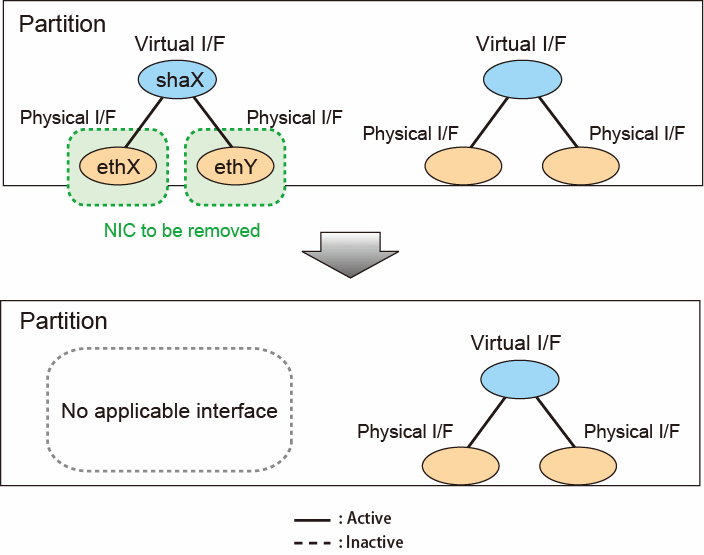
This section describes the procedure for removing NICs whose virtual interface makes them redundant.
Figure 6.2 Removing NICs whose virtual interface makes them redundant (ethX, ethY)

Preparation for removing NIC
See "3.5 Deleting configuration information" to remove the virtual interface that uses the NIC to be removed.
Removing NIC
Remove NIC. For the procedures, see the following manuals:
PRIMEQUEST 2000 Series
"Hot Maintenance in Red Hat Enterprise Linux 7" in "PRIMEQUEST 2000 Series Administration Manual"
PRIMEQUEST 3000 Series
"Hot Maintenance in Red Hat Enterprise Linux 7 or later" in "PRIMEQUEST 3000 Series Administration Manual"
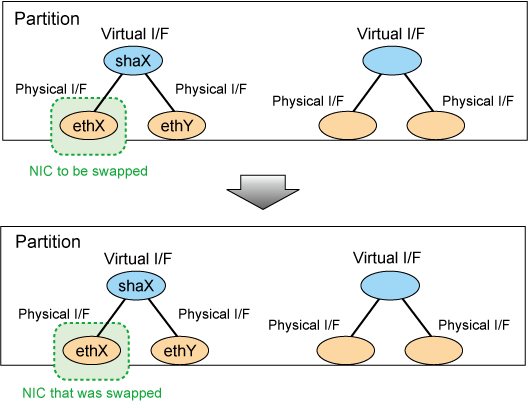
This section describes the procedure for swapping a NIC whose virtual interface makes it redundant.
Figure 6.3 Swapping a NIC whose virtual interface makes it redundant (ethX)

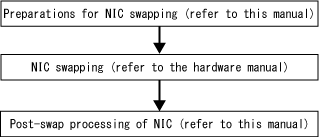
Perform the operation in the following:

Detailed procedures for each redundant line switching mode are shown below.
Replace the virtual interface name (shaX) and physical interface name (ethX, ethY) described in this procedure with the interface suitable for your environment.
For Fast switching mode
Preparations for NIC swapping
1-1. From the virtual interface definition, temporarily delete the definition information about the NIC to be swapped (The interface name of the target NIC is ethX).
# /opt/FJSVhanet/usr/sbin/hanetnic delete -n shaX -i ethX |
1-2. Enter the dsphanet command to confirm that the device status of the target NIC (interface name: ethX) is "CUT".
# /opt/FJSVhanet/usr/sbin/dsphanet
[IPv4,Patrol / Virtual NIC]
 Name       Status   Mode CL  Device
+----------+--------+----+----+------------------------------------------------+
shaX Active t OFF ethX(CUT),ethY(ON) |
NIC swapping
Perform NIC swapping. For details, see the manuals below.
PRIMEQUEST 2000 Series
"Hot Maintenance in Red Hat Enterprise Linux 7" in "PRIMEQUEST 2000 Series Administration Manual"
PRIMEQUEST 3000 Series
"Hot Maintenance in Red Hat Enterprise Linux 7 or later" in "PRIMEQUEST 3000 Series Administration Manual"
Post-swap processing of NIC
3-1. Restore the NIC (interface name: ethX) that was temporarily deleted in step 1.
# /opt/FJSVhanet/usr/sbin/hanetnic add -n shaX -i ethX |
3-2. Enter the dsphanet command to confirm that the device status of the swapped NIC (interface name: ethX) is "ON".
# /opt/FJSVhanet/usr/sbin/dsphanet
[IPv4,Patrol / Virtual NIC]
 Name       Status   Mode CL  Device
+----------+--------+----+----+------------------------------------------------+
shaX Active t OFF ethY(ON),ethX(ON) |
For NIC switching mode
Preparations for NIC swapping
1-1. Stop HUB monitoring.
# /opt/FJSVhanet/usr/sbin/hanetpoll off |
1-2. Stop standby patrol monitoring. If the standby patrol function is not used, skip this step.
# /opt/FJSVhanet/usr/sbin/stpptl -n shaY |
1-3. Enter the dsphanet command to check the status of the NIC (Interface name: ethX) to be swapped. The NIC must be in a different state from that of an active NIC (the NIC must be in the "OFF" or "STOP" state). If the NIC is active, follow step 1-4 to switch its state to standby.
# /opt/FJSVhanet/usr/sbin/dsphanet
[IPv4,Patrol / Virtual NIC]
 Name       Status   Mode CL  Device
+----------+--------+----+----+------------------------------------------------+
shaX Active d OFF ethX(ON),ethY(OFF) |
1-4. If the NIC is an active NIC, switch its state to standby. After the switch, enter the dsphanet command to confirm that the NIC is a standby NIC(OFF).
# /opt/FJSVhanet/usr/sbin/hanetnic change -n shaX |
# /opt/FJSVhanet/usr/sbin/dsphanet
[IPv4,Patrol / Virtual NIC]
 Name       Status   Mode CL  Device
+----------+--------+----+----+------------------------------------------------+
shaX Active d OFF ethX(OFF),ethY(ON) |
1-5. Stop interface status monitoring.
# /bin/touch /var/opt/FJSVhanet/tmp/disable_watchif |
NIC swapping
Perform NIC swapping. For details, see the manuals below.
PRIMEQUEST 2000 Series
"Hot Maintenance in Red Hat Enterprise Linux 7" in "PRIMEQUEST 2000 Series Administration Manual"
PRIMEQUEST 3000 Series
"Hot Maintenance in Red Hat Enterprise Linux 7 or later" in "PRIMEQUEST 3000 Series Administration Manual"
Post-swap processing of NIC
3-1. Change HWADDR of the interface setting file (ifcfg-ethX) of the swapped NIC to the MAC address of the swapped NIC (when HWADDR is described in the file).
ifcfg-ethX (swapped NIC)
HWADDR=XX:XX:XX:XX:XX:XX |
3-2. Set the state of the swapped NIC to that of a standby NIC of GLS.
The procedure varies depending on whether or not the IP address set to the virtual interface is only an IPv6 address.
If an IPv4 address is set to the virtual interface
[For RHEL7]
Make sure that an IPv4 address is not assigned and the "UP" and "NOARP" flags are set.
# /usr/sbin/ip link set dev ethX arp off # /usr/sbin/ip link set dev ethX up # /usr/sbin/ip addr show ethX N: ethX: <BROADCAST,MULTICAST,NOARP,UP,LOWER_UP> mtu 1500 qdisc mq state UP qlen 1000 link/ether XX:XX:XX:XX:XX:XX brd ff:ff:ff:ff:ff:ff inet6 fe80::XXXXXXXXXXXXXXXX/64 scope link valid_lft forever preferred_lft forever |
[For RHEL8 or later]
Make sure that an IPv4 address is not assigned, the UP flag exists, and the setting of the kernel parameter is reflected.
# sysctl -w net.ipv4.conf.ethX.arp_filter=1
# /usr/sbin/ip link set dev ethX up
# /usr/sbin/ip addr show ethX
N: ethX: <BROADCAST,MULTICAST,UP,LOWER_UP> mtu 1500 qdisc mq state UP qlen 1000
     link/ether XX:XX:XX:XX:XX:XX brd ff:ff:ff:ff:ff:ff
     inet6 fe80::XXXXXXXXXXXXXXXX/64 scope link
     valid_lft forever preferred_lft forever
# sysctl -n net.ipv4.conf.ethX.arp_filter
1 |
If an only IPv6 address is set the virtual interface
Make sure that the "UP" flag is set.
# /usr/sbin/ip link set dev ethX up
# /usr/sbin/ip addr show ethX
N: ethX: <BROADCAST,MULTICAST,UP,LOWER_UP> mtu 1500 qdisc mq state UP qlen 1000
    link/ether XX:XX:XX:XX:XX:XX brd ff:ff:ff:ff:ff:ff
    inet6 fe80::XXXXXXXXXXXXXXXX/64 scope link
valid_lft forever preferred_lft forever |
Information
If an only IPv6 address is set, when executing the dsphanet command right after executing the above commands, the available state "ON" is displayed for the both devices. This is a temporary state and it does not affect the system because the state will become a proper state by performing the following steps.
3-3. If necessary, fail-back the NIC.
# /opt/FJSVhanet/usr/sbin/hanetnic change -n shaX |
3-4. Start standby patrol monitoring. If the standby patrol function is not used, skip this step.
# /opt/FJSVhanet/usr/sbin/strptl -n shaY |
3-5. Restart HUB monitoring.
# /opt/FJSVhanet/usr/sbin/hanetpoll on |
3-6. Restart interface status monitoring.
# /bin/rm /var/opt/FJSVhanet/tmp/disable_watchif |
For Virtual NIC mode
Preparations for NIC swapping
1-1. Stop network monitoring.
# /opt/FJSVhanet/usr/sbin/hanetpathmon off |
1-2. From the virtual interface definition, temporarily delete the definition information about the NIC to be swapped (The interface name of the target NIC is ethX).
# /opt/FJSVhanet/usr/sbin/hanetnic delete -n shaX -i ethX |
1-3. Enter the dsphanet command to confirm that the device status of the target NIC (interface name: ethX) is "CUT".
# /opt/FJSVhanet/usr/sbin/dsphanet
[IPv4,Patrol / Virtual NIC]
 Name       Status   Mode CL  Device
+----------+--------+----+----+------------------------------------------------+
shaX Active v OFF ethX(CUT),ethY(ON) |
NIC swapping
Perform NIC swapping. For details, see the manuals below.
PRIMEQUEST 2000 Series
"Hot Maintenance in Red Hat Enterprise Linux 7" in "PRIMEQUEST 2000 Series Administration Manual"
PRIMEQUEST 3000 Series
"Hot Maintenance in Red Hat Enterprise Linux 7 or later" in "PRIMEQUEST 3000 Series Administration Manual"
Post-swap processing of NIC
3-1. Restore the NIC (interface name: ethX) that was temporarily deleted in step 1.
# /opt/FJSVhanet/usr/sbin/hanetnic add -n shaX -i ethX |
3-2. Enter the dsphanet command to confirm that the device status of the swapped NIC (interface name: ethX) is "OFF".
# /opt/FJSVhanet/usr/sbin/dsphanet
[IPv4,Patrol / Virtual NIC]
 Name       Status   Mode CL  Device
+----------+--------+----+----+------------------------------------------------+
shaX Active v OFF ethX(OFF),ethY(ON) |
3-3. If necessary, fail-back the NIC.
# /opt/FJSVhanet/usr/sbin/hanetnic change -n shaX -i ethX |
3-4. Restart network monitoring.
# /opt/FJSVhanet/usr/sbin/hanetpathmon on |
For GS linkage mode
Preparations for NIC swapping
1-1. From the virtual interface definition, temporarily delete the definition information about the NIC to be swapped (The interface name of the target NIC is ethX).
# /opt/FJSVhanet/usr/sbin/hanetnic delete -n shaX -i ethX |
1-2. Enter the dsphanet command to confirm that the device status of the target NIC (interface name: ethX) is "CUT".
# /opt/FJSVhanet/usr/sbin/dsphanet
[IPv4,Patrol / Virtual NIC]
 Name       Status   Mode CL  Device
+----------+--------+----+----+------------------------------------------------+
shaX Active c OFF ethX(CUT),ethY(ON) |
NIC swapping
Perform NIC swapping. For details, see the manuals below.
PRIMEQUEST 2000 Series
"Hot Maintenance in Red Hat Enterprise Linux 7" in "PRIMEQUEST 2000 Series Administration Manual"
PRIMEQUEST 3000 Series
"Hot Maintenance in Red Hat Enterprise Linux 7 or later" in "PRIMEQUEST 3000 Series Administration Manual"
Post-swap processing of NIC
3-1. Restore the NIC (interface name: ethX) that was temporarily deleted in step 1.
# /opt/FJSVhanet/usr/sbin/hanetnic add -n shaX -i ethX |
3-2. Enter the dsphanet command to confirm that the device status of the swapped NIC (interface name: ethX) is "ON".
# /opt/FJSVhanet/usr/sbin/dsphanet
[IPv4,Patrol / Virtual NIC]
 Name       Status   Mode CL  Device
+----------+--------+----+----+------------------------------------------------+
shaX Active c OFF ethY(ON),ethX(ON) |