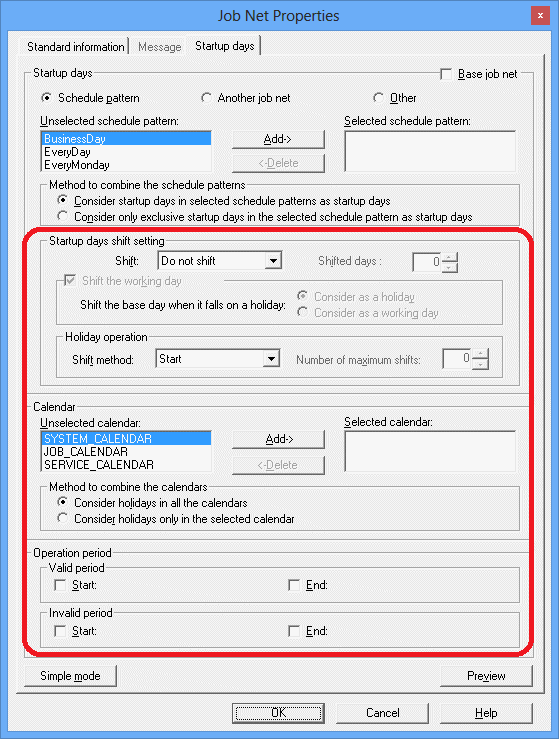
The detail mode windows can be used to select which calendar to use, specify what to do if a startup day coincides with a holiday, and register information about the operating period.
Figure 4.51 The Startup days sheet

This section specifies how to shift startup days, according to the basis that was specified in the Basis settings section of the Startup days (Standard schedule pattern) sheet, the Startup days (Another base job net) sheet, or the Startup days (Other) sheet.
This item specifies the processing for shifting startup days.
Do not shift: The reference day continues to be a startup day.
Shift to previous day: The startup day is shifted backwards.
Shift to next day: The startup day is shifted forward.
This item specifies how many days to shift the starting day, in the direction specified by the Shift item. Any value between 0 and 99 can be specified.
Specify this option to take holidays into account when shifting startup days.
This section is used to specify whether to count reference days during shift processing if the reference day falls on a holiday.
Consider as a holiday:
Specify this option to exclude holidays when counting the number of days to shift the startup day.
Consider as a working day:
Specify this option to include holidays when counting the number of days to shift the startup day.
This section specifies what to do if a startup day coincides with a day that has been specified as a holiday in the Calendar section.
This item is used to select what to do (whether or not to start the job net, and whether to shift the job net forward or backwards).
If Shift to previous day or Shift to next day has been selected for Shift, this item specifies the upper limit for the number of days to shift the startup day. Any value between 0 and 99 can be specified. If "0" is specified, there will be no upper limit.
This section is used to specify which calendars to use, and which condition to use when combining the selected calendars.
Specifies the calendar to be used. Select the calendar to be used from the Unselected calendar list, and then click the Add button to move it to the Selected calendar list. Select a calendar from the Selected calendar list, and then click the Delete button to move it to the Unselected calendar list.
It is also possible to move calendars from one list to the other by double-clicking them.
When multiple calendars have been selected, this item specifies the condition for combining the calendars.
This option determines holidays by combining the calendars with a logical "AND" condition, so that only those days that are holidays in all the selected calendars will be holidays.
This option determines holidays by combining the calendars with a logical "OR" condition, so that those days that are holidays in any of the selected calendars will be holidays.
This section is used to specify the periods when the job net will or will not operate.
This section specifies the period when the job net will operate.
This item specifies the starting date for the valid period.
This item specifies the ending date for the valid period.
This section specifies the period when the job net will not operate.
This item specifies the starting date for the invalid period.
This item specifies the ending date for the invalid period.
Click this button to switch to the simple mode view, where only startup day settings can be specified. This button is only displayed in the detail mode view.
A preview of the startup day information that has been set up in the Startup days sheet is displayed in the Startup days (Preview) window. It is also possible to set an "exception day" (a non-standard manual change to the predefined pattern settings) by changing the calendar in the Startup days (Preview) window.
Operations cannot be performed in the Startup days sheet while the Startup days (Preview) window is displayed.
Note
If startup days are changed in this window, the startup day information that has been specified in the Startup Days window will be deleted, and new startup day information will be set up based on the information that has been registered in this window.
The following message will be displayed if items that cannot be specified in the simple mode view are entered and displayed in the detail mode view and then the display is switched to the simple mode view by clicking the Simple Mode button: There is a hidden item in edited detailed setting. Note that although the settings edited in the detail mode view are hidden when a user switches to the simple mode view, the contents of these settings are still retained. Similarly, when a user switches from the simple mode view to the detail mode view, the settings entered in the simple mode view are also retained.