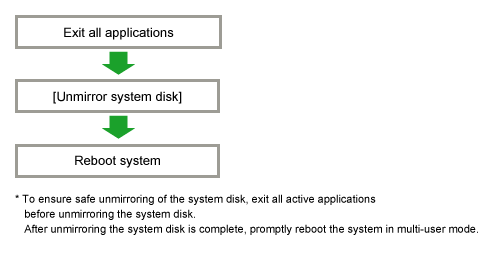
The operation outline of unmirroring the system disk is shown below.
Figure 9.9 Unmirroring System Disk Operation
In this section, how to unmirror a system disk is explained.
Note
When You Cannot Unmirror the System Disk
Under the following conditions, the system disks cannot be unmirrored. To avoid these conditions, restore the disk status or change the configuration first, and then unmirror the system disks.
In the system disk group, a disk has been disconnected with [Swap Physical Disk].
In the system disk group, a disk is in disabled status.
All the disks that are connected with the system disk group contain a slice that is not active.
Among the groups in the root class, any groups other than the system disk group have volumes.
Note
For Safe Unmirroring of System Disk
To safely unmirror the system disk, exit all active applications before proceeding to cancel system disk settings.
After unmirroring the system disk is complete, promptly reboot the system in multi-user mode.
Confirming system disk configuration
Select [Settings]: [Unmirror System Disk] in the Main screen to display system disk mirroring configurations.
Figure 9.10 Unmirror System Disk
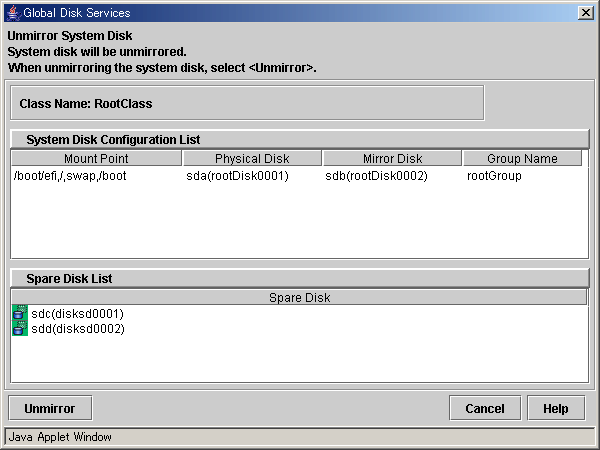
If unmirroring is performed, the disk displayed in the [Mirror Disk] field is disconnected and the disk displayed in the [Physical Disk] field will be used as the system disk.
Note
The disk displayed in the [Mirror Disk] field cannot be used as a system disk after unmirroring.
If the root class includes only system disks with their mirror disks and spare disks, the entire root class is removed. Here, the spare disks displayed in the spare disk field are also removed.
If the root class includes objects other than system disks, such as single disks and mirror groups, those settings are retained and only the unmirroring of system disks is executed. Here, the spare disk field does not display any information and spare disks are not removed.
To unmirror the system disk, click <Unmirror>. To cancel the unmirroring operation, click <Cancel>.
Confirming the unmirroring of system disk
If you click <Unmirror > in the Unmirror System Disk screen, the screen below appears.
Figure 9.11 Unmirroring System Disk Confirmation Screen
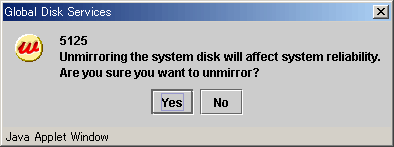
To continue the process, click <Yes>. Clicking <No> cancels the system disk unmirroring process.
Unmirroring System Disk Completion screen
If you click <Yes> on the Unmirroring System Disk Confirmation screen, the screen below appears.
Figure 9.12 Unmirroring System Disk Completion Screen
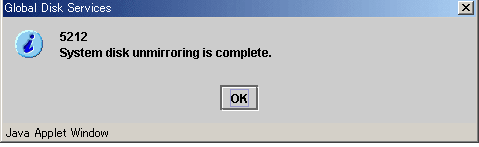
Confirm that unmirroring of system disk is complete and click <OK>.
Figure 9.13 System Reboot Notification Screen

The unmirroring of system disks will take place when the system is rebooted in multi-user mode.
Click <OK> and reboot the system in multi-user mode immediately.
Note
For the cluster system
After unmirroring the system disk on one node, restart the node in multi-user mode immediately. Do not restart multiple nodes at the same time.
When unmirroring the system disk on multiple nodes in the cluster system and the nodes are restarted at the same time, a object in the root class on some nodes may be left without removed. In this case, follow "9.3 Removing Volumes, Groups, and Classes" to remove the object in the root class.
Note
Definition of devices in the /etc/fstab file
After unmirroring the system disk, the devices of the system volumes (/, /var, usr, boot, /boot/efi, and swap area) are defined with the UUID format in the /etc/fstab file.
When you want to change the definition of devices, modify the /etc/fstab file by using the editor such as vim(1) after unmirroring the system disk.