Class configurations, group configurations, and volume configurations can be changed through two types of operation: reconfiguration and attribute change.
This section explains the changing procedures for each configuration.
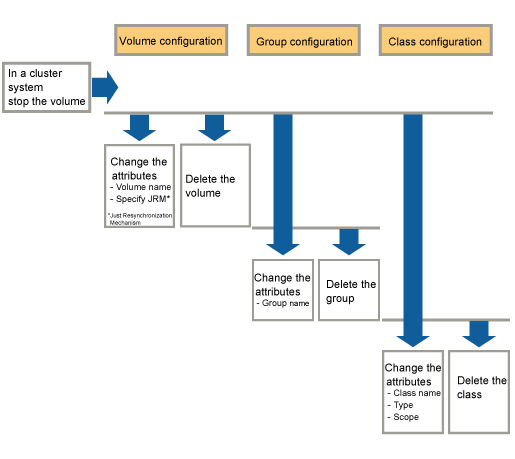
The procedure for changing or removing the configuration settings is shown below.
Figure 8.1 Configuration Changing Operation
The procedures for changing class configuration are explained below.
Changing Class Configuration
Displaying Class Configuration screen
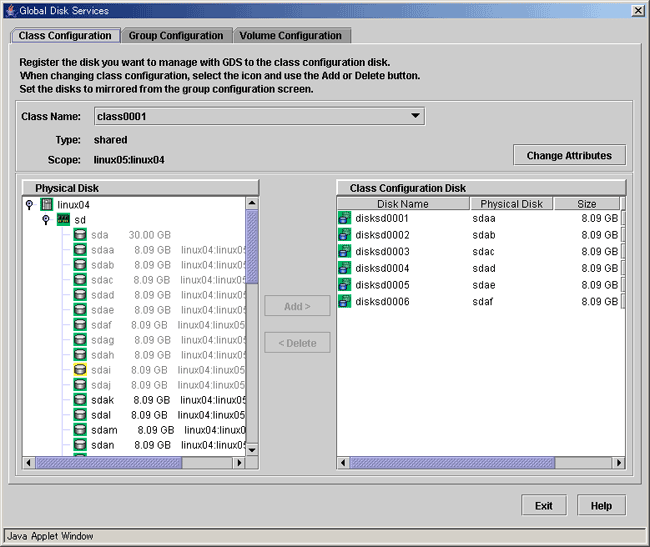
In the Main screen [Settings] menu, select [Class Configuration]. Class Configuration screen appears.
Figure 8.2 Class Configuration
Selecting class to change
Select the class you want to change from Class Configuration screen [Class Name].
Changing configuration
Follow the procedures below to register a physical disk (create a disk), or to remove a disk.
Registering a physical disk (Creating a disk)
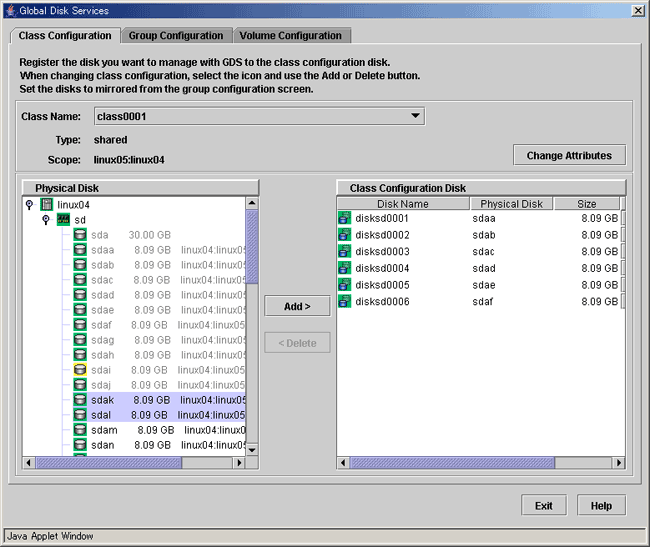
Select the physical disk you want to register as disk from [Physical Disk] field.
Click <Add>.
When changing the disk attributes from the initial values, change the disk type by selecting the appropriate disk from the [Class Configuration Disk] field.
Figure 8.3 Physical Disk Registration
Removing a disk
Select the disk you want to remove from the [Class Configuration Disk] field.
Click <Delete>.
Completing the change
If you have no other changes to make, click <Exit>.
Changing the Class Attributes
Change the class attributes using the following procedures.
Note
Preconditions for Changing Class Attributes
When the class has active volumes, the following class attributes cannot be changed.
To change these class attributes, first stop all the volumes within the class on all the nodes within the class scope.
Type (from "shared" to "local")
Scope (node deletion)
When the class has proxy objects, the class attributes cannot be changed.
To change attributes of such a class, break the proxy objects within the class.
Do not change the class name.
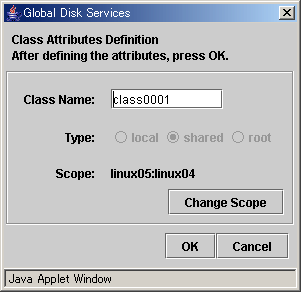
Invoking the Class Attributes Definition screen
Invoke the Class Attributes Definition screen using one of the following methods.
Operation menu in the Main screen
Click the target class's icon on the GDS configuration tree in the Main screen, and select [Operation]:[Change Attributes] to invoke the Class Attributes Definition screen.
Change Attributes button in the Class Configuration screen
Select the target class from the [Class Name] in the Class Configuration screen, and click the <Change Attributes> button to invoke the Class Attributes Definition screen.
Figure 8.4 Class Attributes Definition Screen
Changing attributes
For a single node
You cannot change the class attributes.
For a cluster
You can change the following attributes:
Type
Scope
Implementing changes
Click <OK> to implement the attributes change, or <Cancel> to cancel.
Changing the Disk Attributes
When changing the disk attributes, there are two procedures to choose from:
Using Main screen Operation menu.
Using the Class Configuration Setting screen.
Note
Preconditions for Changing Disk Attributes
Changes cannot be made in the attributes of disks that are connected to groups and disks that have volumes.
Using Main screen Operation menu
Selecting disk to change
Display the disk you want to change in the Main screen [Disk Information] field. Click the icon and select the disk you want to change.
Displaying Disk Attributes Definition screen
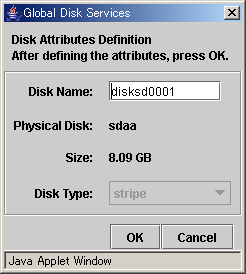
In the Main screen [Operation] menu, select [Change Attributes]. Disk Attributes Definition screen appears.
Figure 8.5 Disk Attribute Definition Screen
Changing attributes
You can change the following attributes.
Disk Name
Disk Type
See
For details on assigning a disk name, see "2.3.1 Object Name."
Applying changes
Click <OK> to apply changes in the attributes change, or <Cancel> to cancel.
Using the Class Configuration screen
Displaying the disk to change attributes
Select the disk of which you want to change attributes in the [Class Configuration Disk] field.
Changing attributes
You can change the following attributes in the [Class Configuration Disk] field.
Disk Name
Double-click the disk name and edit.
Disk Type
Scroll to the right to get the [Disk Type] column, and select the disk type from the list.
See
For details on assigning a disk name, see "2.3.1 Object Name."
The procedures for changing group are explained below.
Changing Group Configuration
Displaying Group Configuration screen
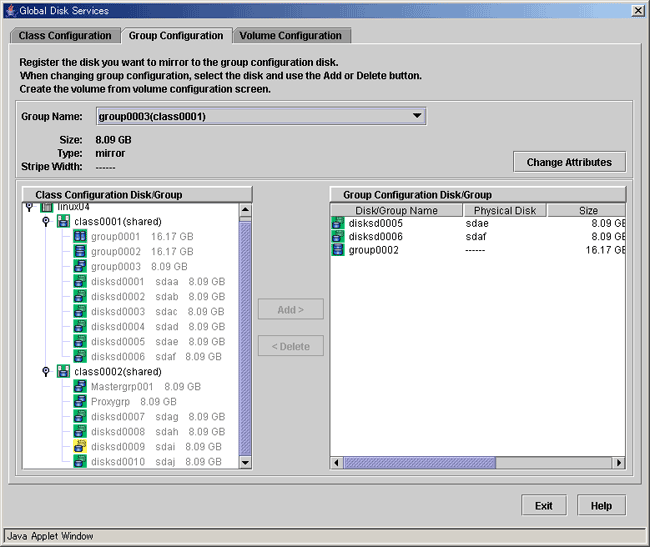
In the Main screen [Settings] menu, select [Group Configuration]. Group Configuration screen appears.
Figure 8.6 Group Configuration
Selecting group to change
Select the group you want to change from Group Configuration screen [Group Name].
Changing configuration
Follow the procedures below to connect a disk/lower level group to a group, or to disconnect a disk/lower level group from a group.
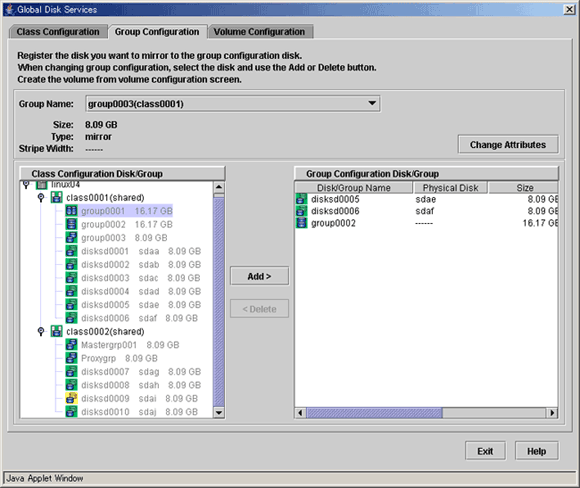
Connecting a disk/lower level group
Select the disk/lower level group you want to add to group from [Class Configuration Disk/Group] field.
Click <Add>.
Figure 8.7 Connecting disk/lower level group
Disconnecting a disk/lower level group
Select the disk/lower level group you want to disconnect from [Group Configuration Disk/Group] field.
Click <Delete>.
Completing the change
If you have no other changes to make, click <Exit>.
Changing Group Attributes
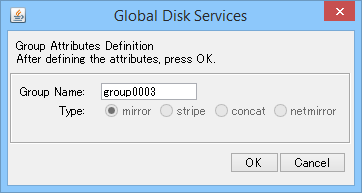
You can only change the [group name]. Change the group attribute using the following procedures.
Note
Preconditions for Changing Group Attributes
The attributes of lower level groups cannot be changed.
The attribute of the highest level group with active volumes cannot be changed. To change the attribute of such a group, first stop all the volumes within the highest level group on all the nodes within the class scope.
When the group has master volumes or proxy volumes, the attribute of the group cannot be changed. To change the attribute of such a group, first break the proxy volumes.
Invoking the Group Attributes Definition screen
Invoke the Group Attributes Definition screen using one of the following methods.
Operation menu in the Main screen
Click the target group's icon on the GDS configuration tree in the Main screen, and select [Operation]:[Change Attributes] to invoke the Group Attributes Definition screen.
Change Attributes button in the Group Configuration screen
Select the target group from the [Group Name] in the Group Configuration screen, and click the <Change Attributes> button to invoke the Group Attributes Definition screen.
Figure 8.8 Group Attributes Definition Screen
Changing group name
You can only change the group name.
Click <OK> to apply the change, or <Cancel> to cancel.
See
For information on assigning a group name, see "2.3.1 Object Name."
The procedures for changing volume configuration are explained below.
Changing Volume Configuration
Change volume attributes using the following procedures.
Note
Preconditions for Changing Volume Attributes
When the volume is active, the following volume attributes cannot be changed. To change these volume attributes, first stop the volume on all the nodes within the class scope.
Volume name
Physical slice attribute
When a volume's slice is detached temporarily, the physical slice attribute of the volume cannot be changed. To change this attribute, first attach the temporarily detached slice to the volume.
If the volume name is described in the /etc/fstab file of the selected node in the GDS Configuration Tree Field, the volume name of that volume cannot be changed. When changing the volume name, change first the volume name described in the /etc/fstab file.
Selecting volume to change
On the GDS Configuration Tree in the Main screen, go to the object to be changed, and click the icon to select the volume to be changed.
Displaying Volume Attributes Definition screen
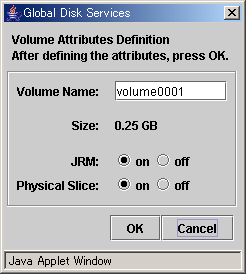
In the Main screen [Operation] menu, select [Change Attributes]. Volume Attributes Definition screen appears.
Figure 8.9 Volume Attributes Definition Screen
Changing attributes
You can change the following attributes:
Volume Name
JRM (on/off)
Physical Slice (on/off)
See
For information on assigning a volume name, see "2.3.1 Object Name."
Applying changes
Click <OK> to apply changes in the attributes change, or <Cancel> to cancel.
Note
Changes in Special File Path Name by Changing Volume Name
Changing the volume name will also change the special file path name used to access the volume, so you must update the settings of software (example: the /etc/fstab.pcl file of PRIMECLUSTER) which accesses to the special file of volume.